The Astronomy Wing in Hogwarts Legacy is a treasure trove of knowledge and secrets, holding 23 Field Guide Pages waiting to be discovered. As a crucial section of Hogwarts Castle, nestled between the South Wing and the Bell Tower, this wing is where students attend Charms, Defence Against the Dark Arts, and Transfiguration classes. Navigating this wing early in your Hogwarts journey is essential, and collecting all the Field Guide Pages here will significantly enrich your understanding of the castle’s history and hidden lore.
Fast travel within the Astronomy Wing is made easy with several Floo Flames: Astronomy Tower, Charms Classroom, Defence Against the Dark Arts Tower and Classroom, Professor Fig’s Classroom, Transfiguration Classroom, and Courtyard. These points will be your anchors as you embark on this page-collecting adventure.
This comprehensive guide will walk you through each location, providing clear instructions and even highlighting the spells you’ll need to unveil these hidden pages. Whether you’re a seasoned witch or wizard or just starting your magical education, this guide ensures you won’t miss a single Field Guide Page in the Astronomy Wing.
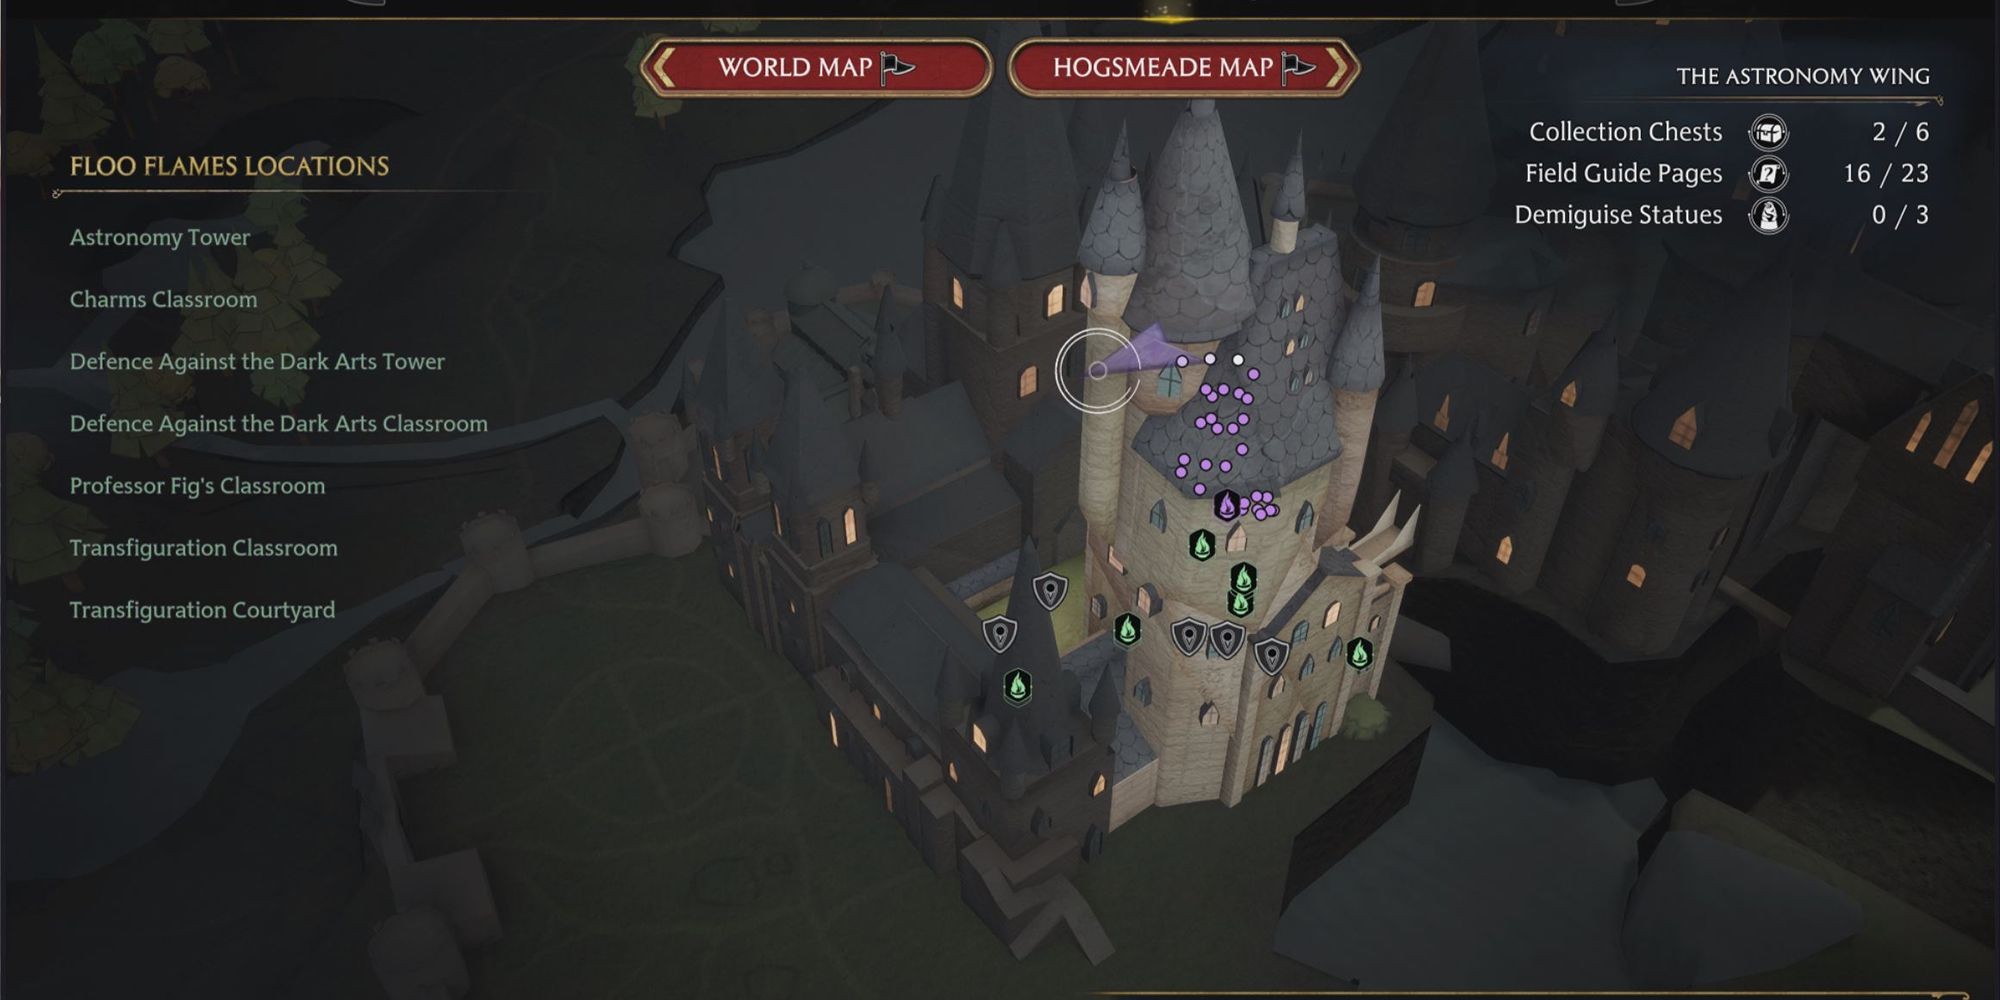 Astronomy Wing Floo Flame Locations in Hogwarts Legacy Map
To make your collection process as smooth as possible, we’ve organized the Field Guide Pages in a logical flow, starting from the highest point of the Astronomy Tower and descending through the wing. For each page, we’ll specify the required spell and provide step-by-step directions. Prepare your wand and your Revelio spell – let’s begin the hunt!
Detailed Locations of All Astronomy Wing Field Guide Pages
Below, you’ll find a detailed breakdown of each Field Guide Page location within the Astronomy Wing. Each entry provides clear directions, the spell required to reveal the page, and a visual aid to pinpoint the exact spot.
1. Moth Painting Atop Astronomy Tower
Spell Required: Lumos
Location: Teleport to the Astronomy Tower Floo Flame and ascend the stairs. On your left, you’ll spot a blank frame – a Moth Painting. Continue your climb to the tower’s peak. Use Revelio to pinpoint the moth fluttering around, or simply approach it with Lumos active. Guide the moth back down to the painting by keeping Lumos lit and cast Lumos again near the painting to release the moth and reveal the Field Guide Page. Remember to collect the next page at the top of the tower before descending.
2. Astronomy Telescope Observation
Spell Required: Revelio
Location: Remain at the highest level of the Astronomy Tower, where you found the moth. Locate the prominent Astronomy Telescope. Cast Revelio while facing the telescope to unveil the Field Guide Page, detailing its historical significance in Hogwarts’ astronomical studies.
3. Dragon Statue Brazier
Spells Required: Confringo or Incendio
Location: Descend slightly from the top platform of the Astronomy Tower. Find a staircase leading down to a smaller room below. Inside, you’ll encounter a Dragon Statue. Ignite the brazier held by the dragon using a fire spell like Confringo or Incendio to reveal the Field Guide Page.
4. Tapestry of Barnabas the Barmy
Spell Required: Revelio
Location: Go down the stairs from the Astronomy Tower Floo Flame. On the wall, you’ll notice an animated tapestry. Cast Revelio in front of the tapestry to reveal the Field Guide Page, depicting Barnabas the Barmy’s peculiar attempt to teach trolls ballet.
5. First Charms Class Statue
Spell Required: Levioso
Location: Continue downwards from the Astronomy Tower Floo Flame, or alternatively, use the Charms Classroom Floo Flame. Look for a small alcove adjacent to a painting with a distinctive gold frame. Inside this alcove is a statue. Use Levioso on the statue to levitate it and reveal the Field Guide Page.
6. Charms Class Flying Page
Spell Required: Accio
Location: You’re now in the Charms Classroom area, near the Floo Flame. Look upwards – a page is fluttering above. Cast Accio to summon the flying page to you and add it to your collection.
7. Second Charms Class Statue
Spell Required: Levioso
Location: From the Charms Classroom Floo Flame, head north down the hallway. You’ll find another statue down a short set of stairs, positioned centrally in the pathway. Cast Levioso on this statue to reveal another Field Guide Page.
8. Moth Painting in Dark Arts Tower Hallway
Spell Required: Lumos
Location: Teleport to the Defence Against the Dark Arts Tower Floo Flame. Turn around – the Moth Painting is directly opposite the Floo Flame location on the wall. For the moth, proceed west down the hallway to the left of the Floo Flame, then ascend the stairs towards Professor Fig’s Classroom Floo Flame. Alternatively, fast travel directly to Professor Fig’s Classroom. The moth rests on a pillar near a skeleton display. Guide the moth back down to the painting using Lumos to claim your page.
9. Professor Fig’s Dragon Brazier
Spells Required: Confringo, Accio
Location: Near Professor Fig’s Classroom Floo Flame. Turn left from the Floo Flame. You’ll see an open balcony overlooking the room below. The Dragon Brazier is mounted high on the far wall. Use Confringo to light the brazier and then Accio to pull the Field Guide Page towards you.
10. Augurey Skeleton Display
Spell Required: Revelio
Location: Travel to the Defence Against the Dark Arts Tower Floo Flame and descend the staircase in the open area. Straight ahead on the northwest wall, you’ll find a display cabinet. Cast Revelio in front of it to reveal the Field Guide Page about the Augurey Skeleton.
11. Painting of Illyius
Spell Required: Revelio
Location: Continue down the stairs from the previous location, or use the Transfiguration Courtyard Floo Flame and turn back inside. You’ll reach a painting at the base of the staircase on the northwest wall. Cast Revelio in front of it to reveal the Field Guide Page, depicting the Painting of Illyius.
12. Pungent Passage Painting
Spell Required: Revelio
Location: From the West Tower Floo Flame in the Bell Tower Wing, immediately turn left and proceed down the hallway filled with green gas rising from the floor. Cast Revelio in front of the painting of an animated figure to reveal the Field Guide Page about the Pungent Passage.
13. Pungent Passage Moth Painting
Spell Required: Lumos
Location: In the same Pungent Passage corridor, southeast of the South Wing Floo Flame, look for a Moth Painting on the northeast wall, just before a doorway. The moth for this painting is located back towards the West Tower Floo Flame, on a tree within a painting itself. Retrieve the moth and guide it back to the Moth Painting to uncover the Field Guide Page.
14. Wyvern Fountain
Spell Required: Revelio
Location: Near the Transfiguration Courtyard Floo Flame, you’ll find a Wyvern Fountain – a dragon statue in the courtyard’s center. Cast Revelio to reveal the Field Guide Page detailing the Wyvern Fountain’s history.
15. Transfiguration Courtyard Statue
Spell Required: Levioso
Location: From the Transfiguration Courtyard Floo Flame, head northeast into the covered hall. There is a statue located there. Use Levioso on it to reveal the Field Guide Page.
16. Partial Transfiguration Display
Spell Required: Revelio
Location: Use the Transfiguration Classroom Floo Flame and enter the doorway directly in front of you. On the left side of the room, you’ll see a desk with turtle shells displayed above it. Cast Revelio here to reveal the Field Guide Page about Partial Transfiguration.
17. Hebridean Black Skeleton
Spell Required: Revelio
Location: Inside the Defence Against the Dark Arts Classroom, look for a small staircase. Near it, above, is a Field Guide Page. Cast Revelio to reveal the page about the Hebridean Black Skeleton.
18. Boggart Closet
Spell Required: Revelio, Alohomora (Level 2)
Location: From the Transfiguration Courtyard, enter the door to your right. You’ll find a Level 2 locked door (requires Alohomora Level 2). Unlock it and enter. At the end of the room, in front of a closet, cast Revelio to reveal the Field Guide Page concerning the Boggart Closet.
19. Alchemy Class Location
Spell Required: Revelio, Alohomora (Level 1)
Location: Pass Ravenclaw House and the Dragon statue. You’ll find a Level 1 locked door (requires Alohomora Level 1). Unlock it to enter the Alchemy Class area. Inside, cast Revelio to discover the Alchemy Class Field Guide Page.
20. Alchemy Class Statue
Spell Required: Levioso, Alohomora (Level 1)
Location: From the previous Alchemy Class location, you’ll see another locked iron gate (Level 1 Alohomora). Unlock it and cast Levioso on the statue behind it to obtain the Field Guide Page.
21. Flying Page Dungeon
Spell Required: Accio, Alohomora (Level 1)
Location: Continue from the Alchemy Class Statue location. You’ll encounter another locked iron gate (Level 1 Alohomora). Unlock this gate and cast Accio to collect the flying page within the dungeon area.
22. Dark Tower Cell
Spells Required: Revelio, Alohomora (Level 1 & 2)
Location: Start at the Charms Classroom Floo Flame. Enter the classroom and find the staircase on the left. Ascend the stairs past a Level 1 locked door and onto the rooftop. Here, you’ll find the Field Guide Page behind bars, requiring a Level 2 Alohomora lock to access the room. Unlock the door and cast Revelio to claim the page from the Dark Tower Cell.
23. Dungeon Dragon Brazier
Spells Required: Confringo, Accio, Alohomora (Level 2)
Location: From the Bell Tower Courtyard Floo Flame, proceed southwest through a small door. Immediately inside, you’ll see stairs going upwards – ignore them and instead turn left to find stairs leading down to the dungeons. Follow this corridor past a Dragon statue, down a lengthy hallway. Before a turn, there’s a Level 2 locked door. Unlock it and enter the room. Look high above to find a Dragon Brazier. Cast Confringo to ignite it, and then use Accio to pull the final Field Guide Page of the Astronomy Wing towards you.
Congratulations, you have now collected all 23 Field Guide Pages in the Astronomy Wing! Return to the main Field Guide menu to review your discoveries and continue your exploration of Hogwarts Castle. Happy spell-casting!