So, you’re ready to dive into the exciting world of Kerbal Space Program (KSP) mods? Fantastic! You’re about to unlock a whole new dimension of gameplay, from visual enhancements to game-changing mechanics. While the modding community is incredibly welcoming, getting started can sometimes feel a bit like deciphering complex schematics. That’s where this X Mods Wiring Guide comes in. Think of it as your blueprint to successfully “wire” mods into your KSP installation, ensuring everything runs smoothly and you can launch into your modded adventures without a hitch.
There are primarily two main paths to install mods in KSP: manual installation and using the Comprehensive Kerbal Archive Network (CKAN). Each method has its own set of advantages and disadvantages, and understanding these differences is key to choosing the best approach for you. Let’s break down both methods in this comprehensive guide.
| Manual Installation | CKAN Installation |
|---|---|
| Advantages: – Universal compatibility: Works with virtually every mod. – Complete control: Offers full oversight of the installation process. Disadvantages: – Time-consuming updates: Updating mods individually can become tedious. – Dependency management: Requires manual handling of mod dependencies. | Advantages: – Quick and easy: Streamlines the installation process significantly. – Automatic dependencies: CKAN automatically manages dependencies. – Version control & updates: Simplifies mod updates and version management. Disadvantages: – Limited mod support: Not all mods are available through CKAN. – Less granular control: Offers less direct control over the installation. |
General Tips Before You Start “Wiring” Your Mods
Before we get into the specifics of each installation method, there are a few crucial general points to consider. Especially if you use Steam for KSP, it’s highly recommended to move your game installation directory outside of the Steam folder. Why? Because Steam auto-updates can be your worst enemy when it comes to modding. A sudden game update can easily break compatibility with your mods, potentially corrupting your save files and disrupting your carefully crafted mod setup. Steam doesn’t offer an option to disable automatic updates, so moving your game folder is the safest preventative measure.
It’s also worth noting that the KSP modding community is often quite adaptable. Many mods designed for older versions like KSP 1.4.x often remain compatible with newer versions such as 1.5.x and 1.6.x. So, if you’re playing on a more recent version and a mod you want isn’t specifically listed for your game version, don’t despair! There’s a good chance an older version of the mod will still work. Always worth a try!
Throughout this x mods wiring guide, we’ll use “SCANsat” as our example mod. SCANsat is a popular and versatile mod, making it a great illustration for various aspects of mod installation.
Method 1: Manual Mod Installation – The DIY “Wiring” Approach
Manual installation is the foundational method for adding mods to KSP. It gives you direct control over every step of the process, making it a valuable skill to learn, even if you primarily use CKAN. Consider this the “under the hood” approach to x mods wiring.
Step 1: Know Your KSP Game Version
Before you download any mods, you absolutely need to know your current Kerbal Space Program version. Mods are often version-specific, and installing a mod designed for a different version can lead to issues. Finding your game version is simple: launch KSP and look at the bottom right corner of the main menu screen.
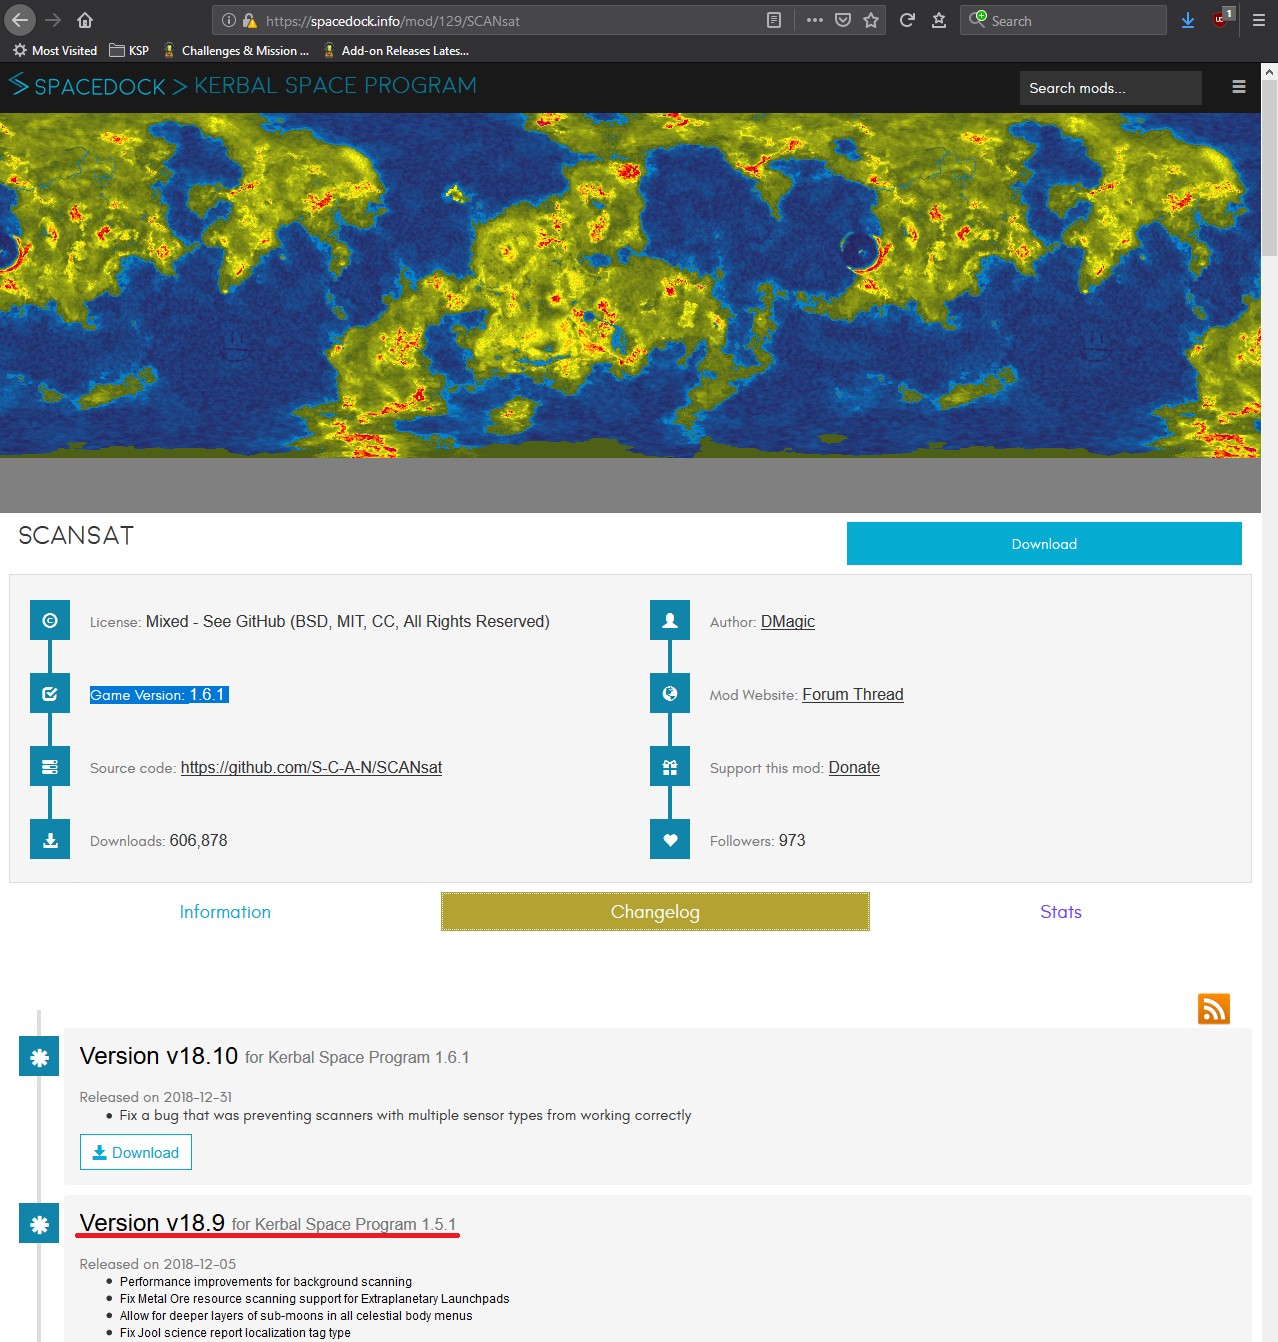
In this example, the game version is 1.6.1. Make a note of this!
Step 2: Source Your Mods – Where to Download
There are three primary and reliable sources for downloading KSP mods:
- SpaceDock: https://spacedock.info/ – A dedicated KSP mod repository, well-organized and easy to navigate.
- CurseForge: https://www.curseforge.com/kerbal/ksp-mods – Another popular platform hosting a wide range of KSP mods.
- GitHub: https://github.com/ – Many mod developers host their projects on GitHub, particularly for open-source mods.
Step 3: Downloading the Correct Mod Version
Once you’ve found your mod, ensure you download the correct version compatible with your KSP installation.
-
SpaceDock: Typically, the main “Download” button provides the latest version, and the compatible KSP version is clearly listed. For older versions, navigate to the “Changelog” section. SpaceDock conveniently lists each previous version alongside its compatible KSP version.
-
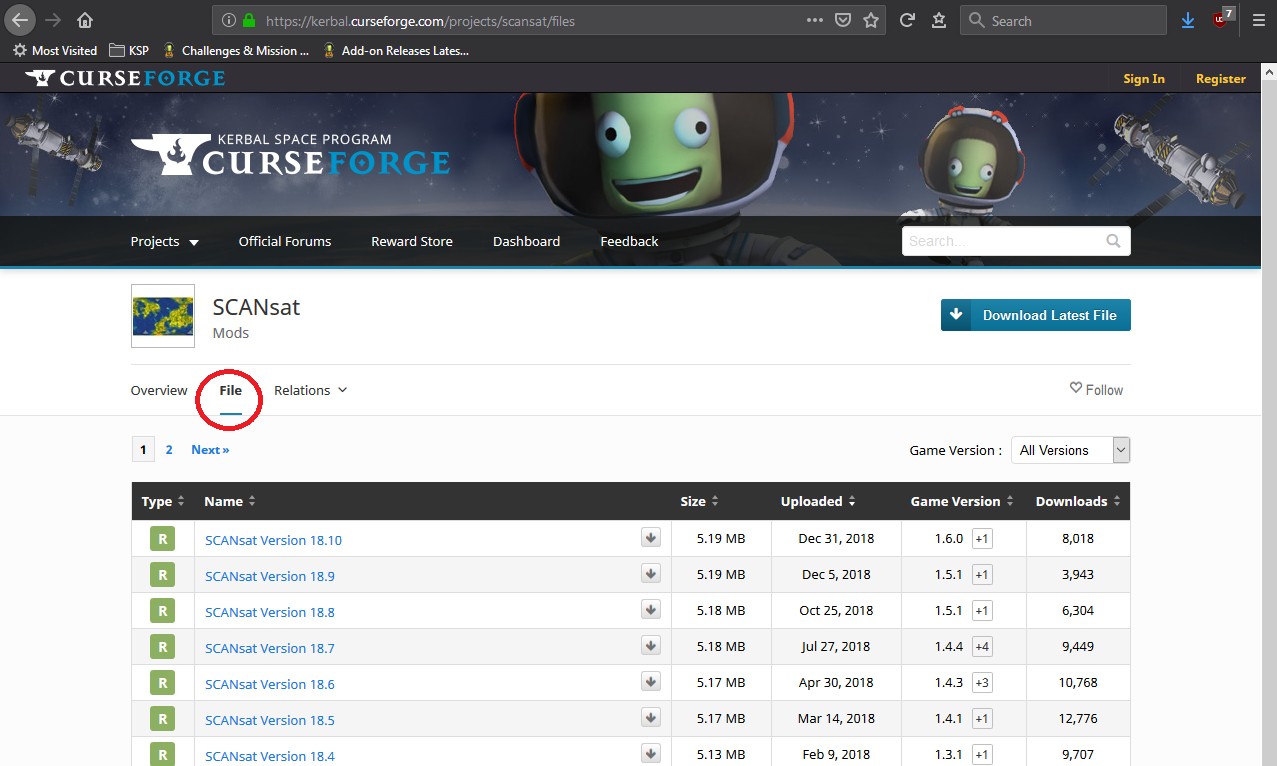
CurseForge: Similar to SpaceDock, CurseForge usually has a prominent “Download Latest File” button. Older versions are found in the “Files” section, where you can browse and select specific versions.
-
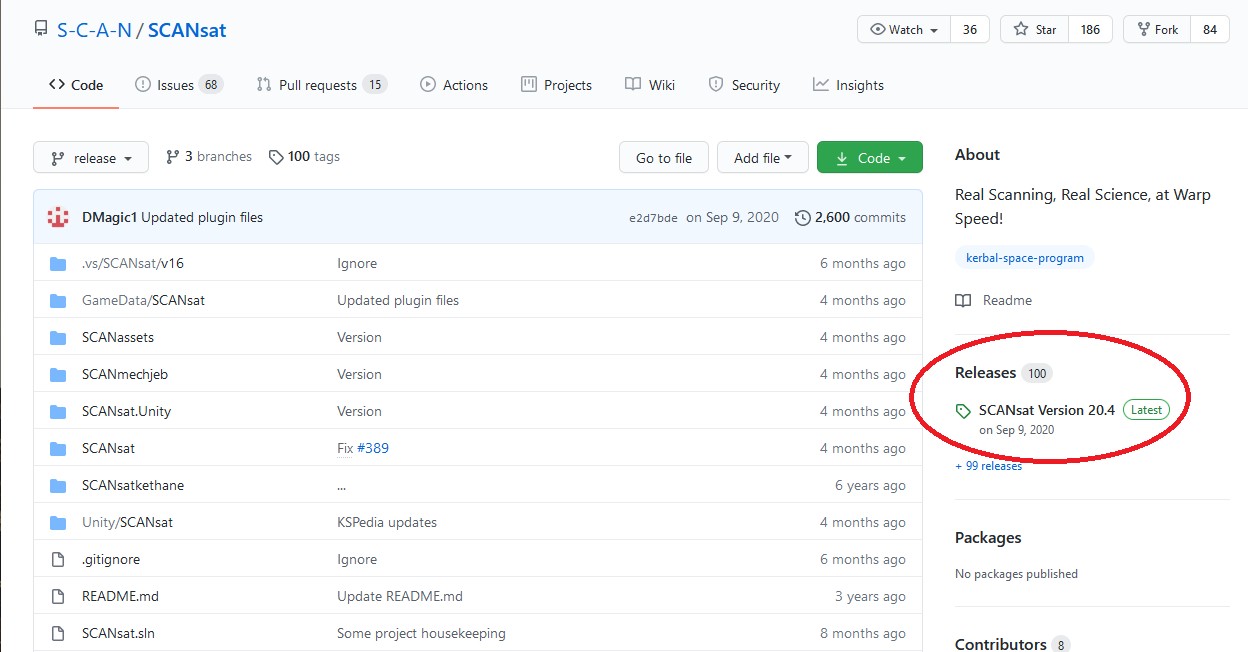
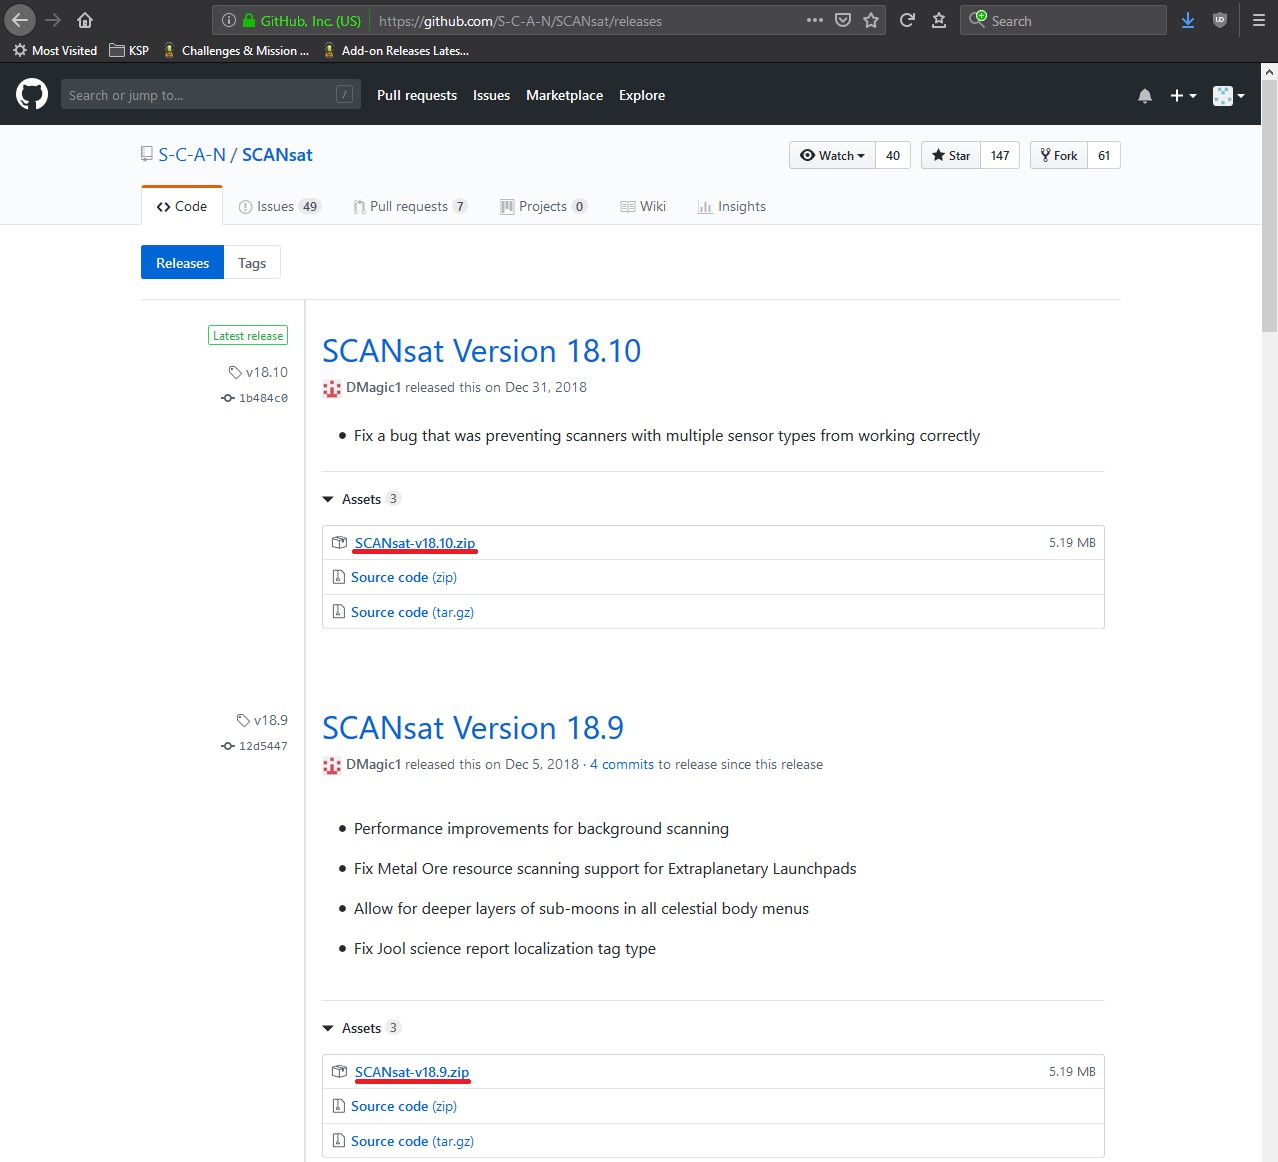
GitHub: GitHub links often lead directly to the “Release” section of a mod’s repository. The “Code” section contains the source code, not pre-packaged releases. In the “Release” section, the latest version is usually at the top. Older versions are also available, although KSP version compatibility might be in the release notes or changelog rather than explicitly listed. Download the
.ziparchive link for the mod.
For a more in-depth guide on finding older mod versions, check out this helpful forum post by @Gargamel: How to get old versions of mods.
Step 4: Understanding Dependencies – Essential “Wiring” Components
Many KSP mods rely on other mods to function correctly. These are called dependencies. There are two types:
- Hard Dependency: Absolutely required. Without these, the mod will likely crash, produce errors, or simply not work.
- Soft Dependency: Optional, but enhances the mod with extra features. The mod will still function without them, but you might miss out on some functionality.
Dependencies are typically listed prominently in the mod’s description:
- Mod Release Thread (Forum): Often in the first post (OP).
- SpaceDock: In the “Information” tab.
- CurseForge: In the “Overview” tab.
Sometimes, dependencies are highlighted visually, or mentioned within the installation instructions.
Alt text: Screenshot of mod installation instructions highlighting dependency requirements for a Kerbal Space Program mod, emphasizing the importance of checking for and installing required supporting mods for proper functionality.
Always take the time to read the mod author’s description and instructions carefully to identify any dependencies! Make sure to download and install all hard dependencies along with your chosen mod.
Step 5: Installation – Connecting the “Wires”
Finally, the moment you’ve been waiting for – installing the mod!
First, locate your Kerbal Space Program installation directory. If you’re unsure where this is, search your computer for “KSP_x64.exe”. Once found, keep this folder window open.
Mods are usually packaged in .zip archives. You can either unzip the archive to a temporary folder or directly unpack the files to their destination – the choice is yours.
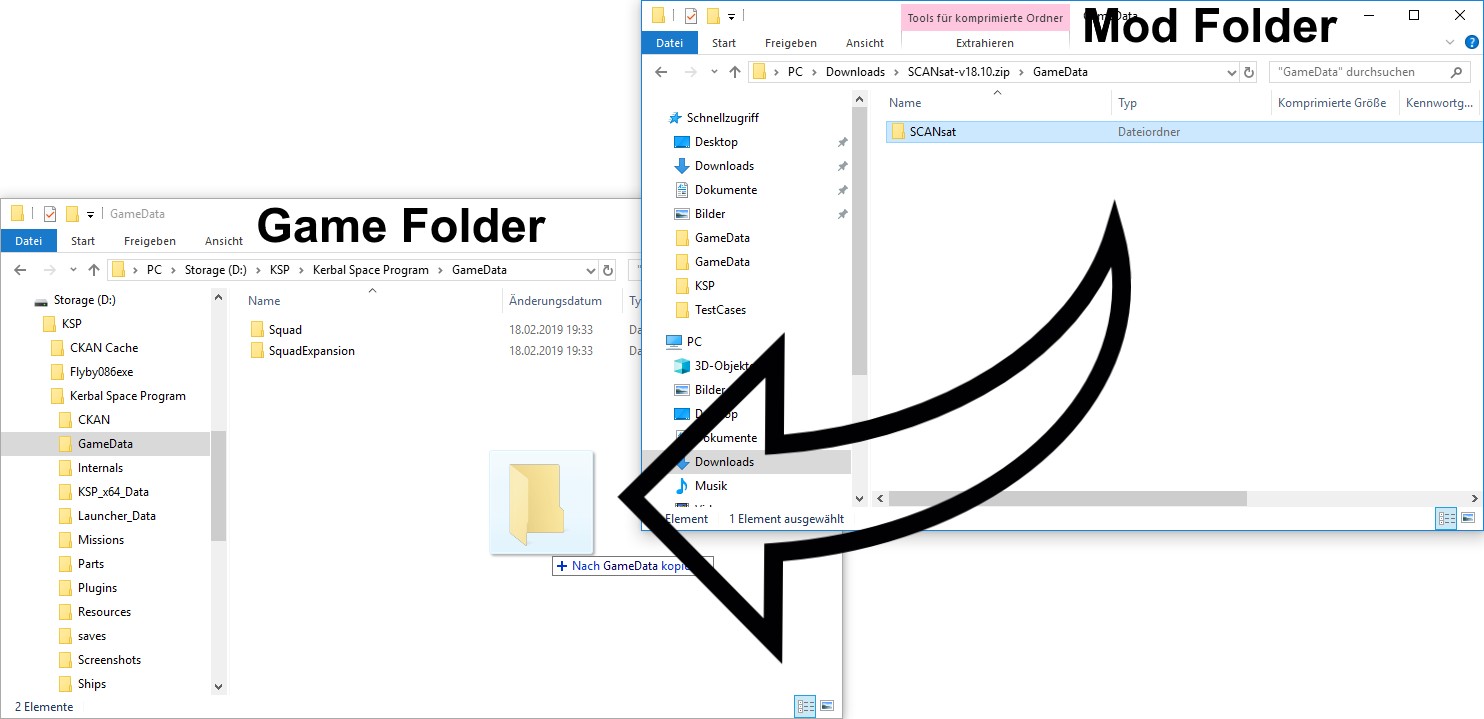
Open the downloaded mod’s .zip file or folder in a separate window, placing it next to your KSP game directory window for easy access. Now, there are two common scenarios:
Case 1: Mod Folder Includes a “GameData” Folder
If the mod’s folder structure contains its own “GameData” folder, simply drag and drop this “GameData” folder directly into your main KSP game directory (the one that also contains a “GameData” folder). This will merge the contents of both “GameData” folders.
Important: Drag and drop into an empty space within your KSP game directory, not into any other folder!
Case 2: You Have a Plain Mod Folder
If the mod folder doesn’t contain a “GameData” folder, drag and drop the mod folder directly into the “GameData” folder within your KSP game directory.
Again, ensure you drop the folder into an empty space inside the “GameData” folder and not into any subfolders.
Side Note: Some mod authors who create multiple mods may use a subfolder within “GameData” to organize their mods (e.g., a folder containing Kerbal Alarm Clock and Transfer Window Planner). Treat these the same as Case 1 – merge the folders by dragging the author’s “GameData” folder into your KSP “GameData” folder.
Special Case: ModuleManager
ModuleManager (MM) is a unique and incredibly powerful mod, often a dependency for many other mods. However, its installation is slightly different. You won’t find a standard release on SpaceDock, CurseForge, or GitHub’s release section. To download ModuleManager manually, you need to go to its dedicated forum thread:
ModuleManager Forum Thread
The first post of this thread contains download links for various KSP versions. Scroll down to find the link for your specific KSP version.
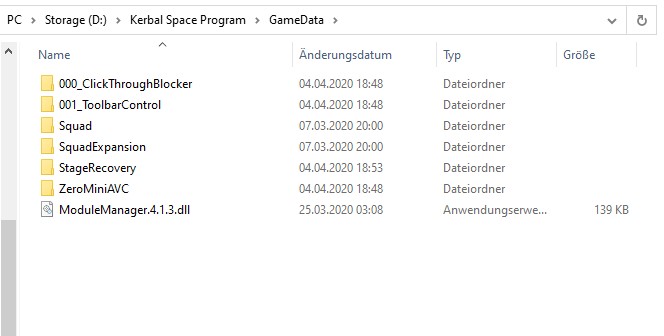
ModuleManager is distributed as a single .dll file. To install it, place “ModuleManager.dll” directly into your “GameData” folder. No subfolders, just the .dll file inside “GameData”.
That’s it! Manual installation is complete. You’ve successfully “wired” your mod into KSP!
Method 2: CKAN Installation – Streamlined “Wiring” with a Mod Manager
CKAN (Comprehensive Kerbal Archive Network) is a powerful and highly recommended tool for managing your KSP mods. It simplifies installation, updates, and removal of mods, and even automatically handles dependencies. It’s available for Windows, Linux, and macOS and can be downloaded from:
Step 1: Launching CKAN and Selecting Your KSP Installation
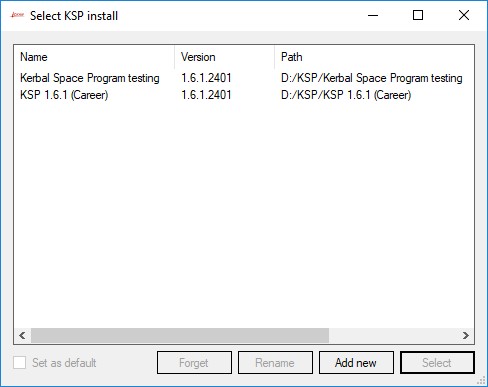
After starting CKAN, you’ll be prompted to choose your KSP installation. CKAN attempts to automatically detect KSP installations in common locations. If you moved your KSP folder outside of Steam as recommended, you might need to manually add it. Click “Add new,” navigate to your KSP install directory, and select “buildID64.txt”.
On the first run for a new KSP installation, CKAN will ask if you want to update the mod list and repository on each launch. It’s generally recommended to allow both options to keep your mod list current.
Step 2: Understanding the CKAN User Interface (UI)
CKAN’s UI is designed to be intuitive and user-friendly.
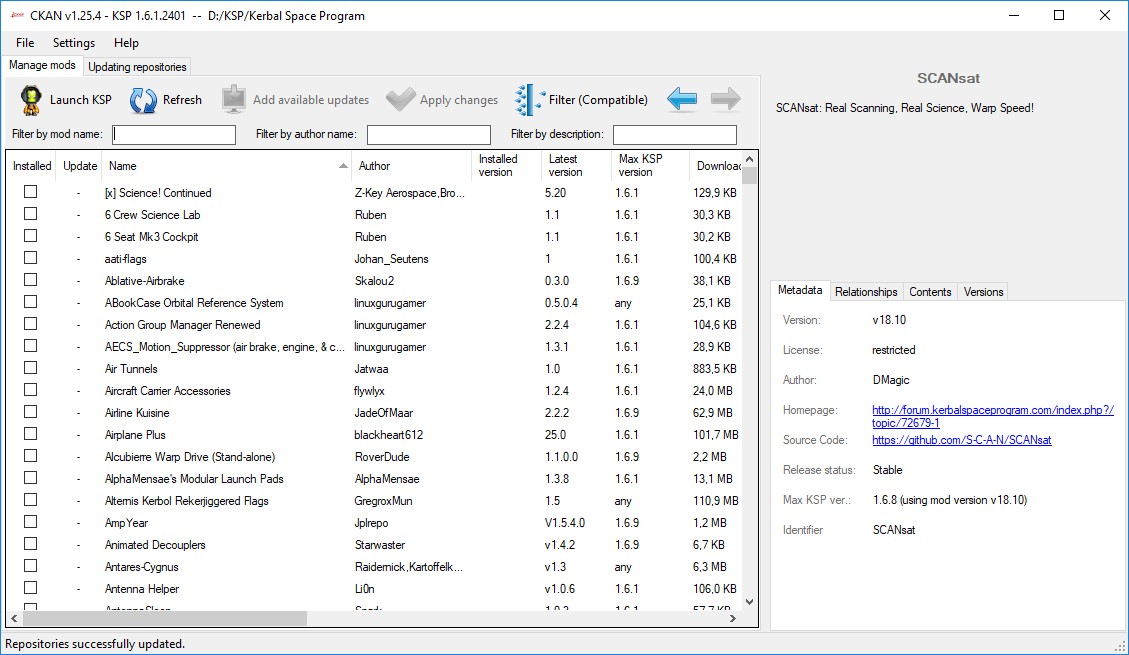
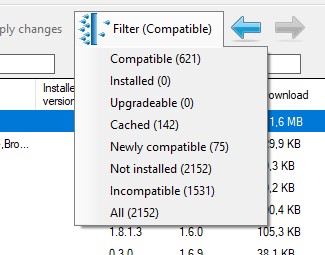
By default, CKAN lists all mods compatible with your selected KSP version. The list can be extensive, so CKAN provides search and filter options:
-
Search by: Mod name, author, or description.
-
Filters: Control which mods are displayed (e.g., installed, not installed, compatible, incompatible).
Step 3: Managing Your Mods with CKAN
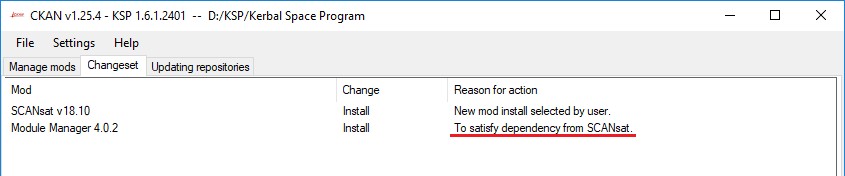
To install a mod, simply check the box to the left of the mod’s name in the list.
Once you’ve selected your desired mods, the “Apply changes” button becomes active. Click it to view the changeset (or click the “Changeset” tab). Notice in the example that ModuleManager is automatically included, even though we only selected SCANsat. This is because ModuleManager is a dependency of SCANsat, and CKAN handles this automatically!
Click “Apply” in the lower right corner to proceed.
CKAN may present additional lists for recommended or suggested mods. Recommended mods are “opt-out” (selected by default), while suggested mods are “opt-in” (you need to select them). Choose any recommended or suggested mods you want and click “Continue”.
CKAN will now download and install all selected mods and their dependencies automatically.
To uninstall a mod, simply uncheck the box next to its name and repeat the “Apply changes” steps. Important: Uninstalling a mod does not automatically remove its dependencies. If you uninstall a dependency, CKAN will remove any mods that depend on it as well.
Advanced CKAN Features – Fine-Tuning Your “Wiring”
CKAN offers several advanced features to further customize your mod management.
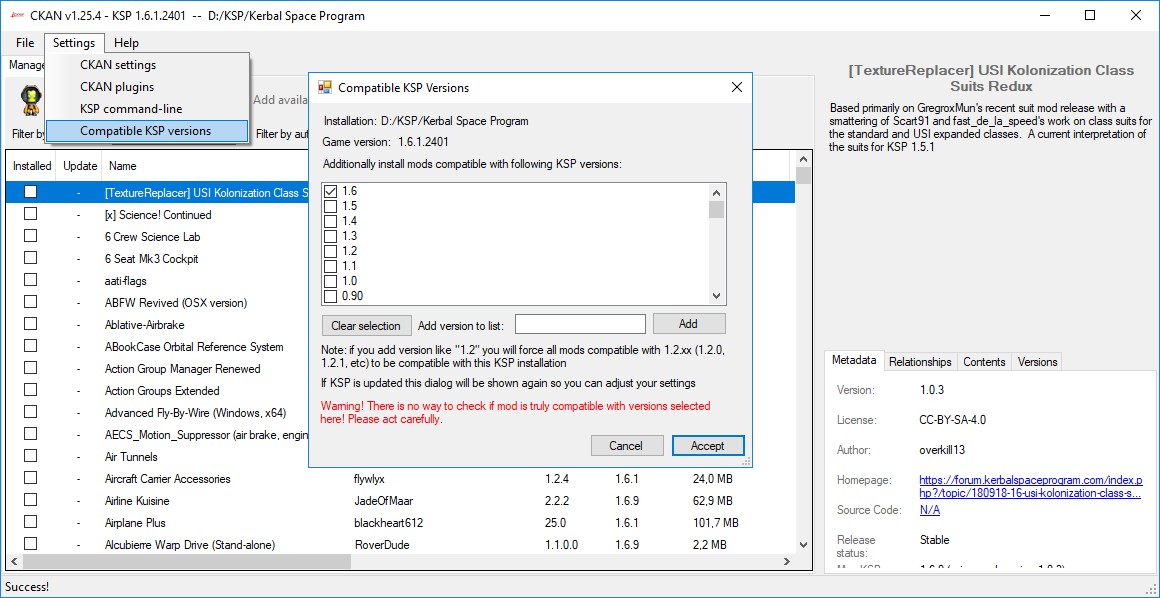
Compatible KSP Versions
By default, CKAN only shows mods compatible with your current KSP version. However, as mentioned earlier, many mods for older versions often work on newer ones. You can tell CKAN to show and allow installation of mods for older KSP versions:
Select the KSP versions you want to include and apply the changes.
Metadata, Relationships, Contents, Versions Tabs
On the right side of the CKAN UI, you’ll find four useful tabs:
- Metadata: Displays general mod information like version, author, homepage (usually the forum thread), and source code link.
- Relationships: Shows dependencies (marked with a star), recommendations (thumb up), suggestions ( “i”), and conflicts (“!”). Red highlighting indicates incompatibility with your KSP version. Double-click on a mod name to view its CKAN entry.
- Contents: Lists the files included in the mod (requires download). A “Download” button is also available to download the mod files without installing.
- Versions: Provides a list of all available mod versions. Compatible versions are highlighted. To install an older version, double-click the list entry. You’ll need to uninstall any newer version first.
That covers the essentials of mod installation in Kerbal Space Program! Whether you choose the manual “wiring” approach or the streamlined CKAN method, you’re now equipped to enhance your KSP experience with the vast world of mods. Happy modding and safe travels in Kerbin space!
Feedback and corrections are always welcome!
Edited by 4x4cheesecake: Updated screenshot leading to GitHub release section.