This guide provides a comprehensive walkthrough on setting up Heartbeat and Node Majority features within StarWind Virtual SAN (VSAN) for VMware ESXi environments. These configurations are crucial for ensuring high availability and data consistency in your virtual infrastructure. StarWind VSAN is a software-defined storage solution that mirrors internal hard disks and flash drives between servers, presenting them as a shared storage pool. Properly configuring Heartbeat and Node Majority is essential for preventing split-brain scenarios and maintaining uninterrupted service.
Configuring Heartbeat in StarWind VSAN
The Heartbeat mechanism in StarWind VSAN is designed to monitor the health and connectivity of replication partners. It ensures that in a two-node setup, both nodes are aware of each other’s status, which is vital for automatic failover and preventing data corruption. Here’s how to configure Heartbeat during the creation of a High Availability (HA) device:
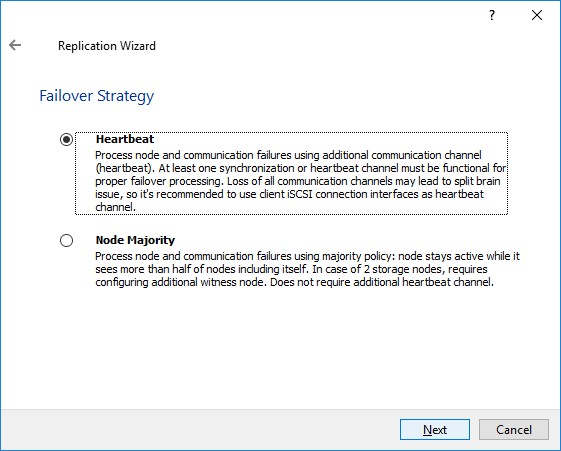
1. Initiate Failover Strategy Selection.
When creating a new HA device in the StarWind Management Console, the first step is to choose a Failover Strategy. This determines how StarWind will handle node failures and ensure continuous operation.
2. Create a Partner Device.
Select the option to Create new Partner Device. This indicates that you are setting up replication with another StarWind node to achieve high availability. Click Next to proceed.
3. Specify Partner Device Location.
Define the Location of the partner device. This typically involves specifying the server name or IP address of the partner node where the replica will be created. Click Next after selecting the appropriate location.
4. Choose Synchronization Journal Strategy.
The Synchronization Journal Strategy is critical for managing data synchronization between nodes, especially after disruptions. StarWind offers several options:
- RAM-based (default): This journal resides in RAM, offering excellent I/O performance under normal conditions. However, in certain scenarios, such as prolonged outages or specific error conditions, a full synchronization might be required. Refer to StarWind’s Knowledge Base for details on when full synchronization might occur.
- Disk-based: This journal is stored on a dedicated disk, ideally a fast one like an SSD or NVMe. It prevents full synchronization even if the StarWind service is stopped on all nodes. Disk-based journals require approximately 2MB of disk space per 1TB of HA device size for 2-way replication and 4MB for 3-way replication. Placing the journal on a separate, high-performance disk is highly recommended to maintain optimal device performance.
- Failure journal: This strategy combines the performance of RAM-based journaling in a healthy state with the persistence of a disk-based journal during synchronization issues. If a node falls out of sync, the disk-based journal activates, potentially leading to a temporary performance decrease as performance becomes disk-bound. Full synchronization can still occur in severe scenarios, like simultaneous hard resets of all nodes.
- Continuous journal: This option prioritizes data consistency and fast synchronization in all situations. However, it offers the lowest I/O performance due to constant write operations to the disk-based journal.
Select the strategy that best fits your performance and data consistency needs and click Next.
5. Access Network Settings.
Click on Change Network Settings to configure the network interfaces used for synchronization and Heartbeat communication between the StarWind nodes.
6. Configure Synchronization and Heartbeat Channels.
In the Network Settings window, specify the network interfaces for both Synchronization and Heartbeat Channels. It is best practice to use separate, dedicated networks for synchronization and Heartbeat to ensure reliability and performance. Click OK to save the network settings and then click Next.
7. Choose Partner Device Initialization Mode.
Select Synchronize from existing Device as the initialization mode. This option ensures that the new replica is synchronized with the existing device, maintaining data consistency from the outset. Click Next.
8. Create Replica and Finish.
Click Create Replica to initiate the replica creation process. Finally, click Finish to close the wizard. The newly created HA device will now be visible in the StarWind Management Console, configured with Heartbeat.
9. Repeat for Additional Virtual Disks.
Repeat steps 1-8 for any other virtual disks that need to be part of your HA storage repositories.
Configuring Node Majority for Enhanced Failover
For two-node StarWind HA setups, employing a Node Majority failover strategy is highly recommended. This strategy utilizes a Witness to prevent split-brain scenarios, where both nodes might assume primary role if the synchronization link is lost. There are two primary methods to configure a Witness: using a File Share (SMB) or a dedicated Witness Node.
Node Majority with File Share (SMB) Witness
Using an SMB file share as a Witness is a straightforward approach. The SMB share hosts a file accessible by both StarWind nodes. In case of network partitioning, the node that can access the SMB share retains operational priority, thus avoiding split-brain. For detailed steps on setting up SMB Witness, refer to StarWind’s guide on Configuring File Share (SMB) as Witness.
Node Majority with Witness Node
A Witness Node is a dedicated StarWind server (can be physical or virtual, even cloud-based) that acts as an arbiter in a Node Majority configuration. It provides a more robust and reliable witness mechanism compared to an SMB share. Here’s how to configure Node Majority with a Witness Node:
Creating HA Device with Witness Node
1. Select Node Majority Failover Strategy.
When initiating the creation of a new HA device, choose Node Majority as the failover strategy. Click Next to continue.
2. Create Partner Device.
Select Create new Partner Device and click Next.
3. Specify Partner Device Details.
Define the partner device Location and modify the target name if needed. Choose the Synchronization Journal strategy and its location, similar to the Heartbeat configuration. Click Next after configuring these settings.
4. Access Network Options for Replication.
Click the Change network settings button to configure network interfaces for replication.
5. Specify Interfaces for Synchronization Channels.
Select the appropriate networks for the synchronization channel in the Specify Interfaces for Synchronization Channels window. Click OK and then Next.
6. Choose Initialization Mode.
Select Synchronize from existing Device as the partner device initialization mode.
7. Create Replica and Close Wizard.
Click Create Replica and then close the wizard. The HA device is now created with Node Majority configured between the two main nodes.
Adding Witness Node to Node Majority HA Device
1. Add Witness Server in StarWind Management Console.
Open the StarWind Management Console and add the server that will act as the Witness Node. Right-click on the Servers field, select Add Server, and enter the Witness node details (Host Name or IP address). Click OK.
2. Open Replication Manager for HA Device.
Right-click on the HA device you configured with Node Majority and select Replication Manager. Then, click Add Replica.
3. Select Witness Node as Replica Type.
Choose Witness Node as the type of replica you want to add.
4. Specify Witness Node Host Details.
Enter the Host Name or IP address of the Witness node. The default Port Number is 3261.
5. Define Witness Device Setup.
Specify the Location for the Witness device on the Witness Node. You can also modify the target name if necessary.
6. Configure Network Options for Witness Replication.
Click Change Network Settings to select the synchronization channel for communication with the Witness node.
7. Specify Interfaces for Witness Synchronization and Heartbeat.
Define the interface for Synchronization and Heartbeat communication with the Witness node. Click OK.
8. Create Witness Replica and Finish.
Click Create Replica to finalize the Witness node configuration and then close the wizard.
9. Repeat for Other Virtual Disks.
Repeat these steps for any other virtual disks requiring Witness Node configuration.
Note: For instructions on how to extend the size of an Image File or a StarWind HA device, please refer to How to Extend Image File or High Availability Device.
By correctly configuring Heartbeat and Node Majority with a Witness Node in StarWind VSAN for your ESXi environment, you significantly enhance the resilience and availability of your virtual infrastructure, ensuring business continuity and data protection.