Applying for a passport can be an exciting step towards your next adventure. However, ensuring your application is processed smoothly requires attention to detail, especially when it comes to your passport photo. A seemingly minor aspect, the photo is a critical component, and incorrect photos are a common cause of application delays. This guide will walk you through everything you need to know to get a passport photo that meets all official requirements, whether you choose to use a professional service or take the photo yourself.
Understanding Digital Passport Photo Requirements
For online passport applications, you’ll need to submit a digital photo. It’s crucial to understand that even if your appearance hasn’t changed since your last passport, a new photo taken within the last month is mandatory for each new application. Failing to adhere to these guidelines can lead to significant delays in receiving your passport. If you have a disability and require assistance with your passport photos, resources are available to help you through the process.
How to Obtain Your Digital Passport Photo
You have two primary options for getting your digital passport photo:
- Using a Photo Booth or Professional Shop: This is often the recommended route for ensuring compliance. Photo booths and shops that offer passport photo services are generally well-versed in the specific requirements and can provide you with a code to digitally link your photo to your online application.
- Taking a Photo Yourself Using Your Own Device: This option offers convenience, but it requires careful attention to detail to meet all the necessary criteria. You will likely need someone to assist you in taking the photo.
While taking a photo at home might seem easier, photos obtained from professional booths or shops statistically have a higher rate of approval due to their expertise in meeting photo specifications.
Getting a Photo with a Digital Code from a Booth or Shop
Opting for a photo booth or shop is a straightforward way to handle your passport photo. Simply choose the service that provides a digital code along with your photos before you begin your online passport application. During the application process, you will be prompted to enter this code, which will then automatically upload your compliant digital photo to your application.
Taking Your Passport Photo with Your Own Device
If you decide to take your photo at home, remember that you’ll need assistance from someone else to capture the image during your application. This method requires you to be particularly meticulous about following all guidelines to avoid rejection.
Detailed Rules for Digital Passport Photos
The quality and content of your digital passport photo are strictly regulated to ensure it is suitable for identification purposes. Here’s a breakdown of the essential rules:
Photo Quality Specifications
Your digital photo must:
- Be clear and sharply focused, avoiding any blurriness.
- Be in full color and accurately represent your skin tones.
- Be unaltered digitally. Do not use any filters or editing software to change your appearance.
- Have minimum dimensions of 600 pixels wide and 750 pixels tall.
- Have a file size between 50KB and 10MB.
Essential Content Requirements
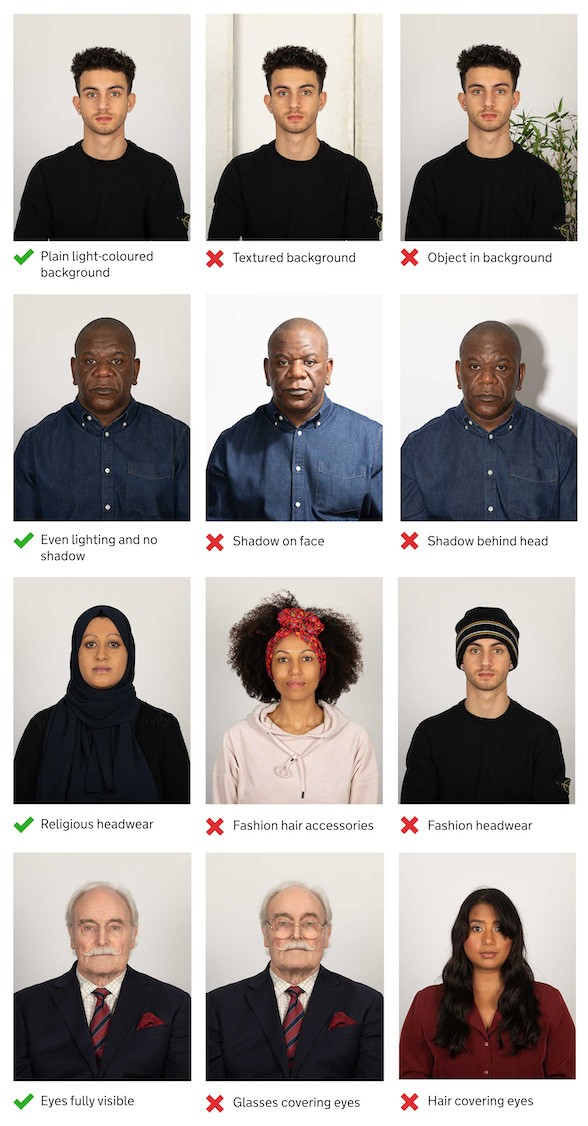
The photo itself must clearly show you and adhere to the following:
- No other people or objects should be visible in the photo.
- The background must be plain and light-colored, providing sufficient contrast.
- Ensure there is a clear contrast between you and the background to distinguish your features.
- Red eye is not permitted. Ensure flash settings are adjusted to prevent this, or correct it using software if necessary (though professional services usually avoid this issue).
When taking the photo yourself, frame the shot to include your head, shoulders, and upper body. It is crucial not to crop the photo yourself; the system will handle any necessary cropping to ensure standardization.
In terms of your appearance in the photo, you must:
- Face directly forward and look straight into the camera lens.
- Maintain a neutral expression with your mouth closed. Smiling widely or having an exaggerated expression is not permitted.
- Ensure your eyes are open and clearly visible.
- Keep hair away from your eyes so they are fully visible.
- Avoid any head coverings unless worn for religious or medical reasons. If a head covering is worn, it must not obscure your face.
- Ensure nothing covers your face.
- There should be no shadows on your face or in the background behind you. Proper lighting is essential to eliminate shadows.
Regarding glasses, it is preferable not to wear glasses in your passport photo unless they are medically necessary. If you must wear them, ensure they are not sunglasses or tinted, and importantly, that the frames do not obscure your eyes in any way. There should be no glare, reflection, or shadows from the glasses.
Specific Guidelines for Baby and Child Passport Photos
Taking passport photos of babies and young children requires extra patience and understanding of the slightly relaxed rules for this age group.
Key points to remember when photographing children for passports:
- Children must be the only subject in the photo.
- Babies should not be holding toys or using dummies in the photo.
While the rules are more lenient for very young children, some guidelines still apply:
- Children under 6 years old do not need to look directly at the camera or have a perfectly plain expression. However, it’s still helpful if they are generally facing forward.
- Babies under one year old are not required to have their eyes open.
For infants, there are specific techniques to make the process easier:
- You can support a baby’s head with your hand, but ensure your hand is not visible in the final photo.
- For babies under one, the easiest method is often to lay them on a plain, light-colored sheet. Then, take the photo from directly above.
Conclusion: Ensuring Your Passport Photo Success
Getting your passport photo right is a crucial step in ensuring a smooth and timely passport application process. By understanding and adhering to these guidelines, whether you opt for a professional service or take the photo yourself, you can avoid common pitfalls and potential delays. Remember to double-check all requirements before submission, and you’ll be one step closer to your travel plans.