Crota’s End has returned in Destiny 2 as the newest reprised raid, launching with “Season of the Witch.” Guardians are called back to the treacherous Hellmouth on the Moon to confront Crota, the menacing son of Oryx. The recommended Power level for tackling this raid is 1790.
This comprehensive Destiny 2 Crota’s End guide will navigate you through each of the raid’s four intense encounters. We’ll reveal the locations of all three hidden secret chests, detail how to master the encounter challenges, and explain how to secure a guaranteed Deepsight weapon each week. Gear up, Guardians, it’s time to delve into the darkness!
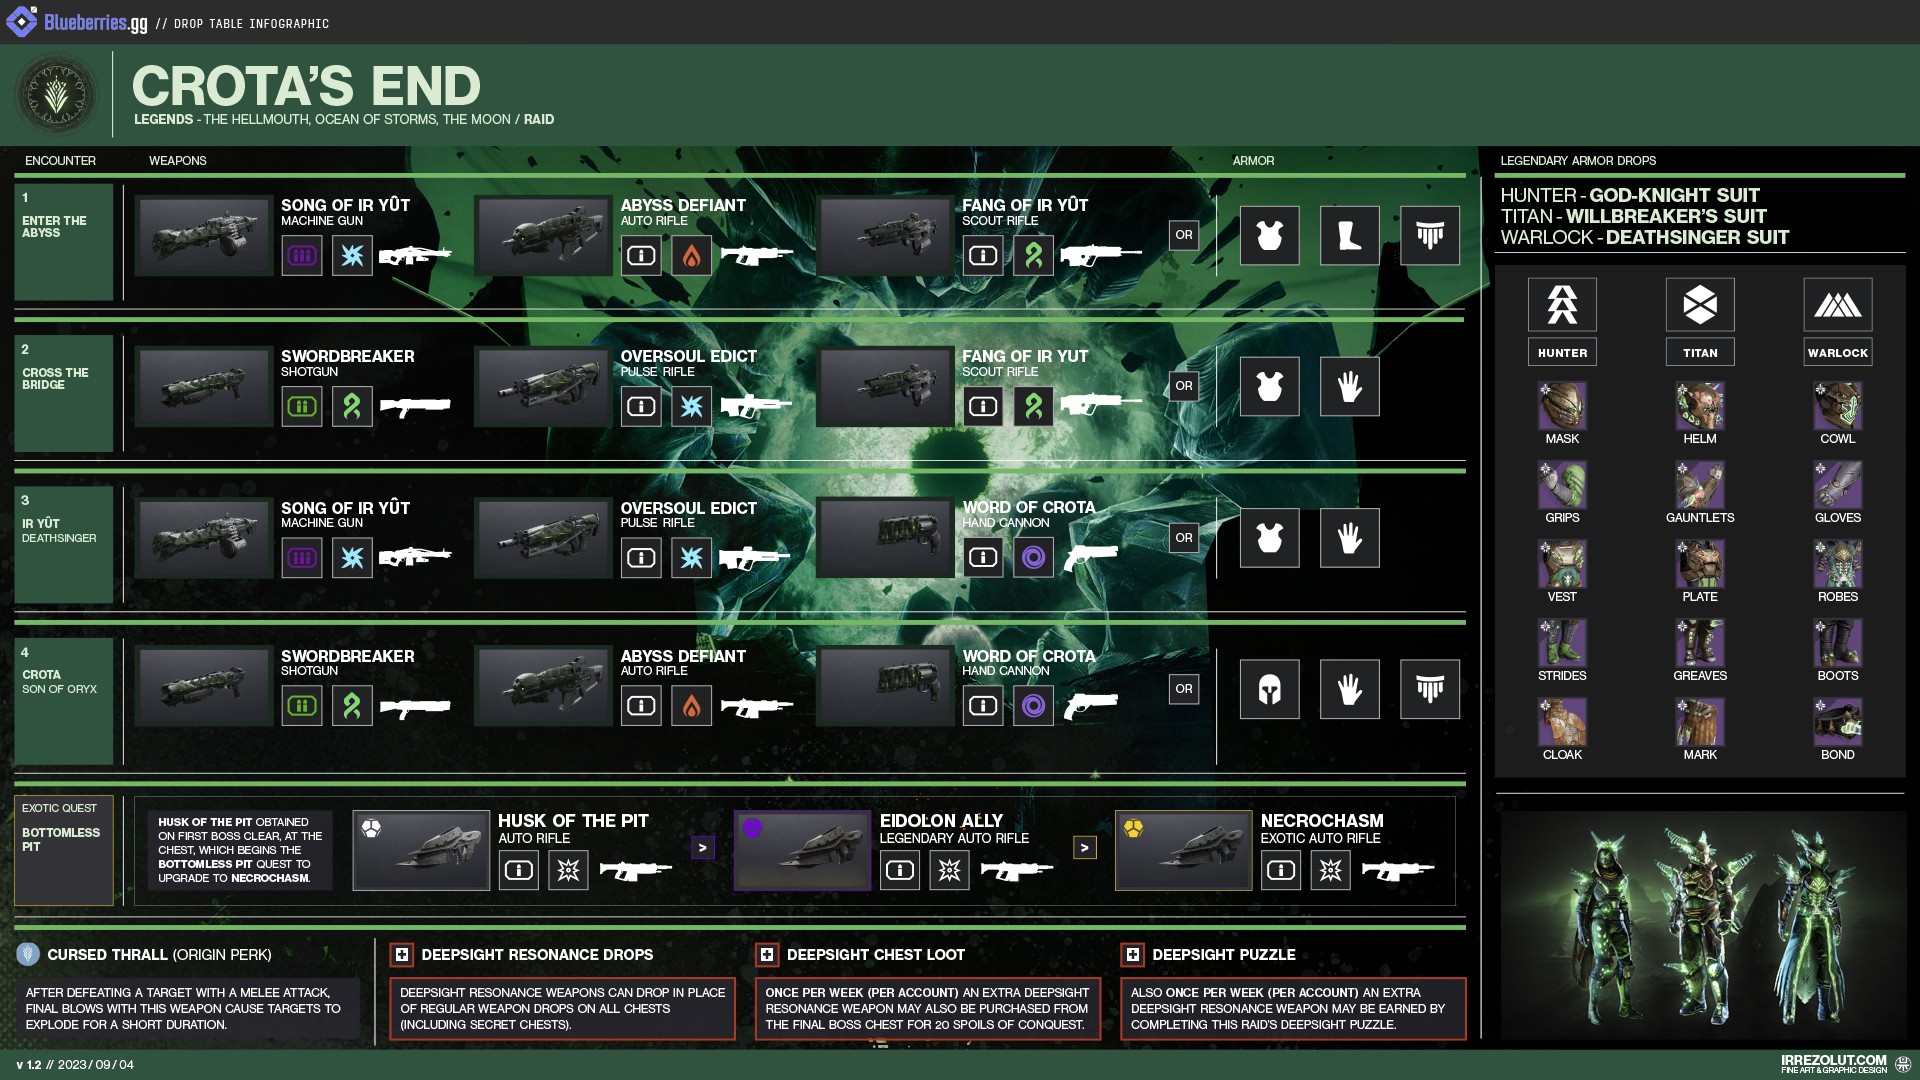
Crota’s End Loot Table
Image: Blueberries.gg
Courtesy of Blueberries.gg, renowned for their rapid and accurate loot tables, here’s a breakdown of the potential rewards from Crota’s End. Excluding the raid-exclusive Necrochasm, all items listed can drop from secret chests after you’ve earned them from an encounter. We’ll pinpoint those secret chest locations later in this guide.
How to Get a Guaranteed Deepsight Resonance Chest
Image: Bungie via Polygon
Ensuring the Deepsight Resonance chest appears after defeating Crota is a straightforward process. Upon loading into the raid, proceed forward slightly and gaze across the Hellmouth. You’ll observe three sets of Hive statues.
Deciphering the Deepsight Legend
Image: Bungie via Polygon
Each statue set contains a left and a right statue, with only one illuminated in each set. Reading the sets from left to right, note down whether “left” or “right” is lit for each. In this example, the sequence would be right, left, left. Remember this sequence as you progress through the raid until the bridge encounter.
Deepsight Statue Set One
Image: Bungie via Polygon
Upon reaching the bridge encounter, stand at the rally flag and look across the chasm. Based on your first statue set (right in our example), descend the stairs and move in that direction. Hug the wall until you enter an open room – the very room where enemies spawn during the encounter.
Image: Bungie via Polygon
Locate the statue within this room. Approach and interact with it. Confirmation of the correct statue interaction will appear in the combat log: “A choice echoes into the future.” Now, proceed to complete the bridge encounter.
Deepsight Statue Set Two
Image: Bungie via Polygon
After successfully completing the bridge encounter, position yourself at the base of the stairs leading away from the bridge-building plate. Observe the areas to the left and right of these stairs. Move to the side corresponding to your second statue set (left, in our example).
Image: Bungie via Polygon
Venture to the back of this area and interact with the statue. Continue onward and complete the Ir Yut encounter.
Deepsight Statue Set Three
Image: Bungie via Polygon
Following the Ir Yut encounter, ascend to the area above the Crota rally flag. On either side of the small central room, you’ll find the statues. Interact with the statue that corresponds to your third and final set from the initial sequence.
Remember, “left” and “right” are oriented as if you were facing the Oversoul. Therefore, once you turn to jump up to the statues, the directions will appear reversed. In our example, interact with the statue on the picture’s right side (which is actually the left statue relative to the Oversoul).
Upon interacting with all three correct statues, the combat log will display: “A balance is reached. To the victor go the final spoils.” This message confirms that the Deepsight chest will materialize after Crota’s defeat.
Understanding the “Enlightened” Mechanic
The core mechanic in Crota’s End revolves around the Chalice of Light, which grants the “Enlightened” buff. Picking up the Chalice initiates a charge bar on your screen labeled “Chalice of Light.”
An image showing the Chalice charge bar Image: Bungie via Polygon
Once this bar reaches full capacity, you’ll receive the “Engulfed in Light” debuff for ten seconds. Failure to pass the Chalice to a teammate by having them interact with you before this debuff expires results in death. Successfully passing the Chalice when the bar is full grants you the “Enlightened” buff.
Utilizing the “Enlightened” buff in various ways throughout the raid (explained in each encounter section) will apply the “Drained of Light” debuff, lasting 45 seconds. This prevents you from picking up the Chalice during this duration, and you also cannot pick up the Chalice while you already have the “Enlightened” buff.
Image: Bungie via Polygon
A player carrying the Chalice can deposit it into a preservation node to temporarily store it without gaining the “Drained of Light” debuff (if deposited before the charge bar is full). Preservation nodes, visually represented above, are crucial for activating lamps in the first encounter and serve as safe storage points during DPS phases in later encounters, eliminating the need for passing the Chalice during critical moments.
The “Enlightened” buff is central to numerous mechanics across the raid, but its acquisition process remains consistent. Establishing a Chalice passing order at the raid’s outset is highly recommended. This order, designated as Enlightened 1, Enlightened 2, and so on up to Enlightened 6, will streamline Chalice management throughout each encounter.
Starting the Raid
Image: Bungie via Polygon
Upon loading into Crota’s End, you’ll find yourself at the Hellmouth. Directly ahead, the Chalice of Light will spawn alongside a plate that initiates bridge construction when stood upon. Grab the Chalice to gain “Enlightened,” which will trigger the spawning of Thralls.
Continuously stand on the plate to gradually build the bridge. An “Enlightened” player can deposit their buff into the plate to accelerate bridge formation. Once the bridge is complete, enemies will cease spawning, allowing safe passage across and a jump into the raid proper.
First Secret Chest Location
Image: Bungie via Polygon
From the Abyss encounter’s starting point, head left and stay close to the wall. You’ll encounter illuminated doorways periodically. Follow these doorways until you can turn left, then turn left again.
Image: Bungie via Polygon
You’ll see one more illuminated door to your left and one directly ahead. The first secret chest is hidden behind the door straight ahead.
The Abyss Encounter: Navigating the Darkness
The first encounter, The Abyss, challenges players to traverse a maze shrouded in darkness. Within the darkness, the “Weight of Darkness” debuff accumulates, stacking up to ten times. Higher stacks significantly reduce movement speed and eventually eliminate sprinting and jumping abilities. Standing near lit lamps dispels this debuff and reveals the path forward.
Activating a lamp requires a player with the “Enlightened” buff. Once activated, a lamp remains lit for approximately 12-15 seconds before exploding, posing a lethal threat to anyone nearby. Navigate the maze by strategically passing the “Enlightened” buff in your predetermined order, taking turns activating lamps to light the way.
Image: Bungie via Polygon
Preservation nodes for the Chalice of Light are positioned every few lamps. Depositing the Chalice here is essential for regrouping and preparing for the next lamp sequence. Node locations are randomized each run, but the initial lamp always has a node.
Image: Bungie via Polygon
An unlit lamp ahead indicates the presence of a preservation node.
This encounter also features a timer, indicated by the “Engulfed in Darkness” debuff. Reaching zero on this timer results in a team wipe. Activating lamps and/or depositing the Chalice extends the timer. Occasionally, depositing the Chalice might not reset the timer; in such cases, picking up the Chalice from the node should extend it. Continue progressing through the maze, carefully avoiding pits and swinging pendulums.
Image: Bungie via Polygon
Eventually, you’ll reach a plate resembling the raid start plate. Stand on this plate and use “Enlightened” buffs to construct a bridge, just as before. Numerous enemies, including Unstoppable Ogres, will spawn during this phase. Eliminate them until the bridge is fully formed. Cross the bridge into the light to conclude the encounter.
Example Abyss Cycle
Here’s an example cycle assuming preservation nodes are at the first and fourth lamps:
- Enlightened 1 grabs Chalice, group moves to first lamp.
- Enlightened 2 takes Chalice from Enlightened 1, deposits into preservation node.
- Enlightened 1 activates lamp using “Enlightened” buff.
- Enlightened 3 takes Chalice from preservation node.
- Group moves to next lamp.
- Enlightened 4 takes Chalice from Enlightened 3.
- Enlightened 3 activates lamp.
- Group moves to next lamp.
- Enlightened 5 takes Chalice from Enlightened 4.
- Enlightened 4 activates lamp.
- Group moves to next lamp.
- Enlightened 6 takes Chalice from Enlightened 5, deposits into preservation node for the next lamp set.
- Enlightened 5 activates lamp.
- Enlightened 1 takes Chalice from preservation node.
- Group moves to next lamp.
- Enlightened 1 activates lamp.
This cycle repeats until the end plate is reached, the bridge is built, and the encounter is complete.
Oversoul Throne Bridge Encounter: Crossing the Chasm
The Oversoul Throne Bridge encounter tasks you with crossing a vast chasm to defeat specialized Gatekeeper enemies. The objective is to have all players cross the bridge, eliminate five Gatekeepers, store sword relics, and then defeat five more Gatekeepers. This encounter has specific rules, which we’ll break down.
Building the Bridge and Annihilator Totems
Image: Bungie via Polygon
Each side of the bridge area has three plates: a central bridge-building plate and two side plates designated as “Annihilator Totems.”
Standing on the bridge-building plate triggers the Annihilator Totems to become active. A player must stand on each totem plate to prevent them from overwhelming the team. If totems are active without players on their plates, a team wipe will occur within approximately seven to ten seconds.
Note that only the totems on the side where the bridge plate is activated will become active. As before, an “Enlightened” player can deposit their buff to speed up bridge construction. It’s recommended that the first “Enlightened” player use their buff for this purpose.
Swordbearers and Gatekeepers
Image: Bungie via Polygon
After about a minute, Swordbearers will begin spawning on the starting side. Defeating a Swordbearer causes them to drop a sword relic. Picking up the sword requires the “Enlightened” buff. Once you have a sword, you can cross the bridge (if it’s built). Attempting to cross without a sword or the Chalice of Light will result in death. Upon crossing, enemies, including a Gatekeeper, will spawn on the far side.
Image: Bungie via Polygon
Gatekeepers are bluish Knights that are only vulnerable to sword damage. After defeating a Gatekeeper, retain your sword. You’ll find five deposit points where swords can be stored until the encounter’s final phase. A preservation node for the Chalice of Light is also present on the far side.
Image: Bungie via Polygon
Bridge Strategy
The most effective strategy is to ensure all players are “Enlightened” before anyone crosses the bridge. During this setup phase, players should rotate positions to cover totems, build the bridge, and ensure everyone receives the “Enlightened” buff.
In this strategy, Enlightened 1 uses their initial buff on the bridge plate. By the time the Chalice cycles back to Enlightened 1 from Enlightened 6, Enlightened 2 should be on the bridge plate with a sword, ready to cross. Both players cross simultaneously, with Enlightened 2 focusing on the Gatekeeper and Enlightened 1 prioritizing Chalice deposit in the preservation node before their buff expires.
Once Enlightened 3 obtains a sword, they cross and defeat their Gatekeeper. At this point, three players should be on each side. Those who have crossed now stand on the far side plates to maintain the bridge, allowing the remaining three players to focus on acquiring swords and crossing.
If a player on the starting side dies while “Enlightened,” a crossed player must retrieve the Chalice and return across the bridge. Once their bar is full, the respawned player takes the Chalice and crosses, swapping places with the Chalice runner. Repeat this process until all players have crossed and five swords are preserved.
Defeating Five More Gatekeepers
Image: Bungie via Polygon
After all six players have crossed and five swords are preserved, the encounter enters its second phase. Five more Gatekeepers spawn simultaneously. You’ll need to retrieve the Chalice, pass it around to “Enlighten” a few players, enabling them to pick up preserved swords to defeat the Gatekeepers. Avoid standing on the central bridge plate during this phase, as it will still activate the totems, potentially causing a wipe. The encounter concludes upon defeating all five Gatekeepers and remaining enemies, and preserving the Chalice.
Example Bridge Cycle
An example cycle for the encounter’s opening, using the described strategy:
- Players take starting positions.
- Enlightened 1 and 2 start on the middle plate.
- Enlightened 3 and 5 start on the left totem plate.
- Enlightened 4 and 6 start on the right totem plate.
- Enlightened 1 grabs the Chalice and charges it.
- Once full, Enlightened 2 takes the Chalice.
- Enlightened 1 deposits buff into the center plate, swaps with Enlightened 3.
- Enlightened 3 takes Chalice from Enlightened 2.
- Enlightened 2 swaps with Enlightened 4.
- Swordbearer spawns, Enlightened 2 grabs sword after defeat.
- Enlightened 4 takes Chalice from Enlightened 3.
- Enlightened 3 swaps with Enlightened 5.
- Enlightened 5 takes Chalice from Enlightened 4.
- Enlightened 4 swaps with Enlightened 6.
- Enlightened 6 takes Chalice from Enlightened 5.
- Enlightened 5 swaps with Enlightened 1.
- Enlightened 2 meets at bridge with sword, ready to cross.
- Enlightened 1 takes Chalice from Enlightened 6.
- Enlightened 1 and 2 cross bridge.
- Enlightened 6 stays on middle plate to maintain bridge.
- Enlightened 1 deposits Chalice into preservation node.
- Enlightened 2 defeats first Gatekeeper, deposits sword.
- Enlightened 3 looks for sword, Enlightened 5 & 4 maintain totem plates.
- Enlightened 3 gets sword, crosses, defeats Gatekeeper, deposits sword.
- Enlightened 2 goes to far left totem, Enlightened 3 to far right totem, Enlightened 1 to far middle plate.
- Enlightened 4, 5, 6 get off plates, defeat enemies, acquire swords until everyone crosses.
Reaching the Ir Yut Encounter
Image: Bungie via Polygon
Following the bridge encounter is a short hallway, often called the Shrieker Sprint. Here, you must use the “Enlightened” buff to pass through a green force field. Passing through removes your “Enlightenment.” Juggle the buff, sending one or two “Enlightened” players through to defeat the Shrieker on the other side. Upon the Shrieker’s death, the green wall dissipates. Repeat this process twice more. Finally, deposit the Chalice into the deposit point to end the Shrieker Sprint section.
Second Secret Chest Location
Image: Bungie via Polygon
The second secret chest is situated at the Shrieker Sprint’s end, but it’s time-sensitive. Once the second force field drops, the player with the Chalice must sprint forward and deposit it into the preservation node on the front side of the hole before the door closes. Successful timing will result in the door mostly closing, the chest spawning, and the door shortly reopening.
Note on the Third Secret Chest
The third secret chest remains undiscovered at the time of writing. Current community theories suggest that the chest, linked to a Triumph, might be the Deepsight chest itself, and the Triumph may be bugged. This guide will be updated with the location or confirmation as soon as definitive information emerges.
Ir Yut, the Deathsinger Encounter
The third raid encounter pits players against Ir Yut, a formidable wizard whose song threatens instant death to any who hear it in full.
Starting the Ir Yut Encounter
Image: Bungie via Polygon
Begin by dividing your team into two groups of three. One team goes right, the other left. Navigate around to the central room containing the crystal, eliminating the six yellow-bar knights along the way. Upon their defeat, a Shrieker will open on each side. Destroying these Shriekers removes the green barriers to the central room, allowing both teams to reunite and commence the main encounter.
Ir Yut Encounter Setup
Image: Bungie via Polygon
Image: Bungie via Polygon
Once inside the crystal room, numerous enemies will spawn continuously. The primary mechanic involves utilizing the “Enlightened” buff to pass through green wall shields (similar to the Shrieker Sprint) to defeat wizards shielding Ir Yut. These wizards can spawn in seven possible locations. The maps above provide callouts for these locations.
Image: Bungie via Polygon
Wizards can be concealed. It’s recommended that Enlightened 6 (or your designated scout) uses Wish-Ender or a similar ability granting Truesight to easily locate hidden wizards. Your radar can also help; red circles indicate Shriekers, not wizards. Designating Enlightened 6 as scout allows them to identify wizard locations while the rest of the team cycles the buff. The first phase requires killing three wizards, the second four, and the final phase five if needed.
Image: Bungie via Polygon
Collect the Chalice from the preservation node in front of the crystal. Pass the Chalice to “Enlighten” a number of players equal to the wizards needing elimination. Extra “Enlightened” players can contribute to Ir Yut DPS, as explained shortly. After the last player receives “Enlightened,” they deposit the Chalice in the preservation node by the crystal.
Each player assigned to a wizard location proceeds to their designated spot. Two approaches are viable:
One option is to enter the barrier upon arrival, weakening the wizard for a finisher. Note that entering the barrier removes “Enlightened,” and re-entry is blocked until the wizard dies. Once all wizards are weakened, everyone simultaneously finishes their assigned wizard.
Alternatively, wait outside the barrier until everyone is ready, then all players enter their barriers and kill their wizards simultaneously. Both methods work, but weakening wizards beforehand tends to be more consistent. Once the timer starts and all wizards are defeated, regroup just outside the crystal room for DPS.
Ir Yut DPS Phase
Once any hidden wizards are defeated, or if time elapses, Ir Yut begins her death song, indicated by “Dark Liturgy” on screen. After all wizards are dead, her shield drops, initiating the DPS phase. A segment of her health bar will be highlighted. You must deplete at least this highlighted portion during the DPS phase, or she will wipe the team at song’s end. If sufficient damage is dealt, repeat the setup steps until Ir Yut is defeated.
Image: Bungie via Polygon
Numerous DPS strategies are effective. At least one Well of Radiance is highly recommended. Divinity significantly aids in DPS due to Ir Yut’s small hitbox. Rocket launchers, linear fusion rifles, Leviathan’s Breath, and Heir Apparent are all potent damage options. Choose your preferred loadout and coordinate accordingly.
Remember those extra “Enlightened” buffs? Players with the buff can interact with Ir Yut during DPS to “Expunge” her. This deals significant damage and appears to increase her vulnerability for the remainder of the DPS phase. Expunging at the start of each phase is highly recommended to maximize damage output. Repeat the cycle until Ir Yut falls.
Example Ir Yut Cycle
An example cycle for the Ir Yut encounter:
- Players split, clear knights and Shriekers.
- Enlightened 1 grabs Chalice.
- Enlightened 6 scouts wizards, finds them at 1 top, 4, and 5 bottom.
- Enlightened 2 takes Chalice from Enlightened 1.
- Enlightened 1 goes to 5 bottom wizard, weakens it for finish.
- Enlightened 3 takes Chalice from Enlightened 2.
- Enlightened 2 goes to 4 wizard, weakens it.
- Enlightened 4 takes Chalice from Enlightened 3.
- Enlightened 3 goes to 1 top wizard, weakens it.
- Enlightened 5 takes Chalice from Enlightened 4, deposits it.
- Enlightened 1, 2, 3 countdown, finish wizards simultaneously.
- Team gathers at DPS plate, Well of Radiance, begins DPS.
- Enlightened 4 Expunges Ir Yut, rejoins Well.
- Everyone DPS, dealing enough damage to avoid wipe.
- DPS phase ends, cycle repeats.
Crota, Son of Oryx: The Final Boss Fight
Finally, we reach Crota, the Son of Oryx, the raid’s final boss. Swords are crucial for lowering his shields and dealing damage. Shooting his Oversoul is necessary to end DPS phases and prevent team wipes.
Starting the Crota Encounter
Image: Bungie via Polygon
To start the encounter, all players must gather around the crystal in the Ir Yut room where the Chalice was located. Everyone must touch the crystal to initiate the encounter, hence the phrase “Kiss the crystal.”
Once started, green barriers will enclose the room for 5-7 seconds. Crota spawns directly in front of the room, so position yourselves behind the crystal to avoid immediate attacks when the barriers drop. After the barriers fall, split into two groups of three again, one going left, one right, to clear enemies and prepare for DPS setup.
Crota Encounter Cycle
Image: Bungie via Polygon
The encounter cycle is straightforward. First, defeat the four Boomer Knights, two in each of the left and right towers. This spawns two Ogres and a Swordbearer in the middle. Defeating the Swordbearer allows an “Enlightened” player to pick up the sword. The pickup window is short, so coordinate Swordbearer elimination. After the Swordbearer dies, Wizards and Thralls spawn under the towers and in the middle. The four Boomer Knights respawn after a short delay, and the cycle repeats.
Crota Encounter Setup
This cycle repeats three times to gather three swords. Concurrently, the “Enlightened” cycle continues, but with a slight difference. Throughout the Crota encounter, players are afflicted with the “Presence of Crota” debuff.
Image: Polygon
Unlike Destiny 1, “Presence of Crota” doesn’t prevent healing but restricts Chalice swaps to small circles of light that spawn in one of five locations (see map above for locations and callouts). This necessitates more coordinated buff swapping.
You need at least four “Enlightened” players per DPS phase: three for sword pickups, and one to destroy the Oversoul. An additional “Enlightened” player can “Expunge” Crota for extra damage, similar to Ir Yut.
Image: Bungie via Polygon
After the final Chalice swap, the last player (likely Enlightened 6) should deposit the Chalice in the preservation node located in the pit beneath the crystal room. Once three swords are collected, gather near Crota to prepare for DPS.
Crota DPS Phase
Breaking Crota’s shield with swords initiates the damage phase. Two shield-breaking methods exist: simultaneous attacks with all three swords (the encounter challenge), or individual sword attacks as swords are acquired. The three-sword strategy is generally preferred as individual attacks expose players to Crota’s attacks.
Whether using one or three swords, Tractor Cannon is highly recommended. Hitting Crota with Tractor Cannon before sword attacks significantly increases damage taken and sword damage to his shield. This makes shield breaking much easier; Tractor Cannon allows shield break with two swords if executed precisely.
Crota DPS strategies fall into two categories: close-range and long-range. Close-range is currently more popular.
Close-Range Crota Damage
Both strategies benefit greatly from Well of Radiance; at least one Well is vital, two or three optimal. For close-range, break Crota’s shield while surrounding him. Drop the first Well as swords swing. The Lament or Legend of Acrius are top close-range damage choices. For The Lament, use the Lucent Blade chest mod for increased sword charge rate. With Legend of Acrius, melee every three shots to trigger Trench Barrel’s massive damage.
Long-Range Crota Damage
For long-range DPS, rockets are the preferred option. Most rockets are viable, but Gjallarhorn is highly recommended. Other strong rocket perks include Explosive Light, Field Prep, Clown Cartridge, and Bait and Switch. Position the team safely, ideally atop the crystal room. After shield break, the sword player rejoins the team immediately.
The Oversoul
Image: Bungie via Polygon
During DPS, the “The Oversoul” timer appears. Reaching zero results in a team wipe. Destroying the Oversoul ends the DPS phase, so delay its destruction until the timer is nearly depleted. Only “Enlightened” players can damage the Oversoul, hence the need for at least four “Enlightened” players per phase. The Oversoul has low health; fusion rifle shots can destroy it quickly, so be cautious to avoid accidental destruction. The designated Oversoul destroyer should aim carefully to avoid hitting it prematurely.
Crota Final Stand
Image: Bungie via Polygon
Reaching the Final Stand occurs after significant damage to Crota, indicated by the split in his health bar. Crota briefly becomes immune and stands up. Players should retreat to avoid damage during this immunity phase. Afterward, his shield drops again, and the Oversoul reappears with a 20-second timer. Destroying this Oversoul extends DPS by ten seconds, providing extra time to finish Crota. If the Oversoul timer reaches zero, a wipe occurs, but you have a few additional seconds to deal damage. Defeating Crota in this final window will still grant loot even if the team wipes afterward.
Example Crota Cycle
An example cycle for the final Crota fight:
- Everyone “kisses the rock.”
- Three players per side clear enemies.
- One player per side kills Boomer Knights, while Enlightened 1 grabs Chalice.
- Ogres and Swordbearer spawn, killed after Enlightened 2 has Chalice.
- Enlightened 1 picks up sword.
- One player per side kills Boomer Knights again.
- Ogres and Swordbearer spawn, killed after Enlightened 3 has Chalice.
- Enlightened 2 picks up sword.
- One player per side kills Boomer Knights again.
- Ogres and Swordbearer spawn, killed after Enlightened 4 has Chalice.
- Enlightened 3 picks up sword.
- Enlightened 5 takes Chalice from Enlightened 4, preserves it.
- Team gathers around Crota for DPS.
- Sword users attack Crota, breaking shield.
- Everyone DPS until Oversoul timer has 3-4 seconds left.
- Enlightened 4 destroys Oversoul, ending DPS.
- Cycle repeats until Crota is defeated.
Encounter Challenges
As with all Destiny 2 raids, each Crota’s End encounter has a weekly rotating challenge offering bonus loot upon completion.
The Abyss Challenge
The Abyss challenge requires activating only lamps with a preservation node nearby. Simple in concept, but demands coordinated group movement and Chalice timer awareness.
Oversoul Throne Bridge Challenge
The Bridge challenge mandates crossing the bridge without anyone standing on the bridge-building plate. Requires clear communication from the crossing player and plate holders briefly stepping off. The bridge will retract slightly, requiring a jump across the gap during crossing.
Ir Yut Challenge
The Ir Yut challenge demands that each player becomes “Enlightened” once before anyone can receive it again. A more complex challenge, demanding constant Chalice rotation, preservation node avoidance, and careful tracking, even during DPS.
Crota, Son of Oryx Challenge
The Crota challenge is to break his shield in a single synchronized sword attack, necessitating collecting 3 swords (or 2 for skilled sword-bearers) and attacking simultaneously. This challenge aligns with the preferred encounter strategy, making bonus loot acquisition relatively straightforward.
See More: (This section would typically link to related content, but is left as is per instructions)