Ensuring high availability for your virtual infrastructure is paramount, and StarWind Virtual SAN provides a robust solution to achieve this within VMware vSphere environments. This guide will walk you through setting up high availability (HA) storage using StarWind on ESXi, focusing on two key failover strategies: Heartbeat and Node Majority. By following these steps, you can create a resilient and fault-tolerant storage infrastructure for your critical virtual machines.
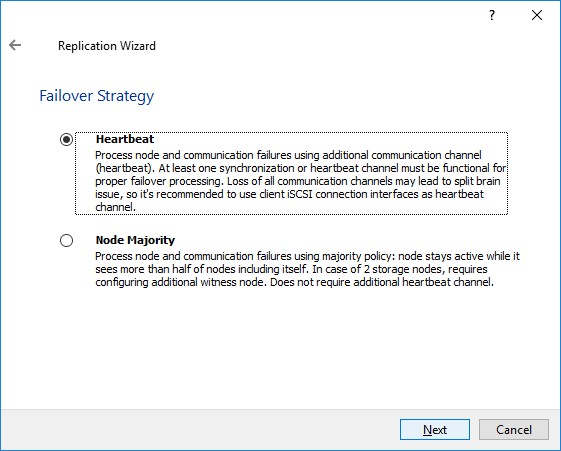
Configuring Heartbeat Failover Strategy
The Heartbeat failover strategy in StarWind ensures continuous data availability by monitoring the connection between storage nodes. If a node fails or becomes disconnected, the other node seamlessly takes over, preventing service interruptions. Here’s how to configure it:
1. Select Failover Strategy:
Begin by selecting the Failover Strategy during the device creation process in the StarWind Management Console. This is the foundational step in defining how your HA storage will behave in failure scenarios.
2. Create New Partner Device:
Choose the option to Create new Partner Device. This indicates that you are setting up a new HA pair and need to define the partner node for replication. Click Next to proceed.
3. Specify Partner Device Location:
Define the Location of the partner device. This typically involves specifying the server name or IP address of the second node in your HA cluster. Click Next to continue the setup.
4. Choose Synchronization Journal Strategy:
Select a Synchronization Journal Strategy. This setting is crucial for managing data synchronization between nodes, especially after disruptions. StarWind offers several options:
-
RAM-based (default): The journal resides in RAM, offering excellent I/O performance under normal conditions. However, full synchronization might be required in certain failure scenarios, as detailed in the StarWind Knowledge Base: Reasons for Full Synchronization.
-
Disk-based: The journal is placed on a dedicated disk, separate from the StarWind devices. This strategy helps avoid full synchronization even if the StarWind service is stopped on all nodes. For optimal performance, use a fast disk like an SSD or NVMe for the journal. Allocate 2MB of disk space per 1TB of HA device size for 2-way replication and 4MB for 3-way replication.
-
Failure journal: Combines the performance of a RAM-based journal with the resilience of a disk-based journal. It operates in RAM during normal operation and switches to disk if a node becomes unsynchronized. While generally fast, full synchronization can still occur in severe scenarios like simultaneous hard resets.
-
Continuous journal: Prioritizes fast synchronization and data consistency in all situations. However, it has the lowest I/O performance due to frequent write operations to the disk-based journal.
Choose the strategy that best aligns with your performance and data consistency requirements. Click Next after selecting.
5. Change Network Settings:
Click Change Network Settings to configure the network interfaces used for synchronization and heartbeat traffic. Proper network configuration is vital for reliable HA.
6. Specify Network Interfaces:
In the Network Settings window, specify the network interfaces for Synchronization and Heartbeat Channels. Dedicate separate networks for these critical functions to ensure isolation and performance. Click OK to save network settings and then Next to proceed.
7. Select Partner Device Initialization Mode:
Choose Synchronize from existing Device as the initialization mode. This ensures that the new partner device is synchronized with the existing device, maintaining data consistency from the outset. Click Next.
8. Create Replica and Finish:
Click Create Replica to initiate the replication process. Finally, click Finish to close the wizard. The newly created HA device will now be visible in the StarWind Management Console, ready for use.
9. Repeat for Additional Virtual Disks:
Repeat steps 1-8 for any additional virtual disks that you need to configure for high availability storage repositories.
Configuring Node Majority Failover Strategy
The Node Majority strategy is another robust approach for HA, particularly in two-node setups. It leverages a witness mechanism to prevent split-brain scenarios, ensuring data consistency even when communication between the primary storage nodes is interrupted. You can configure a witness using either an SMB file share or a dedicated Witness Node.
Creating HA Device with File Share (SMB) as Witness:
Using an SMB file share as a witness is a cost-effective way to implement Node Majority. The SMB share acts as a tie-breaker in case of node isolation. For detailed steps on setting up an SMB witness, refer to this guide: Configuring File Share (SMB) as Witness.
Creating HA Device with Witness Node:
For enhanced resilience, you can use a dedicated Witness Node. This node, running StarWind Virtual SAN service, participates in the quorum and ensures that only one node remains active in a split-brain situation.
1. Select Node Majority Failover Strategy:
Choose Node Majority as the failover strategy when creating a new device. This indicates that you will be using a witness mechanism for your HA setup. Click Next.
2. Create New Partner Device:
Select Create new Partner Device and click Next, similar to the Heartbeat strategy setup.
3. Specify Partner Device Location and Journal Strategy:
Define the partner device Location and choose the Synchronization Journal strategy as described in steps 3 and 4 of the Heartbeat configuration. Click Next after configuring these options.
4. Change Network Settings for Replication:
Click the Change network settings button to configure network interfaces for replication, just as you did in step 5 of the Heartbeat configuration.
5. Specify Interfaces for Synchronization Channels:
Select the appropriate network interfaces for synchronization channels. Click OK to save the settings and then Next.
6. Select Synchronization Mode:
Choose Synchronize from existing Device as the partner device initialization mode and click Next.
7. Create Replica and Close Wizard:
Click Create Replica and then close the wizard by clicking Finish. The HA device is now created with Node Majority failover.
8. Repeat for Other Virtual Disks:
Repeat steps 1-7 to create HA devices for any other virtual disks as needed.
Adding Witness Node
After setting up a two-node HA device with Node Majority, adding a Witness Node is crucial for completing the configuration and ensuring optimal resilience. The Witness Node can be a separate physical server or a virtual machine, even in the cloud.
1. Add Witness Server to StarWind Management Console:
Open the StarWind Management Console and add the server that will act as the Witness Node. Right-click on the Servers field, select Add Server, and enter the Witness node’s details. Click OK to add the server.
2. Open Replication Manager for HA Device:
Right-click on the HA device you configured with Node Majority failover and select Replication Manager. Then, click the Add Replica button to add the Witness Node.
3. Select Witness Node as Replica Type:
Choose Witness Node as the type of replica you want to add. This specifies that you are adding a witness to the existing HA setup.
4. Specify Witness Node Host Details:
Enter the Host Name or IP address of the Witness Node. The default Port Number is 3261.
5. Configure Witness Device Location:
Specify the Location for the Witness device on the Witness Node. You can also modify the target name if necessary.
6. Configure Network Options for Witness Replication:
Click Change Network Settings to select the synchronization channel for communication with the Witness Node.
7. Specify Interfaces for Witness Synchronization and Heartbeat:
Define the interface for Synchronization and Heartbeat traffic to the Witness Node. Click OK to save the network settings.
8. Create Replica and Finish:
Click Create Replica and then close the wizard by clicking Finish. The Witness Node is now added to your StarWind HA device.
9. Repeat for Other Virtual Disks:
Repeat steps 1-8 for any other HA virtual disks that require a Witness Node.
By following this Starwind Esxi Guide, you can effectively set up highly available storage for your VMware vSphere environment, ensuring business continuity and data protection. For information on extending your storage, refer to: How to Extend Image File or High Availability Device.