By Luke Bridwell
The Keepers in Iron, often called Badgers, present a rewarding challenge in Root, demanding strategic depth and adaptability. This faction is a continuous journey of learning, where experience sharpens your understanding and board awareness. Badgers offer remarkable flexibility, and this guide serves as your compass in navigating strategic decisions, revealing the satisfying mastery of their gameplay.
Whether you’re new to the Badgers or a seasoned player, consider this guide a resource that evolves with the shifting Root meta. Badger strategies are multi-layered, requiring tactical adjustments as the game landscape changes.
Explore more Root insights at The Woodland for further articles on Root!
Keepers-in-Iron-Guide-1Download
Inside this Guide:
How to Achieve Victory with the Keepers in Iron
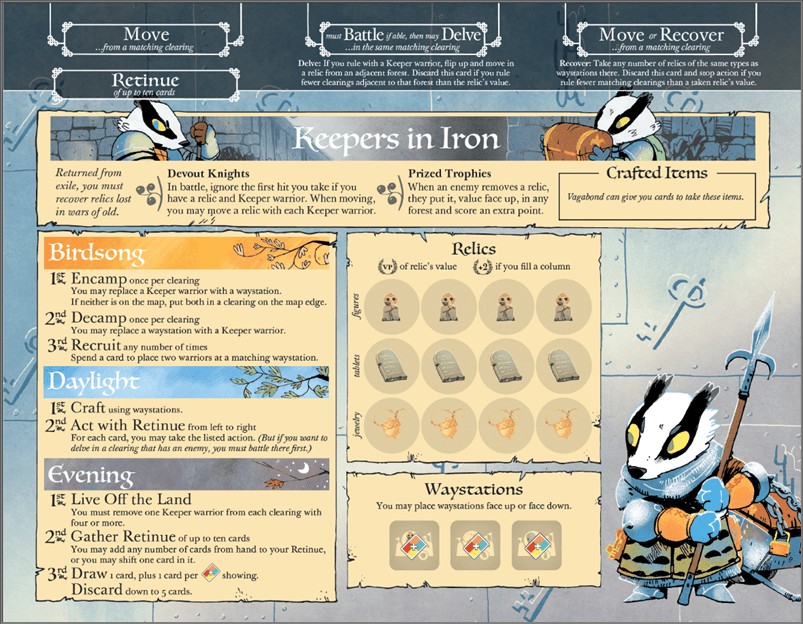
The Keepers in Iron boast a substantial victory point potential directly from their player board. Relics alone can contribute up to 27 points, with an additional 8 points available through relic column bonuses. This inherent scoring power positions the Badgers among the highest-scoring factions in Root. Your primary path to victory lies in accumulating points through relics, enhanced by strategic engagements with enemy pieces and the utilization of crafted items. Understanding the game dynamics, including player counts, is crucial for tailoring your Badger strategy.
Relics: Treasures of the Forest
Root’s law describes Badger relics as “twelve relic tokens of three types: figures, tablets, and jewelry, with four of each. The front displays the relic type, while the back reveals a value of 1, 2, 3, or 3.” These relics are unearthed from the forest clearings and recovered at your waystations to amass victory points.
The Retinue: Your Action Engine
The retinue, prominently featured at the top of your faction board, is the engine driving Badger actions. At the end of each turn, you allocate cards to your retinue, pre-planning future actions, much like the Eyrie Dynasties’ Decree. By adding cards, you enable corresponding actions in clearings of matching suits. The retinue consists of three columns: Move, Battle then May Delve, and Move or Recover.
The Move action allows movement from a clearing matching the card’s suit. Battle then May Delve lets you battle in a suit-matching clearing with Badger warriors, followed by the option to delve a relic from an adjacent forest into the clearing. Crucially, delving is possible even without enemy pieces in the clearing. The Move or Recover column mirrors the Move action, and also facilitates relic recovery from waystation-equipped clearings of matching suits.
However, actions come with potential consequences. During a delve, failure to rule more surrounding forest clearings than the relic’s value results in card discard. Similarly, during recovery, not ruling enough clearings of the waystation’s suit relative to the relic’s value leads to discard.
A vital distinction from the Eyrie Decree is that inaction or partial action never results in card loss from the retinue. The Move column has no discard trigger. In Battle then May Delve, you can opt out of delving post-battle to avoid discard. Likewise, you can choose not to recover even when able. Discard is a potential outcome of taking actions. Consider carefully whether the impact of a discarded action outweighs the immediate benefit. Sometimes, battling without delving, to set up future plays, might be a more strategic choice.
Early retinue building is paramount for Badgers; it’s your action lifeline. You begin with three bird cards as Faithful Retainers, one in each column. Adding cards early maximizes action potential and control. Unlike the Eyrie’s limited Decree, the Badger retinue cap is ten cards, not a per-turn addition limit. Rapidly maximizing your retinue action engine unlocks flexibility for recruiting and crafting, alongside scoring opportunities.
In the initial turns, aiming for at least two, ideally three, added cards to reach the retinue cap is advisable. Experience might later guide you to adding just one card, balancing it with warrior recruitment or crafting. Reduced retinue additions slow down action engine optimization, impacting consistent recovery. Prioritizing the retinue early might initially limit warrior presence, but engine acceleration is crucial.
Avoid early discards (rounds one to three) unless securing a high-value relic in a contested area becomes essential. Early discards hinder action capacity, which is vital in the early game. Discarding later can curate actions, but premature discard compromises turn efficiency and vulnerability when board pressure mounts.
Ideal Retinue Growth:
- Rounds 1-3: Aim for 8-10 cards.
- Round 1: Add 3 cards (Retinue total = 6)
- Round 2: Add 2-3 cards (Retinue total = 8-9)
Waystations: Your Forest Outposts
Waystations are the Badgers’ structures. Each waystation has two sides, each displaying a different relic type. Crucially, each waystation on the board increases your card draw by one during the evening phase, potentially adding up to four cards! Waystations also serve as your crafting hubs, essential for creating items from forest resources.
Ideally, establish waystations in two distinct clearing suits for consistent resource access. Designate one suit as your primary recovery suit, strategically placing waystations to maximize relic recovery per Move or Recover retinue card. The secondary suit, your “off recovery suit,” aids recruitment consistency. Early waystation deployment is vital; the increased card draw fuels your engine, providing actions, craftable points/improvements, and recruitment opportunities.
As the game progresses, expect opponent pressure to reduce your clearing control, limiting waystation presence and card draw. Prioritize securing edge clearings with multiple building slots to maintain waystation count even with reduced territory. This also enhances recover action efficiency, allowing recovery of diverse relics within a single clearing with corresponding waystations.
Card Utilization: Versatility in the Woodland
Cards serve three crucial roles for Badgers, each weighted by context. These roles, ranked by typical priority, demand careful consideration when deciding card usage. All are vital to Badger success; experience guides optimal decision-making.
-
Retinue:
- Suited Cards: Suited cards are potent actions, though restricted to suit-matching clearings. Prioritize them for Battle/Delve and Recover/Move columns. For Battle/Delve, choose clearings for multi-delve potential per round. For Recover/Move, match suits to ruled clearings with waystations for efficient recovery. Suited cards in Move or Recover columns are vulnerable to opponent warrior removal, hindering recovery.
- Bird Cards: Highly valued for retinue flexibility, bird cards excel in Move and Move or Recover columns. They conceal your turn plans. However, a retinue without bird cards isn’t weak; it necessitates strategic turn planning.
-
Recruiting:
- Suited Cards: Recruitment should predominantly use suited cards. Prioritizing bird cards for retinue necessitates suited cards for warrior placement. Suit-matching waystations are required for suited card recruitment. Waystations in two suits ensure reliable card draw for recruitment.
- Bird Cards: Bird cards offer recruitment flexibility but are generally more potent as retinue actions. However, in board-wipe scenarios, bird cards enable recruitment in any suit, facilitating board presence re-establishment. In anticipation of a board wipe, retain a bird card or two for recovery.
-
Crafting:
Crafting is the third demand on Badger cards. Deciding when crafting is worthwhile requires judgment. Badgers cycle cards rapidly, often encountering numerous craftable items/abilities. While relics are primary scoring, high-point items like coins, appearing mid-to-late game, are valuable crafts if you have waystations in suitable clearings. Crafting priorities are detailed later in this guide.
Faction Abilities: Badger Strengths
Devout Knights: Unyielding Defense
The Devout Knights ability, likely to draw opponent ire, provides battle resilience. If Badgers have at least one relic and warrior present, they negate the first hit in battle. Ambushes trigger this, but subsequent hits are not negated.
This ability is potent defensively and offensively. Fighting single warriors with immunity to losses (except ambushes) is powerful. However, its relic dependency means opponents will target warriors when Devout Knights is inactive, efficiently clearing board presence and forcing costly re-establishment.
Furthermore, keepers can move one relic per warrior. When delving, it’s advisable to bring 2-3 more warriors than relics intended for delving.
Prized Trophies: Enhanced Relic Value
Prized Trophies increases relic value when destroyed; each destroyed relic awards an extra point, and the opponent places it in a forest of their choice. This incentivizes opponents to target relics after overcoming Devout Knights to maximize scoring.
Avoid concentrating relics. Leaving more than two relics in a clearing invites punishment, potentially granting a decisive lead to an opponent. Extra relics don’t amplify Devout Knights; the risk is disproportionate. If multiple relics are necessary, disperse them to minimize opponent scoring from attacks. Recent experience suggests minimizing relics on the board; even one relic attracts significant opponent aggression for bonus points.
Birdsong Phase: Planning and Expansion
Encamp: Establishing Forest Presence
Encamping is about future turn preparation. Place waystations for recovery, crafting, or recruiting. Throughout your turn, consider desirable waystation clearings. Assess your hand, noting suit distribution, and place waystations in suits you have plentiful cards of, unless a waystation of that suit already exists. The interplay between Encamp and Live off the Land (an evening action removing excess warriors in specific clearings) is crucial. Leaving lone warriors strategically provides encamping flexibility.
When encamping, prioritize waystation placement based on relic recovery order. Place the waystation corresponding to your first relic recovery target, with the reverse side for later relics. If encamping turn one (common for Badgers), keep the waystation for second or third relic bursts on your board. Place waystations for initial relics in your “on-suit” clearing (matching your recovery suit), and later relics in the “off-suit” (non-recovery suit) for recruitment utility.
Encamp also functions as a comeback mechanism. With no waystations or warriors on the map, place a warrior and waystation in any edge clearing. Position strategically near delveable relics and in a clearing matching abundant card suits in hand. Rapid board re-establishment is crucial for regaining momentum and scoring.
Decamp: Relocating Outposts
Decamping is infrequent. Opponent destruction is often preferable; the single point is usually insignificant compared to Badger scoring potential. Decamp if multiple clearings with the same waystation relic face are needed for consistency. Primarily, decamp to relocate a waystation placed earlier in an off-suit clearing to your current encamping location.
Recruit: Forest Warrior Reinforcements
Badger recruitment is card-use dependent. In low-reach games, prioritize retinue cards over recruiting. In high-reach games, recruit roughly once per turn to contest clearings and withstand red faction pressure. This strategic difference stems from opponent aggression levels. In low-reach games, limited opponent battles allow less recruitment priority. High-reach games, with frequent battles, necessitate regular recruitment to maintain warrior strength.
Badger warriors are costly to deploy. While each recruitment card yields two warriors and potential bursts, recruitment is conditional. Hand limitations can impede recruitment. Waystation suit matching is mandatory, and cards may be needed for retinue or crafting.
Waystations in multiple suits improve recruitment reliability. Prioritize retinue building early to enable card discard for recruitment. Hand draws may be suit-limited or lack waystation-matching suits. Minimize losses and protect warriors with Devout Knights to deter attacks.
Daylight Phase: Actions in the Forest
Craft: Forest Resource Utilization
Crafting priorities for Badgers:
- Card Draw: Maximize card draw at all costs. Each extra card enhances flexibility for recruitment, item acquisition, and strategic retinue card cycling. Card draw equals flexibility.
- Points: Craftable point items are secondary. Badgers need only about six extra points beyond relics to win if three relic columns are completed. Prioritize high-point items like coins mid-to-late game, especially if fewer than three relic columns are achievable. 2-3 point items are valuable for closing out games.
- Movement: Movement-enhancing improvements (e.g., Boat Builders, Corvid Planners) are last. Craft these when immediately useful, as crafting precedes movement, mitigating Saboteur risks. This also allows flexible recruitment or retinue additions. Certain maps (Lake, Winter) necessitate these more than others.
Move: Strategic Forest Maneuvering
The Move column is discard-proof. Start with the Faithful Retainer bird card. Add either another bird card early for flexibility or a suited card matching clearings intended for relic recovery. Suited cards have inherent risks due to movement restrictions. Prioritize bird cards for maximum flexibility in this column.
Initially, two cards suffice in this column, with a potential third added mid-game for enhanced movement. Movement is vital for Badgers, reaching clearings connected to relic-rich forests. The images below illustrate clearing forest connections, highlighting clearings offering access to multiple forests for relic delving.
Battle then Delve: Securing Forest Relics
A crucial strategic tip before delving into discardable columns: prioritize discarding Faithful Retainers over other bird cards if discard is likely (e.g., delving a high-value relic). Faithful Retainers are removed from the game, not discarded, denying cards to opponents by locking them in your retinue.
Badger actions operate on two axes: ruling 3 clearings around the forest for delving and ruling 3 same-suit clearings for waystation relic recovery. Early game (round 1), focus on the battle/delve axis.
However, prioritizing ruling three forests around a relic is generally inefficient post-round 1. Most forests have only one or two relics, limiting gains to one or two relics per turn. Ruling three forests is challenging due to faction counterplay (Lizard gardens, Eyrie Lord of the Forest, WA sympathy, Corvids Snares).
Reframe this column’s purpose: clearing a single location of enemy pieces. By placing multiple same-suit cards in this column, you can target a clearing with multiple surrounding forests. Move to a matching clearing with relics, then battle and delve repeatedly to secure all relics. (Remember the relic movement rule.) This enables efficient relocation, relic acquisition, and strategic retreat for recovery in the same turn. Resistance will likely diminish after the 2nd or 3rd battle, facilitating delve actions and triggering potential retinue card discards.
Suited cards are prime discard candidates in this column due to their limited recovery flexibility. Aim to delve at least two relics per turn using Battle then Delve. The discard cap depends on whether the recovered points make you a target and your ability to recover all delved relics. Recovering delved relics is generally prioritized, leaving at most one relic undelved. Consistent scoring without undue aggression is key.
The efficiency of discarding in this column is amplified by forest proximity to recovery clearings (often within two moves). Even in chokepoint scenarios, Battle then Delve allows relic acquisition beyond your immediate clearing. As shown earlier, many clearings access three or more forests, enabling potential gains of three+ relics.
Early game delve prioritization: clearings with minimal (0-1) enemy presence to minimize losses. Late game: clearings maximizing same-relic-type delves (2-3). If not possible, maximize relic count for later recovery scoring.
Battle as Policing: In a Badger-aware meta, policing can foster goodwill. Target strategically, prioritizing actions furthering your game. Police red factions becoming threats. Police clearings with buildings/tokens for extra points. Police clearings leading to relic delves. Avoid policing dictated by opponents at your expense.
Landmark Specific Strategy: With the Lost City landmark, suited battle cards are always active. Maximize this column’s use.
Move or Recover: Securing and Scoring Relics
Maximize relic recovery each turn. In low-aggression games, delving for Devout Knights might be less frequent, but in high-aggression games, consistent relic recovery secures crucial points for victory.
Recovery maximization strategy: rule 2-3 clearings matching the recovery clearing’s suit. This allows repeated recovery actions without card discard. For example, with three tablets (values 1, 2, 3) in adjacent forests, recovering all three can yield six+ points (plus column bonuses) while requiring only ruling two same-suit clearings to avoid discard.
Prioritize ruling three clearings, especially for 3-value relics early in the game when easier to achieve. A Badger strength: ruling two matching clearings with waystations allows battling/delving in a third matching clearing, leaving a warrior, then recovering all relics upon return while ruling three clearings and avoiding discard.
Experienced opponents will disrupt three-clearing rule, hindering recovery. Prioritize recovering 3-value relics early when ruling three clearings is easier.
Movement in this action is primarily for returning from delve clearings to recovery clearings. Leave warriors behind during retreat for Live off the Land fodder. Spreading out warriors provides encamping options and preempts Live off the Land losses.
Scoring: Relic Point Accumulation
Example scoring: Figure (2 points), Tablet (1 point), Jewelry (3 points), Column bonus (2 points) = 8 points total.
Relics are the Badger scoring core, totaling 27 points. Completing relic columns (one of each relic type) grants 2 bonus points per column, up to 8 extra points. Effective Badger play involves calculating points to win. Badgers, like Otters and Moles, can consistently project scoring and plan accordingly.
Each relic type (jewelry, tablets, figures) has values 1, 2, 3, and 3, totaling 9 points per type if all four are recovered. Completing two columns averages 17.5 points. Like Otters, Badgers need about 12 more points to reach 30 and victory. The first column, with minimum relic values, yields a mere 5 points (3 relics + 2 bonus).
The second column, even with minimum values, increases the total to 13 points (5 + 6 relics + 2 bonus). The third column elevates the total to 24 points (13 + 9 relics + 2 bonus). Aiming for 24 points from three columns is a viable minimum strategy, supplementing with enemy pieces and craftable items. Every point from other sources reduces relic dependence for victory.
Calculate required points to win and prioritize plays accordingly. Badger burst potential from relics necessitates strategic planning to secure those crucial final points. Achieving even three relic columns is challenging; two is more manageable. Secure remaining points from items and tokens/buildings for victory.
Daylight Strategy Wrap Up – The Hit and Run
Against experienced opponents, Badgers face frequent attacks, especially in high-reach games. The “Badger Hit and Run” strategy, detailed throughout this guide, counters this. Move from map edges to delve clearings, battle, delve, then retreat to recovery clearings. This approach minimizes policing vulnerability and removes relics from the board, preventing opponent scoring.
While most factions cannot abandon a battled clearing in the same turn, Badgers can “hit and run” using the Move-Battle-Move action sequence. Setting up along map edges allows targeting central clearings for battling and delving, then retreating. The Lost City landmark enhances this strategy, but even without it, the Hit and Run remains potent.
Evening Phase: Consolidation and Preparation
Live off the Land: Managing Forest Footprint
Live off the Land can deplete warrior resources. Minimize losses by strategically leaving single warriors in clearings instead of triggering this action. A single warrior in a clearing forces an opponent to expend a battle action for removal, achieving what Live off the Land would have done for free. If the warrior survives to your next turn, it facilitates encamping and warrior reinforcement.
As mentioned earlier, Live off the Land and Encamp are linked. To avoid warrior loss from Live off the Land (triggering at four+ warriors in a clearing), strategically leave warriors behind during map movement, providing encamping options and mitigating Live off the Land triggers.
Gather Retinue: Action Planning
Retinue card allocation is crucial. In low-reach games, prioritize Move and Move or Recover in round 1, then Battle and Move or Recover in round 2. In high-reach games, prioritize Move and Battle then Delve for proactive opponent policing.
Retinue building has been discussed throughout, but retainer shifting hasn’t. Shifting is infrequent, as discarding and replacing retinue cards is usually preferred. However, in games with minimal delving or recovering discards, shifting becomes relevant. Overload the Battle column (5+ cards), then shift a card (usually a bird) to the Move or Recover column later.
Draw and Discard: Card Management
Badgers should rarely discard cards. Prioritize retinue additions, recruitment, or crafting. If excess cards remain, add them to the retinue.
Luke’s Cliff Notes for New Badger Players: The Forest Crafting Guide Essentials
- Play from Behind! Badger scoring potential is massive, enabling catch-up from point deficits. Leading early attracts unwanted attention and hinders victory.
- Add Two Cards per Turn to Retinue until reaching the 10-card limit.
- Deploy Both Waystations Turn 1.
- Avoid Delving Rounds 1-3 if it Discards Retinue Cards. Prioritize building an 8-10 action retinue before accepting discards.
- Post-Round 3, with 8-10 Retinue Actions, Discarding from Battle then Delve is Acceptable. Rule three matching clearings to protect Recover cards from discard.
- Never Keep More Than One Relic per Clearing. Delve only if you can recover the relic in the same turn, and only if the new relic won’t exceed the one-relic-per-clearing limit.
- Leave Warriors Behind After Moving if Live off the Land will trigger. These warriors aid future encamping.
- Ensure Sufficient Movement to return relics to recovery clearings.
Maps: Forest Terrain and Badger Strategy
Autumn (Or Summer) Map: Badger Paradise
Autumn/Summer is ideal for Badgers. Abundant connected clearings, especially with randomized setups, can yield protectable suit clusters for efficient three-clearing recovery. Relic access from all forests is easy; starting in the top-left or bottom-right corner places all forests within three moves.
Winter Map: Badger Challenges
Winter poses Badger challenges. While two clearings offer access to all forests, opponents will contest these. Avoid getting trapped on one side. Starting in the bottom-middle clearings is optimal, but the top clearing string can be advantageous if same-suit clearings are clustered, providing two-move access to central clearings.
Lake Map: Navigating Chokepoints
Lake is also tough for Badgers. The lake restricts movement if the ferry is inaccessible. Focus on the northern and eastern map sections, sneaking relics beyond bottom chokepoints to close out games. Chokepoints are prevalent; be aware of them.
Mountain Map: Verticality and Opportunity
Mountain is another excellent Badger map. Post-opening, numerous connected paths lead to central relic-rich clearings. Modified Mountain with the Lost City instead of the Tower in the Pass makes battle actions always active there, and ruling that clearing counts for any suit. Path removal benefits Badger scoring but also accelerates opponent scoring. Avoid starting in the bottom path-connected clearing; red factions will exploit this in round 1.
Picking Badgers and Set Up: Strategic Selection
When to pick Badgers? Consider hand, faction pool, maps, and turn order.
Hand: Card Advantage
More bird cards in hand are better. At least one bird card is recommended for Badger selection. Experienced players can manage without starting birds due to high card draw, but bird cards enhance early consistency. Suited hands should match starting clearings for recruitment or be usable for move/battle retinue actions.
Faction Pool: Opponent Composition
Avoid Badgers if three other factions are red. Badgers thrive with fewer red factions and fewer starting warriors on the board.
Maps: Terrain Preference
Map preferences are detailed above. Autumn/Summer and Mountain are easy Badger picks. Winter and Lake are harder due to chokepoints.
Turn Order: Initiative Advantage
Badgers can succeed in any turn order slot but are stronger earlier in the round.
FAQ: Setup Considerations
Per the March 17th FAQ, in ADSET, Badgers unable to set up due to lacking two adjacent edge clearings will be mulliganed from the draft. This is rare, occurring in specific scenarios on Mountain maps where opponents deliberately space out starting warriors. Be aware of this edge case.
Share this:
Like this:
Like Loading…
