Gauss in Warframe is renowned for his incredible speed and ability to decimate enemies with a flurry of attacks. This Warframe delivers adrenaline-pumping gameplay unlike any other, blending rapid movement with devastating offensive capabilities. While Gauss excels in various combat scenarios, his Thermal Sunder ability stands out as a potent tool for leveling and conquering challenging content.
[
](/warframe-grendel-parts-abilities-best-builds/)
Related
Warframe: Grendel Complete Guide – Drops, Abilities, And Builds
The reworked Grendel is now a formidable force across all mission types. Discover the optimal builds for this unique Warframe.
Originally accessible through Sedna’s Disruption missions, Gauss is a top-tier solo Warframe, particularly favored by players who enjoy weapon-centric and melee combat styles. He offers unmatched speed, armor stripping, instant freezing, damage mitigation, and a significant boost to weapon fire rate. This guide will provide a comprehensive walkthrough on acquiring Gauss, understanding his abilities, and creating powerful builds, with a special focus on leveraging Thermal Sunder for efficient leveling and tackling high-level missions.
Acquiring Gauss and Gauss Prime
The blueprint for base Gauss is available in the in-game market for 30,000 Credits. To craft him, you’ll need blueprints for his Neuroptics, Chassis, and Systems, which are all rewards from Rotation C of Kappa on Sedna. Kappa is a Disruption mission against Level 30 Grineer opponents.
Disruption Reward Rotations:
Disruption missions offer escalating rewards based on mission duration and player proficiency. After the third round, successfully defending three conduits guarantees a Rotation C reward, ensuring a consistent path to Gauss’s components.
While Gauss’s parts are exclusively in Rotation C, Disruption’s reward structure makes the farming process more manageable compared to other Warframes. Each component blueprint has a 7.84% drop chance.
Gauss Blueprint
| Drop Source | In-Game Market (30,000 Credits) |
|---|---|
| Crafting Costs | – 25,000 Credits – 1 Gauss Neuroptics – 1 Gauss Chassis – 1 Gauss Systems – 3 Orokin Cells |
| Crafting Time | 72 Hours |


Gauss Neuroptics
| Drop Source | Kappa, Sedna (Rotation C, 7.84% drop chance) |
|---|---|
| Crafting Costs | – 15,000 Credits – 1 Argon Crystal – 1,600 Rubedo – 6,200 Salvage – 2,950 Alloy Plate |
| Crafting Time | 12 Hours |
Gauss Chassis
| Drop Source | Kappa, Sedna (Rotation C, 7.84% drop chance) |
|---|---|
| Crafting Costs | – 15,000 Credits – 3 Radian Sentirum – 3 Heart Nyth – 6 Star Crimzian – 55 Grokdrul |
| Crafting Time | 12 Hours |
Gauss Systems
| Drop Source | Kappa, Sedna (Rotation C, 7.84% drop chance) |
|---|---|
| Crafting Costs | – 15,000 Credits – 3 Radiant Zodian – 3 Marquise Thyst – 70 Mytocardia Spore – 85 Thermal Sludge |
| Crafting Time | 12 Hours |
Obtaining Gauss Prime
Gauss Prime is acquired by opening Void Relics in Fissure missions across the Star Chart. Void Relics are commonly found in most Star Chart missions, Syndicate Relic Packs, and through player trading. Once you have a Relic, participate in a Fissure mission and collect ten Reactant to open it. Your reward will be revealed upon extraction.
Relic Farming Tips:
The quickest way to gather Void Relics is by purchasing Relic Packs from Syndicate factions, including Teshin’s Steel Path offerings and Arbitration rewards.
After exhausting your Syndicate Standing, you can farm specific Relics in these Star Chart nodes:
| Lith Relics | Hepit, Void – Capture – Always drops Lith Relics or Aya |
|---|---|
| Meso Relics | Ukko, Void – Capture – 50% chance of earning Meso Relics |
| Neo Relics | Ukko, Void – Capture – 50% chance of earning Neo Relics |
| Axi Relics | Apollo, Lua – Disruption – Always drops Axi Relics on Rotation B |
Gauss Prime Blueprint
| Drop Source | – Axi B7 (Uncommon) |
|---|---|
| Crafting Costs | – 25,000 Credits – 1 Gauss Prime Neuroptics – 1 Gauss Prime Chassis – 1 Gauss Prime Systems – 5 Orokin Cells |
| Crafting Time | 72 Hours |
Gauss Prime Neuroptics
| Drop Source | – Meso H5 (Uncommon) |
|---|---|
| Crafting Costs | – 15,000 Credits – 2 Tellurium – 600 Cryotic – 1,100 Rubedo – 4,975 Nano Spores |
| Crafting Time | 12 Hours |
Gauss Prime Chassis
| Drop Source | – Neo W1 (Common) |
|---|---|
| Crafting Costs | – 15,000 Credits – 2 Nitain Extract – 450 Plastids – 1,425 Polymer Bundle – 5,500 Alloy Plates |
| Crafting Time | 12 Hours |
Gauss Prime Systems
| Drop Source | – Lith G9 (Rare) |
|---|---|
| Crafting Costs | – 15,000 Credits – 2 Argon Crystals – 3 Control Modules – 1,150 Circuits – 3,800 Salvage |
| Crafting Time | 12 Hours |
[
](/warframe-companions-ranked/)
Related
Warframe: Top 10 Companions, Ranked
Discover the top ten companions in Warframe, from Sentinels to Kavats, and enhance your gameplay.
Gauss Stats and Abilities: Mastering Thermal Sunder for Leveling
Base Stats Comparison
| Gauss | Gauss Prime |
|---|---|
| – Armor: 185 – Energy: 225 – Health: 370 – Shields: 555 – Sprint Speed: 1.4 | – Armor: 185 – Energy: 225 – Health: 370 – Shields: 650 – Sprint Speed: 1.5 |
Passive: Gauss’s Battery
Gauss’ Battery: Movement generates an electrical current, charging Gauss’ battery. Shield recharge speed increases by up to 120%, and recharge delay reduces by up to 80%, based on battery level.
Gauss utilizes a battery gauge as a secondary resource, enhancing his shields and certain abilities. Charging the battery is done by sprinting, using Mach Rush, and inflicting Cold status with Thermal Sunder. A higher charge level results in faster shield regeneration and more potent abilities.
To maximize battery charge, maintain Mach Rush’s hyper-sprint mode.
By default, the battery caps at 80% capacity (indicated by the red line). Activating Redline allows it to reach 100%. A full battery dramatically improves shield recharge, reduces recharge delay to just 0.25 seconds, and maximizes ability effectiveness.
Mach Rush: High-Speed Mobility and Battery Charge
Mach Rush: Enter a hyper-sprint, knocking down enemies and charging the battery. Impacting solid objects creates a powerful shockwave. Hold to sprint continuously.
| Mach Rush Stats |
|---|
| Drain |
| Drain: 12.5 Energy per Second |
| Speed |
| Range (Dash Distance) |
| Shockwave Radius |
| Shockwave Damage |
| Mod Scaling |
| Duration |
| Affects Energy drain while < 175% Efficiency |
Mach Rush propels Gauss into a hyper-sprint, ragdolling enemies on contact. A tap initiates a 12-meter dash, while holding the ability allows continuous sprinting until deactivated or an obstacle is hit.
During Mach Rush, actions like shooting, melee attacks, and parkour are restricted. Turning radius is also significantly reduced, encouraging straight-line movement. Aiming or deactivating Mach Rush allows course correction. Alternatively, colliding with a wall generates a shockwave, damaging and knocking down nearby enemies without harming Gauss.
Sprint speed mods further enhance Mach Rush’s velocity. It also synergizes with mobility powers like Volt’s Speed and Infested Mobility. Strength only affects the minimal shockwave damage, making it a low priority. Duration and Efficiency impact energy consumption, while Range affects the sprinting hitbox size.
Kinetic Plating: Damage Resistance and Energy Conversion
Kinetic Plating: Generates armor plating, converting kinetic damage (Physical, Heat, Cold, Blast) into Energy and preventing stagger or knockdown. Damage resistance scales with battery level.
| Kinetic Plating Stats |
|---|
| Drain |
| Duration |
| Damage Reduction |
| Energy Conversion |
| Mod Scaling |
| Duration |
| Affects DR duration |
Kinetic Plating utilizes Gauss’s battery to significantly reduce incoming damage for 30 seconds. Each damage source drains a small battery percentage (1-6%), and the battery passively depletes while active. This ability can provide near-immunity to Impact, Puncture, Slash, Heat, Cold, and Blast damage—most common damage types except Toxin.
Damage reduction starts at 20% with an empty battery, scaling linearly to 100% at full charge. Achieving full 100% DR requires Redline to bypass the 80% battery cap.
Kinetic Plating also grants immunity to stagger and knockdown, including Quick Thinking stagger.
Additionally, 5% of all received damage converts into Energy, similar to Rage or Hunter Adrenaline, affecting shields and Overguard. This conversion rate is unaffected by Strength.
Kinetic Plating scales best with Duration and Strength. Duration extends the ability’s uptime, and Strength increases damage reduction at lower battery levels. Energy efficiency is less critical due to the energy conversion aspect.
Thermal Sunder: The Key to Gauss Leveling and Damage Scaling
Thermal Sunder: Siphon kinetic energy, charging the battery and inflicting Cold status (tap). Hold reverses the process, draining the battery and inflicting Heat status.
This ability can be subsumed via the Helminth system.
Thermal Sunder’s damage is equivalent to Gauss at 50% battery level when used by other Warframes.
| Thermal Sunder Stats |
|---|
| Drain |
| Radius |
| Duration |
| Status Ailments: 4-8 Seconds |
| Damage |
| Heat: 300-1,500 Heat |
| Mod Scaling |
| Duration |
| Affects ability and status duration |
Thermal Sunder has two modes: Cold (tap) and Heat (hold).
- Cold (Tap): Emits a freezing ring, applying Cold status and charging 10% battery. Subsequent casts can freeze enemies solid.
- Heat (Hold): Creates a flame ring, inflicting Heat status and dealing double damage, while draining 10% battery.
Casting Cold and Heat back-to-back triggers a Blast version, dealing significant burst damage based on accumulated Heat and Cold procs. When Redline is active, Blast Thermal Sunder also partially strips armor, achieving full armor strip at 100% battery.
Instead of Strength, focus on cast speed and Efficiency for Thermal Sunder builds. Each Heat Thermal Sunder cast amplifies damage exponentially by leveraging existing Heat procs on targets, creating a potent damage loop.
The base damage of Thermal Sunder is less important than the frequency of Heat procs. Prioritize Efficiency, Range, and cast speed to maximize Heat proc application and damage scaling. Strength is not essential.
Scaling Heat Status Damage:
Archon Vitality adds an extra Heat status ailment, further enhancing Thermal Sunder’s damage scaling. Redline doubles Heat proc damage from Thermal Sunder.
Redline: Overdrive for Abilities and Combat Prowess
Redline: Push the battery past redline, supercharging abilities and boosting fire rate, attack speed, reload speed, and casting speed. Releases arcing electricity when past redline, exploding upon deactivation.
| Redline Stats |
|---|
| Drain |
| Duration |
| Fire Rate |
| Attack Speed |
| Reload Speed |
| Casting Speed |
| Area Damage |
| Mod Scaling |
| Duration |
| Affects ability duration |
Redline is Gauss’s signature ability, unlocking the battery’s full potential and providing substantial buffs. It allows the battery to reach 100% charge, boosting fire rate, reload speed, cast speed, and melee attack speed linearly with charge level. Redline drains 2% battery per second.
Unlike most buff abilities, Redline scales with Ability Duration, not Strength. Higher Duration also affects battery charge time. Stacking Duration can extend full charge time beyond 15 seconds, requiring strategic build planning.
Redline also offers hidden synergies:
- Battery: Extends to 100% charge, maximizing shield recharge.
- Mach Rush: Halves energy drain, stacking multiplicatively with Efficiency.
- Kinetic Plating: Melee weapons gain +100% base damage and guaranteed stagger.
- Thermal Sunder: Doubles Heat proc damage, instantly freezes with Cold procs, and fully strips armor with Blast procs at max battery.
[
](/warframe-grimoire-tome-mods-builds/)
Related
Warframe: A Complete Guide To The Grimoire
Unlock the Grimoire’s potential with unique Tome mods and create a versatile utility weapon.
Gauss Augments: Enhancing Mach Rush and Thermal Sunder
Gauss has two augment mods, available from the Arbiters of Hexis and Perrin Sequence Syndicates (Rank 4, 25,000 Standing each) or via trading.
Mach Crash: Crowd Control with Mach Rush
Mach Crash: Mach Rush Augment – Impact shockwave creates a vacuum, pulling enemies within 8m.
Mach Crash adds a Mag’s Pull-like implosion when Mach Rush impacts a wall, grouping enemies tightly for about two seconds, during which they are ragdolled and unable to attack.
Scaling with Ability Range, Mach Crash is effective in pulling enemies together for melee attacks or punch-through weapons, without line-of-sight restrictions.
Thermal Transfer: Elemental Weapon Buff
Thermal Transfer: Thermal Sunder Augment – Allies in range gain 75% bonus elemental damage for 30s.
Thermal Transfer grants bonus Heat or Cold damage to weapons based on the Thermal Sunder type you stand in, functioning like elemental damage augments for Volt’s Shock and Ember’s Fireball.
Both buffs last 30 seconds and apply after weapon mods, allowing for elemental combination. Strength affects bonus damage, and Duration affects buff duration.
Gauss Builds: Focusing on Thermal Sunder for Efficient Leveling
We present three Gauss builds, highlighting his versatility and effectiveness at different investment levels. One build specifically emphasizes Thermal Sunder for leveling and high-damage output, while others focus on Redline and weapon DPS.
Gauss’s high base shields and damage resistance make him ideal for shield tanking and shield-gate builds. Adaptation further enhances survivability, while Rolling Guard or Catalyzing Shield are options for active shield-gating in Steel Path.
For Focus schools, Zenurik (Energy sustain) or Madurai (cast speed and Strength for Thermal Sunder) are recommended.
Archon Shard Synergies:
Archon Shards can significantly enhance Gauss. Consider these properties:
| Amber | – Maximum Energy on Spawn – Cast Speed (Thermal Sunder builds) |
|---|---|
| Crimson | – Ability Duration (Highly recommended) – Ability Strength (If not at 100% Strength for Kinetic Plating) |
| Azure | – Energy Max |
| Emerald | – Corrosive Status Cap (Redline builds) |
| Violet | – Melee Critical Damage (Redline melee builds) – Equilibrium (QoL) |
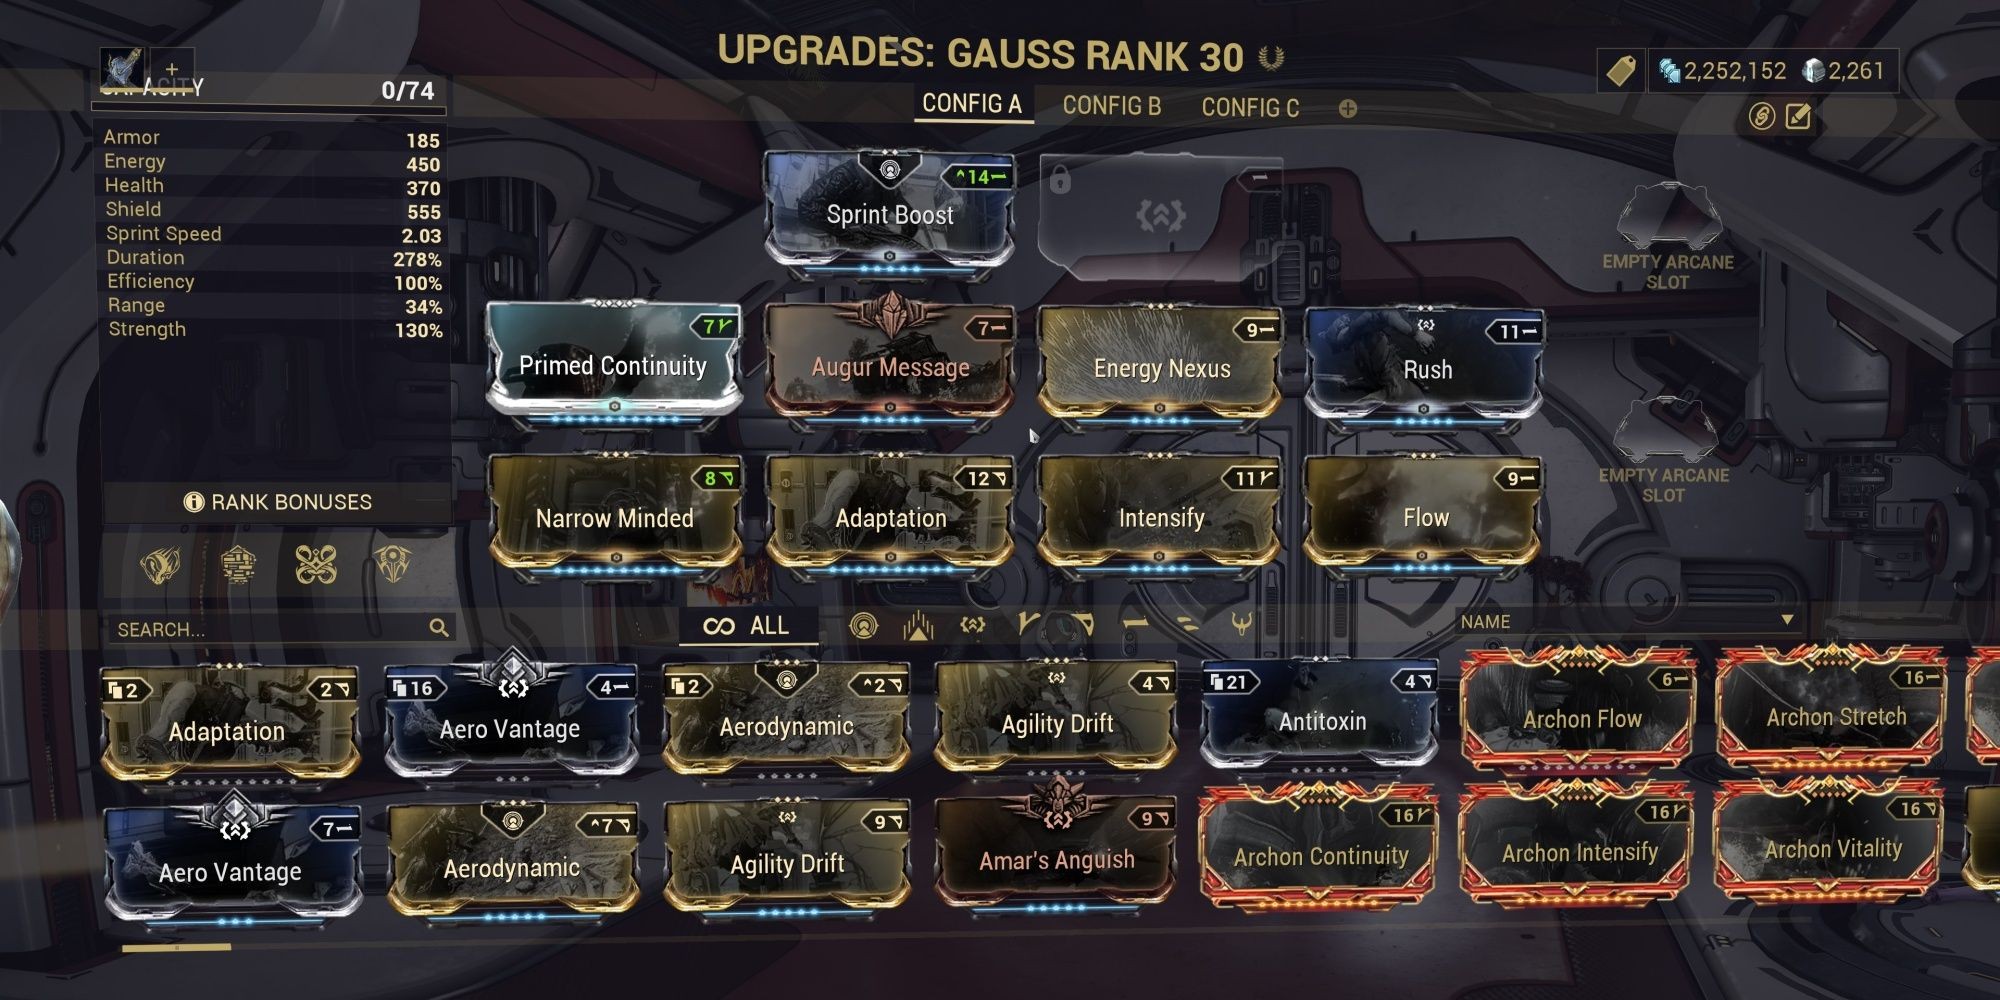
Thermal Sunder Leveling Build (2 Forma, No Subsume)
| Forma | 2 (D and –) |
|---|---|
| Subsume Options | N/A |
| Archon Shards | Recommended: Amber Cast Speed, Crimson Duration |
This build is specifically designed around Thermal Sunder for rapid enemy clearing and leveling, focusing on maximizing cast speed and efficiency to leverage its exponential damage scaling. The core strategy is to spam Heat Thermal Sunder to build up Heat procs and then unleash combined Heat and Cold casts for massive damage.
Mod Configuration:
- Archon Vitality: Crucial for adding a second Heat proc, significantly boosting damage scaling. (Unranked is sufficient).
- Narrow Minded & Primed Continuity: Increase Duration to enhance Redline’s cast speed buff and overall ability uptime. If more range is needed, Narrow Minded can be swapped for another Duration mod.
- Archon Flow & Arcane Energize: Provide excellent energy sustain. Archon Flow synergizes with Thermal Sunder’s Cold variant to generate more Energy Orbs. If Arcane Energize is unavailable, replace Archon Flow with Primed Flow. Zenurik Focus School can also alleviate energy issues.
- Fleeting Expertise: Reduces Thermal Sunder’s energy cost significantly, enabling spamming.
- Overextended, Stretch, Augur Reach, & Cunning Drift: Maximize Ability Range to cover vast areas with Thermal Sunder, ensuring efficient enemy clearing.
- Molt Augmented: Compensates for Strength reduction from Overextended, slightly improving Kinetic Plating’s DR.
Gameplay Strategy:
- Activate Redline: For increased cast speed and doubled Heat proc damage.
- Spam Heat Thermal Sunder: Rapidly apply Heat procs to enemies.
- Utilize Blast Thermal Sunder (Heat then Cold or vice versa): Unleash devastating burst damage, especially effective against armored targets when Redline is active, which will also strip armor at high battery levels.
- Maintain Energy: Utilize Zenurik or Energy regeneration methods to sustain Thermal Sunder spam.
This Thermal Sunder build excels in missions where rapid enemy elimination is key for leveling and progression, such as Survival, Defense, and Exterminate missions, especially in Steel Path content with Corrosive Projection for full armor strip at 84% battery with Blast Thermal Sunder.
Starter Redline Build (0 Forma, No Subsume)
| Forma | 0 |
|---|---|
| Subsume Options | N/A |
| Archon Shards | None |
This starter build prioritizes enhancing Redline without relying on Arcanes or Archon Shards. It focuses on maximizing Ability Duration to amplify Redline’s buffs.
Mod Configuration:
- Primed Continuity, Narrow Minded, Augur Message: Maximize Ability Duration for Redline, reaching 278%. (Continuity can replace Primed Continuity if needed. Narrow Minded rank can be adjusted).
- Intensify: Boosts Kinetic Plating’s damage reduction.
- Energy Nexus & Flow: Improve Energy economy for sustained ability use.
- Adaptation: Provides scaling damage resistance. (Redirection or Vitality are alternatives).
- Rush: Increases sprint speed, enhancing Mach Rush. (Can be replaced).
Gameplay: Focus on utilizing Redline’s buffs to enhance weapon damage and speed while using Mach Rush for mobility and battery charging. Kinetic Plating provides survivability.
Weapons Platform Gauss (2 Forma, Nourish Subsume)
| Forma | 2 (D and –) |
|---|---|
| Subsume Options | Nourish (Grendel – Recommended), Roar (Rhino), Energized Munitions (Helminth) |
| Archon Shards | Recommended: Crimson Duration |
This build transforms Gauss into a weapon-centric powerhouse, replacing Thermal Sunder with a weapon damage buff ability.
Mod Configuration:
- Nourish (Subsumed): Provides Viral damage buff, enhancing weapon damage significantly. Roar or Energized Munitions are alternatives.
- Primed Continuity, Constitution, Augur Message, Molt Efficiency: Maximize Ability Duration (243% with Molt Efficiency active). Narrow Minded can replace Overextended for maximum duration at the cost of range.
- Mach Crash: Augment for Mach Rush, providing crowd control.
- Overextended: Increases Mach Crash’s range. Stretch can replace Augur Message for further range.
- Molt Augmented & Umbral Intensify: Increase Ability Strength to improve Kinetic Plating and Nourish buff.
- Adaptation & Primed Flow: Enhance survivability and Energy reserves.
- Sprint Boost & Rush: Further increase sprint speed.
Gameplay: Utilize Nourish to buff weapon damage, Redline for fire rate and reload speed enhancements, and Mach Rush with Mach Crash for mobility and crowd control. Kinetic Plating provides excellent damage mitigation.
[
](/warframe-prime-resurgence-explained/)
Next
Warframe: Prime Resurgence Guide – Aya, Regal Aya, And Vaulted Primes
Understand Prime Resurgence and learn how to acquire Aya, Regal Aya, and vaulted Prime items.