CapCut is a powerhouse for video editing, especially when it comes to making engaging content for platforms like TikTok, Instagram Reels, and YouTube Shorts. If you’re wondering, Deos Capcut Have Guides for adding those slick transitions you see everywhere, you’re in the right place. Yes, CapCut offers a wide array of transitions to elevate your videos from simple clips to professional-looking stories. This guide will walk you through everything you need to know about using transitions in CapCut, ensuring your edits are smooth, captivating, and truly stand out.
Understanding Transitions in CapCut
In video editing, a transition is essentially the bridge between two video clips or scenes. It’s a visual effect applied at the point where one clip ends and another begins, creating a seamless and often stylish shift. Instead of abrupt cuts that can feel jarring, transitions in CapCut provide a smooth visual flow, enhancing viewer engagement and adding a touch of professionalism to your videos.
CapCut’s library is packed with diverse transition styles to suit any video project. Whether you’re aiming for subtle elegance with fades, dynamic movement with slides, creative reveals with wipes, or dramatic flair with zooms, CapCut has a transition to match your video’s mood and pace. Learning how to effectively use these transitions is key to taking your CapCut edits to the next level.
Step-by-Step Guide: Adding Transitions in CapCut
Adding transitions in CapCut is straightforward, whether you’re working on your phone or desktop. Here’s a simple guide to get you started:
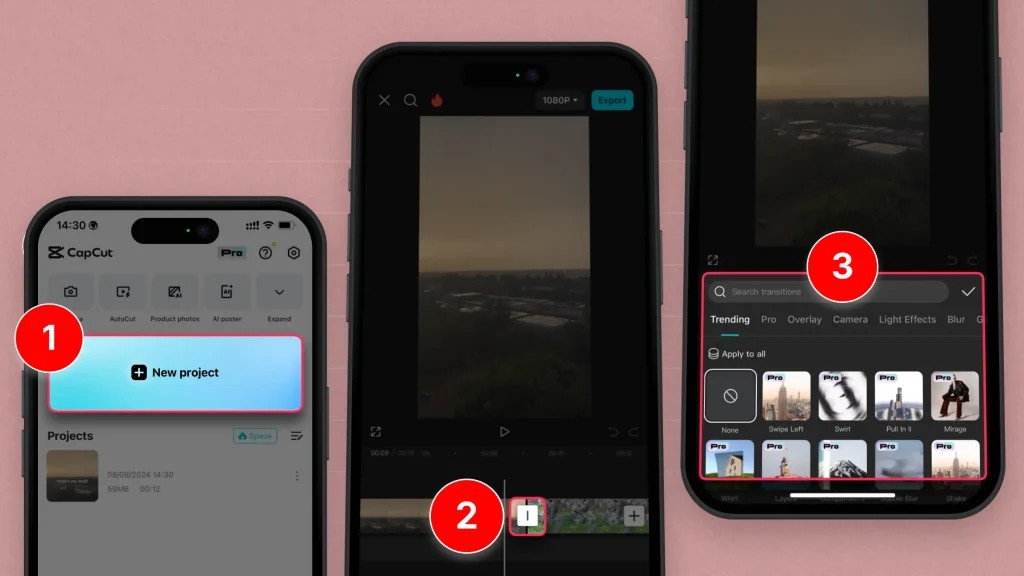
Quick Answer: To add a transition, import your video clips into CapCut, locate the “|” icon between the clips on the timeline, tap it, and then choose your desired transition. Confirm your selection by hitting the “✅” icon.
Here’s a more detailed breakdown:
- Launch the CapCut App: Open the CapCut application on your mobile device or desktop. You can download CapCut from the official website or your app store.
- Start a New Project or Open a Draft: Tap on “New project” to begin a fresh edit, or select a draft if you’re continuing work on a previous project.
- Import Your Video Clips: Upload at least two video clips that you want to transition between. Arrange them in your desired sequence on the timeline.
- Locate the Transition Icon: On the timeline, you’ll see a vertical “|” line appearing between each pair of video clips. This icon signifies the transition point. Tap on this icon.
- Choose Your Transition: A transition menu will pop up, displaying a variety of options categorized for ease of use. Browse through the different types like Basic, Sliding, Mask, Blur, and more. Tap on a transition to preview it in real-time on your clips.
- Apply and Adjust: Once you’ve selected a transition, tap the “✅” button to apply it. You can often adjust the duration of the transition to speed it up or slow it down, depending on the effect you want to achieve.
You can repeat these steps to add transitions between all the clips in your video, ensuring a smooth and visually appealing flow throughout your project.
Understanding Text Animations: The Closest Thing to Text Transitions in CapCut
While CapCut doesn’t have dedicated “text transitions” in the same way as video transitions, you can achieve similar effects by using text animations. These animations control how your text enters and exits the screen, providing a dynamic feel.
Here’s how to add animations to your text in CapCut:
- Open CapCut and Select Text: Launch CapCut and select the text layer you want to animate.
- Edit Text: Tap the “Pen” icon (edit) associated with your text layer to access text editing options.
- Navigate to “Animations”: Look for the “Animations” tab within the text editing menu.
- Choose an Animation Style: CapCut offers “In,” “Out,” and “Loop” animations for text. “In” animations control how the text appears, and “Out” animations dictate how it disappears. Select an animation style that suits your needs.
- Apply and Save: Tap “✅” to apply the chosen text animation. You can adjust the duration and speed of the animation for a customized effect.
By using text animations, you can effectively create dynamic text reveals and exits that function similarly to transitions, adding another layer of visual interest to your videos.
Top 8 Video Transitions in CapCut to Enhance Your Edits
Choosing the right transition can significantly impact the style and effectiveness of your video. Here are eight of the best transitions in CapCut that are widely favored by video editors:
- Fade: The “Fade” transition is a classic choice for subtly blending clips together. It gently fades out the first clip while fading in the next, perfect for creating emotional transitions or smooth scene changes.
- Slide: “Slide” transitions introduce dynamism by moving one clip out of the frame as the next slides in. Choose from directions like left, right, up, or down to match the flow of your video.
- Wipe: “Wipe” transitions reveal the new scene by wiping across the screen in a chosen direction. This can be used to signify a clear change in topic or location within your video.
- Zoom: The “Zoom” transition adds drama by zooming into the current clip before transitioning to the next. It’s excellent for emphasizing details or creating a sense of urgency.
- Spin: “Spin” transitions rotate the current clip out of view and spin the next one in. This playful transition works well for engaging content and adding a fun element.
- Cube: The “Cube” transition flips the current clip like a rotating cube to reveal the next scene, offering a visually striking 3D effect ideal for creative storytelling.
- 3D Flip: Similar to flipping a card, the “3D Flip” transition provides a three-dimensional effect when switching between clips, adding depth and visual intrigue.
- Glitch: For a modern, edgy feel, the “Glitch” transition creates a digital distortion effect. It’s perfect for tech-themed videos or content aiming for a contemporary vibe.
Experimenting with these transitions will help you discover which ones best suit your video style and the message you want to convey.
Why Use Transitions in CapCut? 5 Key Benefits
You might be wondering if transitions are really necessary. Here are five compelling reasons why adding transitions in CapCut can significantly enhance your video projects:
- Improves Visual Flow: Transitions smooth out the shifts between clips, making your video easier and more enjoyable to watch. This seamlessness keeps viewers engaged without distracting jump cuts.
- Boosts Professionalism: Using transitions thoughtfully gives your video a polished, professional appearance. It shows attention to detail and elevates the overall quality of your content, making it more credible and appealing.
- Highlights Tone Changes: Transitions can effectively signal shifts in mood, tone, or setting within your video. Different transition styles can subtly or dramatically indicate changes in the narrative or emotional landscape.
- Enhances Viewer Engagement: Dynamic transitions can grab and hold viewers’ attention. Creative and unexpected transitions can surprise and delight your audience, encouraging them to watch longer and stay invested in your content.
- Strengthens Storytelling: Transitions are powerful tools for storytelling. They guide viewers smoothly from one scene to the next, maintaining continuity and helping to convey your message more effectively. By linking scenes visually, transitions help build a cohesive narrative.
Incorporating transitions is a simple yet impactful way to enhance your video editing in CapCut, making your content more professional, engaging, and enjoyable for your audience.
SendShort: An Alternative for Streamlined Transitions
While CapCut offers excellent transition options, SendShort provides an even more streamlined and AI-driven approach to video transitions.
Here’s what makes SendShort stand out for video transitions:
- AI-Powered Transition Suggestions: SendShort’s intelligent AI analyzes your video content and suggests transitions that best fit the flow and style of your video. This AI assistance simplifies the editing process and ensures professional-looking transitions with minimal effort.
- Seamless and Customizable Transitions: Transitions in SendShort are designed to be smooth and are highly customizable, allowing you to fine-tune them to perfectly match your video’s pacing and aesthetic.
- Extensive Library of Modern Effects: SendShort boasts a wide range of contemporary and dynamic transitions that go beyond standard options. This extensive library gives your videos a unique, polished, and standout quality, helping you create content that truly captivates your audience.
SendShort is designed to make video editing more efficient and creative, particularly when it comes to transitions.
Frequently Asked Questions about CapCut Transitions
1. Are CapCut transitions good?
Yes, CapCut offers a robust selection of transitions that are considered high quality. Popular choices like “Glare” and “Pull In/Out” are versatile and effective for various video types, enhancing visual appeal and engagement.
2. What is considered the best transition in CapCut?
Many editors consider “Fade” and “Glare” among the best transitions in CapCut. “Fade” is valued for its subtlety and versatility, while “Glare” is praised for its modern and dynamic effect that works well across different video styles.
Thank you for exploring the world of CapCut transitions with us!
By David Ch, Head of the Editing Team at SendShort