Dyeing your clear polycarbonate yo-yo can breathe new life into your favorite toy, adding a personal touch and vibrant colors. This comprehensive guide will walk you through the process of using Rit dye and acetone to achieve stunning, lasting colors on your yo-yos. Whether you’re aiming for a subtle tint or a deep, bold hue, understanding the nuances of Rit dye and acetone is key. This method, initially popularized within the yo-yo community for customizing YoYoJam (YYJ) yo-yos, is applicable to most polycarbonate plastic yo-yos. Let’s dive into the world of yo-yo customization with this Rit Dye Color Guide.
Understanding the Fundamentals of Dyeing Polycarbonate
Before we begin, it’s crucial to understand the interaction between acetone, Rit dye, and polycarbonate plastic. Polycarbonate, the durable plastic commonly used in clear yo-yos, is receptive to dye when treated with acetone. Acetone acts as a carrier, allowing the Rit dye to penetrate the plastic and create a permanent color change. However, this process requires careful control, as acetone can also weaken or damage the plastic if not used correctly.
Key Principles for Success
- Color Depth Control: Achieving the perfect color depth is a balance between dye concentration, acetone strength, and soaking time. For lighter, clearer colors, opt for a higher dye concentration, lower acetone ratio, and longer soak times. For more opaque and intense colors, use a lower dye concentration but a higher acetone ratio, and meticulously monitor the dyeing process to prevent over-dyeing or plastic damage.
- Experimentation is Key: Since each yo-yo and desired color intensity can vary, experimentation is crucial. Start with weaker acetone solutions and gradually increase concentration as needed, always observing the plastic’s reaction.
Materials and Setup: Your Dyeing Toolkit
To embark on this colorful journey, gather the following materials:
- Clear Polycarbonate Yo-Yo: Ensure your yo-yo is made of clear polycarbonate. This method is specifically designed for this type of plastic.
- Rit Dye: Purchase Rit dye in your desired colors. Powder or liquid form works, but powder is often more concentrated. For deeper colors, you will likely need two packets per color. Rit dye is readily available in most craft stores and online.
- Acetone: You’ll need at least one pint (473 mL) of acetone. Hardware stores are your best bet for sourcing acetone.
- Water: Tap water will suffice. Have access to a sink or basin for rinsing.
- Glass Containers: Mason jars or Pyrex glass containers are ideal for mixing and holding your dye solutions. Glass is non-reactive and easy to clean. You’ll need one container per color.
- Mixing Utensils: Metal spoons are recommended for stirring your dye mixtures. Avoid using wood or plastic spoons as they can absorb dye or react with acetone.
- Tongs: Metal tongs are essential for safely handling the yo-yo in and out of the dye solution, minimizing direct skin contact with acetone and dye.
- Paper Towels: Keep plenty of paper towels on hand for spills, cleaning, and drying the yo-yo.
- Protective Gear: Safety is paramount. Wear work clothes that you don’t mind getting stained, and consider safety goggles to protect your eyes from splashes. Working in a well-ventilated area is also advisable.
- Optional: Elmer’s Glue: For intricate designs or to protect specific areas of your yo-yo from dye, Elmer’s glue can be used as a masking agent.
Setting Up Your Dye Station
Choose a non-stainable work surface and lay down protective coverings like newspaper or plastic sheeting to prevent dye spills from staining your workspace. Arrange your glass containers, water source, acetone, Rit dye, mixing spoons, tongs, and paper towels within easy reach.
Preparing the Dye Solution: The Art of the Mix
The dye solution is where the magic happens. Follow these steps to create your dyeing mixtures:
- Concentrated Dye Mixture: In each glass container, pour two packets of Rit dye (for standard colors and depth). Add ¾ cup of hot tap water to each container. Stir thoroughly with a metal spoon until the dye is fully dissolved. This creates a concentrated dye stock.
- Acetone Dilution: For your initial dye bath, start with a mixture of 3 parts water to 1 part acetone. This ratio provides a gentler dyeing action, especially for beginners. Add ¼ cup of acetone to your dye concentrate. Mix the solution thoroughly. Remember, this is a starting point – you can adjust the acetone concentration later to achieve your desired color intensity.
Alt Text: Assortment of Rit Dye powders and liquid bottles in various colors displayed on a white background, showcasing the range of options for fabric and plastic dyeing.
Optional: Glue Masking for Design Precision
If you want to create patterns or prevent dye from reaching certain areas of your yo-yo, Elmer’s glue can be your ally.
- Apply Glue: Carefully apply Elmer’s glue to the areas you want to remain undyed. This could be around the axle area, logos, or to create stripes or other designs.
- Drying Time: Allow the glue to dry completely. This is crucial for creating a waterproof barrier against the dye solution.
The Dyeing Process: Step-by-Step Transformation
Now for the exciting part – dyeing your yo-yo!
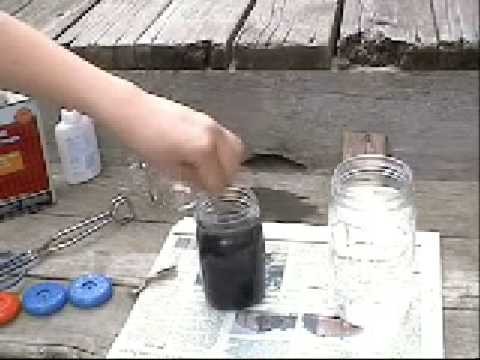
- Initial Dunk Test: Using tongs, carefully hold your yo-yo (or a half, if dyeing halves separately) and gently dunk it into the dye solution. Swirl it slowly to ensure even dye coverage. For a first check, remove it after just a few seconds. This initial dip will give you a quick indication of how rapidly the dye is taking effect in your current solution.
- Color Monitoring and Adjustment: Observe the color change closely. For lighter colors, you might need longer soaking times. If the color isn’t developing quickly enough (after a couple of minutes with frequent checks), avoid simply extending the soak time dramatically. Instead, carefully increase the acetone concentration. Add acetone in small increments (about ½ to 1 tablespoon at a time). Mix thoroughly after each addition and re-test the dye absorption rate by briefly soaking the yo-yo again. This incremental acetone adjustment is crucial to control the dyeing speed and prevent plastic damage.
- Achieving Uniform Color: Once you are satisfied with the color depth, continue swirling the yo-yo in the dye bath for a few more seconds to ensure the color is consistent and uniform across the surface.
- Rinsing and Washing: Immediately after removing the yo-yo from the dye, rinse it thoroughly under running water. Ensure all traces of the dye solution and acetone are washed away. You can also submerge it in a basin of clean water for a more thorough rinse. Compressed air can be helpful for removing liquid from crevices.
- Drying Time: Pat the yo-yo dry with paper towels. Then, allow it to air dry completely in an open, well-ventilated space for at least a couple of hours. This allows any residual acetone to evaporate fully and the dye to set properly.
 Close-up of hands using tongs to dye a yoyo half in a glass jar with colored liquid
Safety First: Essential Warnings and Precautions
Working with acetone and dyes requires caution. Adhere to these safety guidelines:
- Eye and Skin Protection: Acetone and dye mixtures can be harmful to your eyes and skin. Always wear safety goggles to protect your eyes from splashes. While the original author mentioned bare hands, it’s highly recommended to wear chemical-resistant gloves (like nitrile gloves) to minimize skin contact with acetone and dyes.
- Ventilation: Work in a well-ventilated area to avoid inhaling acetone vapors.
- Acetone’s Effect on Plastic: Be mindful that acetone temporarily weakens plastic and can permanently weaken it in some cases, especially with prolonged exposure or high concentrations. Handle the yo-yo gently, especially when freshly dyed, to avoid scratches. Minimize direct plastic contact during handling by holding it by any metal parts if possible.
- Controlled Dyeing: Avoid excessive redunking and redyeing in high acetone concentrations. This can lead to surface deformities like clouding or texturing. Patience and gradual adjustments are key.
Tips for Optimal Results
- Start Light: It’s easier to darken a color than to lighten it. Begin with a weaker acetone solution and lighter dye concentrations.
- Test on Scraps: If possible, test your dye solution and process on a piece of scrap polycarbonate plastic before dyeing your yo-yo.
- Color Mixing: Rit dye offers a vast color palette, and you can mix dyes to create custom shades. Refer to Rit dye color charts and mixing guides online for inspiration and instructions.
- Longer Soaks for Clear Colors: For deep, clear colors, consider longer soaking times (up to 10 minutes or more) with a lower acetone concentration. This allows for deeper dye penetration without making the plastic opaque.
- Document Your Process: Keep notes of your dye ratios, soaking times, and acetone adjustments for future reference and consistent results.
Conclusion: Unleash Your Creativity with Rit Dye
Dyeing your polycarbonate yo-yo with Rit dye and acetone is a rewarding way to personalize your equipment and express your creativity. By understanding the principles of color control, following safety guidelines, and experimenting with different techniques, you can achieve stunning and unique results. Remember to start slowly, adjust gradually, and prioritize safety throughout the process. Now, grab your Rit dye, acetone, and yo-yo, and embark on your color customization adventure!