The Keepers in Iron, often called Badgers, present a formidable and engaging faction within Root. Their gameplay is a continuous journey of learning and refinement. The more you immerse yourself in playing as the Badgers, the deeper your understanding of their nuances becomes, allowing you to adapt effectively to any game state. Renowned for their strategic flexibility, this guide serves as your comprehensive resource to navigate the myriad of options available to you when making crucial decisions as the Badger faction. Mastering the Badgers is a rewarding endeavor, unlocking a playstyle that is both powerful and deeply satisfying.
This guide is designed to be a valuable asset for both newcomers and experienced Badger players. It is a living document, constantly being reevaluated and updated to reflect the evolving Root metagame and the ever-shifting landscape of tactics and strategies. As the meta of Root changes, so too must the approaches to playing the Badgers, ensuring you remain at the forefront of strategic play.
For more insights and articles on Root, be sure to visit The Woodland.
Keepers-in-Iron-Guide-1Download
Jump To
How do They Win?
The Keepers in Iron possess a significant victory point potential directly from their player board, totaling up to 27 points from relics and an additional 8 points from relic column bonuses. This inherent scoring capacity positions the Badgers among the factions with the highest potential for point accumulation. Your primary path to victory lies in strategically scoring victory points through your relics, supplemented by points gained from engaging with enemy pieces and crafting valuable items. Understanding the general dynamics of the game, including player counts, is crucial for tailoring your Badger strategy.
Relics
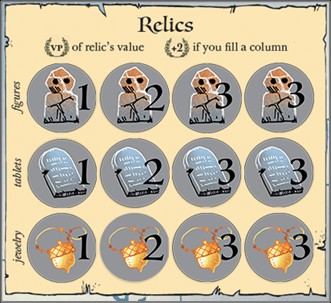
Alt text: Root board game relic tokens for the Keepers in Iron faction, showing different relic types and point values.
As outlined in the Law of Root, the Badgers utilize “twelve relic tokens of three types: figures, tablets, and jewelry. Each relic type consists of four tokens. The front of each relic displays its type, while the back reveals a point value of 1, 2, 3, or 3.” These relics are initially located in the forests across the game map. Your objective is to “delve” them out of these forests and subsequently “recover” them at your waystations to accumulate victory points.
Retinue
The retinue is the core action engine for the Badger faction, prominently positioned at the top of their faction board. At the end of each turn, the Badger player strategically allocates cards to their retinue, pre-planning their actions for future turns, a mechanic reminiscent of the Eyrie Dynasties’ Decree. In essence, Badgers add cards to their retinue to unlock actions, but failure to meet specific conditions in the action column can lead to card discards from the retinue.
The retinue is structured into three columns: Move, Battle then May Delve, and Move or Recover. Each card added to a column enables the corresponding action to be performed in clearings matching the card’s suit. Selecting the Move action allows movement from a clearing of the matching suit. The Battle then May Delve action lets you initiate battles in clearings with Badger warriors that match the suit, followed by the option to delve a relic from an adjacent forest into the battled clearing. Crucially, delving is possible even if no enemy pieces are present in the clearing. The Move or Recover column mirrors the Move action, and also allows you to recover relics from clearings with a waystation of the matching suit.
Two conditions can trigger card discards from the retinue. During the delve action, if the Badgers do not rule more clearings in the surrounding forest than the value of the relic being delved, the card is discarded. Similarly, during the recovery action, if the Badgers do not rule more clearings of the matching waystation suit than the value of the recovered relic, the card is discarded.
A vital distinction from the Eyrie Decree is that Badgers never lose a card from their retinue simply by choosing not to take an action or by taking only partial actions. No card is ever lost from the Move column. When taking the Battle then May Delve action, you can choose to forgo delving after battling without triggering a discard. Likewise, you can opt not to recover a relic, even if you are able to, without penalty. Therefore, the risk of discarding a card arises only when you actively choose to perform a delve or recover action and fail to meet the ruling requirements. Remember, you always have the option to refrain from these actions. Sometimes, it is strategically advantageous to battle and set up for a more impactful turn later, rather than forcing actions that might lead to premature discards.
Badgers benefit greatly from populating their retinue early and consistently, as it serves as their primary engine for action generation. You begin with three bird cards in your retinue, known as the Faithful Retainers, with one placed in each column. Adding cards to your retinue early allows you to utilize them sooner for corresponding actions. More cards translate to more actions, which typically correlate with higher scoring potential and greater board control. Every faction has limitations on their engine’s capacity. For instance, the Eyrie Dynasties are restricted to adding only one or two cards to their decree, with only one bird card allowed. However, for Badgers, the constraint is not the number of cards added per turn from hand, but rather the retinue’s capacity of 10 cards. Maximizing your action potential early provides the flexibility to allocate cards for recruiting and crafting as needed.
In the initial turns, aim to add at least two, and ideally three, cards to your retinue to approach its capacity. However, as you gain experience with the Badgers, you might opt to add only one card, prioritizing warrior recruitment or crafting improvements or items. Reducing retinue additions slows down your action engine’s progress to maximum capacity, which is essential for consistent relic recovery. The framework below illustrates an ideal progression. Prioritizing the retinue early may initially result in fewer warriors on the board. Adding cards is easier in the early game as other factions are also focused on establishing their engines.
A crucial point is that Badgers should avoid discarding retinue cards in the first few turns. While discarding becomes strategically useful later for curating actions, early discards, especially in rounds one to three, are detrimental. Avoid discarding cards in rounds one to three, unless absolutely necessary to secure a high-value three-point relic in a hostile area where immediate scoring is paramount. Maintaining a near-maximum retinue is advantageous; early discards can limit your turn’s effectiveness and create vulnerabilities when you need both actions and board presence as opponents apply pressure.
- Rounds 1-3: Aim to add 8-10 cards to the retinue.
- Round One – Add 3 cards (Retinue total = 6)
- Round Two – Add 2 or 3 cards (Retinue total = 8 or 9)
Waystations
Alt text: Root board game waystation pieces for the Keepers in Iron faction, showing two different relic types on each side.
Waystations are the building infrastructure of the Badgers. Each waystation is double-sided, displaying two different relic types, one on each side. Critically, each waystation on the board increases your card draw by one at the end of the evening phase, potentially allowing you to draw up to four additional cards! Waystations also function as the Badgers’ crafting locations.
Ideally, Badgers should aim to establish waystations in clearings of two different suits to ensure strategic consistency. Typically, one suit becomes your primary recovery suit, meaning you strategically place waystations in this suit to maximize relic recovery per card played in the Move or Recover retinue column. The other suit, the “off recovery suit,” aids in mitigating recruitment RNG. Deploying waystations early is crucial because the increased card draw significantly accelerates your engine’s development. Each card drawn can be utilized for actions, crafting points/improvements, or recruiting warriors.
As the game progresses, opponents will likely target and pressure you, aiming to restrict your presence to fewer clearings, thereby minimizing the number of waystations you can maintain and limiting your card draw. Therefore, securing edge clearings with multiple building slots is vital, enabling you to sustain multiple waystations even if confined to a single clearing. This also enhances the efficiency of the recover action, allowing you to recover diverse relics within the same clearing, provided you have the corresponding waystations.
Card Uses
Cards serve three distinct roles for the Badgers, and the relative importance of each role is influenced by various game factors. These three primary uses create decision pressure when determining card allocation. In order of importance based on experience, these uses are:
-
Retinue
-
Suited Cards: Suited cards are always valuable for actions, but their utility is somewhat restricted by the requirement that the action must occur in a clearing of the matching suit. Typically, suited cards are best utilized in the Battle/Delve and Recover/Move columns. When placed in the Battle then May Delve column, suited cards should ideally target clearings where multiple delves are possible within a single round (further detailed in the Battle and May Delve section). Suited cards in the Move or Recover columns should match the suit of clearings you control for recovery and where your waystations are located. However, placing suited cards in the Move or Recover column carries the risk of opponents targeting and removing your warriors from clearings of that suit, aiming to disrupt your recovery capabilities.
-
Bird Cards: Bird cards are highly prized for your retinue due to their unparalleled flexibility. They are optimally used in the Move or Move or Recover action columns. Bird cards also offer strategic ambiguity, concealing your turn’s intentions from other players. However, a retinue lacking bird cards is not necessarily weak; it simply necessitates more careful planning during your turn.
-
-
Recruiting
-
Suited Cards: Recruiting should almost always prioritize suited cards. Given the preference for bird cards in the retinue, suited cards are best used for deploying warriors onto the board. Recruiting with suited cards requires matching the suit to a waystation on the map. Therefore, as mentioned in the waystation section, having waystations in two different suits ensures a more reliable chance of drawing a card matching a waystation’s suit for recruitment.
-
Bird Cards: Bird cards offer recruitment flexibility but are generally more impactful as actions within the retinue. However, in situations where you are facing a potential board wipe, a bird card becomes invaluable, allowing you to recruit in any suit, regardless of your chosen restart clearing. If you anticipate a board wipe, retaining a bird card or two can be crucial for quickly re-establishing board presence.
-
-
Crafting
Crafting represents the third, and often final, competing demand for cards, making crafting decisions sometimes challenging. Badgers cycle through their cards rapidly, typically encountering numerous craftable items and abilities. While relics are your primary scoring avenue, high-value items like coins, if available and craftable in your waystation suits during the mid to late game, are worthwhile crafting targets. Crafting priorities for Badgers are discussed in greater detail later in this guide.
Faction Abilities
Devout Knights
Alt text: Root board game Devout Knights faction ability description for the Keepers in Iron, highlighting battle advantages with relics.
Devout Knights is an ability that may draw the ire of your opponents. It allows the Badgers to negate the first hit taken in battle, provided they have at least one relic and one Keeper warrior present in the clearing. Ambushes will trigger this negation, but subsequent hits in the same battle are not negated.
This ability is potent defensively, but even more so offensively. The capacity to engage single warriors without sustaining losses, except against ambushes, is incredibly powerful. However, because this ability is contingent on relics, be aware that opponents will target your warriors when it is inactive, as this becomes the most effective way to diminish your board presence and impose recruitment costs on you.
Equally important is the ability for Keepers to move one relic with each warrior they move. Thus, with two relics and two warriors, you can move both relics simultaneously. While usually not a constraint, it is advisable to bring 2-3 more warriors than the number of relics you intend to delve when moving into a clearing for delving purposes.
Prized Trophies
Prized Trophies increases the point value of your relics by one when they are destroyed, and allows the opponent who destroys a relic to place it in a forest of their choice. This incentivizes opponents to target and remove your relics, as they can score significantly after overcoming the Devout Knight ability.
Based on experience, avoid concentrating more than two relics in a single clearing. Doing so invites severe punishment from opponents, potentially giving them a lead that is difficult, if not impossible, to overcome. Extra relics do not amplify Devout Knights’ strength, making such accumulation strategically unsound. If multiple relics are necessary, distribute them across different clearings to mitigate the point swing opponents can achieve by attacking your relic-bearing warriors. Recent experience suggests that minimizing the number of relics on the board is generally preferable, as even a single relic creates a strong incentive for opponents to engage you for the bonus points.
Birdsong
Encamp
Alt text: Root board game Encamp Birdsons phase action description for the Keepers in Iron faction, detailing waystation placement and comeback mechanic.
Encamping is about strategically planning your future turn. You encamp to deploy a waystation, which can be used for recovery, crafting, or recruiting. Throughout your turn, consider which clearings might benefit from a waystation. Examine your hand, identify prevalent suits, and aim to place a waystation in a clearing matching the most frequent suit, unless you already have a waystation in a clearing of that suit. The interaction between Encamp and Live off the Land (an evening action that removes warriors if you have too many in specific clearings) will be discussed later, but leaving single Badger warriors on the map provides flexibility in waystation placement.
When placing a waystation, prioritize placing the side that corresponds to the relic type you intend to recover first, and the backside for relics you want to recover later. If you encamp on turn 1 (common for Badgers), try to orient the waystation so the relic type you plan to recover second or third is face up. Place the waystation in your “on-suit” clearing (matching your recovery suit) for early relics, and in an “off-suit” clearing (not matching your recovery suit) for later relics and recruitment purposes.
Encamp also serves as your comeback mechanic. If you have no waystations or warriors on the map, you can place a warrior and a waystation in any edge clearing. When utilizing this, aim to position yourself near relics you need to delve and in a clearing that aligns with a suit you have multiple cards of. Rapidly re-establishing board presence is crucial for re-engaging in the game and scoring points.
Decamp
Alt text: Root board game Decamp Birdsong phase action description for the Keepers in Iron faction, detailing waystation removal for points.
Decamping is rarely a priority; usually, allowing opponents to destroy waystations is preferable. Given the Badgers’ high scoring potential, the single victory point gained from decamping is often insignificant. Consider decamping only if you need multiple clearings displaying the same relic type on their waystations for consistency. Decamping is primarily used to relocate a waystation placed in an off-suit clearing to a clearing where you intend to encamp.
Recruit
Badger recruitment decisions are largely dictated by card utility. Generally, in low-reach games, prioritize cards for the retinue over recruiting. In high-reach games, aim to recruit once per turn to contest clearings and manage pressure from other aggressive factions. This strategic divergence stems from the fact that in low-reach games, where opponents are less likely to aggressively battle you, warrior replenishment is less critical. Conversely, in high-reach games with frequent battles and potential losses, consistent recruitment becomes necessary to maintain a robust warrior presence.
Badger warriors are expensive to deploy. While recruiting yields two warriors per card and allows for bursts of warrior deployment, the conditional nature of recruitment can be restrictive. Hand limitations can prevent recruiting if you lack a card matching a waystation’s suit, or if cards are needed for retinue actions or crafting.
As previously noted, waystations in multiple suits enhance recruitment consistency. This is another reason to prioritize retinue development early, as discarding cards for recruitment becomes more viable. Situations can arise where you draw only one or two suits, or none matching your waystation suits. Minimize losses and leverage Devout Knights to protect warriors, deterring attacks.
Daylight
Craft
Alt text: Root board game Craft Daylight phase action description for the Keepers in Iron faction, outlining crafting priorities for items and improvements.
Crafting priorities are ranked as follows:
-
Card Draw: Badgers should prioritize any opportunity to increase card draw. Each additional card enhances flexibility for recruiting, accessing more craftable items, and strategically discarding and replacing retinue cards. Extra cards translate directly to increased tactical options each turn.
-
Points: Craftable items that grant victory points are second in priority. Badgers need only approximately six additional points beyond relics to secure a win if they recover three columns of relics. Use this knowledge to guide your item crafting choices. However, if you anticipate recovering only two full relic columns, prioritize 2- or 3-point items when available, as they contribute significantly to closing the point gap and achieving victory.
-
Movement: Finally, improvements that enhance movement (e.g., Boat Builders, Corvid Planners) are considered. Craft these improvements just before they are needed in a turn, as crafting precedes movement, mitigating the impact of Saboteurs. They also provide flexibility for recruiting or retinue additions. Certain maps, particularly Lake and Winter, necessitate these improvements more than others.
Move
No card in this column is ever discarded due to action triggers. Starting with a bird card (Faithful Retainer), consider adding another bird card early for flexibility, or a suited card matching clearings you aim to control for relic recovery. Suited cards in this column carry the risk of movement being blocked if your path is obstructed in the suited clearing. Prioritize bird cards in this column for their adaptability.
In the initial rounds, this column typically needs no more than two cards, with a potential third card added mid-game for increased movement options. Movement is critical for Badgers, as it is essential for reaching clearings connected to numerous forests, which are prime relic sources. The images below illustrate clearings and their forest connections, highlighting clearings that offer access to a greater number of forests for relic delving.
Alt text: Root board game map highlighting clearing forest connections for strategic movement.
Alt text: Root board game map highlighting clearing forest connections for strategic movement.
Alt text: Root board game map highlighting clearing forest connections for strategic movement.
Alt text: Root board game map highlighting clearing forest connections for strategic movement.
Battle then Delve
A key strategy tip before discussing discardable columns: if you must discard a bird card, or it is highly probable (e.g., delving and expecting a high-value relic), prioritize discarding a Faithful Retainer before other bird cards. Faithful Retainers are removed from the game entirely when discarded, unlike other cards that go to the discard pile. This denies cards to other factions by locking them out of circulation as retinue actions.
A crucial concept for Badgers is that their actions operate on two distinct axes, both centered on ruling specific clearings: ruling 3 clearings surrounding a forest to delve relics, and ruling 3 clearings of the same suit as a waystation to recover relics. The strategic choice arises: which axis to prioritize? Except for round 1, de-emphasize the battle/delve axis.
Trying to navigate the map and rule three forests around a relic is inefficient and challenging. Inefficiency stems from most forests containing only one or two relics, limiting relic acquisition to one or two per turn. The difficulty in ruling three clearings around a forest arises from factions that counter rule manipulation (e.g., Lizard Gardens, Eyrie Lord of the Forest, WA sympathy, Corvids Snares). These mechanics hinder clearing control and movement after the initial rounds.
Consider a revised approach to this column: it can enable 3-5 battles in a single clearing, effectively eliminating all enemy presence. This allows Badgers to commit multiple cards of a single suit, move to a matching clearing with numerous adjacent relics, and then battle and delve repeatedly until all desired relics are secured (remembering the relic movement rule). This facilitates efficient movement to relic-rich areas, relic acquisition, and strategic retreat for recovery in the same turn. By the second or third battle, resistance in the clearing is likely minimal, allowing you to focus on delving and managing potential card discards.
Which cards to discard? Suited cards should be the first to discard, as they offer less flexibility for future recovery turns. Aim to acquire at least two relics per turn using Battle then Delve. The decision of how many relics to delve, and thus how many cards to discard, depends on whether it makes you an excessive target and if you can recover all delved relics. Recovering all delved relics is generally advisable, leaving at most one relic undelved. Badgers can recover from behind, so consistent scoring without becoming the primary target dictates delving frequency.
Discarding cards in this column is strategically sound because most forests are within two moves of a recovery clearing. Even at chokepoints, battling and delving can secure relics beyond your current clearing. Many clearings provide access to three or more forests, offering potential for acquiring multiple relics.
Which clearings to prioritize for delving? Early game, target clearings with 0-1 enemy pieces to minimize losses. Late game, prioritize clearings offering access to multiple relics of the same type (2-3). If that’s not possible, delve in clearings that offer as many relics as possible to facilitate future scoring.
Battle as Policing: As Badger popularity increases, the metagame becomes more hostile. Policing the table can foster goodwill and demonstrate your engagement with the game’s dynamics. However, prioritize policing actions that advance your own game. Target opposing red factions that may turn on you once you become the leader. Police clearings where removing buildings/tokens yields extra points. Police clearings where delving relics is possible, ensuring continued scoring through recovery. Do not let the table dictate your game at your expense.
Landmark Specific Strategy: Lost City: With the Lost City landmark, your suited battle cards are always active. Utilize this by freely placing cards in this column, as they will consistently provide value.
Move or Recover
Alt text: Root board game Move or Recover Daylight phase action description for the Keepers in Iron faction, emphasizing relic recovery and ruling clearings.
Badgers should maximize relic recovery each turn. In games with low aggression, you might forgo delving to leverage Devout Knights. However, in high-aggression scenarios, consistently recovering relics secures points and can be decisive for victory.
Maximize recovery by ruling two to three clearings matching the suit of the recovery clearing. This allows repeated recovery actions without discarding the action card. For example, if a clearing has three adjacent forests with tablets valued at 1, 2, and 3, recovering all three in a turn can yield at least six points (potentially more with column bonuses) while requiring you to rule only two clearings of a single suit to avoid discard. When recovering, count clearings ruled of the suit matching the recovery clearing.
Given that each relic type has two clearings with a value of 3, ruling three clearings should be a priority. A hidden Badger strength is the ability to rule two matching clearings with waystations, then battle and delve in a third matching clearing, leave a warrior, and return to recover all relics, ruling three clearings and avoiding card discard.
Experienced players will attempt to disrupt your control of three clearings, making recovery more difficult. Therefore, prioritize recovering 3-value relics early when maintaining control of three clearings is easier.
Movement in this action primarily serves to return from delving clearings to recovery clearings. When moving back, leave warriors behind; these can be removed by Live off the Land, providing encamping flexibility and mitigating Live off the Land penalties.
Scoring
Alt text: Root board game example of Keepers in Iron scoring, illustrating relic and column bonus point calculation.
The example scoring shows 2 points from a figure, 1 from a tablet, 3 from jewelry, and 2 bonus points from the column, totaling 8 points.
Relics are central to Badger scoring, contributing 27 potential points. Completing a relic column of each type yields an additional two points per column, totaling 8 bonus points. Effective Badger play involves calculating points needed for victory. Badgers, like Otters and Moles, can reliably anticipate their scoring and plan accordingly.
Badgers have 12 relics of three types (jewelry, tablets, figures), each type with values 1, 2, 3, and 3. Each relic type can contribute 9 points if all four are recovered. Completing two columns averages 17.5 points. Badgers, like Otters, need approximately 12.5 additional points to reach the 30-point victory threshold. Scoring only minimum values in the first column yields a mere 5 points (3 from relics, 2 from column bonus).
However, the next set of minimum relic points brings the total to 13 points (5 from the first column, 6 from the second, and 2 column bonus). Completing the third column escalates the total to 24 points (13 from previous columns, 9 from relics, and 2 column bonuses). This is crucial: aim for at least 24 points from three columns, supplementing the rest with enemy pieces and craftable items. Each point from other sources reduces the relic points needed to win.
Calculating points to win and focusing on plays that achieve this is crucial. While this applies to all factions, Badgers, like Moles and Otters, have predictable scoring and can strategize effectively.
Given opponents’ fear of Badger burst scoring from relics, planning to secure those extra 12.5 points is vital. Obtaining even three relic columns is challenging; two is more manageable. Secure remaining points from items and tokens/buildings to achieve victory!
Daylight Strategy Wrap Up – The Hit and Run
Against experienced players, Badgers face frequent attacks in high-reach games. Counter this with the “Badger Hit and Run” strategy. Move from the map edge into delving clearings, battle, delve, and then retreat to recovery clearings. This makes policing difficult, as you operate far from other factions, and relics are quickly removed from the board, denying opponents scoring opportunities.
Most factions, when moving to battle, cannot abandon the clearing in the same turn. Badgers, however, can execute a “hit and run” with their Move-Battle-Move action sequence. Setting up along the edge allows you to target relics in central clearings. The Lost City landmark further enhances this strategy, but even without it, the hit and run remains effective.
Alt text: Root board game example of Keepers in Iron “hit and run” strategy setup on the map edge.
Evening
Live off the Land
Live off the Land can deplete a crucial resource: warriors. Minimize losses to this action. Leaving a single Badger in a clearing is often preferable to losing warriors to Live off the Land. If an opponent attacks that lone warrior, they expend a battle action achieving what Live off the Land would have. If the warrior survives until your next turn, you can encamp and recruit more warriors.
As mentioned earlier, Live off the Land and Encamp are linked. Since Live off the Land triggers warrior loss with four or more warriors in a clearing, leaving warriors behind while moving across the map provides encamping options and prevents Live off the Land triggers.
Gather Retinue
Alt text: Root board game Gather Retinue Evening phase action description for the Keepers in Iron faction, detailing card allocation strategies.
Card allocation when adding to the retinue is critical. In low-reach games, prioritize Move and Move or Recover in round 1, then Battle and Move or Recover in round 2. In high-reach games, prioritize Move and Battle then Delve to proactively police opponents and suppress warrior counts.
Retinue gathering has been discussed throughout this guide, but retainer shifting has not. Shifting retainers is infrequent; discarding and replacing cards is usually preferred. However, if you are not discarding cards through delving or recovering, shifting becomes relevant. Overloading the Battle column (5+ battles) and later shifting a card (usually a bird) to the Move or Recover column is a viable tactic.
Draw and Discard
Badgers should rarely discard cards. Cards should ideally be used for retinue, recruiting, or crafting. If you have surplus cards at this stage, add them to the retinue.
Luke’s Cliff Notes for New Badger Players
- Play from behind! Badger’s scoring potential is immense, enabling comebacks from large point deficits. Leading early often makes you a target and hinders your win chances.
- Add two cards per turn to the retinue until reaching 10.
- Deploy both waystations on turn 1.
- Avoid delving in rounds 1-3 if it causes retinue card loss. Aim for 8-10 actions before discarding.
- After round 3, with 8-10 actions, prioritize relic recovery and don’t overly worry about discarding from Battle then Delve. Rule three matching clearings to protect recovery cards from discard.
- Never keep more than one relic per clearing. Delve only if you can recover the relic that turn and avoid exceeding one relic per clearing.
- Leave warriors behind when moving to prevent Live off the Land triggers. They aid future encamping.
- Ensure sufficient movement to return relics to recovery clearings.
Maps
Autumn (Or Summer)
Alt text: Root board game Autumn map analysis for Keepers in Iron, highlighting connected clearings and relic access.
Autumn (or Summer) is an excellent map for Badgers. Numerous connected clearings, especially with randomized setups potentially creating suit clusters, simplify ruling three clearings for recovery. Relic access from all forests is easy; starting in the top left or bottom right is only three moves from all forests.
Winter
Winter map presents challenges for Badgers. While two clearings offer access to all forests, opponents will likely contest these. Avoid being trapped on one side. Starting in the bottom middle clearings is optimal, but the top string of clearings can be strong if it has suit clusters and proximity to center clearings.
Lake
Alt text: Root board game Lake map analysis for Keepers in Iron, highlighting movement challenges and chokepoints.
Lake map is tough for Badgers; the lake restricts movement if the ferry is inaccessible. Focus gameplay in the northern and eastern map sections, and consider sneaking relics beyond bottom chokepoints late-game to secure victory. Chokepoints are prevalent; be aware of them.
Mountain
Mountain map is another strong choice for Badgers. After initial setup, numerous connected paths facilitate reaching central clearings for relic delving. Playing a modified Mountain map with the Lost City instead of the Tower in the Pass makes battle actions always active in the Lost City, and ruling it counts for any suit. Path removal aids Badger scoring but also accelerates other factions’ scoring. Avoid setting up in the bottom clearing with a path, as red factions will exploit this for round 1 attacks.
Picking Badgers and Set Up
When to pick Badgers? Consider hand, faction pool, maps, and turn order.
Hand
More bird cards in hand are better. Ideally, have at least one bird card to consider Badgers. Experienced players can play without starting bird cards due to high card draw, but a bird card improves consistency. If hand is suited, cards should match starting clearings for recruiting or be suitable for retinue actions (move or battle).
Faction Pool
Generally, avoid Badgers if three other factions are red. Badgers thrive with fewer red factions and fewer clearings starting with warriors.
Maps
Autumn (Summer) and Mountain are easy Badger picks. Winter and Lake are harder due to chokepoints (discussed in detail above).
Turn Order
Badgers can succeed in any turn order position but are stronger earlier in the round.
FAQ
Based on the March 17th FAQ, in ADSET, if Badgers cannot set up due to lacking two adjacent edge clearings, they are mulliganed out of the draft. This is rare, occurring in specific scenarios on Mountain map where starting warriors are spaced to prevent Badger setup. Be aware of this possibility, especially if the first three players intentionally block Badger setup.
Share this:
Like this:
Like Loading…