Hematoxylin and eosin staining, also known as H&E staining, is a widely used staining technique in histology to visualize cell structure and tissue components. This comprehensive guide from CONDUCT.EDU.VN explores the principles, procedures, and applications of this essential method, offering a solution for understanding its crucial role in diagnostics and research. Explore related staining methods and microscopic analysis techniques for advanced insights.
1. Understanding the Basics of Tissue Staining
Before diving into the specifics of hematoxylin and eosin (H&E) staining, it’s important to understand why we need to stain tissues at all. Microscopic evaluation of tissue specimens is impossible without proper staining. Unstained tissue lacks contrast because fixed materials share similar refractive indexes and colors. Viewing an unstained tissue section under a microscope reveals a uniform, dull grey appearance, making it difficult to distinguish cellular components.
1.1. The Importance of Contrast in Histology
Tissue staining enhances contrast, enabling the differentiation of various cell parts. This process involves using dyes that selectively stain particular cell components, allowing for detailed visualization of tissue structure under a microscope. The staining process uses various dyes that stain particular cell components within tissues, so you can distinguish different cell parts from each other. This contrast is crucial for identifying abnormalities, diagnosing diseases, and conducting research on tissue structures.
1.2. How Staining Enhances Microscopic Evaluation
Staining enhances microscopic evaluation by highlighting specific cellular and tissue components. Different dyes have affinities for different structures, allowing pathologists and researchers to visualize details that would otherwise be invisible. For instance, certain dyes bind to DNA in the nucleus, making it visible, while others target proteins in the cytoplasm.
1.3. Common Types of Tissue Stains
Besides H&E, several other staining methods are used in histology, each with unique applications:
- Periodic Acid-Schiff (PAS) Stain: Used to detect glycogen and other carbohydrates.
- Masson’s Trichrome Stain: Used to visualize collagen fibers in connective tissue.
- Giemsa Stain: Used to identify blood cells and parasites.
- Silver Stain: Used to detect reticular fibers and certain microorganisms.
2. A Brief History of Hematoxylin and Eosin Staining
Hematoxylin and eosin (H&E) staining, is a foundational technique in histology. Its use allows detailed examination of tissue structure under a microscope. The history of H&E staining is a testament to its enduring utility and simplicity.
2.1. The Independent Discovery of Hematoxylin and Eosin
The dyes hematoxylin and eosin were independently introduced in 1865 and 1875, respectively, by Böhmer and Fischer. In 1876, Wissowzky described their use in combination as a tissue staining method for staining structures in different colors. These two stains, when combined, provide a comprehensive view of tissue morphology.
2.2. The Combination of Hematoxylin and Eosin
The combination of hematoxylin and eosin as a staining method was first described in 1876. This combination proved to be particularly effective because hematoxylin stains nucleic acids blue, while eosin stains proteins pink, creating a contrasting view of cellular structures.
2.3. The Enduring Legacy of H&E Staining
Despite its early origins, H&E remains one of the most frequently used tissue stains worldwide. Its simplicity, reliability, and broad applicability have made it a staple in histology laboratories for over a century. The stain is still used due to its simplistic nature.
3. The Scientific Principles Behind H&E Staining
Understanding the mechanism behind H&E staining involves delving into the chemical interactions between the dyes and tissue components. Hematoxylin and eosin work through ionic bonding, exploiting differences in the chemistry of the tissue to differentially color various tissue components.
3.1. Ionic Bonding in Histologic Staining
Ionic bonding is the primary mechanism in histologic staining techniques. This process relies on the electrostatic attraction between ions of opposite charge. One ion is fixed in the tissue, and the other is in the dye. The dyes selectively bind to different tissue components based on their charge.
3.2. The Role of Hematoxylin as a Basic Dye
Hematoxylin alone is not technically a dye and requires a mordant to link to the tissue. A mordant is a compound that helps it bind to the tissue. The mordant is typically a metal cation, such as aluminum. When combined with a mordant, hematoxylin becomes cationic and acts as a basic dye. Being positively charged, it binds to negatively charged, basophilic cell components, such as nucleic acids in the nucleus. These components are stained blue or purple.
3.3. The Role of Eosin as an Acidic Dye
Eosin is anionic and acts as an acidic dye. It is negatively charged and binds to positively charged, acidophilic components in the tissue, such as amino groups on proteins in the cytoplasm. These components are typically stained in various shades of pink.
4. Step-by-Step H&E Staining Protocol
Performing H&E staining requires following a precise protocol to ensure optimal results. Here’s a step-by-step guide:
4.1. Tissue Preparation
- Fixation: Immerse the tissue in a fixative such as formalin to preserve its structure. Formalin preserves tissue and prevents decay.
- Dehydration: Gradually dehydrate the tissue by immersing it in increasing concentrations of ethanol (e.g., 70%, 90%, 100%). Ethanol removes water from the tissue.
- Clearing: Replace the ethanol with a clearing agent such as xylene, which makes the tissue transparent. Xylene prepares the tissue for infiltration with paraffin.
- Infiltration: Embed the tissue in molten paraffin wax to provide support during sectioning. Paraffin supports the tissue during sectioning.
- Embedding: Allow the paraffin to harden, creating a tissue block. The tissue block is ready for sectioning.
4.2. Sectioning and Mounting
- Sectioning: Use a microtome to cut thin sections (typically 4-5 micrometers) from the paraffin block. Thin sections allow for clear microscopic examination.
- Mounting: Affix the sections onto glass slides. Slides provide a stable support for staining and viewing.
4.3. Staining Procedure
- Deparaffinization: Remove the paraffin wax by immersing the slides in xylene.
- Rehydration: Gradually rehydrate the tissue sections by immersing them in decreasing concentrations of ethanol (e.g., 100%, 90%, 70%) and then in water.
- Hematoxylin Staining: Immerse the slides in hematoxylin solution for a specified time (e.g., 5-15 minutes), allowing the nuclei to stain blue.
- Washing: Rinse the slides in water to remove excess hematoxylin.
- Differentiation: Briefly immerse the slides in a dilute acid solution (e.g., 1% hydrochloric acid in ethanol) to remove excess hematoxylin from the cytoplasm.
- Bluing: Immerse the slides in a weak alkaline solution (e.g., ammonia water) to enhance the blue color of the nuclei.
- Eosin Staining: Immerse the slides in eosin solution for a specified time (e.g., 1-3 minutes), allowing the cytoplasm and other structures to stain pink.
- Dehydration: Dehydrate the tissue sections by immersing them in increasing concentrations of ethanol.
- Clearing: Clear the tissue sections by immersing them in xylene.
- Mounting: Mount the slides with a permanent mounting medium and coverslip to preserve the stained sections.
4.4. Troubleshooting Common Issues
- Weak Staining: Ensure that the staining solutions are fresh and properly prepared. Adjust staining times as needed.
- Uneven Staining: Agitate the slides gently during staining to ensure even dye penetration.
- Over-Staining: Reduce the staining time or increase the differentiation time.
- Contamination: Use clean glassware and fresh solutions to avoid contamination.
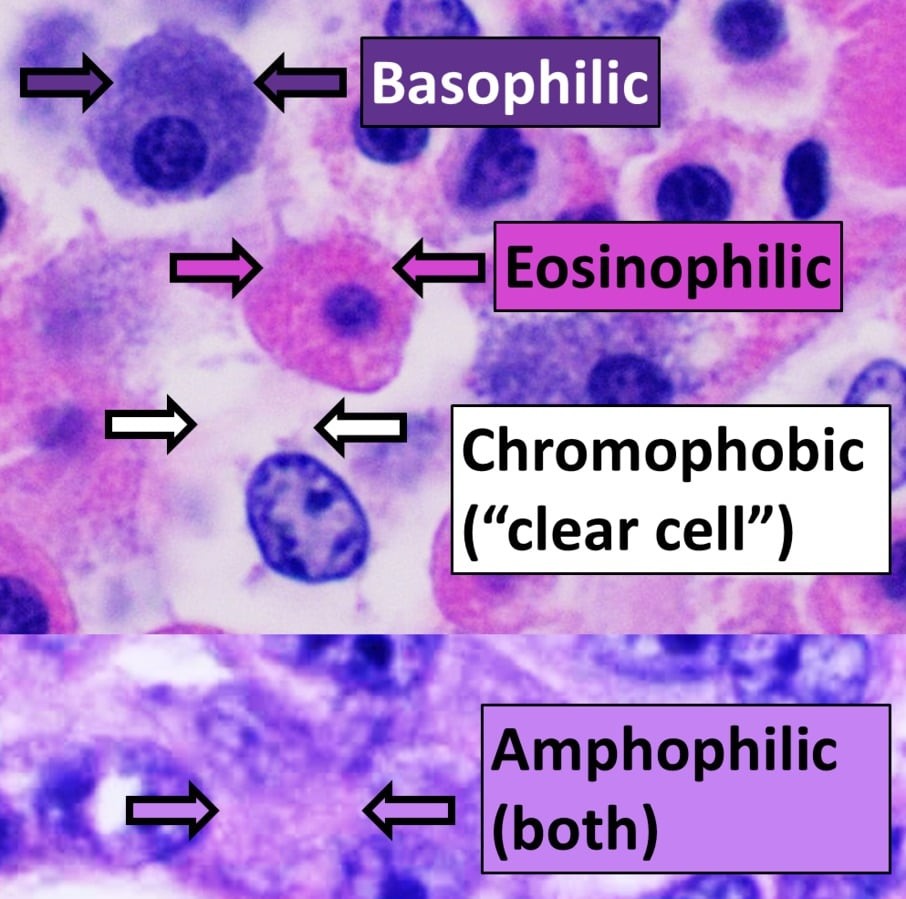
5. Identifying Structures Stained by H&E
H&E staining is used to visualize various tissue and cellular structures. Understanding what each dye stains allows for accurate interpretation of tissue sections.
5.1. Structures Stained by Hematoxylin
Hematoxylin stains basophilic structures, which are negatively charged. These structures include:
- Nuclei: Cell nuclei are stained blue or purple due to the presence of nucleic acids.
- Ribosomes: Ribosomes, rich in RNA, are also stained blue or purple.
- Other Basophilic Structures: Any other structure with a high concentration of nucleic acids or negatively charged molecules.
5.2. Structures Stained by Eosin
Eosin stains acidophilic structures, which are positively charged. These structures include:
- Cytoplasm: The cytoplasm of cells is stained shades of pink or red due to the presence of proteins.
- Collagen and Extracellular Matrix: Collagen fibers and other components of the extracellular matrix are stained pink or red.
- Other Acidophilic Structures: Any other structure with a high concentration of proteins or positively charged molecules.
5.3. Examples of H&E Staining in Different Tissues
- Liver: Hepatocyte nuclei are stained blue, while the cytoplasm is stained pink. Sinusoids and connective tissue are also visible.
- Kidney: Glomeruli and tubules show distinct staining patterns. Nuclei are blue, and the cytoplasm varies in shades of pink.
- Intestine: The nuclei of epithelial cells are blue, and the cytoplasm is pink. Muscle layers and connective tissue are also visible.
 Intestine stained with hematoxylin and eosin showing nuclei of epithelial cells in blue, and the cytoplasm in pink.
6. Limitations of H&E Staining
While H&E staining is versatile, it has limitations. It is not suitable for visualizing certain structures, particularly neutral components.
6.1. Structures Not Stained by H&E
H&E staining is poor at staining most neutral components because it is ionic. These include:
- Lipids: Fat droplets are not stained by H&E and appear as clear spaces.
- Glycogen: Glycogen deposits are not stained and appear as pale areas.
- Mucus: Mucus secretions are poorly stained and may appear as faint, amorphous material.
6.2. Alternative Staining Methods for Specific Structures
When H&E staining is insufficient, other methods are used to visualize specific structures:
- Oil Red O Stain: Used to stain lipids.
- Periodic Acid-Schiff (PAS) Stain: Used to stain glycogen.
- Alcian Blue Stain: Used to stain mucus.
- Masson’s Trichrome Stain: Used to visualize collagen fibers in connective tissue when more detail is needed than H&E provides.
6.3. When to Use Special Stains
Special stains are used when specific tissue components need to be highlighted that H&E cannot adequately visualize. For example, if a pathologist suspects a glycogen storage disease, a PAS stain would be used to confirm the presence of abnormal glycogen deposits.
7. Applications of H&E Staining in Diagnostics and Research
H&E staining is a cornerstone of diagnostic pathology and biomedical research, providing essential information about tissue structure and pathology.
7.1. Role in Diagnostic Pathology
In diagnostic pathology, H&E staining is used to examine tissue biopsies and surgical specimens to diagnose diseases. Pathologists use H&E-stained slides to identify abnormalities in tissue structure, such as cancer cells, inflammatory infiltrates, and infectious agents.
7.2. Examples of H&E in Disease Diagnosis
- Cancer Diagnosis: H&E staining helps identify cancerous cells based on their altered nuclear morphology, increased cell division, and invasion into surrounding tissues.
- Infection Detection: H&E staining can reveal the presence of microorganisms, such as bacteria, fungi, or parasites, within tissues.
- Inflammatory Conditions: H&E staining can highlight inflammatory infiltrates, such as lymphocytes and neutrophils, in tissues affected by inflammatory diseases.
- Tissue Damage Assessment: H&E staining is used to assess tissue damage in conditions such as ischemia, infarction, and trauma.
7.3. Applications in Biomedical Research
In biomedical research, H&E staining is used to study tissue structure and pathology in experimental models of disease. Researchers use H&E-stained slides to evaluate the effects of drugs, therapies, and genetic manipulations on tissue morphology.
8. Tips for Optimal H&E Staining Results
Achieving optimal H&E staining results requires attention to detail and adherence to best practices.
8.1. Proper Tissue Fixation
Proper tissue fixation is crucial for preserving tissue structure and ensuring optimal staining. Use appropriate fixatives, such as formalin, and ensure that tissues are adequately fixed before processing.
8.2. Using Fresh Staining Solutions
Use fresh staining solutions to ensure optimal dye penetration and staining intensity. Replace solutions regularly and follow the manufacturer’s instructions for preparation and storage.
8.3. Controlling Staining Time and Temperature
Control staining time and temperature to achieve consistent and reproducible results. Adjust staining times based on tissue type, thickness, and the age of the staining solutions.
8.4. Proper Washing and Dehydration Techniques
Proper washing and dehydration techniques are essential for removing excess dye and preventing artifacts. Use appropriate washing solutions and dehydration gradients to avoid tissue damage and distortion.
8.5. Selecting the Right Mounting Medium
Select the right mounting medium to preserve stained sections and ensure long-term stability. Use a permanent mounting medium that is compatible with the staining dyes and provides good optical clarity.
9. Advanced Techniques and Variations in H&E Staining
Several advanced techniques and variations can enhance H&E staining and provide additional information about tissue structure.
9.1. Immunohistochemistry (IHC)
Immunohistochemistry (IHC) combines H&E staining with antibodies to detect specific proteins in tissues. IHC is used to identify cell types, assess protein expression, and diagnose diseases.
9.2. Special Stains Combined with H&E
Combining H&E staining with special stains, such as PAS, Masson’s trichrome, or silver stain, can provide complementary information about tissue structure and pathology.
9.3. Digital Pathology and Image Analysis
Digital pathology involves scanning H&E-stained slides and analyzing the images using computer algorithms. Digital pathology enables quantitative analysis of tissue features, automated disease detection, and remote consultation.
10. The Future of H&E Staining
H&E staining continues to evolve with advances in technology and scientific understanding.
10.1. Artificial Intelligence (AI) in H&E Interpretation
Artificial intelligence (AI) is used to analyze H&E-stained images and assist pathologists in disease diagnosis. AI algorithms can identify subtle patterns and features that may be missed by human observers, improving diagnostic accuracy and efficiency.
10.2. Integration with Molecular Diagnostics
H&E staining is increasingly integrated with molecular diagnostics to provide a comprehensive view of disease pathology. Molecular tests, such as PCR and FISH, can be performed on tissue sections to detect genetic mutations, gene expression changes, and infectious agents.
10.3. Advances in Staining Technology
Advances in staining technology, such as automated staining platforms and novel dyes, are improving the speed, reliability, and reproducibility of H&E staining. These advancements enable high-throughput tissue analysis and personalized medicine.
11. Ethical Considerations in H&E Staining
Ethical considerations are paramount in histology and pathology, ensuring responsible and respectful handling of tissue samples.
11.1. Patient Consent and Privacy
Obtain informed consent from patients before collecting tissue samples for diagnostic or research purposes. Protect patient privacy and confidentiality by de-identifying tissue samples and storing them securely.
11.2. Proper Handling and Disposal of Biological Waste
Handle and dispose of biological waste, including tissue samples and staining solutions, according to institutional guidelines and regulatory requirements. Follow proper safety protocols to prevent exposure to hazardous materials.
11.3. Quality Control and Reproducibility
Implement quality control measures to ensure the accuracy and reproducibility of H&E staining results. Regularly calibrate equipment, monitor staining solutions, and participate in proficiency testing programs.
12. H&E Staining: A Summary of Best Practices
To summarize, here’s a list of best practices for achieving optimal H&E staining results:
12.1. Key Steps for Success
- Ensure proper tissue fixation to preserve tissue structure.
- Use fresh staining solutions to ensure optimal dye penetration.
- Control staining time and temperature for consistent results.
- Use proper washing and dehydration techniques to prevent artifacts.
- Select the right mounting medium for long-term stability.
- Implement quality control measures to ensure accuracy and reproducibility.
- Adhere to ethical guidelines for patient consent, privacy, and waste disposal.
12.2. Common Pitfalls to Avoid
- Inadequate tissue fixation.
- Using outdated staining solutions.
- Inconsistent staining times and temperatures.
- Improper washing and dehydration techniques.
- Neglecting quality control measures.
- Ignoring ethical considerations.
12.3. Resources for Further Learning
For those seeking to expand their knowledge of H&E staining, here are some valuable resources:
- Histology Textbooks: Consult comprehensive histology textbooks for detailed information about tissue structure and staining techniques.
- Online Courses and Webinars: Enroll in online courses and webinars to learn from experts in the field and stay up-to-date with the latest advances.
- Professional Organizations: Join professional organizations, such as the National Society for Histotechnology (NSH) and the College of American Pathologists (CAP), to network with colleagues and access educational resources.
- Research Articles: Stay informed about the latest research findings by reading peer-reviewed articles in scientific journals.
13. Frequently Asked Questions (FAQs) About H&E Staining
Here are some frequently asked questions about H&E staining to address common queries and misconceptions.
13.1. What is the purpose of H&E staining?
H&E staining is used to visualize tissue structure and cellular components, allowing pathologists and researchers to diagnose diseases and study tissue pathology.
13.2. How does H&E staining work?
H&E staining works by using two dyes, hematoxylin and eosin, to stain different tissue components based on their charge. Hematoxylin stains negatively charged structures (e.g., nuclei) blue, while eosin stains positively charged structures (e.g., cytoplasm) pink.
13.3. What structures are stained by hematoxylin?
Hematoxylin stains basophilic structures, such as nuclei and ribosomes, blue or purple.
13.4. What structures are stained by eosin?
Eosin stains acidophilic structures, such as cytoplasm and collagen fibers, pink or red.
13.5. Why is tissue fixation important for H&E staining?
Tissue fixation is important for preserving tissue structure and preventing autolysis, ensuring optimal staining and visualization of cellular components.
13.6. What are the limitations of H&E staining?
H&E staining is poor at staining neutral components, such as lipids and glycogen, and may not provide sufficient detail for identifying specific cell types or proteins.
13.7. When should special stains be used in addition to H&E staining?
Special stains should be used when specific tissue components need to be highlighted that H&E cannot adequately visualize, or when additional information is needed for disease diagnosis.
13.8. How can AI improve H&E staining analysis?
AI algorithms can analyze H&E-stained images to identify subtle patterns and features, improving diagnostic accuracy and efficiency.
13.9. What ethical considerations should be kept in mind during H&E staining?
Ethical considerations include obtaining patient consent, protecting patient privacy, handling biological waste properly, and ensuring quality control and reproducibility.
13.10. Where can I find more information about H&E staining?
More information about H&E staining can be found in histology textbooks, online courses, professional organizations, and research articles.
14. Conclusion: Mastering H&E Staining for Accurate Diagnosis
Hematoxylin and eosin (H&E) staining is a fundamental technique in histology, providing essential information about tissue structure and pathology. By understanding the principles, procedures, and applications of H&E staining, professionals can improve their diagnostic accuracy and contribute to advances in biomedical research.
Are you facing challenges in finding reliable information on H&E staining protocols or understanding the nuances of tissue preparation? Do you need clear, step-by-step guidance on ethical considerations and best practices? Visit CONDUCT.EDU.VN for comprehensive resources and expert guidance. Our website offers detailed articles, tutorials, and community support to help you master H&E staining and other essential techniques in histology.
For further information or assistance, please contact us at:
- Address: 100 Ethics Plaza, Guideline City, CA 90210, United States
- WhatsApp: +1 (707) 555-1234
- Website: CONDUCT.EDU.VN
By providing easily accessible and comprehensive information, conduct.edu.vn empowers professionals to excel in their fields and uphold the highest standards of conduct.