A beginner’s guide to sourdough bread baking empowers you to create artisanal loaves right in your kitchen, leveraging natural fermentation principles for a unique taste and texture. At CONDUCT.EDU.VN, we simplify this age-old process, providing clear instructions and expert tips. Unlock the secrets to mastering sourdough, from starter cultivation to achieving that perfect crust, enhancing your baking prowess and delivering exceptional results.
1. Introduction to Sourdough Baking
Sourdough bread, with its tangy flavor, chewy texture, and crisp crust, has captivated bakers for centuries. Unlike commercial bread that relies on instant yeast, sourdough gets its rise from a live, fermented culture known as a sourdough starter. This natural leavening process not only imparts distinctive flavors but also offers health benefits by breaking down gluten, making it easier to digest. A beginner’s guide to sourdough bread baking unveils the mysteries of this slow-fermented bread, providing a clear path for novice bakers to create their own delicious loaves.
1.1 What is Sourdough Bread?
Sourdough bread is a unique type of bread made by fermenting flour and water using a sourdough starter. This starter, a live culture, replaces commercial yeast, giving the bread its characteristic tangy taste and chewy texture.
1.2 Why Choose Sourdough?
Choosing to bake sourdough offers several advantages:
- Flavor: The fermentation process yields a complex, tangy flavor unmatched by commercial bread.
- Texture: Sourdough boasts a delightful chewy texture and a crisp, crackly crust.
- Health Benefits: The long fermentation process breaks down gluten, making it more digestible.
- Natural Ingredients: Sourdough relies on simple, natural ingredients without the need for additives or preservatives.
- Tradition: Embracing an ancient baking tradition, connecting with the roots of bread making.
2. Understanding the Sourdough Starter
Before embarking on your sourdough journey, it’s essential to understand the heart of the process: the sourdough starter. A starter is a live culture made from flour and water, teeming with wild yeasts and bacteria that give sourdough its unique characteristics. Cultivating and maintaining a healthy starter is the key to successful sourdough baking.
2.1 What is a Sourdough Starter?
A sourdough starter is a fermented mixture of flour and water that contains wild yeasts and lactic acid bacteria. This culture leavens the bread and imparts its characteristic flavor.
2.2 Creating Your Own Starter
Creating a sourdough starter from scratch is a rewarding process. Follow these steps:
- Combine: Mix equal parts (e.g., 50g) of flour and water in a jar.
- Wait: Let it sit at room temperature for 24 hours.
- Feed: Discard half of the mixture and add fresh flour and water in equal parts.
- Repeat: Continue feeding daily for 7-10 days, or until the starter doubles in size and becomes bubbly.
- Observe: Look for consistent doubling in size within 4-8 hours after feeding as a sign of readiness.
2.3 Maintaining Your Starter
Maintaining a healthy starter requires regular feeding:
- Room Temperature: Feed daily, discarding half before each feeding.
- Refrigeration: Feed weekly, allowing the starter to warm up before use.
- Consistency: Adjust water content as needed to maintain a thick pancake batter consistency.
2.4 Troubleshooting Starter Problems
- No Activity: Ensure consistent temperature (70-75°F), use unbleached flour, and be patient.
- Mold: Discard the entire starter and begin again with fresh ingredients.
- Unpleasant Smell: A vinegary smell is normal, but a foul or putrid odor indicates contamination.
3. Essential Ingredients and Equipment
Baking sourdough requires a few essential ingredients and equipment to ensure success. Quality ingredients and proper tools can make a significant difference in the final product.
3.1 Key Ingredients
- Flour: Bread flour is preferred for its high gluten content, providing structure to the loaf.
- Water: Use filtered water to avoid chemicals that may inhibit fermentation.
- Salt: Salt controls the fermentation process and enhances flavor.
3.2 Recommended Equipment
- Digital Scale: Accurate measurements are crucial for consistent results.
- Mixing Bowls: Use large bowls for mixing and bulk fermentation.
- Dough Scraper: A flexible scraper helps handle sticky dough.
- Proofing Basket (Banneton): Provides support and shape during the second rise.
- Dutch Oven: Traps steam for a crisp crust and even baking.
- Bread Lame: A sharp blade for scoring the dough before baking.
- Thermometer: Instant-read thermometer to check the internal temperature of the bread.
4. The Sourdough Baking Process: A Step-by-Step Guide
The sourdough baking process involves several key stages, each contributing to the final flavor and texture of the bread. A beginner’s guide to sourdough breaks down each step, making it manageable for new bakers.
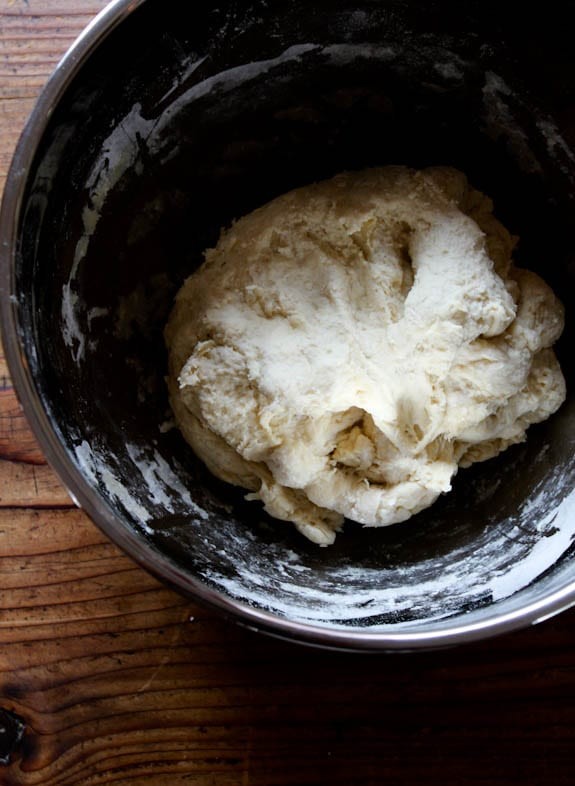
4.1 Mixing the Dough
- Combine Ingredients: In a large bowl, mix the starter, water, and flour.
- Autolyse: Let the mixture rest for 30-60 minutes. This allows the flour to fully hydrate, promoting gluten development.
- Add Salt: Incorporate the salt and mix until a shaggy dough forms.
4.2 Bulk Fermentation
- Rest and Rise: Cover the dough and let it rise for 4-6 hours at room temperature.
- Stretch and Fold: Perform stretch and folds every 30-60 minutes during the first 2-3 hours to strengthen the gluten.
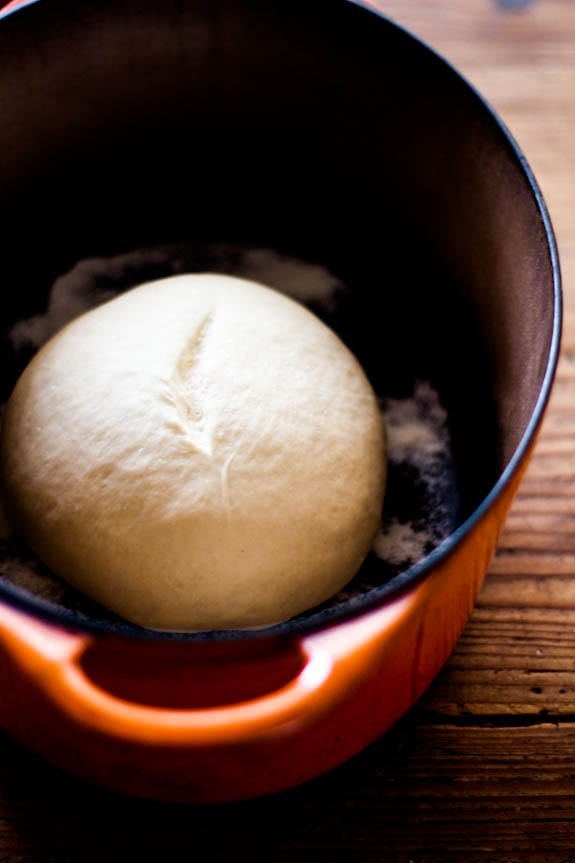
4.3 Shaping the Dough
- Divide: Gently divide the dough in half (or leave as one large loaf) on a lightly floured surface.
- Pre-Shape: Form each piece into a round or oval.
- Rest: Let the dough rest for 20 minutes.
- Final Shape: Shape the dough into its final form, creating surface tension.
4.4 Proofing
- Prepare Basket: Place the shaped dough in a floured proofing basket, seam-side up.
- Refrigerate: Cover and refrigerate for 12-24 hours to develop flavor.
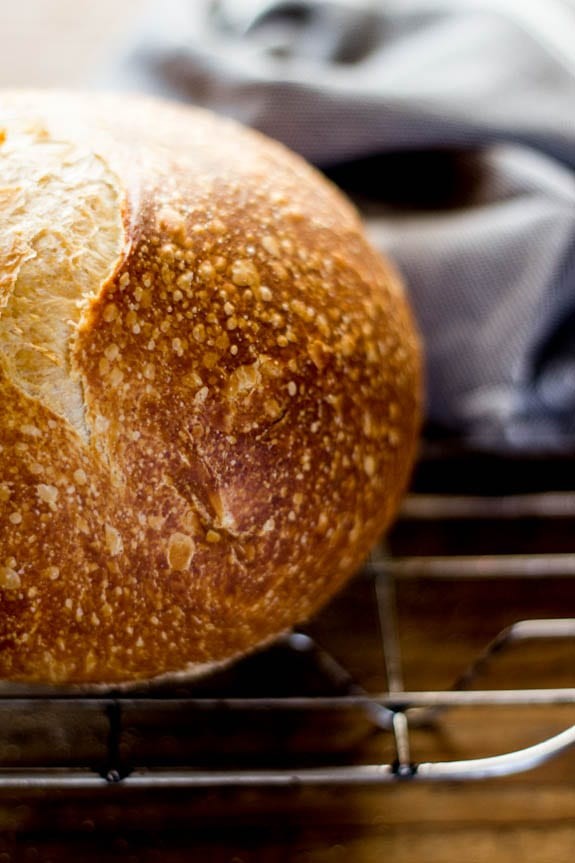
4.5 Baking
- Preheat: Preheat the Dutch oven in the oven at 450°F (232°C) for 30 minutes.
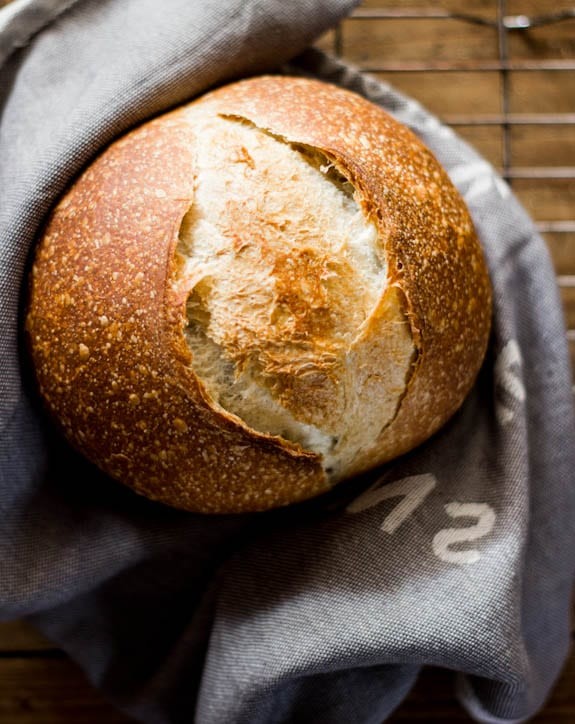
- Score: Remove the dough from the basket, score the top with a lame.
- Bake: Place the dough in the hot Dutch oven, cover, and bake for 20 minutes.
- Uncover: Remove the lid and bake for another 25-30 minutes, until the crust is deep golden brown.
- Cool: Let the bread cool completely on a wire rack before slicing.
5. Mastering the Bulk Fermentation
Bulk fermentation, the first rise of the dough, is a crucial stage in sourdough baking. It is during this period that the wild yeasts and bacteria in the starter work their magic, developing the complex flavors and airy texture characteristic of sourdough bread. Understanding and mastering bulk fermentation is essential for achieving consistent results.
5.1 Understanding Bulk Fermentation
Bulk fermentation is the process where the dough rises as the sourdough starter ferments. This step develops flavor and texture.
5.2 Factors Affecting Fermentation Time
- Temperature: Warmer temperatures accelerate fermentation; cooler temperatures slow it down.
- Starter Activity: A vigorous starter ferments faster.
- Hydration: Higher hydration doughs ferment more quickly.
- Flour Type: Whole grain flours ferment faster than refined flours.
5.3 Techniques to Monitor Fermentation
- Visual Cues: Look for a significant increase in volume (about 50-100%).
- Texture: The dough should be light, airy, and slightly jiggly.
- Bubble Activity: Small bubbles should be visible throughout the dough.
- Dough Pliability: The dough should stretch easily without tearing.
- Smell: A slightly acidic, pleasant aroma indicates proper fermentation.
5.4 Adjusting Fermentation Time
- Under-Fermented: If the dough is dense and tight, extend the fermentation time.
- Over-Fermented: If the dough is slack and deflated, shorten the fermentation time.
6. Shaping Techniques for Sourdough
Shaping is a critical step in sourdough baking that determines the final form and structure of the loaf. Proper shaping creates surface tension, which helps the bread rise and develop a beautiful crust.
6.1 Importance of Shaping
- Structure: Shaping provides structure to the loaf, allowing it to rise properly.
- Surface Tension: Proper shaping creates surface tension, leading to a crisp crust.
- Aesthetics: Shaping contributes to the overall appearance of the bread.
6.2 Basic Shaping Techniques
- Round (Boule): Gently pull the edges of the dough towards the center, creating a tight ball.
- Oval (Bâtard): Shape the dough into a log, tapering the ends.
6.3 Creating Surface Tension
- Gentle Handling: Avoid overworking the dough.
- Floured Surface: Use a lightly floured surface to prevent sticking.
- Tightening: Pull the dough taut, tucking the edges underneath.
6.4 Video Tutorials and Resources
- CONDUCT.EDU.VN: Visit our website for detailed video tutorials and shaping guides.
- Online Communities: Join sourdough baking communities for tips and inspiration.
7. Scoring: The Baker’s Signature
Scoring the dough before baking is not just an aesthetic choice; it’s a functional technique that controls how the bread expands in the oven. A well-executed score allows the bread to rise evenly and develop a beautiful “ear.”
7.1 Purpose of Scoring
- Controlled Expansion: Scoring directs the bread’s expansion, preventing cracks.
- Aesthetics: Scoring creates visually appealing patterns.
- Steam Release: Allows steam to escape, promoting a crisp crust.
7.2 Tools for Scoring
- Bread Lame: A specialized blade designed for scoring dough.
- Sharp Knife: A sharp paring knife can also be used.
- Razor Blade: Provides a clean and precise cut.
7.3 Scoring Techniques
- Straight Cut: A single slash down the center of the loaf.
- Curved Cut: A curved slash along the side of the loaf.
- Decorative Patterns: Intricate designs for advanced bakers.
- Depth and Angle: Cut at a 45-degree angle and about 1/4 to 1/2 inch deep for optimal expansion.
7.4 Tips for Clean Cuts
- Sharp Blade: Use a new or freshly sharpened blade.
- Moist Blade: Dip the blade in water before scoring.
- Confident Motion: Use a smooth, confident motion.
8. Baking in a Dutch Oven
Baking sourdough in a Dutch oven is a game-changer for home bakers. The Dutch oven traps steam, creating a moist environment that promotes oven spring and a crisp, crackly crust.
8.1 Benefits of Using a Dutch Oven
- Trapped Steam: Creates a moist environment for optimal oven spring.
- Even Baking: Distributes heat evenly, preventing hot spots.
- Crisp Crust: Promotes a deeply caramelized, crisp crust.
8.2 Preparing the Dutch Oven
- Preheating: Preheat the Dutch oven in the oven at 450°F (232°C) for 30 minutes.
- Lining: Line the bottom with parchment paper for easy removal.
8.3 Baking Process
- Score: Score the dough and carefully transfer it to the preheated Dutch oven.
- Cover: Cover the Dutch oven and bake for 20 minutes.
- Uncover: Remove the lid and bake for another 25-30 minutes, until the crust is deep golden brown.
- Cool: Let the bread cool completely on a wire rack before slicing.
8.4 Alternative Baking Methods
- Baking Stone: Use a baking stone with a steam source (e.g., a pan of hot water).
- Baking Sheet: Bake directly on a baking sheet with steam.
9. Cooling and Storing Sourdough Bread
Proper cooling and storage are essential for preserving the quality of your sourdough bread. Allowing the bread to cool completely before slicing prevents a gummy texture, while proper storage maintains its freshness and flavor.
9.1 Cooling Techniques
- Wire Rack: Cool the bread on a wire rack to allow air to circulate.
- Complete Cooling: Wait at least 1-2 hours before slicing.
9.2 Storage Options
- Bread Box: Store in a bread box to maintain moisture.
- Plastic Bag: Wrap in a plastic bag for short-term storage.
- Freezing: Freeze slices or the whole loaf for longer storage.
9.3 Maintaining Freshness
- Avoid Refrigeration: Refrigeration dries out the bread.
- Reheat: Reheat slices in a toaster or oven to restore crispness.
10. Troubleshooting Common Sourdough Problems
Sourdough baking can be challenging, but understanding common problems and their solutions can help you overcome obstacles and achieve success.
10.1 Dense or Gummy Texture
- Cause: Under-fermentation, insufficient gluten development, or cutting too soon.
- Solution: Extend bulk fermentation, improve shaping technique, cool completely before slicing.
10.2 Flat or Spreading Loaf
- Cause: Over-fermentation, weak starter, or insufficient surface tension.
- Solution: Shorten bulk fermentation, strengthen starter, improve shaping technique.
10.3 Lack of Sour Flavor
- Cause: Short fermentation time, young starter, or low temperature.
- Solution: Extend bulk fermentation, use a mature starter, maintain warmer temperature.
10.4 Tough Crust
- Cause: Over-baking or low humidity.
- Solution: Reduce baking time, use a Dutch oven, add steam to the oven.
10.5 Resources for Troubleshooting
- CONDUCT.EDU.VN: Visit our website for detailed troubleshooting guides.
- Online Forums: Participate in sourdough baking forums for community support.
11. Advanced Sourdough Techniques
Once you’ve mastered the basics, explore advanced techniques to elevate your sourdough baking skills.
11.1 Working with Different Flours
- Whole Wheat: Adds nutty flavor and texture.
- Rye: Imparts a distinctive tang and dense crumb.
- Spelt: Offers a slightly sweet flavor and soft texture.
11.2 Adding Inclusions
- Herbs: Rosemary, thyme, or oregano.
- Cheese: Cheddar, Parmesan, or Gruyère.
- Nuts and Seeds: Walnuts, pecans, or sunflower seeds.
- Fruits: Dried cranberries, apricots, or figs.
11.3 Experimenting with Hydration Levels
- High Hydration: Creates a more open crumb and delicate texture.
- Low Hydration: Results in a denser crumb and longer shelf life.
11.4 Resources for Advanced Techniques
- CONDUCT.EDU.VN: Discover advanced sourdough recipes and tutorials on our website.
- Baking Books: Explore specialized sourdough baking books for inspiration.
12. Health Benefits of Sourdough Bread
Beyond its delightful flavor and texture, sourdough bread offers several health benefits compared to commercially produced bread. The fermentation process enhances its nutritional value and digestibility.
12.1 Improved Digestion
- Gluten Breakdown: The long fermentation process breaks down gluten, making it easier to digest.
- Prebiotics: Sourdough contains prebiotics that support gut health.
12.2 Lower Glycemic Index
- Slow Release: Sourdough has a lower glycemic index, leading to a slower release of sugar into the bloodstream.
- Blood Sugar Control: Helps maintain stable blood sugar levels.
12.3 Enhanced Nutrient Absorption
- Phytic Acid Reduction: Fermentation reduces phytic acid, improving mineral absorption.
- Increased Bioavailability: Makes nutrients more accessible to the body.
12.4 Nutritional Comparison
| Nutrient | Sourdough Bread | Commercial Bread |
|---|---|---|
| Gluten | Lower | Higher |
| Glycemic Index | Lower | Higher |
| Prebiotics | Present | Minimal |
| Mineral Absorption | Higher | Lower |
13. Sourdough Around the World
Sourdough bread is a staple in many cultures around the world, each with its own unique variations and traditions.
13.1 Regional Variations
- San Francisco Sourdough: Known for its distinct tang.
- German Rye Bread: Dense and flavorful with a dark crust.
- Italian Pane di Matera: Made with ancient grains and a long fermentation process.
- Russian Black Bread: Dark, dense, and slightly sweet.
13.2 Cultural Significance
- Traditional Baking: Passed down through generations.
- Local Ingredients: Reflects regional flavors and ingredients.
- Community Connection: Often baked and shared within communities.
13.3 Exploring Global Recipes
- Online Resources: Find sourdough recipes from around the world online.
- Travel: Experience authentic sourdough bread in different countries.
- Baking Communities: Connect with bakers from diverse backgrounds.
14. Common Myths About Sourdough Baking
Sourdough baking is often surrounded by myths and misconceptions that can deter beginners. Separating fact from fiction can make the process less intimidating and more enjoyable.
14.1 Myth: Sourdough is Difficult
Reality: While sourdough requires patience, the basic process is simple and manageable with clear instructions.
14.2 Myth: You Need Special Equipment
Reality: Essential equipment includes a digital scale and mixing bowls; advanced tools are optional.
14.3 Myth: Sourdough Takes Too Long
Reality: Sourdough requires time for fermentation, but the hands-on time is minimal and can be adjusted to fit your schedule.
14.4 Myth: You Must Use a Very Old Starter
Reality: A young, active starter can produce excellent bread, though older starters may offer more complex flavors.
14.5 Myth: You Need Special Flour
Reality: Bread flour is preferred, but all-purpose flour can be used with adjustments.
14.6 Myth: Sourdough Is Always Sour
Reality: The level of sourness can be controlled through fermentation time and temperature.
14.7 Resources to Debunk Myths
- CONDUCT.EDU.VN: Check our articles for factual information on sourdough baking.
- Experienced Bakers: Learn from experienced bakers who can share reliable tips and techniques.
15. Incorporating Sourdough into Your Diet
Sourdough bread can be a healthy and delicious addition to your diet. Its unique characteristics make it a versatile choice for various meals and snacks.
15.1 Meal Ideas
- Sandwiches: Use sourdough for sandwiches with your favorite fillings.
- Toast: Enjoy sourdough toast with toppings like avocado, eggs, or nut butter.
- Soups and Stews: Serve sourdough as a side with soups and stews.
- Bruschetta: Top toasted sourdough with fresh tomatoes, basil, and garlic.
- Croutons: Make homemade sourdough croutons for salads.
15.2 Snack Options
- Sourdough Crackers: Bake thin slices of sourdough for crackers.
- Sourdough Pretzels: Make homemade sourdough pretzels.
15.3 Recipes Featuring Sourdough
- Sourdough Pizza Dough: Use sourdough for a flavorful pizza crust.
- Sourdough Pancakes: Make fluffy sourdough pancakes with discard starter.
- Sourdough Waffles: Enjoy crispy sourdough waffles for breakfast.
- Sourdough Dumplings: Add a tangy twist to traditional dumplings.
16. Resources for Continued Learning
Continue your sourdough journey with these valuable resources, offering in-depth knowledge, inspiration, and community support.
16.1 Online Courses
- CONDUCT.EDU.VN: We offer online sourdough baking courses for all skill levels.
- Skillshare: Explore sourdough baking classes on Skillshare.
- Craftsy: Find comprehensive baking courses on Craftsy.
16.2 Books
- Tartine Bread by Chad Robertson: A classic guide to sourdough baking.
- The Sourdough School by Vanessa Kimbell: A comprehensive approach to sourdough.
- Artisan Sourdough Made Simple by Emilie Raffa: Beginner-friendly recipes and techniques.
- Sourdough by Sarah Owens: A guide to baking with heritage grains and wild yeasts.
16.3 Websites and Blogs
- CONDUCT.EDU.VN: Our website features a wealth of sourdough baking articles and tutorials.
- The Perfect Loaf: A popular blog with detailed sourdough recipes.
- King Arthur Baking: Offers a variety of sourdough recipes and resources.
16.4 Communities
- Online Forums: Join sourdough baking forums for tips and support.
- Social Media Groups: Connect with bakers on Facebook, Instagram, and Reddit.
- Local Baking Clubs: Participate in local baking clubs for hands-on learning.
17. The Science Behind Sourdough
Understanding the science behind sourdough can enhance your baking skills and help you troubleshoot problems more effectively.
17.1 Fermentation Process
Wild Yeasts: These microorganisms consume sugars and produce carbon dioxide, causing the dough to rise.
Lactic Acid Bacteria: They produce lactic acid and acetic acid, which contribute to the sour flavor and preserve the bread.
17.2 Gluten Development
Hydration: Water is essential for gluten development, creating a network that traps gas and provides structure.
Kneading: This process aligns gluten proteins, strengthening the dough.
Autolyse: Allowing the flour and water to rest before adding salt improves gluten development.
17.3 The Role of Acidity
Flavor: Acidity contributes to the tangy flavor of sourdough.
Preservation: Acidity inhibits the growth of mold and bacteria, extending shelf life.
Texture: Acidity affects the texture of the dough, making it more extensible.
17.4 Key Scientific Principles
- Enzymatic Activity: Enzymes break down starches into sugars, providing food for the microorganisms.
- pH Levels: Monitoring pH levels can help you understand the fermentation process.
- Temperature Control: Maintaining consistent temperatures is crucial for optimal fermentation.
18. Creative Ways to Use Sourdough Discard
Sourdough discard, the portion of starter removed during feeding, can be used in a variety of creative recipes, minimizing waste and adding a tangy flavor to your cooking.
18.1 Sourdough Discard Recipes
- Pancakes: Add discard to pancake batter for a tangy twist.
- Waffles: Make crispy sourdough waffles with discard.
- Crackers: Bake thin slices of discard for savory crackers.
- Cakes: Add discard to cakes for a moist and flavorful crumb.
- Pizza Dough: Use discard to enhance the flavor of pizza dough.
- Scones: Create tangy and delicious sourdough scones.
18.2 Benefits of Using Discard
- Reduces Waste: Minimizes food waste by using excess starter.
- Adds Flavor: Enhances the flavor of recipes with a subtle tang.
- Improves Texture: Contributes to a moist and tender texture.
18.3 Storage Tips for Discard
- Refrigeration: Store discard in the refrigerator for up to a week.
- Freezing: Freeze discard for longer storage.
- Labeling: Label containers with the date for easy tracking.
19. Tools and Resources for Sourdough Enthusiasts
To enhance your sourdough baking experience, consider these essential tools and resources tailored for enthusiasts.
19.1 Recommended Baking Tools
- Digital Kitchen Scale: For precise measurements of ingredients.
- Mixing Bowls: A set of various sizes for different stages of baking.
- Dough Scraper: Helps to handle sticky dough with ease.
- Proofing Baskets (Bannetons): Provide support and shape during the second rise.
- Dutch Oven: Essential for trapping steam and baking the bread evenly.
- Bread Lame: For scoring the dough before baking.
- Cooling Rack: Allows air to circulate and cool the bread evenly.
19.2 Online Communities
- Sourdough Baking Forums: Engage with other bakers for tips and support.
- Social Media Groups: Connect with bakers on Facebook, Instagram, and Reddit.
19.3 Influential Bakers to Follow
- Chad Robertson: Renowned baker and author of “Tartine Bread.”
- Vanessa Kimbell: Sourdough expert and author of “The Sourdough School.”
- Sarah Owens: Baker and author specializing in heritage grains and wild yeasts.
- Brittany Wood: Passionate sourdough baker and educator.
19.4 Local Resources
- Baking Supply Stores: Stock up on essential ingredients and equipment.
- Baking Classes: Learn from experienced instructors in hands-on classes.
- Farmers Markets: Source fresh, local ingredients for your sourdough bread.
20. Starting Your Own Sourdough Business
For passionate bakers, turning a hobby into a sourdough business can be a rewarding venture.
20.1 Planning Your Business
- Market Research: Understand your target audience and local competition.
- Business Plan: Develop a comprehensive plan outlining your goals and strategies.
- Branding: Create a unique brand identity to attract customers.
- Legal Requirements: Comply with health and safety regulations.
20.2 Production Considerations
- Scaling Recipes: Adjust recipes to accommodate larger batches.
- Equipment: Invest in commercial-grade equipment for efficient production.
- Storage: Ensure proper storage for ingredients and finished products.
20.3 Sales and Distribution
- Farmers Markets: Sell your bread at local farmers markets.
- Online Stores: Create an online store for direct sales.
- Wholesale: Partner with local cafes and restaurants.
- Community Supported Bread (CSB): Offer subscriptions for regular bread deliveries.
20.4 Marketing Strategies
- Social Media: Promote your business on social media platforms.
- Local Partnerships: Collaborate with local businesses for cross-promotion.
- Website: Create a website showcasing your products and services.
- Community Events: Participate in community events to raise awareness.
Embark on your sourdough journey with confidence, armed with the knowledge from this beginner’s guide to sourdough. Embrace the art and science of sourdough baking, and create exceptional loaves that delight your senses and nourish your body. For more detailed guidance and resources, visit CONDUCT.EDU.VN today! You can also contact us at 100 Ethics Plaza, Guideline City, CA 90210, United States, Whatsapp: +1 (707) 555-1234, or visit our website conduct.edu.vn.
Frequently Asked Questions (FAQ)
-
What is sourdough bread?
Sourdough bread is made by fermenting flour and water using a sourdough starter, a live culture containing wild yeasts and bacteria. This natural leavening process gives sourdough its characteristic tangy flavor and chewy texture.
-
How do I create a sourdough starter from scratch?
To create a sourdough starter, mix equal parts of flour and water in a jar. Let it sit at room temperature for 24 hours. Discard half of the mixture and add fresh flour and water daily for 7-10 days until it doubles in size and becomes bubbly.
-
What ingredients are essential for sourdough baking?
The essential ingredients for sourdough baking are bread flour, water, salt, and a sourdough starter. Bread flour is preferred for its high gluten content, and filtered water is recommended to avoid chemicals that may inhibit fermentation.
-
What equipment do I need to bake sourdough bread?
Recommended equipment includes a digital scale for accurate measurements, mixing bowls, a dough scraper, a proofing basket (banneton), a Dutch oven, and a bread lame for scoring the dough.
-
How long does it take for sourdough dough to rise?
The rising time for sourdough dough depends on factors such as temperature, starter activity, and hydration levels. Generally, bulk fermentation takes 4-6 hours, and proofing can take 12-24 hours in the refrigerator.
-
Why is scoring the dough important?
Scoring the dough is important because it controls how the bread expands in the oven, prevents cracks, creates visually appealing patterns, and allows steam to escape, promoting a crisp crust.
-
What is the benefit of baking sourdough in a Dutch oven?
Baking sourdough in a Dutch oven traps steam, creating a moist environment that promotes oven spring and a crisp, crackly crust. It also distributes heat evenly, preventing hot spots.
-
How should I store sourdough bread to maintain its freshness?
To maintain freshness, store sourdough bread in a bread box or wrap it in a plastic bag for short-term storage. Avoid refrigeration, as it dries out the bread. For longer storage, freeze slices or the whole loaf.
-
What are some common problems in sourdough baking and how can I fix them?
Common problems include dense or gummy texture (caused by under-fermentation or cutting too soon), flat or spreading loaf (caused by over-fermentation or a weak starter), and lack of sour flavor (caused by short fermentation time or a young starter). Solutions include adjusting fermentation times, improving shaping techniques, and using a mature starter.
-
Can I use sourdough discard in other recipes?
Yes, sourdough discard can be used in a variety of creative recipes, such as pancakes, waffles, crackers, cakes, and pizza dough, to minimize waste and add a tangy flavor.