Everyone deserves a second chance, and that’s at the heart of A Christmas Carol by Charles Dickens. This guide will serve as your roadmap to navigating the hidden object game, Christmas Stories: A Christmas Carol, ensuring you experience every poignant moment of Scrooge’s transformation.
General Tips for a Seamless Christmas Journey
- This is your comprehensive strategy guide for Christmas Stories: A Christmas Carol.
- Remember to zoom into scenes to find key items and solve puzzles. The screenshots in this guide will highlight these areas.
- We’ll use HOP to denote Hidden-object puzzles.
- HOP lists may vary slightly between playthroughs.
- Utilize the Map to swiftly travel between locations and revisit areas where you may have missed something.
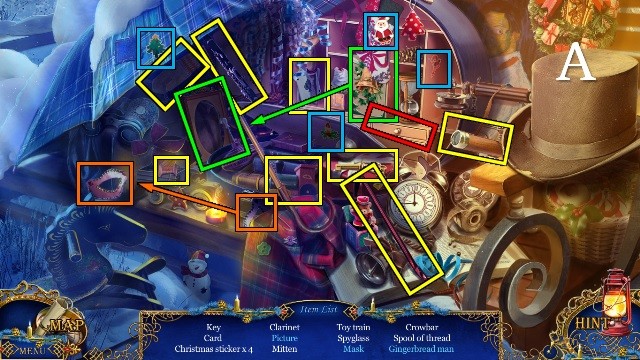
Chapter 1: Unlocking Scrooge’s Past Through His Diary
- Begin by opening the gate to Scrooge’s property.
- Engage with the Hidden-Object Puzzle (HOP) marked (A) to acquire the MAILBOX KEY.
- Use the MAILBOX KEY (B) to open the mailbox, retrieve the DOOR KNOCKER (C).
- Interact with the door knocker, placing it in its mouth, and then knock (D) to gain entry.
- Proceed forward into Scrooge’s abode.
- Attempt to rouse Scrooge from his slumber.
- Converse with the Ghost of Christmas Past (E) to understand your purpose.
- Collect the BELL (F) from the scene.
- Position the BELL on the fireplace and retrieve the BOOKMARK (G).
- Obtain the SLING and use the BOOKMARK to open the book (H); discover the SCREWDRIVER (I).
- Employ the SCREWDRIVER (J) to detach the WINDOW HANDLE.
- Persist in interacting with the gingerbread house until you uncover a HEART HALF (K).
- Ascend the stairs.
- Use the WINDOW HANDLE (L) to open the window, then attach the SLING to the slingshot to target the raven (M) and obtain the HEART HALF (N).
- Secure the POUCH (O).
- Utilize the “+” symbol on the pouch to access its contents, open it, and restore the medallion by piecing together fragments from within, along with the two HEART HALVES (P).
- This action will grant you the HEART AMULET (Q).
- Return downstairs.
- Examine Scrooge’s medallion, affix the HEART AMULET to it, and unlock it (R) to receive the NURSERY KEY.
- Return upstairs.
- Use the NURSERY KEY (S) to unlock the door.
- Enter the Nursery.
- Collect the ROPE LADDER (T).
- Acquire the POKER (U).
- Find the FEATHER (V).
- Descend the stairs.
- Affix the ROPE LADDER to the window (W).
- Venture forward.
- Take the SPOUT (X).
- Grab the HORN (Y).
- Proceed to the Hall.
- Use the POKER to obtain the BIRDCAGE ORNAMENT; attach the SPOUT to the watering can and secure the EMPTY WATERING CAN (Z).
- Return to the Nursery.
- Place the BIRDCAGE ORNAMENT on the birdcage, then prompt Scrooge to breathe life back into the bird (A). Collect the ANIMATED BIRD (B).
- Go back to the Hall.
- Utilize the ANIMATED BIRD to retrieve the SCROOGE AMULET (C).
- Return to the Nursery.
- Open the box using the SCROOGE AMULET (D) and take the PUPPET (E).
- Position the PUPPET on the puppet theatre and engage all three puppets in a dance sequence, triggering a series of mini-games (F).
-
Restore all the puppets by moving one block at a time, adhering to the rule that smaller blocks can only be placed on larger ones (G).
-
Move all items to their correct room (H).
-
Once a room is completed, a quarter sun will light up; place all quarter suns on the sun (I).
-
Take the FLOWER (J).
- Take LENSES 1/3 (K).
- Descend the stairs.
- Take LENSES 2/3 (L).
- Place the FLOWER on the picture frame and push it (M); take the FIREFIGHTER BADGE (N).
- Go forward.
- Open the fire box with the FIREFIGHTER BADGE (O); take the WIRE BRUSH and CHISEL (P).
- Go to the Hall.
- Take LENSES 3/3 (Q).
- Go down.
- Use the CHISEL on the steps and take the PRETZEL (R).
- Go to the Side Street.
- Hang the PRETZEL outside the bakery and take the RULER (S).
- Go down.
- Open the cupboard with the RULER (T) for a series of mini-games.
- Put the three books on the shelf (U).
- Select the books in the following order: red 3, 2, 1, green 3, 2, 1, yellow 3, 2, 1 (V).
- Restore the image (W).
- Find the 8 coins (X,Y).
- Match the dancers with their correct partners (Z).
- Move the cupids up and down until they can both fire their arrows at the hearts at once (A).
- Move the right cupid all the way up, move the left cupid up slowly until it’s just below the right, then move down to aim at the hearts.
- Take the SCISSORS (B).
- Go down.
- Open the cushion with the SCISSORS and take the BLUE SNOWFLAKE and SECRETARY KEY (C).
- Open the cabinet with the SECRETARY KEY (D); take the CANDY and the VALVE (E).
- Go to the Side Street.
- Clean the pump with the WIRE BRUSH and put the VALVE on it and the EMPTY WATERING CAN under it; swing the handle and take the FULL WATERING CAN (F).
- Go down.
- Water the plant with the FULL WATERING CAN and take the BUTTON (G).
- Put the BUTTON on the safe and push 145 (H).
- Play the HOP (I).
- You receive the STAMP.
- Go down.
- Open the box with the STAMP (J); take the WINDUP KEY and BROKEN LANTERN (K).
- Talk to the Ghost (L) to receive a CANDLE.
- Go to the Nursery.
- Wind up the puppet with the WINDUP KEY (M); take the MITTENS (N).
- Remove the ice with the MITTENS to receive PAGES 1/3 (O).
- Go down.
- Remove the ice with the MITTENS to receive PAGES 2/3 (P).
- Go down.
- Remove the ice with the MITTENS to receive PAGES 3/3 (Q).
- Access the BROKEN LANTERN and put the CANDLE and LENSES in it (R); close the door to receive the LANTERN.
- Melt the gremlin with the LANTERN (S); move the diary and put the PAGES in it (T).
Chapter 2: Venturing into Christmas Past
- Talk to the Ghost (U).
- Take the COALS 1/2 (V).
- Take the SCARF (W).
- Take COALS 2/2 (X).
- Take the PIPE WITHOUT HOLES (Y).
- Put the SCARF and COALS on the snowman; take the ROASTED CHICKEN and YOKE (Z).
- Put the ROASTED CHICKEN on the door and swap signs 1 and 2, then 2 and 3 (A).
- Go into the Tavern.
- Take the MALLET (B).
- Go down.
- Break the street lamp with the MALLET and take the MATCHES (C).
- Go left.
- Put all logs on the fire and light it with the MATCHES; remove the pot with the YOKE and take the BOILING WATER (D).
- Go down.
- Melt the ice castle with the BOILING WATER (E).
- Play the HOP (F).
- You receive the MONEY.
- Give the MONEY to the boy and take the BONE (G).
- Go left.
- Put the BONE in the bowl (H).
- Take the DAGGER (I).
- Go down.
- Remove the COMPASS with the DAGGER (J).
- Go left.
- Put the COMPASS on the shield and take the AXE (K).
- Go down.
- Remove the fallen tree with the AXE (L).
- Go right.
- Take the AWL (M).
- Access the PIPE WITHOUT HOLES and use the AWL to make a FLUTE (N).
- Use the FLUTE on the mouse hole (O); take the RAZOR and CONTINENT (P).
- Cut the strings with the RAZOR and take the GINGERBREAD SNOWMAN (Q).
- Go down.
- Put the GINGERBREAD SNOWMAN on the tree and receive the HATCH HANDLE (R).
- Go right.
- Take the WHEEL and put the HATCH HANDLE on the hatch for a mini-game (S).
- Use the arrows on the sides to move the rows of blocks until the gem has dropped down to the bottom.
- Level 1: T, Ux4, Tx3.
- Level 2: T, U, T, Ux2, Tx3, Ux4, Tx4, Ux5, Tx2, U.
- Level 3: keep alternating T and U as far as they go.
- Take the DISASSEMBLED CATAPULT, NET and HORN (V).
- Take the second CONTINENT with the NET (W).
- Put both CONTINENTS on the globe (X); take the CORKSCREW (Y).
- Go to the Tavern.
- Remove the cork with the CORKSCREW (Z); fill the HORN with gunpowder and take the HORN WITH GUNPWDER (A).
- Go to the School.
- Access the DISASSEMBLED CATAPULT and put the WHEEL on it; open the ball and fill it from the HORN WITH GUNPOWDER (B).
- Close the ball and load the catapult, have Scrooge revive the Viking and give the Viking the MATCHES (C).
- You receive a VIKING WITH A BOMB.
- Shoot the statue (D) with the VIKING WITH A BOMB.
- Walk forward.
- Take the SALT MILL HANDLE (E).
- Go to the Tavern.
- Put the SALT MILL HANDLE on the grinder and grind; fill the shaker with salt and take the SALT (F).
- Go to the Schoolyard.
- Give the SALT to the deer and take the FEATHER (G).
- Go to the Square.
- Put the FEATHER on the dove and select blue, red, and yellow; take the OIL CAN (H).
- Go to the Schoolyard.
- Oil the lock with the OIL CAN and turn the key (I); take the HAY and the LOCK PART (J).
- Stuff the toy with HAY and have Scrooge revive him; take the ANIMATED CAT (K).
- Go to the Square.
- Release the ANIMATED CAT on the tree to retrieve the CUCKOO (L).
- Go right.
- Put the CUCKOO on the clock (M); take the SILVER KEY and LOCK PART (N).
- Go to the Tavern.
- Open the cabinet with the SILVER KEY (O).
- Play the HOP (P).
- You receive the SHOES.
- Go down.
- Give the SHOES to the boy; take the BRUSH (Q).
- Go right.
- Wipe the blackboard with the BRUSH (R).
- Select books III, IV, V, I, II (S); take the LOCK PART (T).
- Walk forward.
- Put the three LOCK PARTS on the door (U) for a mini-game.
- Move all red blocks to the top and all blue blocks to the bottom (V).
- Blocks can move to an empty spot or jump over one other block.
- There are many possible solutions; keep sliding and jumping, making sure you keep moving the red blocks all the way to the top and the blue ones all the way to the bottom.
- Go to the Belfry.
Chapter 3: Navigating the Engagement
- Talk to evil Scrooge; take the LUMP OF GOLD (W).
- Talk to the Ghost (X).
- Take the SMITHY INSTRUCTIONS (Y).
- Take STAINED-GLASS PIECES 1/3 (Z).
- Take the YELLOW STAR (A).
- Go to the Square.
- Put the YELLOW STAR on the box (B); take the CANDLE (C).
- Go to the Belfry.
- Put the CANDLE on the basin (D) for a mini-game.
- Move the candles and rotate the silhouettes to create the correct shadows (E, F).
- Take the BELFRY KEY (G).
- Open the door with the BELFRY KEY (H).
- Walk forward.
- Take the EMPTY BUCKET (I).
- Take the FLOUR (J).
- Take the SHOVEL and hang up the SMITHY INSTRUCTIONS (K).
- Go to the Schoolyard.
- Dig the snow with the SHOVEL; take the MONOGRAM and STAINED-GLASS PIECES 2/3 (L).
- Go down.
- Open the bag with the MONOGRAM (M).
- Play the HOP (N).
- You receive the HOLLY.
- Walk forward.
- Put the HOLLY on the box (O); take the SICKLE and COAL (P).
- Go to the Belfry Tower.
- Use the SICKLE to remove the PLASTER WREATH and STAINED-GLASS PIECES 3/3 (Q).
- Walk down.
- Put the PLASTER WREATH on the angel and take the BRONZE BUCKLE (R).
- Go to the School.
- Open the bag with the BRONZE BUCKLE and take the FLINT and CHISEL (S).
- Go to the Belfry.
- Put the STAINED-GLASS PIECES on the door for a mini-game.
- Move the oil candles to the slots at the top; you can only manipulate the tile with the arrows.
- Break connections between tiles by selecting the gold circles between them.
- Rotate the door with the red arrows.
- T: Pull yellow and red down; U: turn door, move arrow tile top left, turn door; V: Pull purple and blue down; W: turn door, push yellow and red around.
- X: Grab purple only and pull top left, turn door, push purple into place, move arrow tile back down; Y: turn door, grab blue only and pull top left, turn door, move blue into place; Z: repeat for yellow; A: repeat for red.
- Go to the Alley.
- Dig the snow with the SHOVEL and take the ROCK (B).
- Fill the EMPTY BUCKET and take the WATER BUCKET (C).
- Access the ROCK and turn it into a SMELTING MOLD with the CHISEL (D).
- Go to the Belfry Tower.
- Put the COAL on the fire and light it with the FLINT, put the SMELTING MOLD and WATER BUCKET down and put the LUMP OF GOLD in the mold (E); use the tongs to move the mold in and out of the fire and take the RING WITHOUT GEM (F).
- Talk to the Ghost (G).
- Take the ICE ROSE (H).
- Go to the Alley.
- Open the door with the ICE ROSE (I).
- Walk forward.
- Put the FEATHER on the Native American and take the REED PIPE (J).
- Go to the Belfry.
- Give the REED PIPE to the angel; take the COIN (K).
- Go to the Alley.
- Remove the screws with the COIN (L); take the PIGEON and GLASS CUTTER (M).
- Go to the Belfry Tower.
- Put the PIGEON on the tea pot and take the CODE (N).
- Go to the Museum.
