A Dark Room Embark Guide is essential for anyone venturing into the captivating world of film photography and darkroom printing. This comprehensive guide, brought to you by CONDUCT.EDU.VN, offers expert advice and step-by-step instructions to help you create your own functional and inspiring darkroom, and learn about critical behavior guidelines. Learn the ropes of analog photography with us, and explore the realm of professional conduct and ethical considerations.
1. Understanding the Allure of the Darkroom
In an era defined by digital screens and instant results, the darkroom experience stands apart, offering a unique and rewarding creative process. The magic of watching an image emerge from a blank sheet of paper, combined with the hands-on manipulation of chemistry and light, provides a tangible connection to the art of photography that digital methods simply cannot replicate.
1.1. Slowing Down and Appreciating the Process
Unlike the immediacy of digital photography, the darkroom demands patience and a deliberate approach. Each step, from exposing the paper to developing the print, requires careful consideration and precise execution. This deliberate pace allows you to fully engage with the creative process, fostering a deeper understanding of light, contrast, and composition.
1.2. The Tactile Experience
The darkroom is a sensory experience. The feel of the film, the smell of the chemicals, the soft glow of the safelight – all contribute to a unique and immersive environment. This tactile engagement enhances the creative process and creates a lasting connection to the art of photography.
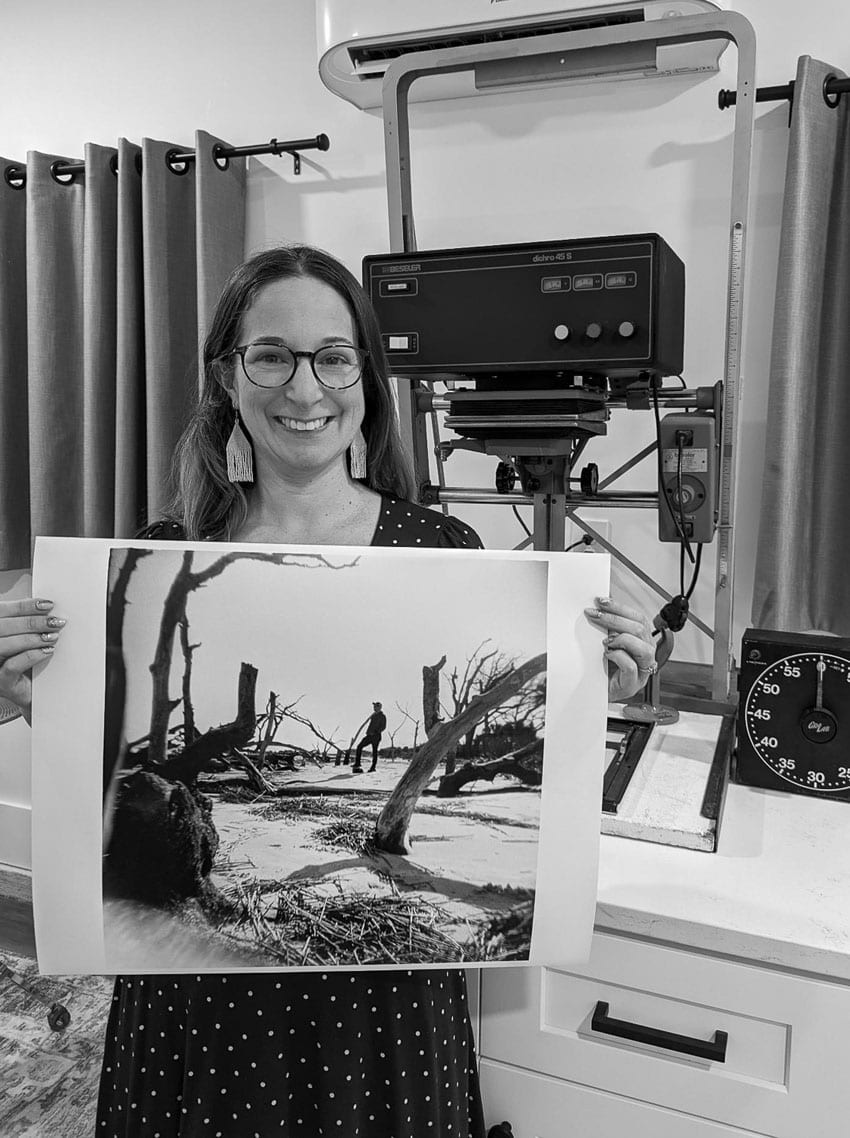
1.3. The Ultimate Reward: The Final Print
The culmination of the darkroom process is the final print – a physical manifestation of your artistic vision. Holding a print that you have personally created, from start to finish, is an immensely satisfying experience, providing a tangible reward for your time and effort.
A darkroom print embodies the dedication and craftsmanship of the photographer.
2. Finding the Perfect Space: Location and Light Control
The most crucial element of any darkroom is, unsurprisingly, its darkness. Total light control is paramount to prevent unwanted exposure of your photographic paper.
2.1. Identifying Potential Locations
Ideal locations include rooms without windows, such as interior bathrooms or basements with limited natural light. However, with careful planning and execution, even rooms with windows can be transformed into functional darkrooms.
2.2. Achieving Total Darkness
- Window Blocking: If your chosen room has windows, you’ll need to completely block all incoming light. Options include:
- Custom Frames: Constructing wooden frames covered with black landscape plastic is a highly effective solution.
- Blackout Curtains: Commercially available blackout curtains offer a convenient alternative. You can purchase these blackout curtains.
- Foam Board Inserts: Crafting inserts from foam board or similar materials can effectively block light.
- Doorway Light Control: Address light seepage under the door with a rolled-up towel or weather stripping.
- External Light Management: Turning off lights outside the darkroom further minimizes potential light leaks.
2.3. Optimizing Visibility
While darkness is essential, a completely black room can be challenging to work in. Light-colored walls can help reflect the safelight, improving visibility without compromising the light-sensitive materials.
3. Water Access: Convenience vs. Necessity
Access to running water is a valuable, though not strictly necessary, darkroom feature.
3.1. Ideal Scenario: On-Site Sink
Having a sink directly in your darkroom allows for convenient rinsing of your final prints.
3.2. Alternative Solution: Remote Rinsing
If a sink isn’t available, you can rinse your prints in a tray or bucket of water within the darkroom and then transfer them to another location for a final rinse under running water. Consider building a DIY print washer for added convenience, as detailed on CONDUCT.EDU.VN.
Setting up a dedicated print washing station can streamline your workflow and ensure thorough rinsing.
4. Essential Darkroom Equipment: A Comprehensive List
Setting up a functional darkroom requires specific equipment. Here’s a detailed overview:
4.1. The Enlarger: Projecting Your Vision
The enlarger is the heart of the darkroom, projecting the image from your negative onto the photographic paper. You can buy enlargers on eBay.
- Contact Prints: If you are interested in contact prints, where the negative is placed directly on the paper, you can skip the enlarger.
- Enlarger Size: Select an enlarger that accommodates the largest negative format you plan to print (e.g., medium format if you might want to print medium format negatives in the future, even if you currently only shoot 35mm film).
- Purchasing Considerations:
- Local Market: Explore local options like Craigslist, eBay, or Facebook Marketplace to avoid shipping costs.
- Pre-Purchase Research: Before buying, research the specific enlarger model online to identify potential issues, find user tips, and locate the original manual.
4.2. Enlarger Lens: The Key to Sharpness
The quality of your enlarger lens significantly impacts the sharpness and clarity of your prints. You can find enlarger lenses on eBay.
- Aperture: Lenses with smaller f-stops (larger apertures) are typically more expensive but provide a brighter image for focusing.
- Manufacturers: Major manufacturers include Nikon, Rodenstock, and Schneider.
- Focal Length: Choose a lens with the appropriate focal length for the negative formats you intend to print (e.g., 50mm for 35mm, 75-90mm for 120 film, 135-150mm for 4×5).
4.3. Negative Carrier: Holding Your Image
The negative carrier is a hinged metal frame that holds the negative flat and in place within the enlarger.
- Compatibility: Carriers are typically specific to the enlarger model and negative size.
- DIY Alternative: You can create a carrier from heavy black paper or similar material.
Find negative carriers on eBay.
4.4. Enlarging Timer: Precise Exposure Control
An enlarging timer controls the duration of the enlarger’s light exposure, ensuring consistent print results.
- Functionality: The timer automatically turns the enlarger lamp on and off for the set exposure time.
- Precision: Timers enable precise exposure control, crucial for dodging and burning techniques.
You can find enlarging timers on eBay.
4.5. Enlarging Easel: Paper Positioning and Flatness
An easel holds the photographic paper flat and allows for consistent positioning during printing.
- Benefits: Easels ensure consistent borders and prevent paper movement during dodging and burning.
Find enlarging easels on eBay.
4.6. Safelight: Working in the Dark
A safelight provides illumination in the darkroom without exposing the light-sensitive photographic paper.
- Options: Use a dedicated darkroom safelight or red LED lights.
Find darkroom safelights on eBay.
4.7. Photo Paper: The Canvas for Your Image
Choose the right photo paper for your darkroom.
- Resin-Coated (RC) Paper: Ideal for beginners due to faster development, lower cost, and flat drying properties.
- Fiber Paper: Offers superior tonal range but requires longer processing and careful drying to prevent curling.
- Surface Finish: Glossy paper provides the greatest tonal range, while matte or pearl paper reduces glare.
4.8. Paper Developing Chemicals: Bringing the Image to Life
The chemical process mirrors film development, requiring specific solutions.
- Developer: Activates the latent image on the exposed paper.
- Stop Bath: Halts the development process.
- Fixer: Makes the image permanent by removing unexposed silver halide crystals.
- Perma Wash (Optional): Aids in the removal of residual chemicals, especially important for fiber-based papers.
4.9. Trays or Containers: Chemical Baths
You’ll need trays to hold your developing chemicals.
- Sizing: Use trays appropriate for the paper sizes you intend to print.
- Organization: A timer placed near the trays helps track development times.
4.10. Tongs: Handling with Care
Use tongs to transfer the paper between chemical baths without contaminating the solutions.
- Alternative: Gloves can be used, but ensure thorough rinsing after each transfer.
4.11. Grain Focuser: Achieving Pinpoint Sharpness
A grain focuser allows you to critically assess the focus of the negative on the baseboard, ensuring sharp prints.
- Functionality: Magnifies the grain structure of the negative, making precise focusing easier.
4.12. Filters: Contrast Control
Multigrade papers combined with filters allow you to adjust the contrast of your prints.
- Functionality: Filters add or subtract contrast during exposure, providing greater control over the final image.
- Split Filter Printing: Advanced technique using multiple filters to manipulate contrast in different areas of the print.
4.13. Dodging and Burning Tools: Fine-Tuning Exposure
Dodging and burning techniques allow you to selectively adjust the exposure of specific areas of the print.
- Dodging: Blocking light to reduce exposure in certain areas.
- Burning: Adding extra light to increase exposure in other areas.
- DIY Tools: Simple tools like cardboard cutouts and wire-mounted shapes can be used effectively.
4.14. Apron and Towel: Protection and Cleanliness
An apron protects your clothing from chemical splashes, while a towel is essential for cleaning your hands.
4.15. Notebook: Recording Your Process
Keep a detailed notebook to record exposure times, f-stops, filter settings, and dodging/burning adjustments for each print.
- Benefits: This information is invaluable for reprinting images and learning from your experiences.
Proper organization of your darkroom equipment is crucial for efficient workflow and consistent results.
5. Setting Up the Darkroom Space: Ergonomics and Workflow
Proper arrangement of your darkroom is crucial for an efficient and enjoyable printing experience.
5.1. Separate Work Surfaces
Ideally, you should have separate surfaces for the enlarger and the chemistry trays to prevent spills and keep the enlarger area dry.
5.2. Surface Protection
Protect wooden or porous surfaces from chemicals with thick drop cloths or plastic sheeting.
5.3. Chemistry Tray Arrangement
Arrange your chemistry trays in a consistent order (Developer, Stop Bath, Fixer, Wash) from left to right or right to left, depending on your preference.
5.4. Safelight Placement
Position the safelight to provide maximum illumination without directly exposing the photographic paper. Avoid placing it directly next to the enlarger.
5.5. Room Layout
- L-Shaped Configuration: The enlarger occupies the short end of the “L,” and the chemistry trays are positioned along the longer section.
- Opposite Configuration: The chemistry trays are directly across from the enlarger, allowing you to easily turn and place the paper into the developer.
6. Beyond the Darkroom: Ethical Considerations and Professional Conduct
While mastering the technical aspects of darkroom printing is essential, understanding the ethical and professional standards is equally important, especially when engaging with a community.
6.1. Respect for Intellectual Property
Always respect the intellectual property rights of others. Obtain permission before printing or distributing images that are not your own.
6.2. Honesty and Transparency
Be honest and transparent in your dealings with clients, colleagues, and the public. Accurately represent your skills and experience, and avoid plagiarism or misrepresentation of your work.
6.3. Responsible Use of Chemicals
Handle darkroom chemicals responsibly and dispose of them according to local regulations. Protect yourself and the environment by using appropriate safety equipment and following established guidelines.
6.4. Community Engagement and Collaboration
Participate in the photographic community in a positive and constructive manner. Share your knowledge, offer support to others, and engage in respectful dialogue.
6.5. Upholding Ethical Standards
Adhere to the highest ethical standards in all your photographic endeavors. Avoid any actions that could harm or exploit individuals or groups.
7. CONDUCT.EDU.VN: Your Guide to Ethical Conduct and Responsible Practices
CONDUCT.EDU.VN is committed to providing comprehensive resources and guidance on ethical conduct and responsible practices across various fields, including photography. We offer a range of articles, tutorials, and expert advice to help you navigate complex ethical dilemmas and uphold the highest standards of professionalism.
7.1. Resources for Ethical Photography
Explore our collection of articles and resources specifically tailored to ethical considerations in photography, including:
- Guidelines for responsible image manipulation.
- Best practices for obtaining informed consent.
- Strategies for avoiding plagiarism and copyright infringement.
- Resources for promoting diversity and inclusion in photography.
7.2. Contact Us
For inquiries, support, or further information, please contact us:
- Address: 100 Ethics Plaza, Guideline City, CA 90210, United States
- WhatsApp: +1 (707) 555-1234
- Website: CONDUCT.EDU.VN
8. Embracing the Art of Printing: Beyond the Technical
The darkroom experience extends beyond technical skill; it’s about connecting with the history of photography, fostering creativity, and producing tangible works of art.
8.1. The Value of Physical Prints
Even in the digital age, physical prints hold immense value. They provide a lasting connection to your work and offer a unique viewing experience that cannot be replicated on a screen.
8.2. Sharing Your Work
Print your work for others to enjoy.
- Create Photo Books: Compile your best images into a personal photo book.
- Give Prints as Gifts: Share your prints with family and friends.
- Frame Prints for Display: Showcase your work in your home or office.
- Submit to Exhibitions: Share your creativity in galleries.
Displaying your darkroom prints allows you to share your vision with others and celebrate the tangible results of your hard work.
9. FAQ: Your Darkroom Questions Answered
9.1. What is the most important thing to consider when setting up a darkroom?
Total light control is paramount. Even a small light leak can ruin your prints.
9.2. Do I need running water in my darkroom?
While convenient, it’s not essential. You can rinse prints in a tray and then transfer them to a sink.
9.3. What kind of photo paper should I start with?
Resin-coated (RC) paper is recommended for beginners due to its ease of use and faster processing.
9.4. What are the basic chemicals I need for darkroom printing?
Developer, stop bath, and fixer. Perma wash is optional but recommended for fiber-based papers.
9.5. Can I use red LED lights as a safelight?
Yes, red LED lights can be used, but ensure they are the correct wavelength for your paper.
9.6. What is dodging and burning?
Techniques used to selectively adjust the exposure of specific areas of a print.
9.7. Do I need to wear gloves when working with darkroom chemicals?
Gloves are recommended, but tongs can also be used to transfer paper between chemical baths. If using gloves, remember to rinse them after you move the chemistry into the next tray.
9.8. How can I ensure my prints are sharp?
Use a grain focuser to critically assess the focus of the negative on the baseboard.
9.9. What is split filter printing?
An advanced technique using multiple filters to manipulate contrast in different areas of the print.
9.10. Where can I find more information on ethical conduct in photography?
Visit CONDUCT.EDU.VN for comprehensive resources and guidance on ethical practices.
10. Conclusion: Embark on Your Darkroom Journey
Setting up a darkroom is a rewarding endeavor that allows you to connect with the art of photography on a deeper level. By following these guidelines and embracing the unique challenges and rewards of the darkroom process, you can create stunning black and white prints that reflect your personal vision. Remember, CONDUCT.EDU.VN is here to support you on your journey, providing guidance on both the technical and ethical aspects of photography.
As you embark on your darkroom adventure, remember that continuous learning and experimentation are key to mastering the art of printing. Don’t be afraid to explore new techniques, try different papers and chemicals, and develop your own unique style. The darkroom is a place of endless possibilities, and with dedication and passion, you can create truly remarkable images that will stand the test of time. Visit conduct.edu.vn today to discover more valuable resources and guidance to elevate your darkroom practice and ensure ethical conduct in all your photographic endeavors.