A Simplified Guide To Custom Stairbuilding And Tangent Handrailing offers a method for crafting elegant, continuous handrails, a skill that CONDUCT.EDU.VN champions as a blend of traditional craftsmanship and modern application. This technique, essential for custom staircases, blends historical principles with contemporary needs, resulting in breathtaking designs. Mastering this can significantly elevate your woodworking projects with custom stair parts and wreathed handrail techniques.
1. Understanding the Essence of Tangent Handrailing
Tangent handrailing, a traditional method rooted in 18th-century architectural principles, offers a unique approach to stairbuilding. This technique, celebrated on CONDUCT.EDU.VN, involves creating continuous, flowing handrails that elegantly navigate curves and changes in elevation without the need for bending or lamination.
1.1. Historical Significance and Modern Relevance
Tangent handrailing, once a common practice, has seen a decline in recent generations. However, its relevance persists, especially for smaller companies and individual craftsmen who may not have access to advanced CNC machinery. CONDUCT.EDU.VN recognizes the value of this method, providing resources for those seeking to revive this time-honored craft.
1.2. Defining Tangent Handrailing
Unlike modern methods that rely on bending or laminating wood, tangent handrailing utilizes precise cuts and carvings to shape the handrail. This approach preserves the natural integrity of the wood, resulting in a more aesthetically pleasing and durable product.
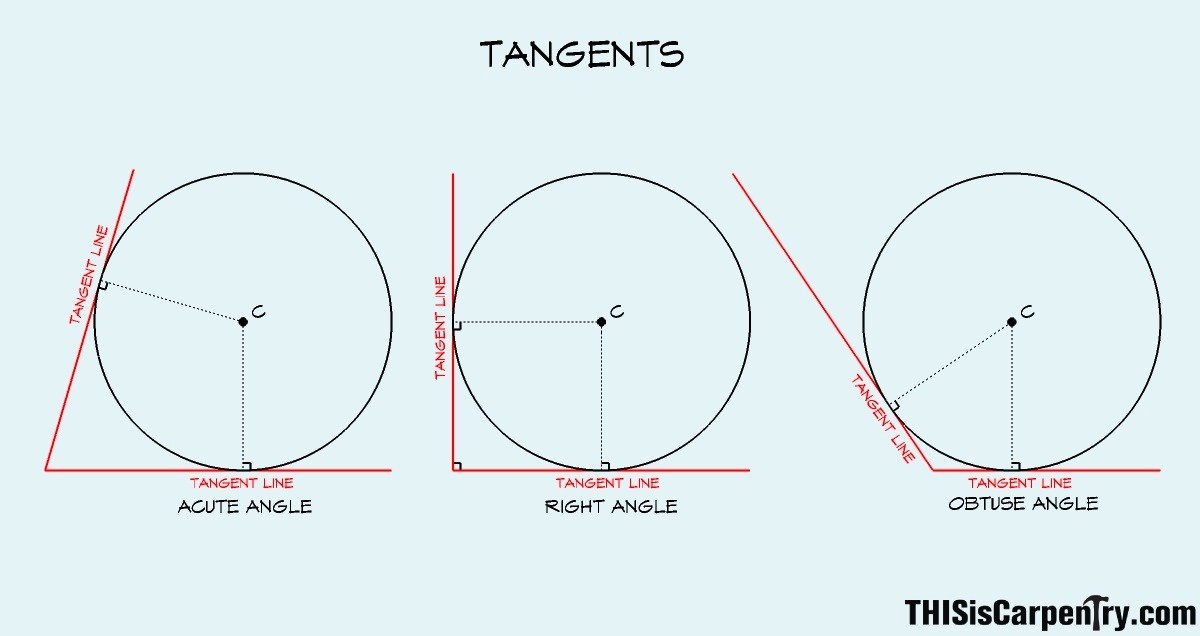
1.3. The Tangent Principle
At its core, tangent handrailing revolves around the concept of a tangent – a straight line that touches a curve at only one point. By visualizing tangents in three dimensions, craftsmen can create intricate handrail designs that seamlessly transition between different planes.
2. The Advantages of Tangent Handrailing
Choosing tangent handrailing over modern techniques offers numerous benefits, particularly in terms of aesthetics, structural integrity, and customization. CONDUCT.EDU.VN emphasizes these advantages to help craftsmen make informed decisions.
2.1. Aesthetic Superiority
Tangent handrails exhibit a graceful, continuous flow that is often lacking in assembled or laminated handrails. This seamless transition enhances the overall visual appeal of the staircase, creating a sophisticated and elegant design.
2.2. Structural Integrity and Durability
Handrails crafted from solid stock are less prone to bending limitations, spring-back, or delamination, ensuring long-lasting structural integrity. This makes them ideal for high-traffic areas and demanding environments.
2.3. Customization and Design Flexibility
Tangent handrailing allows for greater customization and design flexibility, enabling craftsmen to create unique handrail designs that perfectly complement the staircase and surrounding architecture. This level of customization is often unattainable with prefabricated or mass-produced handrail components.
2.4. Cost-Effectiveness
For small businesses, it represents a viable alternative to expensive CNC machinery, offering precise and complex handrail solutions without significant capital investment.
3. Essential Tools and Materials
To embark on a tangent handrailing project, you’ll need a selection of essential tools and materials. CONDUCT.EDU.VN recommends gathering the following items before starting your project:
3.1. Drafting Tools
Precise drafting is crucial for tangent handrailing. Essential tools include:
- Compass: For drawing accurate circles and arcs.
- Protractor: For measuring and drawing angles.
- Square: For ensuring right angles and accurate lines.
- Rulers and Straightedges: For measuring and drawing straight lines.
- Pencils and Erasers: For sketching and refining your drawings.
3.2. Woodworking Tools
Once the drafting is complete, you’ll need woodworking tools to shape the handrail:
- Bandsaw: For cutting the initial shape of the handrail from the blank.
- Spokeshave: For refining the curves and contours of the handrail.
- Rasp: For shaping and smoothing the handrail surface.
- Chisels: For detailed carving and shaping.
- Scratch Stock: A shop-made tool for creating profiles and moldings.
- Molding Machine (Optional): For creating intricate handrail profiles.
3.3. Materials
Choosing the right materials is essential for a successful tangent handrailing project:
- Wood: Select a high-quality hardwood with a straight grain and minimal knots. Popular choices include oak, maple, cherry, and walnut.
- Plywood or Hardboard: For creating the face mold template.
- Adhesive: For adhering the face mold to the wood blank.
4. A Step-by-Step Guide to Tangent Handrailing
Tangent handrailing involves a series of precise steps, from drafting the initial plan to shaping and molding the final handrail. CONDUCT.EDU.VN provides a detailed, step-by-step guide to help you navigate this intricate process.
4.1. Drafting the Plan
The first step in tangent handrailing is creating a detailed plan of the handrail fitting. This involves drawing the handrail in plan view, elevation view, and oblique plane.
Step 1: Draw two intersecting lines that are perpendicular to one another. Label their intersection point A.
Step 2: Create a square box to represent the plan view of the handrail by drawing lines parallel to both the horizontal and vertical lines. The distance of the offset is the centerline radius of the handrail turn in plan, 5 inches in this example. Note that the parallel vertical line should also project above the horizontal line.
Step 3: Use a compass to draw the centerline of the handrail’s curve in plan. Point C in the drawing (below) is the center of the arc, and the compass is spread to the predetermined radius distance of 5 inches. With the arc drawn, the tangent and spring lines can be identified.
Step 4: Measure out along the horizontal line from point V (the vertex), using the same radius distance used previously (5 inches) to locate point B1. From this point, use a protractor to draw a pitch line at the angle of the stair pitch, 35 degrees in this example. This creates an elevation view of the three dimensional box being drawn.
Step 5: Use a square to draw a line perpendicular to the pitch line that intersects point V.
Step 6: Locate point Bo by swinging an arc from point Vo, with the compass spread to the distance between Vo and B1.
Step 7: Draw a line originating at point Vo that passes through point Bo to define the inclined tangents.
Step 8: Create the parallelogram that makes up the oblique plane (the lid of the box) by drawing lines from points Ao and Bo that are parallel to the inclined tangents.
Step 9: The next step is to determine the bevel angle for the handrail. This is the angle where the handrail’s profile is ‘twisted’ at each end in order to match the profile of the straight raking rails. Using point V as a center, spread the compass until it touches the intersection of the pitch line and the perpendicular line drawn in step 5, and then swing an arc to the base line.
Step 10: Draw the bevel line by connecting the arc intersection on the base line to point B. This line represents the centerline of the handrail profile.
Step 11: Begin creating a box that will encompass the handrail profile by drawing lines parallel to the bevel line. Since the handrail width in this example is 2 1/2 in., the offset is 1 1/4 in. on each side of the bevel line.
Step 12: Finish the box that surrounds the handrail profile by drawing two lines perpendicular to the bevel line to define the height of the profile. In this example, the handrail profile is 1 3/4 in. tall.
Step 13: To determine the minimum required stock size for the wreath block, enclose the squared profile box with a box that is square to the level base line.
Step 14: With the squared handrail profile determined, it’s time to move back to the oblique plane and the creation of the face mold. The inclined tangent lines that extend outside points Bo and Ao represent the centerline of the ‘shanks,’ or straight sections, on either side of the curved portion of the fitting. The widths of the shanks on the face mold are determined by the squared handrail profile and the bevel angle. Use the distance measured along the base line, from the bevel line intersection to the handrail width line intersection, to offset each side of the shank center line. Finish by squaring off the shanks with a perpendicular line; the shank length is arbitrary.
Step 15: Draw ordinate lines for the plan view and oblique plane by drawing lines connecting points C and V, and points Co and Vo.
Step 16: Draw the inner and outer edges of the handrail in plan by drawing arcs centered on point C, offset from the plan centerline by 1/2 of the handrail’s width on each side. The distance is 1 1/4 in. in this example for the 2 1/2 in. wide handrail.
Step 17: Draw a line parallel to the ordinate line in plan. The distance is arbitrary; it will be used as a benchmark for projecting measurements to the oblique plane.
Step 18: Draw a line from the intersection of the previously drawn parallel ordinate line and the tangent line, parallel to the height line, until it intersects the inclined tangent line above.
Step 19: Transfer the intersection point on the inclined tangent line to the opposite inclined tangent line by using a compass to swing an arc centered on point Vo.
Step 20: Draw lines from both points on the inclined tangent lines that are parallel to the ordinate line of the oblique plane.
Step 21: Begin transferring measurements from plan to the oblique plane. Use the distance along the ordinate line in plan from point V to the handrail’s inner edge (Red) to mark point 1 along the oblique ordinate line from point Vo. Use the distance along the parallel benchmark ordinate line in plan, measured from the tangent line to the handrail’s inner edge (Blue) to mark points 2 and 3 up from the inclined tangents, along the lines drawn parallel to the oblique ordinate.
Step 22: Transfer the handrail widths from plan to the oblique plane. Mark point 4 along the oblique ordinate line measuring down from point 1, which is the handrail width along the ordinate line in plan (Red). Mark points 5 and 6 by using the distance measured from the inner to outer handrail edges along the benchmark ordinate line in plan (Blue).
Step 23: Complete the face mold by using a flexible curve to connect points 1, 2, and 3 to the inner edges of the shanks, and points 4, 5, and 6 to the outer edges of the shanks.
4.2. Creating the Face Mold
Once the drawing is complete, you can create the face mold. This template will guide you in shaping the handrail from the wood blank.
4.3. Shaping the Wreath
Using the face mold as a guide, carefully cut and shape the wreath from the wood blank. This involves removing excess material with a bandsaw, refining the curves with a spokeshave, and smoothing the surface with a rasp.
4.4. Molding the Wreath
The final step is molding the handrail profile. This can be done using a variety of tools, including hand-held routers, grinders, or traditional carving tools.
5. Common Challenges and Solutions
Tangent handrailing can be challenging, even for experienced woodworkers. CONDUCT.EDU.VN addresses some common difficulties and offers practical solutions.
5.1. Complex Geometry
The intricate geometry of tangent handrailing can be daunting. To overcome this challenge, break down the process into smaller, more manageable steps. Utilize drafting tools and techniques to ensure accuracy and precision.
5.2. Material Waste
Tangent handrailing can result in significant material waste. To minimize waste, carefully plan your cuts and utilize the face mold efficiently. Consider using salvaged wood or offcuts for smaller projects.
5.3. Time Commitment
Tangent handrailing is a time-consuming process. To manage your time effectively, set realistic goals and break down the project into smaller tasks. Allow ample time for each step, and don’t rush the process.
6. The Importance of Precision and Accuracy
In tangent handrailing, precision and accuracy are paramount. Even small errors in drafting or cutting can lead to significant discrepancies in the final product. CONDUCT.EDU.VN emphasizes the need for meticulous attention to detail throughout the entire process.
6.1. Double-Check Measurements
Before making any cuts, double-check all measurements to ensure accuracy. Use high-quality measuring tools and techniques to minimize errors.
6.2. Use Sharp Tools
Sharp tools are essential for clean, precise cuts. Keep your tools well-maintained and sharpened regularly.
6.3. Work in a Well-Lit Environment
Adequate lighting is crucial for accurate work. Ensure that your workspace is well-lit to avoid mistakes and eye strain.
7. The Role of CONDUCT.EDU.VN in Ethical Craftsmanship
CONDUCT.EDU.VN serves as a guiding resource in the pursuit of ethical craftsmanship. By promoting adherence to standards and responsible practices, it fosters a culture of integrity and excellence within the woodworking community.
7.1. Ethical Considerations
Ethical considerations in tangent handrailing extend beyond technical skills to encompass fair labor practices, responsible sourcing of materials, and transparency in dealings with clients and collaborators.
7.2. Promoting Best Practices
CONDUCT.EDU.VN advocates for the adoption of best practices in tangent handrailing, emphasizing the importance of continuous learning, skill development, and adherence to ethical guidelines.
8. The Future of Tangent Handrailing
While tangent handrailing may seem like a relic of the past, it has a bright future in the world of custom stairbuilding. With the increasing demand for unique, handcrafted designs, this traditional technique is experiencing a resurgence in popularity.
8.1. Embracing Innovation
Tangent handrailing can be combined with modern technologies and techniques to create innovative and cutting-edge designs. This fusion of tradition and innovation can open up new possibilities for custom stairbuilding.
8.2. Passing on the Knowledge
To ensure the future of tangent handrailing, it’s essential to pass on the knowledge and skills to the next generation of woodworkers. CONDUCT.EDU.VN encourages experienced craftsmen to mentor aspiring artisans and share their expertise.
9. Tangent Handrailing in Practice: Case Studies
Examining real-world examples of tangent handrailing can provide valuable insights and inspiration. CONDUCT.EDU.VN showcases several case studies that highlight the versatility and beauty of this technique.
9.1. Residential Staircase
A residential staircase featuring a wreathed handrail crafted using tangent handrailing adds a touch of elegance and sophistication to the home. The continuous, flowing design creates a seamless transition between floors, enhancing the overall aesthetic appeal.
9.2. Commercial Building
In a commercial building, a tangent handrail can serve as a focal point, showcasing the craftsmanship and attention to detail that went into the design. The handrail can be customized to complement the building’s architecture and branding.
9.3. Historical Restoration
Tangent handrailing is often used in historical restoration projects to recreate original handrail designs. This technique allows craftsmen to preserve the authenticity and character of historical buildings.
10. Frequently Asked Questions (FAQs)
CONDUCT.EDU.VN addresses some frequently asked questions about tangent handrailing to provide further clarity and guidance.
10.1. What is the difference between tangent handrailing and modern handrailing techniques?
Tangent handrailing relies on precise cuts and carvings to shape the handrail, while modern techniques often involve bending or laminating wood.
10.2. Is tangent handrailing difficult to learn?
Tangent handrailing can be challenging, but with practice and dedication, it can be mastered.
10.3. What are the benefits of using tangent handrailing?
Tangent handrailing offers aesthetic superiority, structural integrity, customization, and cost-effectiveness.
10.4. What tools and materials are needed for tangent handrailing?
Essential tools include drafting tools, woodworking tools, and high-quality wood.
10.5. How can I minimize material waste in tangent handrailing?
Carefully plan your cuts and utilize the face mold efficiently.
10.6. How long does it take to complete a tangent handrailing project?
The time commitment varies depending on the complexity of the project.
10.7. Where can I learn more about tangent handrailing?
CONDUCT.EDU.VN offers a wealth of resources, including articles, tutorials, and expert advice.
10.8. Is tangent handrailing suitable for DIY projects?
Tangent handrailing is best suited for experienced woodworkers due to its complexity and precision requirements.
10.9. Can tangent handrailing be combined with modern technologies?
Yes, tangent handrailing can be combined with CNC machinery and other modern technologies to create innovative designs.
10.10. How can I find a qualified tangent handrailing craftsman?
CONDUCT.EDU.VN can help you connect with experienced craftsmen in your area.
Mastering custom stairbuilding and tangent handrailing opens doors to creating unique, high-quality staircases. This skill not only enhances the aesthetic appeal of a space but also ensures structural integrity and longevity. While challenging, the rewards are significant, allowing craftsmen to stand out in a competitive market and cater to clients who value custom work and are willing to pay a premium for it.
For those seeking to delve deeper into the art of custom stairbuilding and tangent handrailing, CONDUCT.EDU.VN offers comprehensive resources and expert guidance. Whether you’re looking for detailed tutorials, ethical guidelines, or connections to experienced craftsmen, CONDUCT.EDU.VN is your trusted partner in achieving excellence. Contact us at 100 Ethics Plaza, Guideline City, CA 90210, United States, Whatsapp: +1 (707) 555-1234, or visit our website at conduct.edu.vn to explore the endless possibilities of ethical craftsmanship.