Are Sram Guide T Brakes Good for your mountain bike? This comprehensive review explores the features, performance, and potential drawbacks of the SRAM Guide T hydraulic disc brakes, offering a balanced perspective to help you decide if they’re the right choice for your riding style and needs. CONDUCT.EDU.VN provides in-depth analyses of cycling equipment, ensuring you have the information necessary to make informed decisions. Stay informed with insights into braking power, modulation, and overall value.
Table of Contents
- Understanding SRAM Guide T Brakes
- Key Features and Specifications
- Setting Up Your SRAM Guide T Brakes
- Performance on the Trail
- Potential Issues and How to Address Them
- Comparison with Other Brake Systems
- Maintenance Tips for Longevity
- Customization and Upgrades
- Expert Opinions and User Reviews
- Frequently Asked Questions (FAQs)
1. Understanding SRAM Guide T Brakes
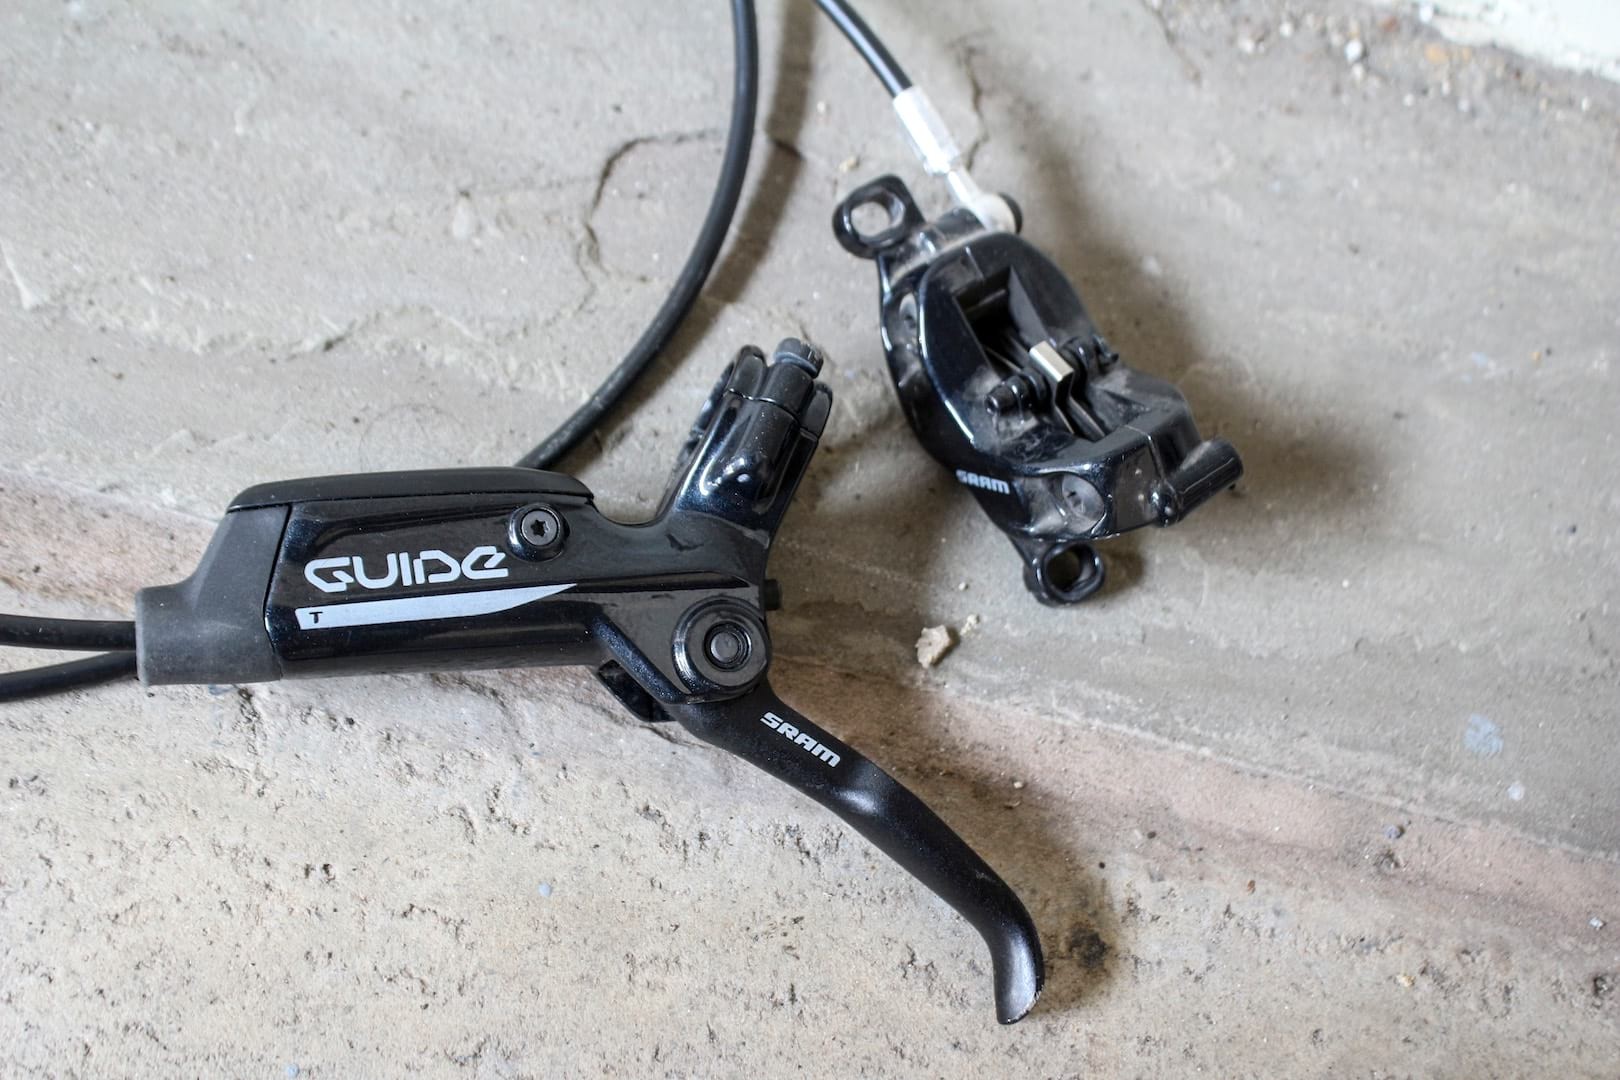
The SRAM Guide T hydraulic disc brakes are designed as an entry-level option within the SRAM Guide series, known for their versatility in handling everything from trail riding to enduro racing. Positioned between the Level series (aimed at XC riding) and the Code series (built for gravity use), the Guide T brakes aim to offer a balance of power and control for a wide range of riding styles. This makes them a popular choice for riders seeking reliable performance without breaking the bank. The design philosophy behind the Guide T brakes emphasizes simplicity and functionality, ensuring ease of use and maintenance.
1.1. Target Audience and Intended Use
The SRAM Guide T brakes are ideal for:
- Trail Riders: Those who enjoy varied terrain and need reliable braking power.
- Enduro Racers: Who require consistent performance under demanding conditions.
- Budget-Conscious Riders: Seeking quality brakes without the high price tag.
1.2. Key Design Principles
- Four-Piston Caliper: Provides increased stopping power and better modulation compared to two-piston designs.
- Forged Alloy Body: Ensures durability and heat dissipation.
- DOT 5.1 Fluid: Offers consistent performance and high boiling point.
2. Key Features and Specifications
The SRAM Guide T brakes come with a range of features designed to enhance performance and reliability. These features, combined with their specifications, make them a competitive option in the entry-level hydraulic disc brake market. Understanding these details can help you appreciate the capabilities and limitations of the Guide T brakes.
2.1. Detailed Feature List
| Feature | Description |
|---|---|
| Caliper Design | Four-piston caliper with forged two-piece alloy body for increased stopping power and heat management. |
| Piston Diameter | 14/16mm pistons for optimal force distribution and consistent performance. |
| Heat Shields | Stainless steel heat shields to reduce heat transfer to the caliper body. |
| Lever Design | Ambidextrous levers with split clamp mount for easy installation and adjustability. |
| Lever Blade | Alloy lever blade with a comfortable, ergonomic design. |
| Reach Adjustment | Tooled reach adjustment to customize lever position. |
| Compatibility | MatchMaker compatible for integration with SRAM shifters and dropper levers. |
| Fluid Type | DOT 5.1 fluid for consistent performance and high boiling point. |
| Bleeding Edge | Compatible with Bleeding Edge tool for easy and effective bleeding. |
| Brake Pads | Organic brake pad compound (sintered metallic available separately). |
| Weight | Approximately 282g (front) & 297g (rear). |
| Rotor Compatibility | Designed to work with SRAM Centreline rotors, available in various sizes (160mm, 180mm, 200mm). |
| Mounting System | Compatible with both Post Mount and IS Mount standards, requiring adapters for specific frame and fork configurations. |
| Master Cylinder Design | Simplified master cylinder design without advanced features like SwingLink. |
| Split Clamp | Allows installation without removing grips or other cockpit components. |
2.2. Material and Construction
- Caliper: Forged two-piece alloy body for durability and heat dissipation.
- Lever Blade: Alloy for strength and responsiveness.
- Heat Shields: Stainless steel to minimize heat transfer.
- Hoses: Hydraulic hoses designed to withstand high pressure and maintain consistent performance.
2.3. Technical Specifications
| Specification | Value | Unit |
|---|---|---|
| Piston Diameter | 14/16 | mm |
| Fluid Type | DOT 5.1 | |
| Weight (Front) | 282 | g |
| Weight (Rear) | 297 | g |
| RRP (Per End) | 104 | £ |
3. Setting Up Your SRAM Guide T Brakes
Proper setup is crucial for maximizing the performance and lifespan of your SRAM Guide T brakes. This section provides a step-by-step guide to ensure your brakes are correctly installed and adjusted for optimal performance. CONDUCT.EDU.VN emphasizes the importance of following manufacturer guidelines and using appropriate tools for all maintenance and setup procedures.
3.1. Installation Process
- Mounting the Calipers:
- Ensure the correct adapters are used for your frame and fork mounting standards (Post Mount or IS Mount).
- Tighten caliper bolts to the manufacturer’s specified torque.
- Installing the Levers:
- Use the split clamp to attach the levers to the handlebars without removing grips or other components.
- Position the levers for comfortable reach and optimal control.
- Tighten the clamp bolts to the specified torque.
- Connecting the Hoses:
- Ensure the hoses are routed correctly and securely fastened to the frame.
- Trim the hoses to the appropriate length, if necessary, and install new barbs and olives.
- Tighten all hose fittings to the specified torque.
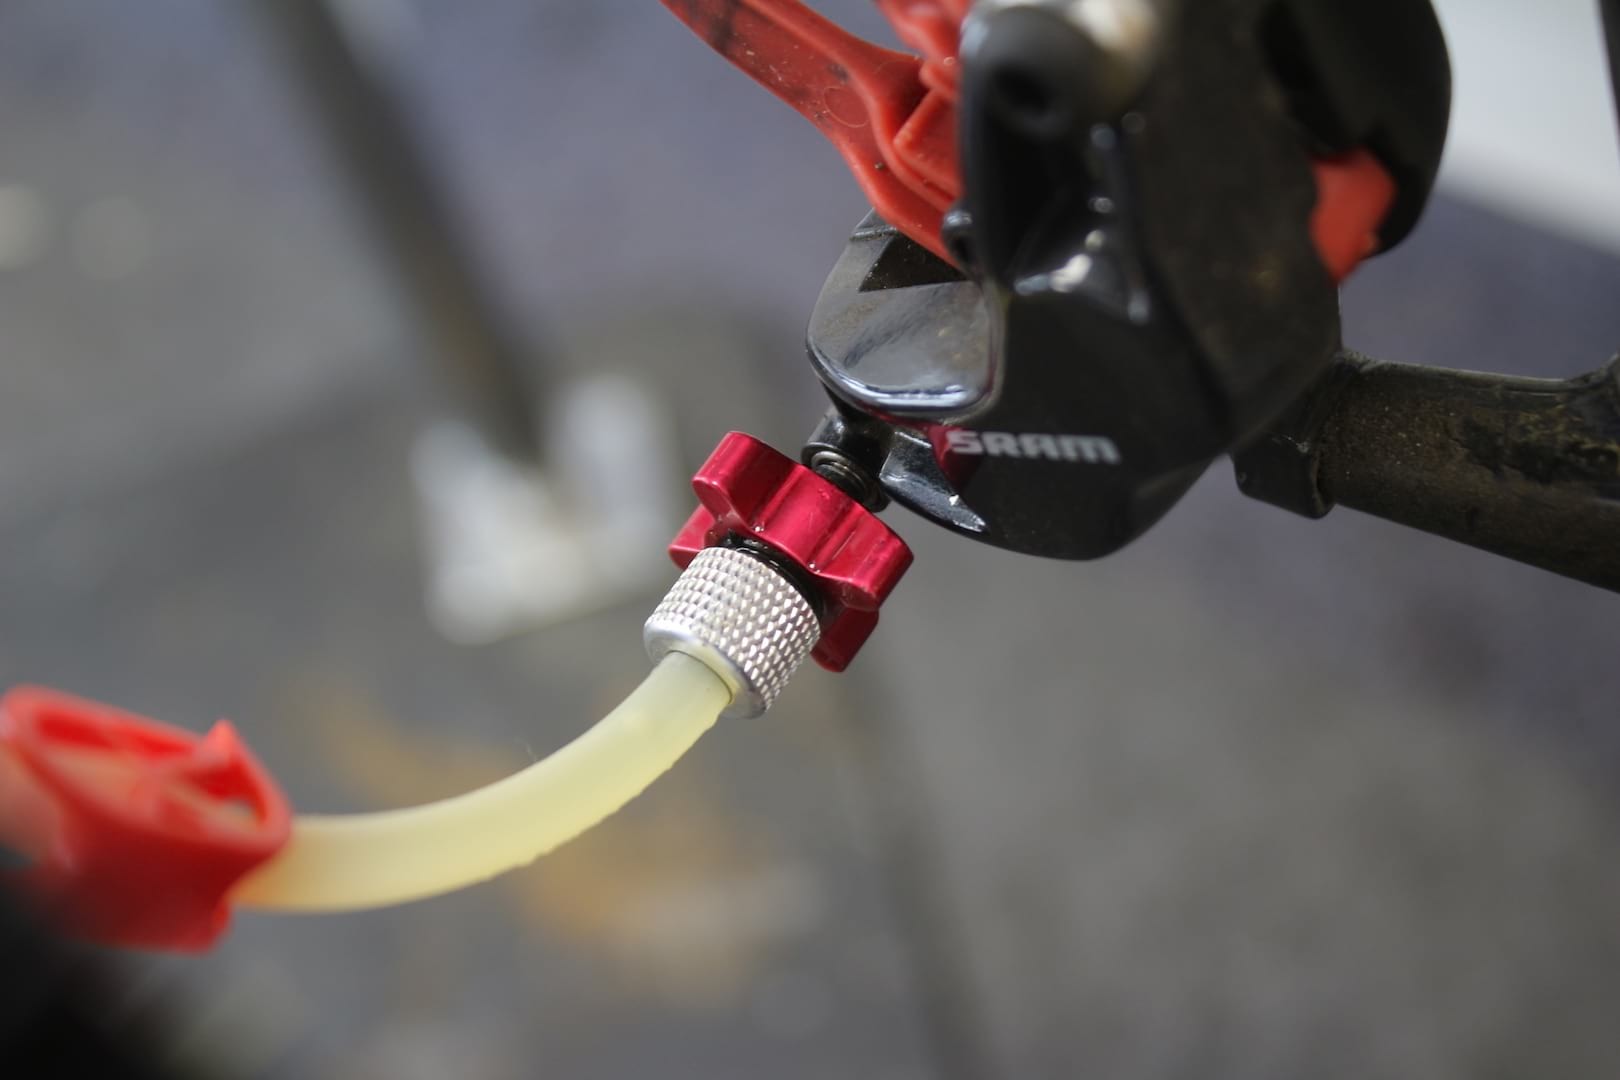
3.2. Bleeding the Brakes
- Preparation:
- Gather the necessary tools: Bleeding Edge tool, DOT 5.1 fluid, syringes, and appropriate fittings.
- Protect your work area to prevent fluid spills.
- Bleeding Process:
- Attach the syringes to the lever and caliper bleed ports.
- Push fluid through the system to remove air bubbles.
- Ensure no air remains in the system before closing the bleed ports.
- Final Checks:
- Clean any spilled fluid from the brakes and surrounding components.
- Test the brakes to ensure proper function and lever feel.
3.3. Adjusting Lever Reach
- Locate the Reach Adjustment Screw:
- Find the 2.5mm hex key adjustment screw on the lever.
- Adjust the Lever Position:
- Use a hex key to adjust the lever closer to or further from the handlebar.
- Ensure both levers are adjusted to the same position for consistent feel.
- Test the Adjustment:
- Test the lever feel while riding to ensure it is comfortable and provides adequate control.
4. Performance on the Trail
The true test of any brake system is its performance on the trail. The SRAM Guide T brakes are designed to offer a balance of power, modulation, and reliability in various riding conditions. This section assesses how well they deliver on these promises.
4.1. Braking Power and Modulation
- Power: The four-piston caliper design provides ample stopping power for most trail riding situations.
- Modulation: The Guide T brakes offer good modulation, allowing riders to control their speed effectively, especially on technical trails.
- Comparison to Higher-End Models: While they may not offer the same level of power as higher-end Guide brakes with SwingLink, they still provide a significant improvement over two-piston systems like the Level T.
4.2. Lever Feel and Ergonomics
- Lever Shape: The curvy lever blade with a hooked profile is comfortable and suitable for both one-finger and two-finger braking styles.
- Lever Action: Smooth lever action with a well-defined bite point that is easy to locate consistently.
- Engagement: The power comes on steadily, providing useful modulation for controlling speed, which is particularly beneficial on loose surfaces.
4.3. Performance in Different Conditions
- Dry Conditions: Consistent and reliable performance with good stopping power and modulation.
- Wet Conditions: The stock organic brake pads may wear quickly in wet and gritty conditions, necessitating more frequent replacements.
- Long Descents: The brakes maintain consistent performance, but riders should be mindful of potential heat build-up and pad wear.
4.4. Real-World Riding Experiences
- Trail Riding: The Guide T brakes excel in trail riding, providing the necessary power and control for varied terrain.
- Enduro Racing: They offer reliable performance for enduro racing, although riders may need to upgrade to sintered metallic pads for better durability in demanding conditions.
- Daily Commuting: Suitable for daily commuting, providing reliable stopping power in urban environments.
5. Potential Issues and How to Address Them
Like any mechanical system, the SRAM Guide T brakes may encounter issues over time. This section identifies common problems and provides practical solutions to keep your brakes performing optimally. CONDUCT.EDU.VN encourages regular maintenance and prompt attention to any signs of trouble to ensure safe and reliable braking performance.
5.1. Common Problems
- Pad Wear: The stock organic brake pads can wear quickly, especially in wet conditions.
- Lever Dead Throw: As the brake pads wear, the lever may travel further before engaging, reducing braking power.
- Air in the System: Air bubbles can compromise braking performance, leading to spongy lever feel and reduced stopping power.
- Contamination: Oil or grease on the brake pads or rotors can reduce braking effectiveness and cause noise.
- Sticking Pistons: Pistons in the caliper may stick, causing uneven pad wear and reduced braking power.
5.2. Troubleshooting Guide
| Problem | Solution |
|---|---|
| Rapid Pad Wear | Upgrade to sintered metallic brake pads for better durability in wet conditions. |
| Lever Dead Throw | Replace worn brake pads to restore proper lever feel and braking power. |
| Air in System | Bleed the brakes to remove air bubbles and restore consistent lever feel. |
| Contamination | Clean brake pads and rotors with isopropyl alcohol or a dedicated brake cleaner. Replace contaminated pads if necessary. |
| Sticking Pistons | Remove the caliper and clean the pistons with isopropyl alcohol. Lubricate the pistons with a small amount of DOT 5.1 fluid. Ensure pistons move freely. Replace seals if necessary. |
5.3. Preventive Maintenance
- Regular Inspections: Check brake pads and rotors regularly for wear and damage.
- Cleaning: Keep brake components clean and free from dirt and debris.
- Bleeding: Bleed the brakes annually, or more frequently if you notice a spongy lever feel.
- Lubrication: Lubricate caliper pistons periodically to ensure smooth operation.
- Proper Storage: Store your bike in a dry place to prevent corrosion and damage to brake components.
6. Comparison with Other Brake Systems
Understanding how the SRAM Guide T brakes compare to other brake systems can help you make an informed decision based on your specific needs and preferences. This section provides a detailed comparison with other popular brake models.
6.1. SRAM Level T vs. SRAM Guide T
| Feature | SRAM Level T | SRAM Guide T |
|---|---|---|
| Piston Count | Two-piston caliper | Four-piston caliper |
| Power | Less power compared to Guide T | More power than Level T |
| Modulation | Less modulation, can be grabby | Better modulation, smoother engagement |
| Intended Use | XC riding and light trail | Trail riding, enduro racing |
| Price | Generally more affordable | Slightly more expensive |
6.2. Shimano Deore vs. SRAM Guide T
| Feature | Shimano Deore | SRAM Guide T |
|---|---|---|
| Piston Count | Two-piston or four-piston options available | Four-piston caliper |
| Power | Comparable power, depending on the Deore model (two-piston vs. four-piston) | Comparable power |
| Modulation | Some riders prefer Shimano’s more “on/off” feel | SRAM offers a more gradual, modulated feel |
| Reliability | Shimano is known for excellent reliability | SRAM has had some reliability issues in the past, but Guide T is generally solid |
| Price | Generally comparable in price | Generally comparable in price |
6.3. Other Considerations
- Maintenance: Both SRAM and Shimano brakes require regular maintenance, including bleeding and pad replacement.
- Compatibility: Ensure compatibility with your existing components, such as rotors and adapters.
- Personal Preference: Ultimately, the best brake system depends on your personal preferences and riding style.
7. Maintenance Tips for Longevity
Proper maintenance is essential for extending the life and performance of your SRAM Guide T brakes. This section provides practical tips to keep your brakes in top condition. CONDUCT.EDU.VN emphasizes the importance of following these guidelines to ensure safe and reliable braking performance.
7.1. Regular Cleaning
- Frequency: Clean your brakes after every ride, or at least once a week.
- Materials: Use a soft brush, mild soap, and water to remove dirt and debris.
- Avoid Contaminants: Avoid using harsh chemicals or solvents that can damage brake components.
- Rotor Cleaning: Clean rotors with isopropyl alcohol or a dedicated brake cleaner to remove oil and grease.
7.2. Brake Pad Maintenance
- Inspection: Check brake pads regularly for wear and damage.
- Replacement: Replace brake pads when they are worn to the minimum thickness or show signs of damage.
- Bedding In: Bed in new brake pads by performing several controlled stops to transfer material to the rotor.
7.3. Bleeding the Brakes
- Frequency: Bleed the brakes annually, or more frequently if you notice a spongy lever feel.
- Tools: Use the Bleeding Edge tool and DOT 5.1 fluid for best results.
- Procedure: Follow the manufacturer’s instructions carefully to ensure all air is removed from the system.
7.4. Caliper Maintenance
- Piston Cleaning: Clean caliper pistons periodically to ensure smooth operation.
- Lubrication: Lubricate the pistons with a small amount of DOT 5.1 fluid.
- Seal Inspection: Inspect caliper seals for damage and replace as needed.
8. Customization and Upgrades
Customizing and upgrading your SRAM Guide T brakes can enhance their performance and tailor them to your specific needs. This section explores various options for improving your braking system.
8.1. Brake Pad Upgrades
- Sintered Metallic Pads: Upgrade to sintered metallic brake pads for better durability and performance in wet conditions.
- Ceramic Pads: Consider ceramic brake pads for reduced noise and improved heat dissipation.
- Performance Compounds: Explore different brake pad compounds to fine-tune braking power and modulation.
8.2. Rotor Upgrades
- Larger Rotors: Increase rotor size for greater stopping power and improved heat dissipation.
- High-Performance Rotors: Upgrade to high-performance rotors with improved heat management and durability.
- Floating Rotors: Consider floating rotors for reduced weight and improved braking consistency.
8.3. Lever Upgrades
- Ergonomic Levers: Upgrade to ergonomic levers for improved comfort and control.
- Adjustable Levers: Consider levers with adjustable reach and contact point for customized feel.
- Lightweight Levers: Explore lightweight levers for reduced weight and improved responsiveness.
8.4. Hose Upgrades
- Braided Hoses: Upgrade to braided hydraulic hoses for improved durability and reduced hose expansion.
- Colored Hoses: Consider colored hoses for a customized look.
9. Expert Opinions and User Reviews
Gathering insights from experts and fellow riders can provide a balanced perspective on the SRAM Guide T brakes. This section compiles expert opinions and user reviews to help you make an informed decision.
9.1. Expert Reviews
- Positive Feedback: Many experts praise the Guide T brakes for their ample stopping power, good modulation, and affordable price.
- Criticisms: Some experts note that the Guide T brakes may not offer the same level of performance as higher-end models and that the stock organic brake pads can wear quickly.
9.2. User Reviews
- Common Themes: Users often highlight the Guide T brakes’ reliability and ease of use. Many appreciate the improved stopping power compared to two-piston systems.
- Concerns: Some users express concerns about the rapid wear of the stock brake pads and the need for frequent replacements.
9.3. Overall Assessment
The SRAM Guide T brakes are generally well-regarded as an entry-level option that provides a good balance of performance and value. While they may not be the top choice for demanding riders, they offer a significant upgrade over basic brake systems and are suitable for a wide range of riding styles.
10. Frequently Asked Questions (FAQs)
This section addresses common questions about the SRAM Guide T brakes to provide comprehensive information for potential buyers and users.
10.1. General Questions
-
What is the intended use of the SRAM Guide T brakes?
The SRAM Guide T brakes are designed for trail riding and enduro racing, offering a balance of power and control.
-
How do the SRAM Guide T brakes compare to the SRAM Level T brakes?
The Guide T brakes offer more power and better modulation compared to the Level T brakes, thanks to their four-piston caliper design.
-
What type of brake pads come with the SRAM Guide T brakes?
The SRAM Guide T brakes come with organic brake pads. Sintered metallic pads are available separately as an upgrade.
-
Are the SRAM Guide T brakes compatible with MatchMaker?
Yes, the SRAM Guide T brakes are compatible with MatchMaker, allowing for integration with SRAM shifters and dropper levers.
-
What type of fluid do the SRAM Guide T brakes use?
The SRAM Guide T brakes use DOT 5.1 fluid.
10.2. Installation and Maintenance
-
How do I install the SRAM Guide T brakes?
The installation process involves mounting the calipers and levers, connecting the hoses, and bleeding the brakes. Follow the manufacturer’s instructions carefully.
-
How do I bleed the SRAM Guide T brakes?
Use the Bleeding Edge tool and DOT 5.1 fluid to bleed the brakes. Attach the syringes to the bleed ports and push fluid through the system to remove air bubbles.
-
How often should I bleed the SRAM Guide T brakes?
Bleed the brakes annually, or more frequently if you notice a spongy lever feel.
-
How do I adjust the lever reach on the SRAM Guide T brakes?
Use a 2.5mm hex key to adjust the reach adjustment screw on the lever.
-
How do I clean the SRAM Guide T brakes?
Use a soft brush, mild soap, and water to clean the brakes. Avoid using harsh chemicals or solvents.
10.3. Performance and Upgrades
-
How can I improve the braking power of the SRAM Guide T brakes?
Consider upgrading to larger rotors or sintered metallic brake pads for improved braking power.
-
How can I improve the modulation of the SRAM Guide T brakes?
Experiment with different brake pad compounds to fine-tune braking modulation.
-
What are the benefits of upgrading to sintered metallic brake pads?
Sintered metallic brake pads offer better durability and performance in wet conditions.
-
Are there any lever upgrades available for the SRAM Guide T brakes?
Yes, you can upgrade to ergonomic levers or levers with adjustable reach and contact point for customized feel.
-
What is the purpose of floating rotors?
Floating rotors reduce weight and improve braking consistency.
For further information and detailed guides, visit CONDUCT.EDU.VN at 100 Ethics Plaza, Guideline City, CA 90210, United States. Contact us via Whatsapp at +1 (707) 555-1234. At conduct.edu.vn, we are dedicated to providing you with the resources you need to make informed decisions and maintain your equipment for optimal performance.