The Bg3 Trophy Guide offers a roadmap for completionists seeking to unlock every achievement in Baldur’s Gate 3. This comprehensive Baldur’s Gate 3 achievement guide provides strategies, tips, and step-by-step instructions to conquer every challenge, ensuring a rewarding and thorough gaming experience. Unlocking these digital accolades enriches the gameplay, offering a deeper appreciation for the game’s intricate design and narrative.
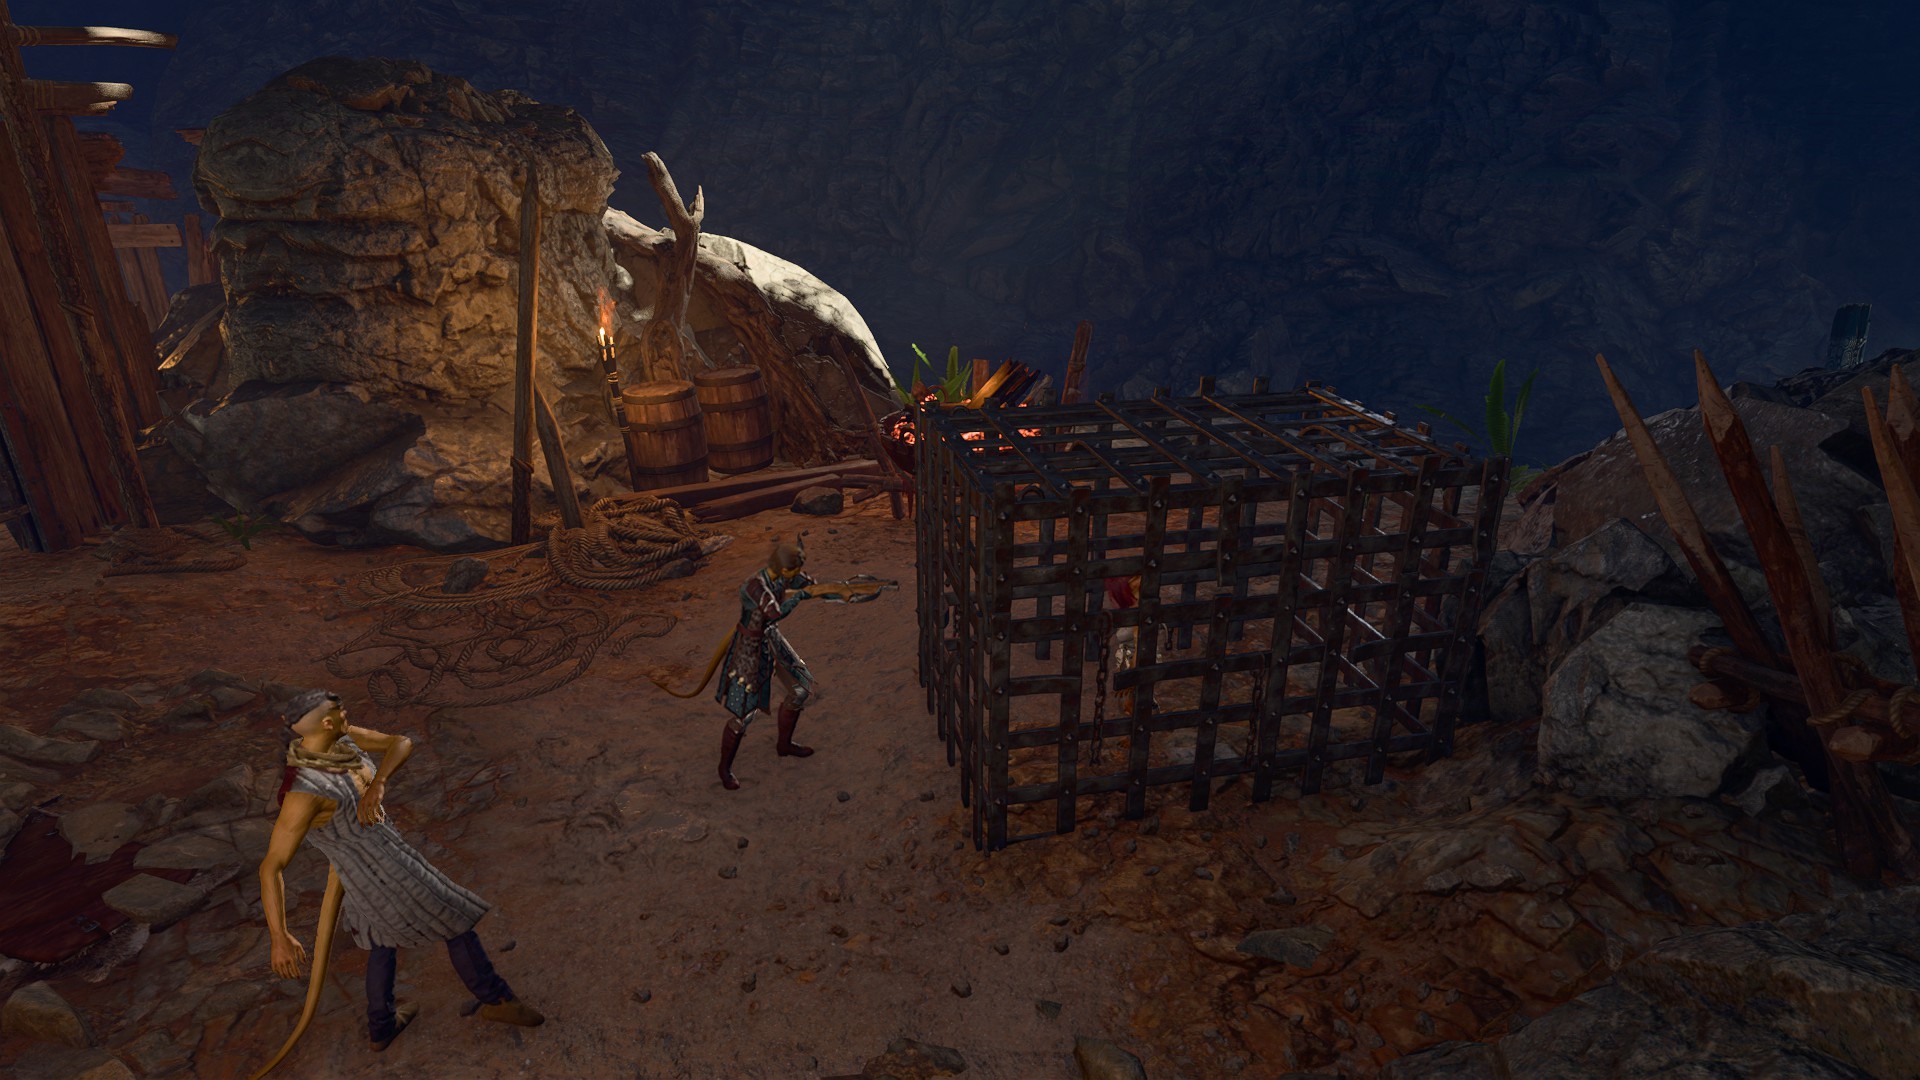
1. She Cannot Be Caged: Rescuing Sazza
This achievement requires rescuing Sazza, a goblin, from three different locations: the Emerald Grove, the Goblin Camp, and Moonrise Towers, within a single playthrough. This task tests your strategic thinking and resourcefulness.
1.1 Saving Sazza from the Emerald Grove
The first step involves rescuing Sazza from the Emerald Grove. She’s initially caged, awaiting punishment. You can free her by finding a secret exit.
1.2 Navigating the Goblin Camp
After rescuing her from the Emerald Grove, you’ll encounter Sazza again at the Goblin Camp. Here, the goblins intend to sacrifice her to spiders. You must prevent this without initiating combat, as Sazza will fight alongside you and likely perish. The solution is to negotiate with Minthara, agreeing to attack the Emerald Grove. Note that if you are pursuing the “Leave No One Behind” achievement, you must side with the Tieflings during the siege.
1.3 Moonrise Towers Encounter
Your final encounter with Sazza occurs in Act 2 at Moonrise Towers. Here, Sazza and other goblins are left to fend for themselves. Your task is to allow them to leave without interference.
2. You Have Two Hands for a Reason: Petting Scratch and the Owlbear Cub Simultaneously
This heartwarming achievement requires you to pet both Scratch the dog and the Owlbear cub at the same time. This highlights the game’s capacity to foster emotional connections within its virtual world.
2.1 Acquiring Scratch
Securing Scratch as a companion is relatively straightforward. He can usually be found near his deceased owner. A successful dialogue or persuasion check will convince him to join your camp.
2.2 Rescuing the Owlbear Cub
Rescuing the Owlbear cub is more complex. First, you must locate the Owlbear cave where the cub resides with its mother. While you can’t save the mother, you must ensure the cub survives the encounter.
Subsequently, the cub can be found at the Goblin Camp, where goblins are using it in a game. You have the option to either claim the cub peacefully or eliminate the goblins. Regardless of your choice, the cub will eventually appear at your camp after a few in-game days. It may initially be wary, but it will eventually warm up to you.
2.3 The Simultaneous Petting
Once both Scratch and the Owlbear cub are in your camp, wait for an in-game night. You’ll hear a distinct sound, prompting you to find and interact with both animals at the same time. It’s crucial not to use a potion of animal speaking while petting them, as this will prevent the achievement from unlocking.
3. Fetch Quest: Playing Fetch with Scratch
This delightful achievement involves playing fetch with Scratch, emphasizing the bond between the player and their canine companion.
3.1 Establishing the Bond
To initiate the fetch quest, Scratch must be a member of your camp. After several in-game nights, he’ll appear with a ball.
3.2 Playing Fetch
Take the ball from Scratch and use the “throw” ability to toss it. Scratch will retrieve it, and the achievement will unlock, celebrating this simple yet rewarding interaction.
4. Expand Your Mind: Consuming a Parasite
This achievement requires you to embrace the illithid influence by consuming a parasite and unlocking a new power. This decision has significant implications for your character’s development.
4.1 Accepting the Guardian’s Offer
During your sleep, a guardian will visit you, urging you to harness the parasite’s power. Agreeing to their offer is the first step.
4.2 Activating the Power
After accepting the offer, access your abilities window and activate one of the newly unlocked powers. This action will unlock the achievement, marking your character’s transformation.
5. Pest Control: Killing the Spider Matriarch Before Her Eggs Hatch
This achievement challenges you to eliminate the Spider Matriarch before her eggs hatch, demanding swift and decisive action.
5.1 Locating the Spider’s Lair
The Spider Matriarch’s lair is situated in the Blighted Village, accessible via a well.
5.2 Strategy for Success
To achieve this, focus on dealing significant damage quickly. Crowd control abilities can delay the hatching, giving you more time to eliminate the Matriarch. Prioritize damage output and target the Matriarch directly to prevent the eggs from hatching.
6. Rude, Crude, and Full of Attitude: Summoning Shovel the Quasit
This whimsical achievement requires you to find and summon the quasit Shovel.
6.1 Locating the Summoning Scroll
The scroll needed to summon Shovel is located in the apothecary’s basement.
6.2 Retrieving the Scroll
The scroll is inside a coffin in the basement. Once you obtain it, use it to summon Shovel, unlocking the achievement.
7. Forged in Blood and Fire: Crafting an Item in the Adamantine Forge
This achievement requires you to craft an item in the Adamantine Forge, a significant location for creating powerful equipment.
7.1 Finding the Adamantine Forge
The Adamantine Forge is located in Grymforge, accessible through the Underdark.
7.2 Crafting an Item
To craft an item, you need both a mold and Mithral ore. Insert the mold and ore into the forge, then activate the forge by using the lava valve and the forge lever. This will create your item and unlock the achievement.
8. A Grym Fate: Killing the Adamantine Golem Without Using the Forge Hammer
This achievement challenges you to defeat the Adamantine Golem without using the Forge Hammer.
8.1 Strategy for Defeating Grym
To defeat Grym without the hammer, you’ll need a well-coordinated team. A tank to draw Grym’s attention, a healer to sustain the tank, and damage dealers to attack from a distance are essential.
8.2 Tactical Tips
Keep Grym focused on the tank, and switch tanks as needed to manage damage. Use ranged attacks to avoid taking unnecessary damage. Remember to apply the “superheated” condition to Grym to maximize your damage output. If the battle proves too difficult, you can enlist the help of three ogres by using a horn found in the Blighted Village.
9. The Plot Thickens: Leaving Act One
This achievement is story-related and unlocks when you complete Act One and transition to Act Two, signifying significant progress in the game’s narrative.
9.1 Completing Act One
To unlock this achievement, simply progress through the main storyline of Act One. This involves completing the major quests and resolving the conflicts in the starting area.
9.2 Moving to Act Two
Once you’ve finished the main objectives in Act One, you’ll be prompted to move to the next act. Accepting this prompt will unlock the achievement.
10. Honour Mode Run: A Comprehensive Guide
Honour Mode in Baldur’s Gate 3 is a challenging difficulty setting designed for experienced players seeking the ultimate test of skill and strategy. Completing the game on Honour Mode unlocks special achievements and solidifies your status as a master strategist. This section provides a comprehensive guide to surviving and thriving in Honour Mode.
10.1 Understanding Honour Mode
Honour Mode differs significantly from other difficulty settings. The most notable change is the single save file, meaning your decisions are permanent and mistakes can be devastating. Additionally, enemy AI is more intelligent, and combat encounters are more challenging. Bosses gain new abilities, making them even more formidable. A party wipe results in the game ending, though you can continue in Custom Mode with adjusted difficulty settings.
10.2 Preparing for Honour Mode
10.2.1 Knowledge is Key
Before starting Honour Mode, it’s crucial to have a thorough understanding of the game mechanics, enemy types, and encounter strategies. Play through the game on a lower difficulty to familiarize yourself with the storyline, character builds, and combat tactics.
10.2.2 Party Composition
Your party composition is critical. Aim for a balanced team with strong damage output, healing capabilities, and crowd control options. Popular party setups include:
- Tank: A character with high AC and HP to absorb damage.
- Healer: A cleric or paladin to provide essential healing and support.
- Damage Dealers: Two characters focused on dealing high damage, such as a rogue, ranger, or fighter.
- Versatile Support: A wizard or sorcerer for crowd control, utility spells, and additional damage.
10.2.3 Character Builds
Optimize your character builds for maximum effectiveness. Research strong builds and customize them to fit your playstyle. Some popular builds for Honour Mode include:
- Life Domain Cleric: Exceptional healing and support capabilities.
- Oath of Ancients Paladin: Strong tanking, healing, and damage output.
- Thief Rogue: High single-target damage and utility.
- Gloom Stalker Ranger: Excellent damage output and stealth.
- Divination Wizard: Powerful crowd control and utility spells.
10.2.4 Essential Gear
Acquire the best gear possible before starting Honour Mode. This includes powerful weapons, armor, and accessories that enhance your party’s capabilities. Explore every nook and cranny to find hidden treasures and complete quests that reward valuable items.
10.3 Honour Mode Strategies
10.3.1 Tactical Combat
Combat in Honour Mode requires careful planning and execution. Utilize the following tactics to gain an advantage:
- Positioning: Position your characters strategically to maximize their effectiveness and minimize their vulnerability. Keep ranged characters at a distance and protect your squishy spellcasters.
- Crowd Control: Use crowd control spells and abilities to disable enemies and control the battlefield. Sleep, Hold Person, and Web are invaluable for managing threats.
- Buffs and Debuffs: Apply buffs to your party members to enhance their strengths and debuff enemies to weaken them. Bless, Haste, and Bane can significantly alter the course of a battle.
- Environmental Awareness: Use the environment to your advantage. Push enemies off cliffs, set fire to oil slicks, and create choke points to funnel enemies into kill zones.
- Resource Management: Conserve your resources carefully. Use potions, scrolls, and special abilities sparingly and only when necessary.
10.3.2 Avoiding Unnecessary Risks
In Honour Mode, every decision matters. Avoid unnecessary risks that could lead to a party wipe.
- Scouting: Scout ahead before engaging in combat to assess the enemy composition and plan your approach.
- Dialogue Choices: Choose your dialogue options carefully, as some choices can lead to combat encounters or negative consequences.
- Stealth: Use stealth to bypass difficult encounters or gain a tactical advantage.
- Escape: Don’t hesitate to flee from a battle if things go south. Running away is often the best option to preserve your party.
10.3.3 Utilizing Consumables
Consumables are essential for survival in Honour Mode. Stock up on potions, scrolls, and elixirs to enhance your party’s capabilities.
- Healing Potions: Essential for recovering health during and after combat.
- Invisibility Potions: Useful for scouting ahead or escaping from difficult situations.
- Elixirs of Hill Giant Strength: Increase your strength score for increased damage output.
- Scrolls of Dimension Door: Allow for quick escapes or tactical repositioning.
10.3.4 Long Rest Management
Long rests are necessary to replenish your party’s health and spell slots, but they consume valuable supplies. Manage your long rests carefully to avoid running out of resources.
- Partial Rests: Use partial rests to recover some health and spell slots without consuming as many supplies.
- Camp Supplies: Gather camp supplies from every possible source to ensure you have enough to sustain your party.
- Efficient Spell Usage: Use your spells efficiently to minimize the need for frequent long rests.
10.4 Key Encounters in Honour Mode
10.4.1 Goblin Camp
The Goblin Camp can be a challenging encounter in Honour Mode. Utilize stealth and tactical positioning to take down the goblin leaders one by one. Focus on eliminating the healers first to reduce the goblins’ survivability.
10.4.2 Grymforge
The Adamantine Golem Grym is a formidable foe. Exploit its weakness to lava and use ranged attacks to whittle down its health. Keep your tank alive with constant healing and avoid getting caught in Grym’s melee range.
10.4.3 House of Grief
The House of Grief is a challenging gauntlet of battles. Prepare for waves of enemies and use crowd control to manage the threats. Focus on eliminating the most dangerous foes first and utilize choke points to funnel enemies into kill zones.
10.5 Honour Mode Tips and Tricks
- Save Often: While you only have one save file, the game autosaves frequently. Use this to your advantage by planning ahead and anticipating potential threats.
- Learn from Mistakes: Every death is a learning opportunity. Analyze your mistakes and adjust your strategy accordingly.
- Stay Positive: Honour Mode can be frustrating, but it’s important to stay positive and persevere. Celebrate your successes and learn from your failures.
- Community Resources: Utilize online resources, such as guides, forums, and videos, to learn from other players and discover new strategies.
FAQ: Understanding BG3 Trophies
1. What are trophies in Baldur’s Gate 3?
Trophies are achievements earned by completing specific tasks or reaching certain milestones in the game.
2. How do I view my trophies in BG3?
You can view your trophies on the platform you’re playing on, such as PlayStation Network or Steam.
3. Do trophies affect gameplay?
No, trophies are purely cosmetic and do not impact the gameplay experience.
4. Are there missable trophies in BG3?
Yes, some trophies can be missed if certain conditions are not met during your playthrough.
5. Can I earn all trophies in a single playthrough?
It’s challenging but possible. It requires careful planning and strategic decision-making.
6. Do difficulty settings affect trophy acquisition?
Yes, Honour Mode is specifically tied to certain achievements.
7. Where can I find detailed guides for specific trophies?
Websites like CONDUCT.EDU.VN offer detailed guides and tips for unlocking every trophy in BG3.
8. What do I do if a trophy doesn’t unlock?
Ensure you’ve met all the requirements and try again. If it still doesn’t unlock, it might be a glitch, and you may need to reload a previous save.
9. Are there online communities for trophy hunters in BG3?
Yes, platforms like Reddit and Steam Community forums have active communities dedicated to trophy hunting in BG3.
10. What is the most challenging trophy to obtain in BG3?
The Honour Mode completion achievements are generally considered the most challenging due to the permadeath feature.
This BG3 trophy guide provides a clear roadmap for completionists. By following these strategies, players can unlock every achievement and fully immerse themselves in the rich world of Baldur’s Gate 3. Remember to visit CONDUCT.EDU.VN for more in-depth guides and resources to enhance your gaming experience. At CONDUCT.EDU.VN, we aim to provide comprehensive guidance for gamers seeking to maximize their in-game achievements while adhering to ethical gameplay standards. Contact us at 100 Ethics Plaza, Guideline City, CA 90210, United States, or via Whatsapp at +1 (707) 555-1234. Visit our website conduct.edu.vn for more information.