Have you ever struggled to slice bread evenly, ending up with wonky, uneven pieces whether it’s your lovingly crafted homemade sourdough or a fresh loaf from the store? You’re not alone! Many bread enthusiasts face this daily kitchen challenge. The solution? A bread slicing guide.
My daughter, Charlotte, recognized this very problem in our kitchen. Tired of misshapen slices, she set out to find a solution. Her research led her to wooden bread slicing guides online, promising uniform, smooth slices every time. But instead of simply buying one, Charlotte had a brilliant idea: “Why not make it ourselves?” And that’s exactly what we did, with a little help from Chandra and his impressive collection of power tools.
Chandra’s workshop became our DIY haven, equipped with everything we needed: a table saw, drill press, hand tools, sandpaper, screws, clamps, and crucial safety goggles. Plus, we had some beautiful scrap maple wood from a previous project, perfect for creating a durable and attractive Bread Slicer Guide.
The beauty of a bread slicing guide lies in its simplicity and effectiveness. It ensures every slice is consistent, making your sandwiches neater, your toast more even, and your overall bread experience more enjoyable. No more thick heels and paper-thin middles!
Why Use a Bread Slicer Guide?
Investing in or crafting your own bread slicer guide offers numerous benefits:
- Consistent Slices: Say goodbye to uneven bread slices. A guide ensures each slice is the same thickness, perfect for sandwiches, toast, and even serving bread with meals.
- Improved Presentation: Uniform slices look more professional and appealing, whether you’re serving guests or simply enjoying a slice yourself.
- Reduced Waste: By cutting even slices, you minimize the chances of cutting too much or too little, reducing bread waste.
- Enhanced Safety: A guide provides a stable surface and clear path for your knife, reducing the risk of slips and cuts, especially when using sharp serrated bread knives.
- DIY Satisfaction: Building your own bread slicer guide is a rewarding project, especially if you enjoy woodworking. It’s a practical and functional addition to your kitchen that you can be proud of.
Materials and Tools for Your DIY Bread Slicer Guide
To embark on this simple woodworking project, you’ll need the following:
- Hardwood: Maple, walnut, or cherry are excellent choices for durability and aesthetics. Scrap wood is ideal for a sustainable approach.
- Table Saw: For precise and straight cuts.
- Drill Press: To create accurate pilot holes for screws.
- Hand Tools: Screwdrivers, clamps, sandpaper, measuring tape, pencil.
- Screws: To assemble the guide securely.
- Safety Goggles: Essential for eye protection when using power tools.
Step-by-Step Instructions to Build Your Bread Slicer Guide
Follow these straightforward steps to create your own efficient bread slicing guide:
-
Prepare the Wood: Cut two pieces of hardwood simultaneously using a table saw to ensure they are perfectly matched. For our guide, we used maple and cut two pieces measuring 14″ x 7 1/4″ x 1″ thick. Adjust the dimensions to suit your bread loaf sizes if needed.
-
Assemble the Base and Back: Clamp the two wooden pieces together, positioning the backboard perpendicular to the bottom board (which will be the cutting surface). Ensure they are aligned and securely clamped. Drill six 1/8″ pilot holes through both boards, starting from the edges and moving towards the center. After drilling each pair of holes, immediately insert and tighten a screw to maintain alignment.
-
Create the Knife Slot: This step requires caution and precision. If you are comfortable and experienced with power tools, you can carefully cut the slot down the center of the backboard while it is screwed in place, ideally under the supervision of someone experienced. For beginners, it’s safer to remove the backboard completely. Then, using a table saw, carefully cut the backboard in half lengthwise to create the slot. The kerf of the saw blade will determine the slot width. You may need to make multiple passes or use a wider blade to achieve the desired slot size for your bread knife.
-
Sanding and Finishing: Sanding is crucial for a smooth, splinter-free finish. Begin with coarse grit sandpaper and gradually progress to finer grits. Sand all surfaces and edges thoroughly until they are exceptionally smooth to the touch. This will not only enhance the look but also make cleaning easier and safer.
-
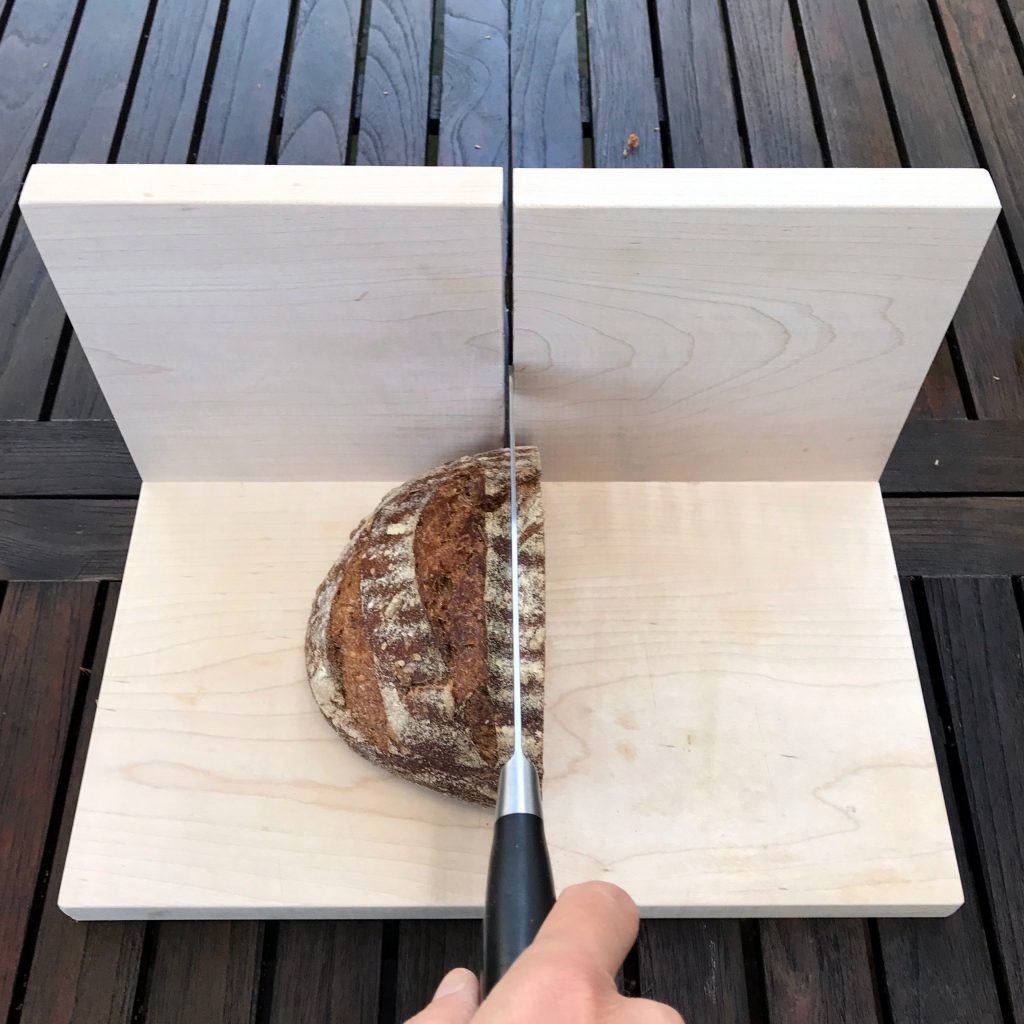
Slicing Time! Once assembled and sanded, your bread slicing guide is ready to use. Place your loaf inside and use a serrated bread knife to slice through the slot, achieving perfectly even slices every time.
-
Cleaning and Maintenance: Cleaning is simple. Just wipe the bread slicer guide with a damp cloth after each use. For more thorough cleaning, you can unscrew one side of the backboard to access and clean the slot edges.
Detailed Technical Drawings for Precision
For those who appreciate precise measurements and technical specifications, Chandra has created detailed plans for this bread slicer guide. You can access the plans in PDF format with both imperial measurements and metric measurements. These drawings provide accurate dimensions and further clarify the construction process.
These technical drawings were created using software Chandra learned in the early 80s, during a visit from an Apple executive to his school – none other than Steve Jobs himself! This project is not only about creating a useful kitchen tool but also a testament to ingenuity and timeless skills.
Building your own bread slicer guide is a satisfying and practical project. It enhances your kitchen, improves your bread slicing experience, and offers a touch of DIY pride. So, gather your tools and wood, and start crafting those perfect slices today!