Are you tired of uneven, mangled bread slices when you try to cut your homemade sourdough or even a store-bought loaf? It’s a common kitchen frustration – we’ve all been there, sawing away and ending up with slices that are far from uniform. But there’s a simple solution to achieve bakery-quality, even slices every time: a Bread Slicing Guide.
This guide will walk you through creating your own wooden bread slicing guide, just like the one my daughter, Charlotte, ingeniously designed and built. Inspired to get those perfect, consistent slices, Charlotte realized she could craft her own bread slicing tool with a little DIY spirit and some help from her friend Chandra and his workshop full of tools. You too can create this handy kitchen accessory with readily available materials and basic woodworking skills.
Why You Need a Bread Slicing Guide
A bread slicing guide, also known as a bread slicer jig, is a game-changer for anyone who values consistent and professional-looking bread slices. Here’s why it’s an essential tool for your kitchen:
- Uniform Slices: The primary benefit is achieving perfectly even slices every single time. No more thick heels or paper-thin middles! This is crucial for sandwiches, toast, and consistent serving portions.
- Improved Presentation: Even slices elevate the presentation of your homemade bread, making it look more appealing and professional, whether for family meals or when serving guests.
- Reduced Bread Waste: By cutting slices of uniform thickness, you minimize uneven cuts and crumbs, ultimately reducing bread waste.
- Safety: A bread slicing guide provides a stable and safe platform for slicing, reducing the risk of slipping and accidental cuts, especially when using sharp serrated bread knives.
- Cost-Effective DIY Project: Instead of purchasing a pre-made bread slicer, building your own is a cost-effective and rewarding DIY project. You can customize it to your preferred size and wood type.
Step-by-Step Guide to Building Your Own Bread Slicing Guide
Inspired by Charlotte’s design, here’s a detailed guide to help you build your own wooden bread slicing guide. This project utilizes basic woodworking techniques and readily available materials.
Materials You’ll Need:
- Hardwood: Maple, walnut, or cherry are excellent choices for their durability and food safety. You’ll need two pieces, ideally 1 inch thick. The original guide used maple scraps, making it a zero-waste project!
- Screws: Wood screws suitable for the thickness of your wood.
- Wood Glue (Optional): For added strength in joints.
Tools Required:
- Table Saw: For precise and straight cuts.
- Drill Press or Drill: For drilling pilot holes and screw holes.
- Clamps: To hold wood pieces securely during assembly.
- Sandpaper: Various grits, from coarse to fine, for smoothing surfaces.
- Safety Goggles: Essential for eye protection when using power tools.
- Measuring Tape and Pencil: For accurate measurements and marking.
Construction Steps:
-
Cut the Wood Pieces: Begin by cutting two pieces of hardwood to the desired dimensions. Charlotte’s guide used pieces measuring 14 inches by 7 1/4 inches by 1 inch thick. Adjust these measurements to suit your preferred bread loaf size and slice thickness. For best results and to ensure the pieces match perfectly, cut both boards together at the same time using a table saw, stacking one on top of the other.
-
Assemble the Base and Back: This step involves attaching the backboard to the bottom board (which will be the cutting surface). Position the backboard perpendicular to the bottom board. Use clamps to hold them firmly in place, ensuring they are perfectly aligned at a 90-degree angle. Pre-drill six 1/8-inch pilot holes through the backboard and into the bottom board. This prevents the wood from splitting when screwing. Securely screw the boards together after drilling each hole, starting from the edges and working towards the center for even pressure. Wood glue can be applied to the joint for extra strength before screwing.
-
Create the Slicing Slot: This is where the slot for your bread knife is created. If you are comfortable using power tools, you can carefully cut the slot down the center of the backboard while it is already screwed to the base. Safety First: This step requires caution and should be done under supervision if you are a beginner. Alternatively, and more safely for beginners, remove the backboard from the base. Then, using a table saw, carefully cut the backboard in half lengthwise, creating the slot. The width of the slot should be slightly wider than your bread knife blade to allow for smooth slicing. If using a thin saw blade, you may need to remove a little more wood from the center to widen the slot appropriately.
-
Sanding and Finishing: Sanding is crucial for a smooth, safe, and aesthetically pleasing finish. Begin with coarser grit sandpaper to remove any rough edges and saw marks. Gradually move to finer grits, sanding repeatedly until you achieve a very smooth surface on all parts of the bread slicing guide. Pay extra attention to the edges and the inside of the slicing slot to ensure there are no splinters or rough patches.
-
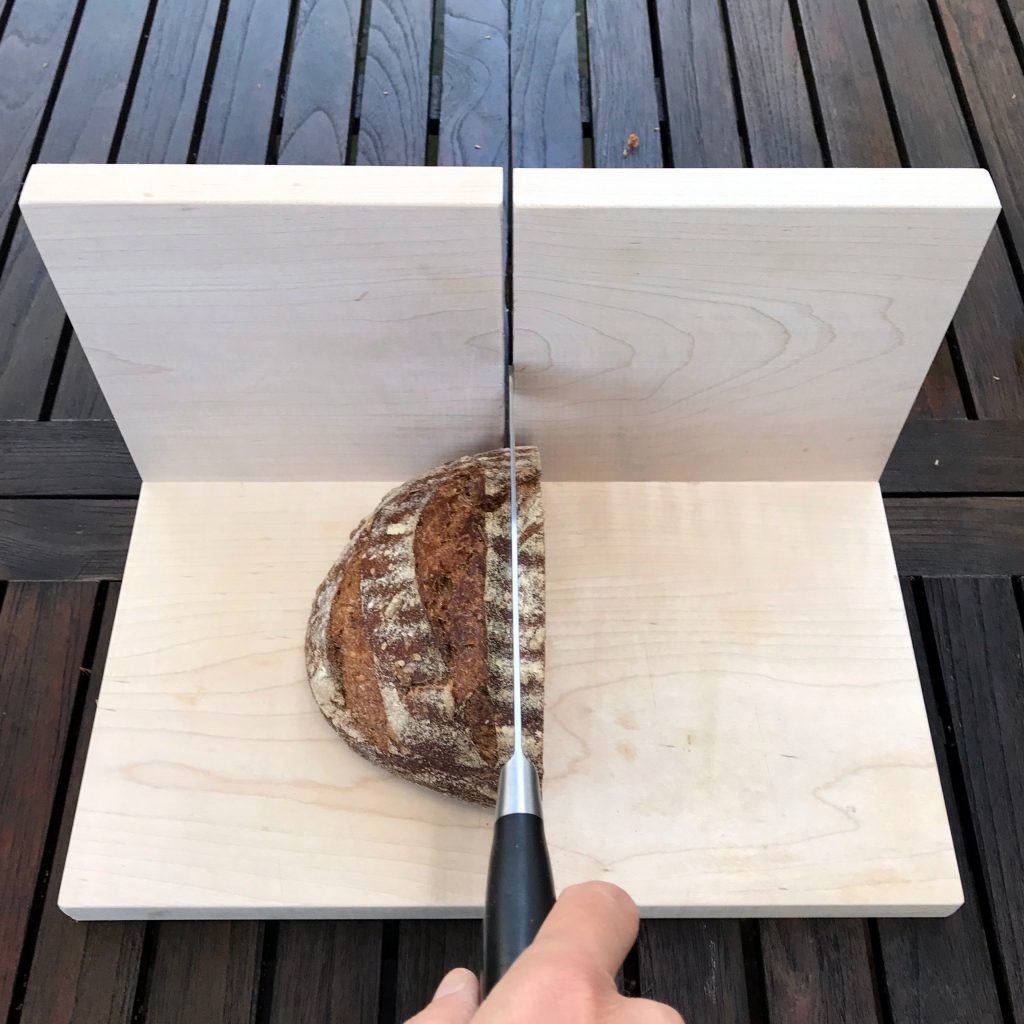
Using Your Bread Slicing Guide: Place your loaf of bread inside the guide, nestled against the backboard. Using a long, serrated bread knife, insert the knife into the slot and slice through the bread using a gentle sawing motion. The guide will ensure each slice is uniform in thickness.
-
Cleaning and Maintenance: Cleaning your wooden bread slicing guide is simple. Usually, wiping it down with a dry or slightly damp cloth is sufficient. If the slot accumulates crumbs, you can use a narrow brush or remove half of the backboard (by unscrewing it) for more thorough cleaning of the slot edges. Avoid soaking the wood in water to prevent warping.
Technical Drawings for Precision
For those who appreciate precise measurements, Chandra thoughtfully created technical drawings for this bread slicing guide project. You can access these plans in both imperial and metric measurements in PDF format. These drawings provide detailed dimensions and perspectives to aid in your construction process.
More Than Just a Bread Slicer: A Touch of History
Interestingly, Chandra, who helped Charlotte with this project, has a connection to technology history. He created these plans using Apple software he learned to use in the early 1980s when an Apple executive, who turned out to be Steve Jobs, visited his school. This adds a unique and nostalgic touch to this simple yet effective kitchen tool.
Embrace the satisfaction of perfectly sliced bread and the pride of creating your own kitchen tool. Building a bread slicing guide is a rewarding DIY project that enhances your baking and cooking experience.
