Navigating the digital world can be challenging, especially when you need to focus or ensure someone using your iPhone 11 stays within a specific app. Guided Access is your solution. This feature, as detailed on CONDUCT.EDU.VN, allows you to lock your device into a single app and control which features are available, enhancing focus and security. Understanding and utilizing this feature effectively will empower you to manage your device usage and protect sensitive information, using accessibility settings, setting up a passcode, and customizing available features to enhance focus.
1. Understanding Guided Access on iPhone 11
1.1 What is Guided Access?
Guided Access is an accessibility feature on iPhone 11 that restricts the device to a single app. This is particularly useful for:
- Parents: Ensuring children only use approved apps.
- Educators: Keeping students focused on educational apps during class.
- Individuals: Minimizing distractions and maintaining focus on a specific task.
- Businesses: Providing a controlled environment for specific applications in a public setting.
This function is essential for creating a controlled environment on your iPhone 11, promoting focused use and preventing unauthorized access to other apps or settings, making it a powerful tool for digital management.
1.2 Why Use Guided Access?
Using Guided Access offers several benefits:
- Enhanced Focus: By limiting access to a single app, users can concentrate on their task without distractions.
- Child Safety: Parents can ensure their children only use age-appropriate apps and prevent accidental purchases or access to inappropriate content.
- Accessibility: Individuals with cognitive or motor skill challenges can use specific apps without accidentally navigating away.
- Security: In public settings, Guided Access can prevent unauthorized access to personal information or device settings.
These benefits highlight the versatility and importance of Guided Access in various scenarios, enhancing both user experience and security, supporting focused work and safe device usage, addressing user needs across different demographics.
1.3 Key Features of Guided Access
Guided Access comes with several customizable features:
- Disable Hardware Buttons: Restrict access to the volume buttons, sleep/wake button, and the Home button (if applicable).
- Disable Touch: Prevent any touch input on the screen.
- Set Time Limits: Automatically end the Guided Access session after a specified time.
- Restrict Screen Areas: Disable specific areas of the screen, preventing interaction with certain elements.
- Enable/Disable Motion: Control how the device responds to motion, such as shaking or screen rotation.
- Keyboard Restriction: Prevent the keyboard from appearing, useful for apps that don’t require text input.
These features allow for a highly customized experience, ensuring that the user is limited to only the necessary functions within the designated app, as CONDUCT.EDU.VN emphasizes, providing solutions for specific needs and optimizing user experience.
2. Setting Up Guided Access on iPhone 11
2.1 Step-by-Step Guide to Enable Guided Access
Enabling Guided Access on your iPhone 11 is a straightforward process. Follow these steps:
-
Open Settings: Launch the Settings app on your iPhone 11.
-
Navigate to Accessibility: Scroll down and tap on “Accessibility”.
-
Find Guided Access: Scroll down to the “General” section and tap on “Guided Access”.
-
Enable Guided Access: Toggle the switch to turn on Guided Access.
 Enable Guided Access
These steps ensure that Guided Access is activated on your device, allowing you to proceed with further customization. CONDUCT.EDU.VN recommends familiarizing yourself with each step to ensure smooth implementation and optimal device management.
2.2 Setting a Passcode
A passcode is required to end a Guided Access session. Here’s how to set it up:
- Go to Passcode Settings: In the Guided Access settings, tap on “Passcode Settings”.
- Set Guided Access Passcode: Tap on “Set Guided Access Passcode”.
- Enter a Passcode: Enter a six-digit passcode, then re-enter it to confirm.
- Enable Touch ID or Face ID (Optional): You can also enable Touch ID or Face ID for ending Guided Access sessions. This provides an alternative to using the passcode.
Setting a strong passcode is crucial for security, ensuring that only authorized users can exit the Guided Access mode, reinforcing the security benefits.
2.3 Configuring Accessibility Shortcut
To quickly start Guided Access, you can configure the Accessibility Shortcut:
- Go to Accessibility Shortcut: In the main Accessibility settings, scroll to the bottom and tap on “Accessibility Shortcut”.
- Select Guided Access: Choose “Guided Access” from the list of options.
With the Accessibility Shortcut configured, you can triple-click the side button (or the Home button on older models) to quickly start Guided Access, streamlining the process and enhancing user convenience.
3. Starting a Guided Access Session on iPhone 11
3.1 Launching Guided Access
Once Guided Access is set up, starting a session is simple:
- Open the App: Open the app you want to lock the device to.
- Activate Accessibility Shortcut: Triple-click the side button (or the Home button on older models).
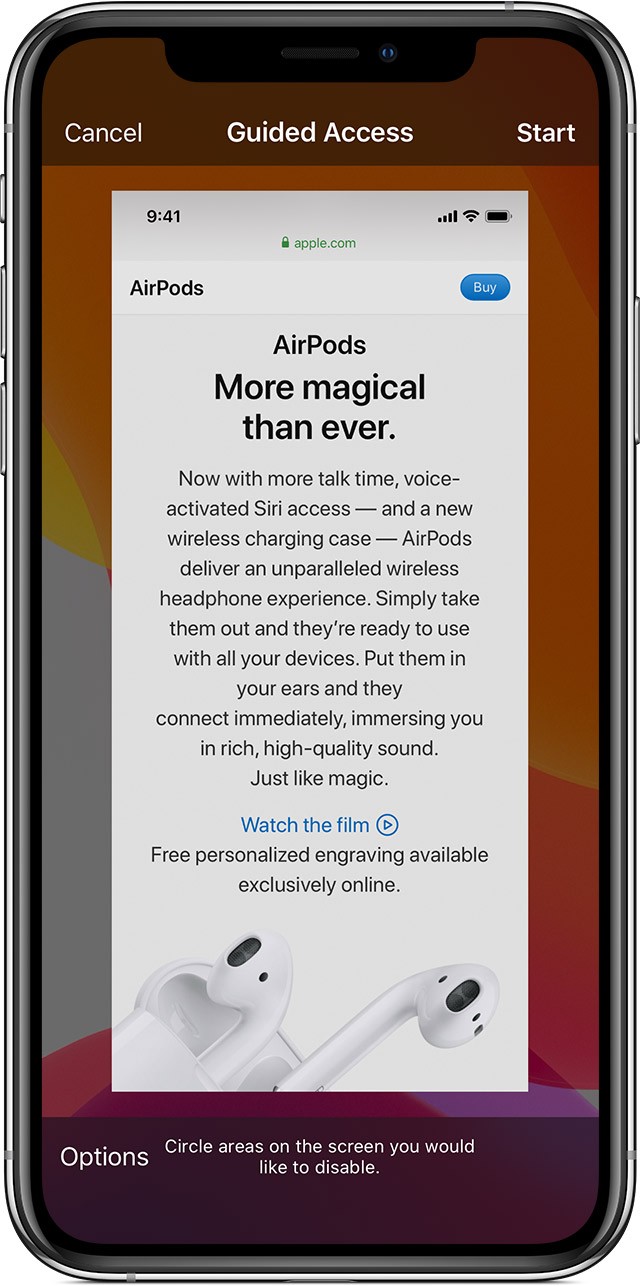
- Adjust Settings (Optional): Before starting, you can circle areas of the screen to disable touch input or tap “Options” to customize other features.
- Start Guided Access: Tap “Start” in the bottom right corner of the screen.
This quick launch process makes it easy to initiate a Guided Access session whenever needed, promoting focused use and digital security.
3.2 Customizing Options Before Starting
Before you start a Guided Access session, you can customize various options:
-
Disable Screen Areas: Use one finger to circle areas of the screen that you want to disable. You can move or resize these circles.
-
Access Options: Triple-click the side button (or the Home button) again to access the “Options” menu.
-
Configure Options: In the Options menu, you can disable hardware buttons, touch input, motion, and more.
Alt text: Icons representing various Guided Access options such as volume control, keyboard access, and touch input, illustrating the customizable features for focused app usage.
Customizing these options allows for a tailored Guided Access experience, ensuring that only the necessary functions are available within the app, as CONDUCT.EDU.VN highlights, aligning the settings with specific user needs.
3.3 Using Siri to Start Guided Access
You can also use Siri to start a Guided Access session:
- Open the App: Open the app you want to use.
- Activate Siri: Say “Hey Siri” or hold the side button to activate Siri.
- Command Siri: Say “Turn on Guided Access”.
Using Siri provides an alternative method to start Guided Access, offering hands-free activation for added convenience, complementing other activation methods.
4. Configuring Guided Access Features
4.1 Disabling Hardware Buttons
Guided Access allows you to disable hardware buttons for added control:
- Sleep/Wake Button: Prevents the device from being turned off or locked.
- Volume Buttons: Prevents the volume from being adjusted.
To disable these buttons:
- Access Options: Triple-click the side button (or the Home button) and enter your passcode.
- Toggle Buttons: Turn off the switches next to “Sleep/Wake Button” and “Volume Buttons”.
- Tap Done: Tap “Done” in the top right corner.
Disabling hardware buttons enhances the level of control during a Guided Access session, preventing users from altering the device’s state or volume settings.
4.2 Disabling Touch Input
To prevent any touch input on the screen:
- Access Options: Triple-click the side button (or the Home button) and enter your passcode.
- Toggle Touch: Turn off the switch next to “Touch”.
- Tap Done: Tap “Done” in the top right corner.
Disabling touch input can be useful for preventing accidental taps or interactions, ensuring that the user can only view the content on the screen.
4.3 Setting Time Limits
Guided Access can automatically end a session after a specified time:
- Access Options: Triple-click the side button (or the Home button) and enter your passcode.
- Toggle Time Limit: Turn on the switch next to “Time Limit”.
- Set the Time: Choose a time limit from the available options.
- Tap Done: Tap “Done” in the top right corner.
Setting a time limit is useful for managing device usage, particularly for children or in timed testing scenarios, as emphasized by CONDUCT.EDU.VN, promoting balanced device usage.
4.4 Restricting Screen Areas
You can disable specific areas of the screen to prevent interaction:
- Start Guided Access: Start a Guided Access session as described earlier.
- Circle Areas: Use one finger to circle the areas you want to disable.
- Adjust or Remove Circles: You can move, resize, or remove these circles as needed.
Restricting screen areas can prevent accidental taps on unwanted elements, ensuring that the user focuses on the intended parts of the app, enhancing precision and control.
4.5 Controlling Motion
To limit how your device responds to motion:
-
Access Options: Triple-click the side button (or the Home button) and enter your passcode.
-
Toggle Motion: Turn off the switch next to “Motion”.
-
Tap Done: Tap “Done” in the top right corner.
Alt text: Icon representing keyboard access in Guided Access, highlighting the ability to disable keyboard input for specific app usage scenarios, enhancing focused interaction.
Disabling motion prevents the screen from rotating and stops the device from responding to shaking, ensuring a stable viewing experience.
5. Ending a Guided Access Session on iPhone 11
5.1 Using the Passcode
To end a Guided Access session:
- Triple-Click: Triple-click the side button (or the Home button).
- Enter Passcode: Enter your Guided Access passcode.
- Tap End: Tap “End” in the top left corner of the screen.
This is the standard method for ending a Guided Access session, ensuring that only authorized users can exit the mode.
5.2 Using Touch ID or Face ID
If you have enabled Touch ID or Face ID for Guided Access:
- Double-Click: Double-click the side button (or the Home button).
- Authenticate: Use Touch ID or Face ID to authenticate.
- Tap End: Tap “End” in the top left corner of the screen.
Using Touch ID or Face ID provides a convenient alternative to entering the passcode, streamlining the process.
5.3 What to Do If You Forget the Passcode
If you forget your Guided Access passcode, you will need to restore your iPhone to its factory settings:
- Connect to Computer: Connect your iPhone to a computer that you have previously synced with.
- Enter Recovery Mode: Follow the steps to enter recovery mode for your iPhone model (usually involves pressing and holding specific buttons while connecting to the computer).
- Restore iPhone: In iTunes or Finder, select “Restore” to restore your iPhone to its factory settings.
Note: Restoring your iPhone will erase all data, so it is crucial to remember your passcode or enable Touch ID/Face ID for easier access.
6. Troubleshooting Common Issues
6.1 Guided Access Won’t Start
If Guided Access won’t start, try the following:
- Ensure Enabled: Make sure Guided Access is enabled in Settings > Accessibility > Guided Access.
- Check Accessibility Shortcut: Ensure Guided Access is selected in Accessibility Shortcut.
- Restart Device: Restart your iPhone 11 and try again.
- Update iOS: Ensure your iPhone is running the latest version of iOS.
6.2 Cannot End Guided Access
If you cannot end Guided Access:
- Try Passcode: Make sure you are entering the correct passcode.
- Use Touch ID/Face ID: If enabled, try using Touch ID or Face ID.
- Force Restart: If the device is unresponsive, force restart your iPhone (press and quickly release the volume up button, press and quickly release the volume down button, then press and hold the side button until the Apple logo appears).
6.3 Screen Not Responding to Touch
If the screen is not responding to touch:
- Check Touch Option: Ensure the “Touch” option is enabled in Guided Access settings.
- Remove Screen Restrictions: Make sure you have not accidentally created a screen restriction over the entire screen.
7. Advanced Tips and Tricks
7.1 Using Guided Access in Educational Settings
In educational settings, Guided Access can be used to:
- Keep Students Focused: Ensure students stay within educational apps during class time.
- Prevent Distractions: Disable access to games, social media, and other distracting apps.
- Administer Tests: Create a secure testing environment by disabling access to the internet and other resources.
7.2 Guided Access for Business Use
Businesses can use Guided Access to:
- Kiosk Mode: Set up iPhones as kiosks for specific purposes, such as product demos or customer surveys.
- Employee Productivity: Ensure employees only use approved apps during work hours.
- Secure Presentations: Prevent accidental access to personal information during presentations.
7.3 Enhancing Accessibility
Guided Access can be combined with other accessibility features to enhance the user experience for individuals with disabilities:
- VoiceOver: Use VoiceOver in conjunction with Guided Access to provide auditory feedback.
- Zoom: Enable Zoom to magnify the screen for users with visual impairments.
- Switch Control: Use Switch Control to navigate the screen with external switches.
8. Maintaining Digital Wellbeing with Guided Access
8.1 Promoting Focused Work
Guided Access helps promote focused work by:
- Eliminating Distractions: By limiting access to a single app, users can concentrate on their tasks without interruptions.
- Time Management: Setting time limits encourages efficient use of time and prevents procrastination.
8.2 Balancing Screen Time
Guided Access can be used to balance screen time by:
- Setting Limits: Parents can set time limits for their children’s app usage.
- Scheduled Sessions: Plan specific times for using certain apps, promoting a healthy balance between digital and real-world activities.
8.3 Creating a Safe Digital Environment
Guided Access helps create a safe digital environment by:
- Restricting Content: Parents can ensure their children only access age-appropriate content.
- Preventing Unauthorized Access: In public settings, Guided Access can prevent unauthorized access to personal information.
9. Real-World Applications of Guided Access
9.1 Case Study 1: Special Education Classroom
In a special education classroom, teachers use Guided Access to keep students focused on learning apps. By disabling access to other apps and setting time limits, students are more engaged and productive, enhancing the educational experience.
9.2 Case Study 2: Retail Kiosk
A retail store uses Guided Access to set up iPhones as kiosks for product demos. Customers can interact with the demo app without accessing other device features, ensuring a controlled and informative experience, showcasing product features effectively.
9.3 Case Study 3: Senior Care Facility
In a senior care facility, staff use Guided Access to simplify the use of communication apps for residents. By limiting access to a single app and disabling unnecessary features, residents can easily stay in touch with their families, enhancing their quality of life.
10. The Future of Accessibility Features
10.1 Emerging Technologies
Emerging technologies like artificial intelligence (AI) and machine learning (ML) are enhancing accessibility features:
- AI-Powered Voice Control: AI can improve voice control accuracy and responsiveness, making it easier for users to interact with their devices hands-free.
- ML-Based Content Adaptation: Machine learning can automatically adapt content to suit individual user needs, such as adjusting font sizes or simplifying language.
10.2 Integration with Other Devices
Accessibility features are increasingly integrated with other devices and platforms:
- Smart Home Integration: Control smart home devices with accessibility features, such as voice control or switch control.
- Cross-Platform Compatibility: Use accessibility features across different devices and operating systems, ensuring a consistent user experience.
10.3 Focus on Inclusive Design
There is a growing focus on inclusive design, which aims to create products and services that are accessible to everyone, regardless of their abilities:
- User-Centered Design: Involve users with disabilities in the design process to ensure their needs are met.
- Accessibility Standards: Adhere to accessibility standards and guidelines, such as WCAG (Web Content Accessibility Guidelines), to ensure products are accessible to as many people as possible.
11. Guided Access and Compliance
11.1 Understanding Compliance Standards
Compliance with accessibility standards is essential for ensuring that digital content and technology are accessible to all users, including those with disabilities. Key standards include:
- Web Content Accessibility Guidelines (WCAG): WCAG provides a set of guidelines for making web content more accessible. These guidelines are used globally and are considered the gold standard for web accessibility.
- Americans with Disabilities Act (ADA): The ADA requires that businesses and organizations provide reasonable accommodations to individuals with disabilities, including accessible technology.
- Section 508 of the Rehabilitation Act: Section 508 requires that federal agencies’ electronic and information technology is accessible to people with disabilities.
11.2 How Guided Access Supports Compliance
Guided Access supports compliance with accessibility standards by:
- Providing a Controlled Environment: Guided Access allows you to create a controlled environment where users can focus on specific tasks without distractions, ensuring compliance with accessibility requirements for focused activities.
- Customizable Features: The customizable features of Guided Access, such as disabling hardware buttons and touch input, help tailor the user experience to meet individual needs, supporting compliance with ADA and Section 508 requirements.
- Enhancing Focus: By limiting access to a single app, Guided Access helps users with cognitive disabilities stay focused, improving their ability to engage with the content, and aligning with WCAG principles.
11.3 Best Practices for Compliance
To ensure compliance with accessibility standards when using Guided Access:
- Understand the Standards: Familiarize yourself with the relevant accessibility standards, such as WCAG, ADA, and Section 508.
- Test with Users: Test the Guided Access setup with users who have disabilities to identify any potential issues.
- Provide Training: Provide training to users and staff on how to use Guided Access and other accessibility features effectively.
- Document Efforts: Document your efforts to ensure compliance, including the steps you have taken to make your content and technology accessible.
12. Resources and Support for Guided Access
12.1 Apple Support
Apple provides comprehensive support for Guided Access:
- Apple Support Website: Visit the Apple Support website for articles, tutorials, and troubleshooting tips.
- Apple Support App: Use the Apple Support app to contact Apple support representatives directly.
- Apple Accessibility Support: Access resources specifically for accessibility features, including Guided Access.
12.2 Third-Party Resources
Numerous third-party resources offer additional support and information:
- Accessibility Blogs and Forums: Engage with online communities and forums to share tips and ask questions.
- Accessibility Consultants: Hire accessibility consultants to assess and improve the accessibility of your content and technology.
- Training Programs: Participate in training programs to learn more about accessibility standards and best practices.
12.3 Contact CONDUCT.EDU.VN
For more information and guidance on accessibility and digital wellbeing, contact CONDUCT.EDU.VN:
- Address: 100 Ethics Plaza, Guideline City, CA 90210, United States
- WhatsApp: +1 (707) 555-1234
- Website: CONDUCT.EDU.VN
13. FAQs About Guided Access on iPhone 11
13.1 What is Guided Access and what is it used for?
Guided Access is an accessibility feature that locks your iPhone into a single app, restricting access to other features and settings. It is used to enhance focus, ensure child safety, and provide a controlled environment for specific applications.
13.2 How do I enable Guided Access on my iPhone 11?
To enable Guided Access, go to Settings > Accessibility > Guided Access and toggle the switch to turn it on.
13.3 How do I set a passcode for Guided Access?
In the Guided Access settings, tap on “Passcode Settings” > “Set Guided Access Passcode”, then enter a six-digit passcode. Re-enter the passcode to confirm.
13.4 Can I use Touch ID or Face ID to end a Guided Access session?
Yes, you can enable Touch ID or Face ID in the Passcode Settings to end a Guided Access session.
13.5 How do I start a Guided Access session?
Open the app you want to use, triple-click the side button (or the Home button), adjust settings if needed, and tap “Start”.
13.6 How do I disable hardware buttons during a Guided Access session?
Triple-click the side button (or the Home button), enter your passcode, and turn off the switches next to “Sleep/Wake Button” and “Volume Buttons” in the Options menu.
13.7 How do I set a time limit for a Guided Access session?
Triple-click the side button (or the Home button), enter your passcode, turn on the switch next to “Time Limit” in the Options menu, and choose a time limit.
13.8 What should I do if I forget my Guided Access passcode?
If you forget your passcode, you will need to restore your iPhone to its factory settings. This will erase all data, so it is crucial to remember your passcode or enable Touch ID/Face ID.
13.9 Can I use Guided Access with Siri?
Yes, you can use Siri to start a Guided Access session by saying “Turn on Guided Access” after opening the desired app.
13.10 How can Guided Access be used in educational settings?
In educational settings, Guided Access can keep students focused on learning apps, prevent distractions, and create a secure testing environment.
14. Conclusion: Maximizing Your iPhone 11 Experience with Guided Access
Guided Access is a powerful tool that can significantly enhance your iPhone 11 experience. Whether you’re a parent, educator, business professional, or simply someone looking to improve focus and digital wellbeing, understanding and utilizing Guided Access can provide numerous benefits. By following the steps outlined in this guide, you can effectively set up and customize Guided Access to meet your specific needs.
Remember, CONDUCT.EDU.VN is your go-to resource for understanding and implementing best practices for digital ethics and responsible technology use. For more detailed guides, resources, and support, visit CONDUCT.EDU.VN or contact us directly. Let us help you navigate the digital world with confidence and integrity.
Are you struggling to find reliable guidelines for digital conduct or implement ethical standards in your organization? Visit conduct.edu.vn today for comprehensive resources and expert guidance. Let us help you create a safer, more ethical digital environment. Contact us at 100 Ethics Plaza, Guideline City, CA 90210, United States or WhatsApp +1 (707) 555-1234.