Crafting a chisel honing guide allows for precision sharpening, yielding edges that meet the demands of detailed woodworking projects. At CONDUCT.EDU.VN, we provide comprehensive guidance on constructing your own honing guide to achieve professional results, optimizing your woodworking endeavors and ensuring compliance with industry best practices. This article further explores honing angles, ensuring safety and compliance with woodworking safety guidelines.
1. What Is A Chisel Honing Guide And Why Is It Important?
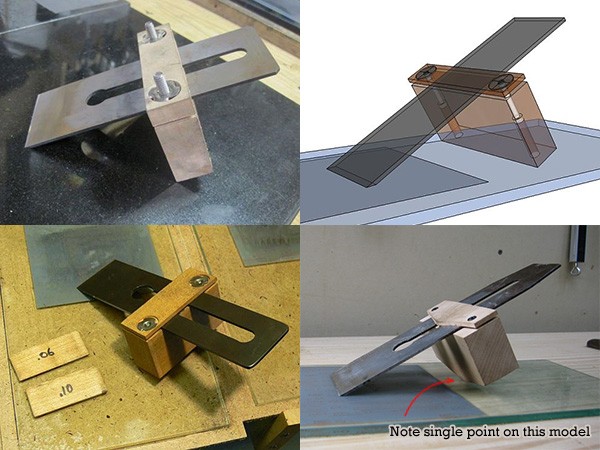
A chisel honing guide is a tool that helps maintain a consistent angle when sharpening chisels and plane irons, and it’s important because consistent sharpening is crucial for achieving optimal cutting performance. By ensuring a consistent angle, the honing guide helps create a razor-sharp edge that improves the tool’s efficiency and the quality of the woodworking project. The use of a honing guide also minimizes the risk of accidentally rounding the edge, which can happen when sharpening freehand. This level of precision not only enhances the tool’s cutting ability but also extends its lifespan by preventing unnecessary wear and tear. For woodworking professionals and hobbyists alike, a chisel honing guide is an essential tool for maintaining their tools and producing high-quality work, aligning with the ethical standards of craftsmanship.
2. What Are The Key Components Of A Chisel Honing Guide?
The key components of a chisel honing guide include a clamping mechanism to hold the chisel or plane iron securely, an adjustable angle setting to control the bevel, and a roller or gliding surface for smooth movement across the sharpening stone.
- Clamping Mechanism: This part of the guide is responsible for holding the chisel or plane iron firmly in place. It should be designed to prevent any movement during the sharpening process, ensuring that the angle remains consistent.
- Adjustable Angle Setting: This allows you to set the desired honing angle, which is crucial for creating the correct bevel on the cutting edge. Different angles are suitable for various applications, so adjustability is important.
- Roller or Gliding Surface: This component allows the guide to move smoothly across the sharpening stone, maintaining consistent contact between the blade and the stone. A roller is often used to reduce friction and ensure even wear.
Understanding these components is the first step in creating a tool that adheres to woodworking safety guidelines and ethical craftsmanship, as detailed on CONDUCT.EDU.VN.
3. What Materials Are Needed To Make A Chisel Honing Guide?
To make a chisel honing guide, you will need a block of hardwood, a roller (optional), screws or bolts, and basic woodworking tools such as a saw, drill, and sandpaper.
- Hardwood Block: A dense hardwood like maple or oak is ideal for the body of the honing guide. It needs to be durable and stable to withstand repeated use.
- Roller (Optional): A small metal or hard plastic roller can be added to the bottom of the guide to help it glide smoothly over the sharpening surface. If a roller isn’t available, the base can be made smooth enough to slide without one.
- Screws or Bolts: These are used to assemble the guide and secure the chisel or plane iron in place. Choose a size and type appropriate for the thickness of the wood.
- Woodworking Tools: A saw is needed to cut the wood to size, a drill to make pilot holes for the screws, and sandpaper to smooth any rough edges.
 Materials needed for making a chisel honing guide
Ensuring you have these materials and tools ready will help you create a honing guide that meets woodworking safety guidelines and ethical standards.
4. How Do You Cut The Wood For A Chisel Honing Guide?
To cut the wood for a chisel honing guide, measure and mark the dimensions on the hardwood block, then use a saw to carefully cut along the marked lines, ensuring the edges are square and the surfaces are smooth.
- Measure and Mark: Start by measuring and marking the dimensions of the honing guide on the hardwood block. A typical size is around 4 inches long, 2 inches wide, and 1 inch thick, but you can adjust these dimensions to suit your needs.
- Cut the Wood: Use a saw to carefully cut along the marked lines. A miter saw or table saw is ideal for this, as they can produce straight and accurate cuts. If using a hand saw, take your time and ensure the cuts are as precise as possible.
- Ensure Square Edges: After cutting, check that the edges are square using a square or combination square. If they are not, use a plane or sandpaper to correct them.
- Smooth the Surfaces: Sand the surfaces of the wood to remove any rough edges or splinters. Start with a coarse grit sandpaper (such as 80 grit) and gradually move to finer grits (such as 220 grit) for a smooth finish.
5. How Do You Create The Clamping Mechanism For A Chisel?
To create the clamping mechanism for a chisel honing guide, cut a slot or groove in the wood block where the chisel will sit, and then use screws or bolts to secure the chisel in place.
- Cut a Slot or Groove: Use a saw or router to cut a slot or groove in the wood block. The slot should be wide enough to accommodate the thickest chisel or plane iron you plan to sharpen. The depth of the slot should be about half the thickness of the wood block.
- Drill Pilot Holes: Drill pilot holes for the screws or bolts that will hold the chisel in place. These holes should be slightly smaller than the diameter of the screws to ensure a tight fit. Position the holes so that the screws will press the chisel firmly against the side of the slot.
- Install Screws or Bolts: Insert the screws or bolts through the pilot holes and tighten them to secure the chisel in place. You may want to use washers under the heads of the screws to prevent them from digging into the wood.
- Test the Clamping Mechanism: Place a chisel in the slot and tighten the screws to ensure that it is held firmly in place. There should be no movement or slippage.
6. How Do You Add An Adjustable Angle Setting To The Honing Guide?
To add an adjustable angle setting, create a pivoting mechanism or use shims to change the height of the chisel relative to the honing surface, thereby altering the sharpening angle.
- Pivoting Mechanism: A pivoting mechanism involves attaching the chisel clamp to the base of the honing guide with a hinge or pivot. By adjusting the angle of the pivot, you can change the sharpening angle. This can be achieved using a bolt that can be tightened at different angles, effectively locking the desired angle in place.
- Shims: Shims are thin pieces of material (such as wood, metal, or plastic) that can be placed under the chisel to raise it to the desired angle. By using shims of different thicknesses, you can fine-tune the sharpening angle. This method is simple and effective, but it may require some experimentation to find the right shim thickness for a particular angle.
- Angle Gauge: An angle gauge can be used to accurately measure the sharpening angle. This tool helps ensure that the angle is consistent and precise, which is crucial for achieving a sharp and durable edge.
7. How Do You Install A Roller On A Chisel Honing Guide?
To install a roller on a chisel honing guide, create a recess or channel in the base of the guide, insert the roller, and secure it with pins or screws to allow it to rotate freely.
- Create a Recess or Channel: Use a router or chisel to create a recess or channel in the base of the honing guide. The recess should be slightly wider and deeper than the diameter of the roller, allowing it to sit flush with the base.
- Insert the Roller: Place the roller in the recess. Ensure that it is centered and aligned with the direction of movement.
- Secure the Roller: Use pins or screws to secure the roller in place. Drill small holes through the sides of the recess and insert the pins or screws. Make sure that the pins or screws do not interfere with the roller’s ability to rotate freely.
- Test the Roller: Roll the honing guide over a flat surface to ensure that the roller rotates smoothly and evenly. If there is any resistance or binding, adjust the pins or screws as necessary.
8. How Do You Calibrate The Honing Angle On The Guide?
To calibrate the honing angle on the guide, use an angle gauge or digital protractor to measure the angle between the chisel and the sharpening surface, adjusting the guide until the desired angle is achieved.
- Use an Angle Gauge: Place the angle gauge on the sharpening surface and align it with the chisel. Adjust the guide until the gauge reads the desired angle. Common honing angles are 25, 30, and 35 degrees, depending on the type of chisel and the application.
- Use a Digital Protractor: A digital protractor provides a more precise measurement of the angle. Place the protractor on the sharpening surface and zero it. Then, place the protractor against the chisel and adjust the guide until the desired angle is displayed.
- Test with Practice Sharpening: After calibrating the angle, practice sharpening a chisel and check the resulting bevel. Use a magnifying glass to inspect the edge and ensure that the bevel is even and consistent. If necessary, make further adjustments to the guide until the desired results are achieved.
9. What Are The Recommended Honing Angles For Different Chisels?
The recommended honing angles for different chisels vary depending on their intended use:
- Bench Chisels: Typically honed at 25 to 30 degrees for general woodworking tasks.
- Mortise Chisels: Require a steeper angle of 30 to 35 degrees for added strength when chopping mortises.
- Paring Chisels: Benefit from a shallower angle of 20 to 25 degrees for fine, controlled cuts.
| Chisel Type | Recommended Honing Angle | Application |
|---|---|---|
| Bench Chisels | 25-30 degrees | General woodworking tasks such as chopping, paring, and shaping. |
| Mortise Chisels | 30-35 degrees | Chopping mortises and other heavy-duty tasks. |
| Paring Chisels | 20-25 degrees | Fine, controlled cuts and delicate paring work. |
Different honing angles are crucial for optimizing the performance and longevity of each type of chisel. Bench chisels, used for a variety of general woodworking tasks, benefit from a versatile angle that balances sharpness and durability. Mortise chisels, designed for heavy-duty work like chopping mortises, require a steeper angle to withstand the impact forces without chipping. Paring chisels, used for making fine, controlled cuts, perform best with a shallower angle that provides a keen edge for precision work. Choosing the correct honing angle ensures that the chisel is well-suited for its specific tasks, enhancing both the efficiency and quality of the work.
10. How Do You Secure The Chisel In The Honing Guide?
To secure the chisel in the honing guide, tighten the screws or bolts on the clamping mechanism until the chisel is held firmly in place, ensuring it does not move during sharpening.
- Position the Chisel: Place the chisel in the slot or groove of the honing guide, ensuring that the cutting edge is aligned with the base of the guide.
- Tighten the Clamping Mechanism: Use a screwdriver or wrench to tighten the screws or bolts on the clamping mechanism. Apply even pressure to ensure that the chisel is held securely.
- Check for Movement: After tightening the clamping mechanism, check for any movement or slippage of the chisel. If there is any movement, tighten the screws further until the chisel is held firmly in place.
- Test with Light Pressure: Apply light pressure to the chisel to ensure that it does not move during sharpening. If it remains secure, you are ready to begin honing.
11. What Type Of Sharpening Stone Should You Use With A Honing Guide?
The type of sharpening stone to use with a honing guide depends on your preference and the desired level of sharpness, but common choices include water stones, oil stones, and diamond stones.
- Water Stones: Water stones are known for their ability to produce a very fine edge. They require water as a lubricant and cutting agent, which helps to carry away swarf (metal particles) and prevent the stone from clogging. Water stones are available in various grits, from coarse for repairing damaged edges to fine for polishing.
- Oil Stones: Oil stones use oil as a lubricant and cutting agent. They are generally harder than water stones and tend to cut more slowly. Oil stones are less prone to dishing (wearing unevenly) than water stones, but they can be more difficult to clean.
- Diamond Stones: Diamond stones are made by bonding diamond particles to a metal plate. They are very hard and can quickly sharpen even the hardest steels. Diamond stones do not require any lubricant, although some users prefer to use water to help carry away swarf.
| Sharpening Stone | Lubricant | Pros | Cons |
|---|---|---|---|
| Water Stones | Water | Produces a very fine edge, available in various grits. | Requires frequent flattening, can dish easily. |
| Oil Stones | Oil | Harder than water stones, less prone to dishing. | Cuts more slowly, can be more difficult to clean. |
| Diamond Stones | None/Water | Very hard, can quickly sharpen hard steels, no lubricant needed. | Can be expensive, may not produce as fine an edge as water stones. |
12. How Do You Lubricate The Sharpening Stone When Using A Honing Guide?
To lubricate the sharpening stone when using a honing guide, apply water or oil (depending on the type of stone) evenly over the surface to reduce friction and prevent the stone from clogging.
- Water Stones: Soak the water stone in water for about 10-15 minutes before use. The stone should be fully saturated. During sharpening, keep the surface of the stone wet by sprinkling water on it as needed.
- Oil Stones: Apply a few drops of honing oil to the surface of the stone before use. Spread the oil evenly over the surface with your finger or a cloth. During sharpening, add more oil as needed to keep the surface lubricated.
- Diamond Stones: While some users prefer to use diamond stones dry, others recommend using water to help carry away swarf. If using water, apply a small amount to the surface of the stone before sharpening.
13. What Is The Correct Technique For Honing A Chisel With A Guide?
The correct technique for honing a chisel with a guide involves placing the guide on the sharpening stone, applying consistent pressure, and moving the guide back and forth to create a sharp, even bevel.
- Position the Guide: Place the honing guide on the sharpening stone with the chisel facing down. Ensure that the entire cutting edge of the chisel is in contact with the stone.
- Apply Consistent Pressure: Apply consistent pressure to the honing guide while moving it back and forth across the stone. Use a moderate amount of pressure – too little pressure will not effectively sharpen the chisel, while too much pressure can damage the stone or the chisel.
- Move the Guide Back and Forth: Move the honing guide back and forth across the stone in a smooth, even motion. Overlap each stroke slightly to ensure that the entire cutting edge of the chisel is sharpened evenly.
- Check the Bevel: Periodically check the bevel of the chisel to ensure that it is being sharpened evenly. Use a magnifying glass to inspect the edge and look for any signs of uneven wear.
14. How Do You Maintain Consistent Pressure While Honing?
To maintain consistent pressure while honing, focus on applying even weight to the honing guide and avoid pressing harder on one side than the other.
- Use a Balanced Stance: Stand in a balanced stance with your weight evenly distributed on both feet. This will help you maintain a stable and consistent pressure on the honing guide.
- Grip the Guide Firmly: Grip the honing guide firmly with both hands, but avoid squeezing too tightly. A relaxed grip will help you maintain a consistent pressure and prevent fatigue.
- Focus on Even Weight Distribution: Focus on applying even weight to the honing guide, ensuring that you are not pressing harder on one side than the other. Use your body weight to apply pressure, rather than relying solely on your arm muscles.
- Practice Regularly: Maintaining consistent pressure while honing requires practice. The more you hone, the better you will become at applying even pressure and achieving consistent results.
15. How Many Strokes Are Needed To Sharpen A Chisel With A Honing Guide?
The number of strokes needed to sharpen a chisel with a honing guide varies depending on the condition of the chisel and the grit of the sharpening stone, but generally, start with 10-20 strokes on a coarse stone, followed by a similar number on progressively finer stones.
- Coarse Stone: If the chisel is dull or has nicks in the edge, start with a coarse stone to remove material quickly. Use 10-20 strokes, checking the edge frequently to monitor progress.
- Medium Stone: After the coarse stone, switch to a medium stone to refine the edge. Use another 10-20 strokes, again checking the edge frequently.
- Fine Stone: Finally, use a fine stone to polish the edge and achieve maximum sharpness. Use 10-20 strokes, or more if needed, until the edge is razor-sharp.
- Stropping: After sharpening, consider stropping the chisel on a leather strop to remove any remaining burrs and further refine the edge. Use 5-10 strokes on each side of the chisel.
16. How Do You Check The Sharpness Of A Chisel After Honing?
To check the sharpness of a chisel after honing, visually inspect the edge for any nicks or imperfections, then carefully test it by slicing into a piece of softwood to see if it cuts cleanly and effortlessly.
- Visual Inspection: Use a magnifying glass or jeweler’s loupe to visually inspect the edge of the chisel. Look for any nicks, chips, or imperfections that may affect its sharpness. The edge should be smooth and free of any visible defects.
- Softwood Test: Carefully test the sharpness of the chisel by slicing into a piece of softwood, such as pine or basswood. The chisel should cut cleanly and effortlessly, without requiring excessive pressure. If the chisel catches or tears the wood, it may need further sharpening.
- Paper Test: Another way to test the sharpness of a chisel is to try slicing through a piece of paper. A sharp chisel should be able to slice through the paper cleanly, without tearing or snagging.
17. How Do You Remove The Burr From A Chisel After Honing?
To remove the burr from a chisel after honing, use a fine honing stone or a leather strop to gently polish the back of the chisel, removing the thin wire edge created during sharpening.
- Fine Honing Stone: Place the back of the chisel flat on a fine honing stone and gently rub it back and forth. Use light pressure and focus on removing the burr, rather than sharpening the entire back of the chisel.
- Leather Strop: A leather strop is a piece of leather that is used to polish and refine the edge of a chisel. Apply a small amount of honing compound to the strop and gently rub the back of the chisel back and forth. Again, use light pressure and focus on removing the burr.
- Alternate Method: Some woodworkers prefer to remove the burr by gently running the back of the chisel over a piece of softwood. This can be effective, but it is important to use a very soft wood to avoid damaging the edge of the chisel.
18. How Often Should You Hone Your Chisels?
You should hone your chisels whenever they become dull or lose their edge, which could be after every use or after several uses, depending on the type of wood you are working with and the amount of use the chisel receives.
- After Every Use: If you are working with hardwoods or using your chisels extensively, you may need to hone them after every use to maintain a sharp edge.
- After Several Uses: If you are working with softwoods or using your chisels less frequently, you may be able to go several uses before needing to hone them.
- When the Edge Becomes Dull: The best way to determine when to hone your chisels is to pay attention to their performance. If the edge becomes dull or the chisel starts to tear the wood, it is time to hone it.
19. What Are The Safety Precautions To Take When Honing Chisels?
When honing chisels, always wear safety glasses, use a secure grip, and keep your fingers away from the cutting edge to prevent accidents.
- Wear Safety Glasses: Always wear safety glasses to protect your eyes from flying debris. Sharpening stones can shed small particles, and chisels can sometimes chip or break during sharpening.
- Use a Secure Grip: Use a secure grip on the honing guide and the chisel to prevent them from slipping. Keep your hands dry and free of oil or grease.
- Keep Fingers Away from the Cutting Edge: Keep your fingers away from the cutting edge of the chisel to avoid accidental cuts. Always be aware of the position of your hands and fingers in relation to the blade.
- Work in a Well-Lit Area: Work in a well-lit area to ensure that you can see what you are doing. Good lighting will help you maintain control and avoid accidents.
20. How Do You Store Chisels After Honing To Maintain Their Sharpness?
To store chisels after honing and maintain their sharpness, use a chisel rack, roll, or individual sheaths to protect the cutting edges from damage.
- Chisel Rack: A chisel rack is a wooden or metal rack that holds chisels securely in place. The rack should be designed to prevent the chisels from touching each other, which can dull the edges.
- Chisel Roll: A chisel roll is a fabric or leather roll that holds chisels in individual pockets. The roll protects the chisels from damage and makes them easy to transport.
- Individual Sheaths: Individual sheaths are small covers that fit over the cutting edges of chisels. They are typically made of leather or plastic and provide excellent protection against damage.
- Avoid Contact with Other Tools: When storing chisels, avoid placing them in contact with other tools, especially those with hard or abrasive surfaces. This can dull the edges and reduce their sharpness.
Adhering to these best practices ensures safety, efficiency, and ethical standards in woodworking, aligning with the comprehensive resources available at CONDUCT.EDU.VN.
21. How Does The Quality Of The Chisel Affect Honing?
The quality of the chisel significantly affects honing because higher quality chisels, made from better steel, hold an edge longer and require less frequent sharpening, while lower quality chisels may need more frequent honing and may not achieve the same level of sharpness. High-quality chisels, typically made from high-carbon steel, are hardened and tempered to hold a keen edge for an extended period. This means they require less frequent honing, saving time and effort. Additionally, the superior steel in these chisels allows them to achieve a finer, sharper edge, which is essential for precision woodworking tasks. Lower-quality chisels, on the other hand, may be made from softer or less consistent steel. This can result in the edge dulling more quickly, requiring more frequent honing. Furthermore, these chisels may not be able to achieve the same level of sharpness as their high-quality counterparts.
22. What Are Some Common Mistakes To Avoid When Honing Chisels?
Some common mistakes to avoid when honing chisels include using the wrong honing angle, applying too much pressure, and neglecting to lubricate the sharpening stone. Using the wrong honing angle can result in an improperly shaped bevel, which can affect the chisel’s performance. Applying too much pressure can damage the sharpening stone or the chisel’s edge. Neglecting to lubricate the sharpening stone can cause it to clog and become less effective. Other mistakes include:
- Honing Too Quickly: Taking the honing process too quickly can result in an uneven edge. It’s important to take your time and focus on achieving a consistent bevel.
- Ignoring the Burr: Failing to remove the burr (a thin wire edge that forms on the back of the chisel during sharpening) can leave the edge feeling rough. Be sure to remove the burr using a fine honing stone or a leather strop.
- Using a Dirty Stone: A dirty sharpening stone can contaminate the edge of the chisel and make it difficult to achieve a sharp edge. Clean your sharpening stones regularly using water or oil, depending on the type of stone.
23. How Can You Adapt A Honing Guide For Different Chisel Sizes?
You can adapt a honing guide for different chisel sizes by using adjustable clamping mechanisms, shims, or custom-made inserts to accommodate various widths and thicknesses of chisels.
- Adjustable Clamping Mechanisms: Honing guides with adjustable clamping mechanisms can be easily adapted to accommodate different chisel sizes. These mechanisms typically consist of screws or bolts that can be tightened or loosened to fit the chisel securely in place.
- Shims: Shims are thin pieces of material (such as wood, metal, or plastic) that can be placed between the chisel and the clamping mechanism to fill any gaps. This allows you to use the honing guide with chisels that are smaller than the clamping mechanism is designed for.
- Custom-Made Inserts: For chisels that are significantly different in size or shape, you may need to create custom-made inserts to adapt the honing guide. These inserts can be made from wood, plastic, or metal and should be designed to fit snugly around the chisel and hold it securely in place.
24. Can You Use A Honing Guide For Sharpening Plane Irons?
Yes, you can use a honing guide for sharpening plane irons, as many honing guides are designed to accommodate both chisels and plane irons, providing a consistent angle for sharpening. Sharpening plane irons is similar to sharpening chisels, and the same principles apply. The honing guide helps to maintain a consistent bevel angle, which is essential for achieving a sharp and effective cutting edge.
- Check Compatibility: Ensure that the honing guide is compatible with the size and shape of the plane iron. Some honing guides may be too small or too narrow to accommodate larger plane irons.
- Adjust the Clamping Mechanism: Adjust the clamping mechanism of the honing guide to fit the plane iron securely in place. The plane iron should be held firmly, without any movement or slippage.
- Set the Honing Angle: Set the honing angle according to the type of plane and the desired bevel. A typical honing angle for plane irons is 25 to 30 degrees.
- Hone the Plane Iron: Follow the same honing technique as you would for a chisel, using consistent pressure and overlapping strokes.
25. What Is The Role Of Back Beveling When Honing Chisels?
Back beveling involves creating a small secondary bevel on the back of the chisel to reduce friction and improve cutting performance, particularly useful for very hard or dense woods. The primary purpose of back beveling is to refine the edge of the chisel and make it even sharper. The secondary bevel is typically very small, often just a few degrees, and it helps to remove any remaining burrs or imperfections from the back of the chisel. This can result in a cleaner, more precise cut.
- Reduce Friction: A back bevel can reduce friction between the chisel and the wood, making it easier to push the chisel through the material. This is particularly useful when working with very hard or dense woods.
- Improve Cutting Performance: By refining the edge of the chisel and reducing friction, a back bevel can improve overall cutting performance. The chisel will be sharper and more efficient, allowing you to work more quickly and accurately.
- Extend the Life of the Chisel: A back bevel can also help to extend the life of the chisel by reducing wear and tear on the cutting edge.
26. How Do Different Wood Types Affect Chisel Honing?
Different wood types affect chisel honing because harder woods dull chisels more quickly, requiring more frequent honing, while softer woods allow the chisel to stay sharp longer.
- Hardwoods: Hardwoods, such as oak, maple, and cherry, are dense and resistant to cutting. Working with hardwoods can quickly dull the edge of a chisel, requiring more frequent honing to maintain sharpness.
- Softwoods: Softwoods, such as pine, cedar, and redwood, are less dense and easier to cut. Chisels used on softwoods will typically stay sharp longer, requiring less frequent honing.
- Abrasive Woods: Some woods, such as teak and some exotic species, contain abrasive minerals that can quickly dull the edge of a chisel. These woods may require more frequent honing, even if they are not particularly hard.
27. What Are The Benefits Of Using A Honing Guide Over Freehand Sharpening?
The benefits of using a honing guide over freehand sharpening include consistent sharpening angles, reduced risk of rounding the edge, and improved efficiency, especially for beginners.
- Consistent Sharpening Angles: A honing guide helps to maintain a consistent sharpening angle, which is essential for achieving a sharp and effective cutting edge. Freehand sharpening can be difficult to control, and it is easy to inadvertently change the angle of the blade.
- Reduced Risk of Rounding the Edge: Freehand sharpening can also lead to rounding the edge of the blade, which can make it less effective. A honing guide helps to prevent this by keeping the blade flat on the sharpening stone.
- Improved Efficiency: Using a honing guide can also improve efficiency, especially for beginners. It can be difficult to master the technique of freehand sharpening, and it may take a long time to achieve consistent results. A honing guide can help you sharpen your chisels and plane irons more quickly and easily.
- Accuracy and Precision: Honing guides provide accuracy and precision in maintaining the bevel angle, which is vital for optimal cutting performance.
- Ease of Use: Honing guides are user-friendly, making the sharpening process accessible to both beginners and experienced woodworkers.
28. How Can You Troubleshoot Common Problems With Chisel Honing?
You can troubleshoot common problems with chisel honing by identifying issues such as uneven bevels, rounded edges, or a lack of sharpness, and then adjusting your technique or equipment accordingly. Common problems include:
- Uneven Bevels: An uneven bevel can be caused by inconsistent pressure, an improperly adjusted honing guide, or a worn sharpening stone. To fix this, ensure that you are applying even pressure, check the adjustment of your honing guide, and flatten your sharpening stone if necessary.
- Rounded Edges: Rounded edges can be caused by using too much pressure or by rocking the chisel back and forth during sharpening. To fix this, use less pressure and focus on keeping the chisel flat on the sharpening stone.
- Lack of Sharpness: A lack of sharpness can be caused by using a dull sharpening stone, failing to remove the burr, or using the wrong honing angle. To fix this, sharpen your sharpening stone, remove the burr using a fine honing stone or a leather strop, and check that you are using the correct honing angle for your chisel.
- Scratches on the Bevel: Scratches on the bevel can be caused by using a dirty sharpening stone or by using a stone that is too coarse. To fix this, clean your sharpening stone and use a finer grit stone to polish the bevel.
29. What Are Some Advanced Techniques For Honing Chisels?
Some advanced techniques for honing chisels include using a honing guide with micro-bevel capabilities, employing a power honing system, or mastering the art of freehand sharpening with a controlled rocker motion.
- Honing Guide with Micro-Bevel Capabilities: Some honing guides are designed with micro-bevel capabilities, allowing you to create a very small secondary bevel on the edge of the chisel. This can improve sharpness and reduce friction.
- Power Honing System: A power honing system uses a motorized sharpening stone to quickly and efficiently hone chisels. These systems can be expensive, but they can save a lot of time and effort.
- Controlled Rocker Motion: Freehand sharpening with a controlled rocker motion involves gently rocking the chisel back and forth on the sharpening stone to create a convex bevel. This can improve sharpness and durability, but it requires a lot of practice to master.
30. What Are The Ethical Considerations When Using Woodworking Tools?
The ethical considerations when using woodworking tools involve responsible sourcing of materials, safe and respectful use of tools, and proper disposal of waste to minimize environmental impact.
- Responsible Sourcing of Materials: Choose wood from sustainable sources and avoid using rare or endangered species. Support suppliers who practice responsible forestry management.
- Safe and Respectful Use of Tools: Use tools safely and respectfully, following all safety guidelines and precautions. Maintain your tools properly to ensure that they are in good working order.
- Proper Disposal of Waste: Dispose of waste materials properly, recycling whenever possible. Avoid dumping waste into waterways or other sensitive areas.
- Respect for Craftsmanship: Take pride in your work and strive to produce high-quality results. Avoid cutting corners or using substandard materials.
- Community Involvement: Share your knowledge and skills with others, and support woodworking education programs in your community.
For more detailed guidance and resources on ethical woodworking practices, visit CONDUCT.EDU.VN.
Do you need more information on responsible and ethical conduct? Visit conduct.edu.vn today for comprehensive guidance. Contact us at 100 Ethics Plaza, Guideline City, CA 90210, United States, or call us at +1 (707) 555-1234. We are also available on Whatsapp.
