Opening Guided Access on your iOS device can significantly improve focus and accessibility. At CONDUCT.EDU.VN, we understand the importance of creating tailored digital experiences. This guide provides an in-depth look at enabling and utilizing Guided Access, covering everything from initial setup to advanced customization options. Unlock the full potential of your device with our expert tips on accessibility features and device management.
1. Understanding Guided Access
Guided Access is an accessibility feature available on iPhones, iPads, and iPod Touch devices that allows you to lock the device into a single app. This is particularly useful in various scenarios, such as:
- Educational Settings: Keeping students focused on specific educational apps.
- Parental Control: Restricting children to approved apps and content.
- Accessibility: Simplifying the device interface for users with cognitive disabilities.
- Public Kiosks: Ensuring users can only access designated functions.
1.1. Key Benefits of Using Guided Access
Guided Access offers several benefits:
- Focus Enhancement: By limiting access to a single app, it minimizes distractions.
- Customizable Controls: You can disable hardware buttons, touch input, and specific screen areas.
- Security: Prevents unauthorized access to other apps and settings.
- Ease of Use: Simple to set up and use, even for those not tech-savvy.
- Time Management: Includes an option to set time limits for usage.
1.2. Who Can Benefit from Guided Access?
- Parents: To control what their children access on the device.
- Educators: To keep students focused during lessons.
- Caregivers: To simplify device use for individuals with disabilities.
- Businesses: To lock down devices used in public settings like kiosks.
- Individuals: To minimize distractions and stay focused on tasks.
2. Setting Up Guided Access
Before you can start using Guided Access, you need to enable it in the Settings app. Here’s how:
2.1. Step-by-Step Guide to Enabling Guided Access
- Open Settings: Locate and tap the “Settings” app icon on your home screen.
- Navigate to Accessibility: Scroll down and tap on “Accessibility.”
- Find Guided Access: Scroll to the bottom of the “Accessibility” menu and tap on “Guided Access.”
 Accessibility Guided Access
 - Turn on Guided Access: Toggle the switch next to “Guided Access” to the ON position.
2.2. Configuring Passcode Settings
Once Guided Access is enabled, you’ll need to set up a passcode. This passcode will be used to exit Guided Access mode.
- Tap Passcode Settings: In the Guided Access menu, tap on “Passcode Settings.”
- Set Guided Access Passcode: Tap on “Set Guided Access Passcode.”
- Enter a Passcode: Enter a passcode, then re-enter it to confirm.
2.3. Enabling Touch ID or Face ID
For added convenience, you can enable Touch ID or Face ID to end Guided Access sessions.
- Navigate to Passcode Settings: Follow the steps above to reach the “Passcode Settings” menu.
- Enable Touch ID/Face ID: Toggle the switch next to “Touch ID” or “Face ID” to the ON position. This will allow you to use biometric authentication to exit Guided Access.
2.4. Best Practices for Passcode Security
- Use a Strong Passcode: Avoid easily guessable passcodes like “1234” or “0000.”
- Enable Biometric Authentication: Use Touch ID or Face ID for added security and convenience.
- Keep Your Passcode Confidential: Do not share your passcode with unauthorized individuals.
- Regularly Update Your Passcode: Change your passcode periodically to maintain security.
3. Starting a Guided Access Session
After setting up Guided Access, you can start a session in any app.
3.1. Step-by-Step Guide to Starting a Session
- Open the Desired App: Launch the app you want to lock the device into.
- Triple-Click the Side or Home Button:
- iPhone X and later: Triple-click the side button.
- iPhone 8 and earlier: Triple-click the Home button.
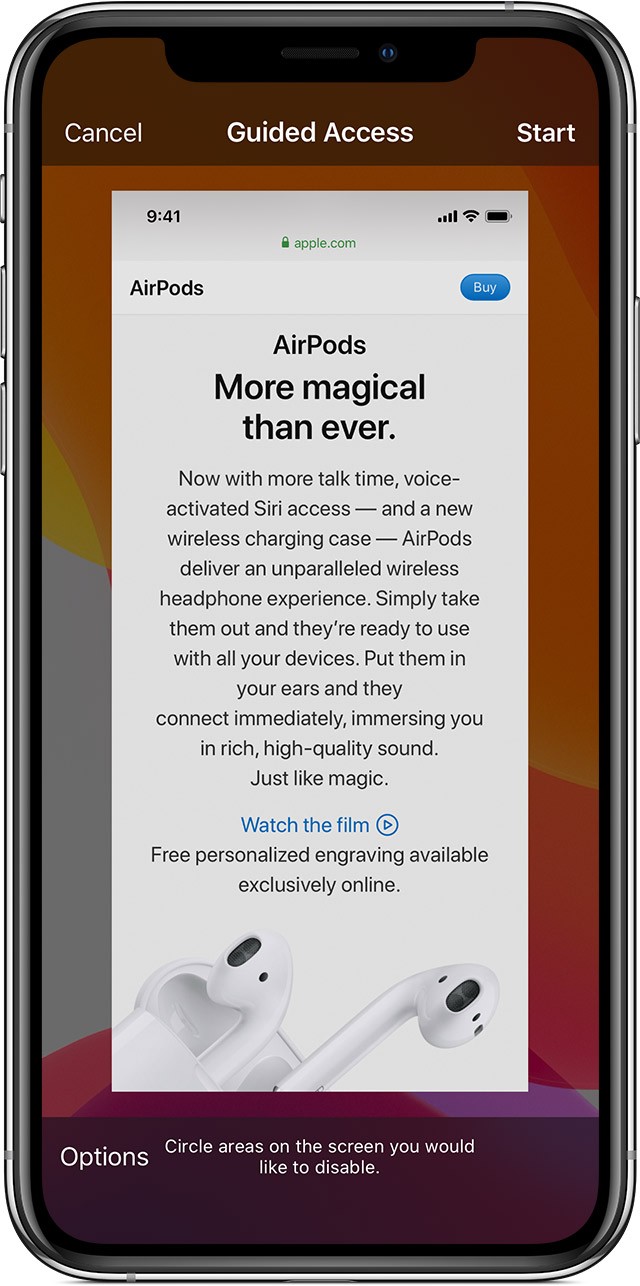
- Adjust Screen Controls (Optional): Use one finger to circle any areas of the screen you want to disable. You can move or resize these circles, or tap the “X” to remove them.
- Tap Start: In the Guided Access menu that appears, tap “Start.”
3.2. Using Siri to Start Guided Access
You can also use Siri to start a Guided Access session.
- Open the Desired App: Launch the app you want to lock the device into.
- Activate Siri: Say “Hey Siri” or press and hold the side or Home button.
- Tell Siri to Turn on Guided Access: Say “Turn on Guided Access.”
3.3. Customizing Screen Areas
Guided Access allows you to disable specific areas of the screen, preventing interaction with those parts of the app.
- Start a Guided Access Session: Follow the steps above to start a session.
- Circle Areas to Disable: Use one finger to draw circles around the areas you want to disable.
- Adjust or Remove Circles: Move or resize the circles as needed, or tap the “X” to remove them.
This feature is particularly useful for preventing accidental taps on certain buttons or links.
4. Controlling Available Features
Guided Access offers several options to control which features are available during a session.
4.1. Accessing the Options Menu
- Triple-Click the Side or Home Button: During a Guided Access session, triple-click the side or Home button.
- Enter Your Passcode (if prompted): If you don’t see the options menu, you may need to enter your Guided Access passcode.
- Tap Options: In the menu that appears, tap “Options.”
4.2. Available Options
The “Options” menu allows you to customize the following features:
- Sleep/Wake Button: Disables the Sleep/Wake button.
- Volume Buttons: Disables the volume buttons.
- Motion: Limits the device’s response to motion.
- Keyboards: Disables the keyboard.
- Touch: Disables touch input.
- Dictionary Lookup: Enables or disables the Look Up feature.
- Time Limit: Sets a time limit for the Guided Access session.
4.3. Configuring Feature Settings
To configure these options:
-
Access the Options Menu: Follow the steps above to access the “Options” menu.
-
Toggle Switches: Turn the switches next to the features you want to enable or disable.
-
Tap Done: Tap “Done” to save your changes.
4.4. Detailed Explanation of Each Option
- Sleep/Wake Button: Disabling this prevents the user from turning off the screen. This is useful in environments where constant access is needed, such as a testing scenario or a public kiosk.
- Volume Buttons: Disabling the volume buttons prevents users from adjusting the volume. This can be useful in environments where a specific volume level is required, such as a classroom or a library.
- Motion: Disabling motion limits how the device responds to movement. This can prevent the screen from rotating and disable features that rely on shaking the device.
- Keyboards: Disabling the keyboard prevents text input. This is useful when you want to limit interaction to pre-existing content, such as in a video playback or interactive display.
- Touch: Disabling touch input prevents any interaction with the screen. This is useful for displaying static content without allowing any user interaction.
- Dictionary Lookup: Disabling dictionary lookup prevents the user from accessing definitions or additional information by selecting text. This is useful in scenarios where you want to limit access to additional content.
- Time Limit: Setting a time limit automatically ends the Guided Access session after a specified duration. This is particularly useful for managing screen time for children or setting time limits for tasks.
5. Ending a Guided Access Session
Ending a Guided Access session is straightforward.
5.1. Step-by-Step Guide to Ending a Session
- Triple-Click the Side or Home Button: Triple-click the side or Home button.
- Enter Your Passcode: Enter your Guided Access passcode.
- Tap End: Tap “End” in the Guided Access menu.
5.2. Using Touch ID or Face ID to End a Session
If you have enabled Touch ID or Face ID for Guided Access:
- Triple-Click the Side or Home Button: Triple-click the side or Home button.
- Use Touch ID or Face ID: Authenticate using your fingerprint or facial recognition.
- Tap End: Tap “End” in the Guided Access menu.
5.3. What to Do If You Forget Your Passcode
If you forget your Guided Access passcode, you will need to restore your device. This process will erase all data on your device, so it’s important to back up your device regularly.
- Connect Your Device to a Computer: Use a USB cable to connect your iPhone, iPad, or iPod Touch to a computer.
- Open iTunes or Finder:
- macOS Mojave and earlier: Open iTunes.
- macOS Catalina and later: Open Finder.
- Put Your Device into Recovery Mode: The process for entering recovery mode varies depending on your device model:
- iPhone 8 or later: Press and quickly release the Volume Up button. Press and quickly release the Volume Down button. Then, press and hold the Side button until you see the recovery mode screen.
- iPhone 7 and iPhone 7 Plus: Press and hold both the Side (or Top) button and the Volume Down button at the same time. Keep holding them until you see the recovery mode screen.
- iPhone 6s and earlier, iPad, or iPod touch: Press and hold both the Home button and the Top (or Side) button at the same time. Keep holding them until you see the recovery mode screen.
- Restore Your Device: In iTunes or Finder, you will see an option to “Restore.” Click this option to restore your device to its factory settings.
- Set Up Your Device: After the restore process is complete, you can set up your device as new or restore from a backup.
6. Advanced Tips and Tricks
To maximize the benefits of Guided Access, consider these advanced tips and tricks.
6.1. Creating Custom Configurations for Different Apps
You can create different Guided Access configurations for different apps based on your specific needs. For example, you might disable the keyboard for a video playback app but enable it for an educational app that requires text input.
- Set Up Guided Access: Follow the steps above to enable Guided Access and configure the passcode settings.
- Start a Guided Access Session: Open the app you want to configure and start a Guided Access session.
- Customize the Options: Adjust the options in the “Options” menu to suit your needs.
- End the Session: End the Guided Access session and repeat the process for other apps.
6.2. Using Guided Access in Educational Settings
In educational settings, Guided Access can be used to keep students focused on specific learning activities.
- Disable Distracting Features: Disable features like the Sleep/Wake button, volume buttons, and motion to minimize distractions.
- Restrict Access to Specific Apps: Lock students into educational apps to prevent them from accessing games or social media.
- Set Time Limits: Use the time limit feature to manage screen time and encourage students to take breaks.
6.3. Implementing Guided Access for Accessibility
Guided Access can also be used to simplify device use for individuals with disabilities.
- Disable Unnecessary Features: Disable features that may be confusing or overwhelming for users with cognitive disabilities.
- Customize Screen Areas: Disable specific areas of the screen to prevent accidental taps on unwanted buttons or links.
- Use Siri for Voice Control: Enable Siri to allow users to control the device using voice commands.
6.4. Enhancing Focus and Productivity
For personal use, Guided Access can help you stay focused on tasks and minimize distractions.
- Lock Yourself into Productivity Apps: Lock yourself into apps like note-taking apps, writing apps, or project management apps to stay on task.
- Disable Notifications: Turn off notifications to minimize interruptions.
- Set Time Limits for Tasks: Use the time limit feature to manage your time and avoid getting sidetracked.
7. Troubleshooting Common Issues
Here are some solutions to common issues you may encounter while using Guided Access.
7.1. Guided Access Not Starting
If Guided Access is not starting, try the following:
- Ensure Guided Access is Enabled: Go to Settings > Accessibility > Guided Access and make sure the switch is turned ON.
- Restart Your Device: Restarting your iPhone, iPad, or iPod Touch can resolve many software issues.
- Update iOS: Make sure your device is running the latest version of iOS.
7.2. Forgetting the Guided Access Passcode
If you forget your Guided Access passcode, you will need to restore your device. This process will erase all data on your device, so it’s important to back up your device regularly.
- Connect Your Device to a Computer: Use a USB cable to connect your iPhone, iPad, or iPod Touch to a computer.
- Open iTunes or Finder:
- macOS Mojave and earlier: Open iTunes.
- macOS Catalina and later: Open Finder.
- Put Your Device into Recovery Mode: Follow the steps outlined in section 5.3 to put your device into recovery mode.
- Restore Your Device: In iTunes or Finder, you will see an option to “Restore.” Click this option to restore your device to its factory settings.
- Set Up Your Device: After the restore process is complete, you can set up your device as new or restore from a backup.
7.3. Touchscreen Not Responding in Guided Access
If the touchscreen is not responding in Guided Access, try the following:
- Check the Touch Option: Triple-click the side or Home button, enter your passcode, and tap “Options.” Make sure the “Touch” option is enabled.
- Restart the Guided Access Session: End the Guided Access session and start a new one.
- Restart Your Device: Restarting your iPhone, iPad, or iPod Touch can resolve many software issues.
7.4. Volume Buttons Not Working
If the volume buttons are not working, try the following:
- Check the Volume Buttons Option: Triple-click the side or Home button, enter your passcode, and tap “Options.” Make sure the “Volume Buttons” option is enabled.
- Check the Device’s Volume Settings: Make sure the volume is not muted and that the volume level is set appropriately.
- Restart Your Device: Restarting your iPhone, iPad, or iPod Touch can resolve many software issues.
8. Case Studies
Let’s explore a few case studies that highlight the practical applications of Guided Access.
8.1. Case Study 1: Special Education Classroom
In a special education classroom, a teacher uses iPads to support students with autism. Guided Access is used to lock the iPads into specific educational apps, preventing students from accessing distracting content. The teacher also disables the volume buttons to maintain a quiet learning environment.
8.2. Case Study 2: Public Library Kiosk
A public library uses iPads as information kiosks. Guided Access is used to lock the iPads into a library catalog app, preventing users from accessing other apps or settings. The library also disables the touch input in certain areas of the screen to prevent accidental taps on administrative functions.
8.3. Case Study 3: At-Home Learning
Parents use Guided Access to manage their children’s screen time and ensure they focus on educational content. By enabling Guided Access during homework time, parents can lock their children into educational apps and set time limits to prevent overuse.
9. Future Enhancements and Updates
Apple is continually updating iOS with new features and enhancements. Here are some potential future updates for Guided Access:
- More Granular Control: Providing more detailed control over individual features and settings.
- Cloud-Based Configuration: Allowing users to sync Guided Access configurations across multiple devices.
- Integration with MDM Solutions: Enhancing integration with mobile device management (MDM) solutions for enterprise environments.
- Improved Accessibility Features: Adding more accessibility features to support users with disabilities.
10. Conclusion
Guided Access is a powerful tool for enhancing focus, accessibility, and security on iOS devices. Whether you’re a parent, educator, caregiver, or individual looking to improve productivity, Guided Access offers a range of features to customize your device experience. By following the steps outlined in this guide, you can effectively set up and use Guided Access to meet your specific needs.
At CONDUCT.EDU.VN, we are dedicated to providing you with the most comprehensive and up-to-date information on ethical conduct and digital responsibility. We understand the challenges in finding reliable information and strive to offer clear, easy-to-understand guidelines. If you’re seeking more detailed information or specific guidance on digital device management, we encourage you to visit CONDUCT.EDU.VN. Our resources are designed to help you navigate the complexities of digital ethics and ensure a safe and productive online experience.
For further assistance or inquiries, please contact us at 100 Ethics Plaza, Guideline City, CA 90210, United States, or reach out via Whatsapp at +1 (707) 555-1234. Visit CONDUCT.EDU.VN for more information.
11. FAQ
11.1. What is Guided Access?
Guided Access is an accessibility feature on iOS devices that locks the device into a single app, allowing you to control which features are available.
11.2. How do I enable Guided Access?
Go to Settings > Accessibility > Guided Access and toggle the switch to the ON position.
11.3. How do I start a Guided Access session?
Open the desired app, triple-click the side or Home button, adjust screen controls (optional), and tap Start.
11.4. How do I end a Guided Access session?
Triple-click the side or Home button, enter your Guided Access passcode, and tap End.
11.5. What do I do if I forget my Guided Access passcode?
You will need to restore your device to its factory settings.
11.6. Can I use Touch ID or Face ID to end a Guided Access session?
Yes, you can enable Touch ID or Face ID in the Passcode Settings menu.
11.7. Can I disable specific areas of the screen in Guided Access?
Yes, you can use one finger to circle areas of the screen you want to disable.
11.8. Can I set a time limit for a Guided Access session?
Yes, you can set a time limit in the Options menu.
11.9. What options can I control in Guided Access?
You can control the Sleep/Wake button, volume buttons, motion, keyboards, touch, dictionary lookup, and time limit.
11.10. Is Guided Access available on all iOS devices?
Yes, Guided Access is available on iPhones, iPads, and iPod Touch devices running iOS 6 and later.
12. External Resources
- Apple Support: Use Guided Access with iPhone, iPad, and iPod touch
- Accessibility Resources: Apple Accessibility
- Digital Wellbeing Guide: CONDUCT.EDU.VN
This comprehensive guide provides you with all the information you need to effectively use Guided Access on your iOS devices. At conduct.edu.vn, we are committed to helping you navigate the digital world safely and ethically.