Guided Access on iPhone 12 limits your device to a single app and lets you control available features, enhancing focus and security. At CONDUCT.EDU.VN, we provide comprehensive guidance on utilizing this feature to tailor your iPhone experience for specific needs, like child safety or minimizing distractions, ensuring optimal device control. Learn to streamline device usage with our detailed instructions and expert tips.
1. What Is Guided Access on iPhone 12 and Why Use It?
Guided Access is an accessibility feature on your iPhone 12 that restricts the device to a single app. It allows you to control which features are available during that session. This is particularly useful in various scenarios:
- For Parents: When letting a child use your iPhone, Guided Access prevents them from accidentally navigating to other apps, making unauthorized purchases, or accessing inappropriate content.
- For Focus: If you need to focus on a specific task without distractions, Guided Access can lock you into a single app, such as a study app or a presentation.
- For Events: In settings like museums or interactive exhibits, Guided Access can ensure that your device only displays the intended content, preventing accidental use.
- For Accessibility: For individuals with cognitive disabilities, it simplifies the iPhone experience by reducing complexity and potential confusion.
Using Guided Access enhances security, focus, and accessibility, making your iPhone 12 more versatile and user-friendly. According to a study by the American Academy of Pediatrics, limiting screen time and controlling content access can significantly benefit children’s cognitive development. CONDUCT.EDU.VN supports such practices by providing tools like Guided Access to manage device usage effectively.
1.1. Benefits of Using Guided Access
Guided Access offers numerous benefits that enhance the usability and security of your iPhone 12. These advantages cater to a wide range of users and situations:
- Enhanced Focus: By restricting the device to a single app, Guided Access minimizes distractions, allowing users to concentrate on the task at hand.
- Improved Security: It prevents unauthorized access to other apps and settings, ensuring that your personal data and privacy are protected.
- Parental Control: Parents can limit their children’s access to specific apps and features, ensuring they only use age-appropriate content.
- Accessibility: Guided Access simplifies the device interface, making it easier for individuals with cognitive disabilities to use the iPhone.
- Customization: You can disable hardware buttons, screen areas, and specific functions within the app to tailor the experience further.
- Peace of Mind: Knowing that the device is locked to a specific app provides peace of mind, whether you’re lending it to a child or using it in a public setting.
1.2. Scenarios Where Guided Access Is Useful
Guided Access is a versatile tool that can be applied in various real-world scenarios to enhance focus, security, and accessibility. Here are some practical examples:
- Educational Settings: Teachers can use Guided Access to lock students into educational apps during class, preventing them from accessing games or social media.
- Therapeutic Environments: Therapists can use it to keep patients focused on specific therapeutic apps or exercises during sessions.
- Public Kiosks: Businesses can set up iPhones or iPads as public kiosks, restricting users to a single app for information or services.
- Testing and Assessments: Guided Access can ensure that students remain in the testing app during exams, preventing them from cheating or accessing unauthorized resources.
- Presentations: Speakers can lock their devices into presentation apps, ensuring that they don’t accidentally switch to other apps during a presentation.
- Home Use: Parents can use Guided Access to manage their children’s screen time and the types of apps they use.
- Travel: When traveling, Guided Access can keep children entertained with a specific video or game without the risk of them accessing other apps or making unintended purchases.
These scenarios highlight the flexibility and utility of Guided Access in making the iPhone 12 a more controlled and secure device.
 iPhone 12 showing settings for Guided Access
2. Step-by-Step Guide to Setting Up Guided Access on iPhone 12
Setting up Guided Access on your iPhone 12 is straightforward. Follow these steps to enable and configure this useful feature:
2.1. Enabling Guided Access
-
Open Settings: Start by opening the Settings app on your iPhone 12.
-
Navigate to Accessibility: Scroll down and tap on “Accessibility.”
-
Select Guided Access: In the Accessibility menu, find and tap on “Guided Access.”
-
Turn On Guided Access: Toggle the switch to turn Guided Access on. The switch will turn green when enabled.
2.2. Configuring Passcode Settings
- Enter Passcode Settings: In the Guided Access menu, tap on “Passcode Settings.”
- Set Guided Access Passcode: Tap on “Set Guided Access Passcode.”
- Enter a Passcode: Enter a new six-digit passcode. Make sure to choose a passcode that you can remember but is difficult for others to guess.
- Re-enter Passcode: Re-enter the same passcode to confirm.
- Enable Touch ID/Face ID (Optional): You can also enable Touch ID or Face ID to end Guided Access sessions. Toggle the switch for “Touch ID” or “Face ID” to the on position. This provides an alternative way to end Guided Access without entering the passcode.
2.3. Starting a Guided Access Session
- Open the Desired App: Open the app that you want to use in Guided Access mode. For example, if you want to lock the device to a specific game, open that game.
- Triple-Click the Side Button: Quickly press the side button (power button) three times. This action initiates Guided Access.
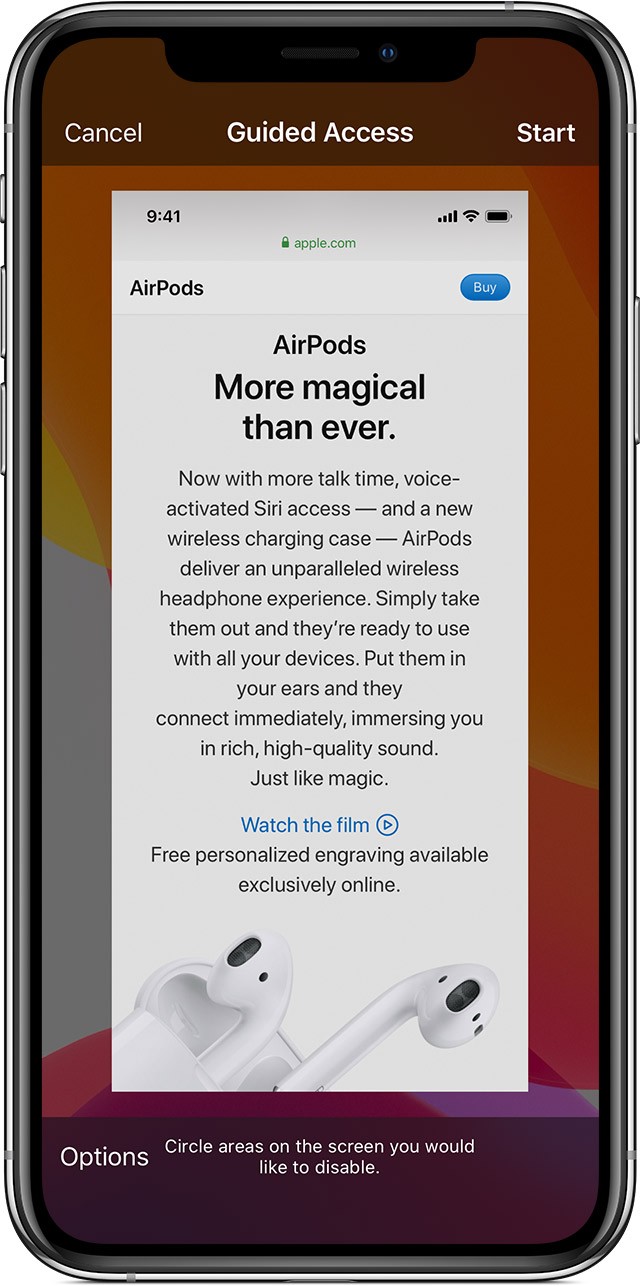
- Circle Areas to Disable (Optional): If you want to disable certain areas of the screen, use your finger to circle those areas. These areas will not respond to touch while Guided Access is active. You can move or resize the circles, or tap the “X” to remove them.
- Tap Guided Access, Then Start: At the bottom of the screen, you will see the Guided Access options. Tap “Guided Access,” then tap “Start” in the upper-right corner of the screen.
- Enter Passcode (If Required): If prompted, enter your Guided Access passcode.
Once you complete these steps, Guided Access will be active, and the device will be locked to the selected app.
3. Customizing Guided Access Options for Enhanced Control
Guided Access offers several customization options that allow you to tailor the experience to your specific needs. These options include disabling hardware buttons, setting time limits, and restricting screen areas.
3.1. Accessing Options During a Session
- Triple-Click the Side Button: While in a Guided Access session, quickly press the side button (power button) three times to access the options menu.
- Enter Passcode (If Required): If prompted, enter your Guided Access passcode or use Touch ID/Face ID.
- Tap Options: In the lower-left corner of the screen, tap “Options.”
3.2. Available Options
The Options menu provides several settings that you can customize:
-
Sleep/Wake Button: Turn this off to disable the Sleep/Wake button. When disabled, the device cannot be put to sleep using the button.
-
Volume Buttons: Turn this off to disable the volume buttons. This prevents users from adjusting the volume while in Guided Access.
-
Motion: Turn this off to restrict the device’s response to motion. This disables features like shaking to undo and screen rotation.
-
Keyboards: Turn this off to disable the keyboard. This is useful if the app doesn’t require text input, preventing the keyboard from appearing.
-
Touch: Turn this off to disable touch input on the screen. This makes the app view-only, preventing any interaction with the screen.
-
Dictionary Lookup: Turn this on to allow the use of the Look Up feature when selecting text.
-
Time Limit: Turn this on to set a time limit for the Guided Access session. When the time limit expires, the session will automatically end, and the device will be locked.
3.3. Setting a Time Limit
- Enable Time Limit: In the Options menu, turn on the “Time Limit” switch.
- Set the Duration: Choose the desired time limit. You can set the time in minutes and seconds.
Once the time limit is set, Guided Access will automatically end when the specified time has elapsed. A notification will appear on the screen before the session ends.
4. How to End a Guided Access Session on iPhone 12
Ending a Guided Access session is simple, but it requires either the correct passcode or the use of Touch ID/Face ID if enabled.
4.1. Using the Passcode
- Triple-Click the Side Button: Quickly press the side button (power button) three times.
- Enter Passcode: Enter your Guided Access passcode when prompted.
- Tap End: In the lower-left corner of the screen, tap “End.”
4.2. Using Touch ID or Face ID
- Triple-Click the Side Button: Quickly press the side button (power button) three times.
- Authenticate: Use Touch ID or Face ID to authenticate.
- Tap End: In the lower-left corner of the screen, tap “End.”
Once you tap “End,” the Guided Access session will terminate, and the device will return to normal operation.
5. Troubleshooting Common Issues with Guided Access
While Guided Access is generally reliable, you may encounter some issues. Here are common problems and how to troubleshoot them:
5.1. Forgetting the Guided Access Passcode
If you forget your Guided Access passcode, you will need to restore your iPhone to factory settings. This process will erase all data on your device, so it’s essential to have a backup.
- Connect to a Computer: Connect your iPhone to a computer that you have previously used to sync with your device.
- Enter Recovery Mode:
- iPhone 8 or Later: Press and quickly release the volume up button, press and quickly release the volume down button, then press and hold the side button until you see the recovery mode screen.
- Restore iPhone: In iTunes or Finder, you will see a prompt to restore or update your iPhone. Choose “Restore.”
- Follow On-Screen Instructions: Follow the on-screen instructions to restore your iPhone to factory settings.
Once the restore process is complete, you can set up your iPhone as new or restore from a backup.
5.2. Guided Access Not Starting
If Guided Access fails to start when you triple-click the side button, ensure that the feature is enabled in Settings.
- Open Settings: Go to Settings > Accessibility > Guided Access.
- Verify Enabled: Make sure the “Guided Access” switch is turned on.
- Check Accessibility Shortcut: Ensure that Guided Access is selected in the Accessibility Shortcut settings (Settings > Accessibility > Accessibility Shortcut).
5.3. Screen Not Responding to Touch
If the screen is not responding to touch during a Guided Access session, make sure that the “Touch” option is enabled in the Options menu.
- Triple-Click the Side Button: Quickly press the side button (power button) three times.
- Enter Passcode: Enter your Guided Access passcode or use Touch ID/Face ID.
- Tap Options: In the lower-left corner of the screen, tap “Options.”
- Verify Touch is Enabled: Make sure the “Touch” switch is turned on.
5.4. Time Limit Not Working
If the time limit is not working as expected, ensure that the “Time Limit” option is enabled and correctly set in the Options menu.
- Triple-Click the Side Button: Quickly press the side button (power button) three times.
- Enter Passcode: Enter your Guided Access passcode or use Touch ID/Face ID.
- Tap Options: In the lower-left corner of the screen, tap “Options.”
- Verify Time Limit is Enabled: Make sure the “Time Limit” switch is turned on and the duration is set correctly.
6. Advanced Tips and Tricks for Guided Access
To get the most out of Guided Access on your iPhone 12, consider these advanced tips and tricks:
6.1. Using Siri to Start Guided Access
You can use Siri to start a Guided Access session. First, ensure that Siri is enabled on your iPhone.
- Open the Desired App: Open the app that you want to use in Guided Access mode.
- Activate Siri: Say “Hey Siri” or press and hold the side button to activate Siri.
- Command Siri: Say “Turn on Guided Access.”
Siri will automatically start a Guided Access session in the current app.
6.2. Disabling Specific Areas of the Screen
Guided Access allows you to disable specific areas of the screen, preventing any interaction with those areas. This is useful for hiding ads or preventing access to certain features within an app.
- Start a Guided Access Session: Open the app and triple-click the side button to start Guided Access.
- Circle Areas to Disable: Use your finger to circle the areas of the screen that you want to disable. You can adjust the size and position of the circles as needed.
- Start Guided Access: Tap “Start” to begin the session with the specified areas disabled.
6.3. Creating Custom Configurations for Different Apps
You can create custom Guided Access configurations for different apps, saving time and effort when setting up Guided Access.
- Set Up Guided Access for an App: Configure Guided Access with the desired options for a specific app.
- Note the Settings: Make a note of the settings you used, such as disabled buttons, screen areas, and time limits.
- Repeat for Other Apps: Repeat the process for other apps, creating a set of custom configurations.
By creating these custom configurations, you can quickly set up Guided Access for different apps without having to reconfigure the settings each time.
6.4. Combining Guided Access with Other Accessibility Features
Guided Access can be combined with other accessibility features on your iPhone 12 to create a more tailored and supportive experience.
- VoiceOver: Use VoiceOver to provide auditory feedback for users with visual impairments.
- Zoom: Use Zoom to magnify the screen for users with low vision.
- Switch Control: Use Switch Control to allow users with motor impairments to control the device using external switches.
- AssistiveTouch: Use AssistiveTouch to provide on-screen controls for users with difficulty using physical buttons.
By combining these features, you can create a more accessible and user-friendly experience for individuals with disabilities.
7. Guided Access and Child Safety: A Parent’s Guide
Guided Access is an invaluable tool for parents who want to ensure their children’s safety and well-being while using an iPhone 12. Here’s how to use Guided Access effectively for child safety:
7.1. Limiting App Access
- Choose Appropriate Apps: Select age-appropriate apps that you want your child to use.
- Enable Guided Access: Open the app and start a Guided Access session to lock the device to that app.
- Prevent Unwanted Access: This prevents your child from accidentally or intentionally accessing other apps, such as social media or messaging apps.
7.2. Disabling In-App Purchases
To prevent unauthorized in-app purchases, you can disable the touch functionality for the purchase areas or disable internet access altogether.
- Identify Purchase Areas: Determine the areas of the screen where in-app purchases can be made.
- Disable Touch in Those Areas: Use Guided Access to circle and disable those areas of the screen.
- Disable Internet Access: Alternatively, disable Wi-Fi and cellular data for the app in Settings > Cellular or Settings > Wi-Fi.
7.3. Setting Time Limits for Usage
- Enable Time Limit: In the Guided Access options, enable the “Time Limit” feature.
- Set a Duration: Set a reasonable time limit for your child’s usage.
- Encourage Breaks: This helps manage screen time and encourages your child to take breaks.
7.4. Monitoring and Communication
While Guided Access provides a secure environment, it’s important to maintain open communication with your child about their online activities.
- Discuss Online Safety: Talk to your child about online safety, appropriate content, and the importance of not sharing personal information.
- Monitor Usage: Periodically check the apps your child is using and discuss their experiences.
- Encourage Responsible Use: Promote responsible and balanced technology use.
By combining Guided Access with open communication and monitoring, you can create a safe and positive digital environment for your child.
8. Enhancing Productivity with Guided Access: A User’s Manual
Guided Access isn’t just for child safety; it’s also a powerful tool for enhancing productivity and focus for adults. Here’s how to leverage Guided Access for personal and professional use:
8.1. Minimizing Distractions
- Identify Distracting Apps: Determine which apps tend to distract you from your work, such as social media, email, or news apps.
- Use Guided Access for Focus: When you need to concentrate, use Guided Access to lock yourself into the app you need for work, such as a word processor, spreadsheet, or presentation app.
8.2. Disabling Notifications
To further minimize distractions, disable notifications for the app you’re using in Guided Access.
- Open Settings: Go to Settings > Notifications.
- Select the App: Find the app you’re using in Guided Access and tap on it.
- Disable Notifications: Toggle the “Allow Notifications” switch to the off position.
8.3. Creating a Focused Work Environment
- Set Boundaries: Establish clear boundaries for your work time, such as setting specific hours for focused work.
- Use Guided Access Consistently: Use Guided Access consistently during your focused work periods to maintain a distraction-free environment.
- Take Breaks: Schedule regular breaks to avoid burnout. Use a timer app in Guided Access to ensure you stick to your break schedule.
8.4. Training and Education
Guided Access can also be used in training and educational settings to keep learners focused on the task at hand.
- Lock to Learning Apps: Use Guided Access to lock learners into educational apps or online courses during training sessions.
- Disable Distractions: Disable access to other apps and features to prevent distractions.
- Monitor Progress: Monitor learners’ progress and provide support as needed.
By using Guided Access to create a focused work environment, you can enhance your productivity, reduce distractions, and achieve your goals more efficiently.
9. Accessibility Features Enhanced by Guided Access
Guided Access is a powerful tool that can significantly enhance the accessibility of your iPhone 12, making it easier for individuals with disabilities to use the device. Here’s how Guided Access can be combined with other accessibility features to create a more tailored and supportive experience:
9.1. VoiceOver and Guided Access
VoiceOver is a screen reader that provides auditory feedback for users with visual impairments. When combined with Guided Access, it can create a more accessible experience for users who need assistance navigating the screen.
- Enable VoiceOver: Go to Settings > Accessibility > VoiceOver and turn the feature on.
- Use Guided Access: Start a Guided Access session in the desired app.
- Navigate with VoiceOver: Use VoiceOver gestures to navigate the screen and interact with the app.
Guided Access ensures that the user stays within the intended app, while VoiceOver provides auditory feedback to help them understand what’s on the screen.
9.2. Zoom and Guided Access
Zoom allows users with low vision to magnify the screen, making it easier to see content. When combined with Guided Access, it can help users stay focused on the magnified area without accidentally navigating away from the app.
- Enable Zoom: Go to Settings > Accessibility > Zoom and turn the feature on.
- Use Guided Access: Start a Guided Access session in the desired app.
- Magnify the Screen: Use Zoom gestures to magnify the screen as needed.
Guided Access keeps the user within the app, while Zoom provides the necessary magnification for comfortable viewing.
9.3. Switch Control and Guided Access
Switch Control allows users with motor impairments to control the device using external switches. When combined with Guided Access, it can create a more accessible experience for users who have difficulty using the touchscreen.
- Connect Switches: Connect the external switches to the iPhone.
- Enable Switch Control: Go to Settings > Accessibility > Switch Control and configure the switches.
- Use Guided Access: Start a Guided Access session in the desired app.
- Control with Switches: Use the switches to navigate and interact with the app.
Guided Access ensures that the user remains within the intended app, while Switch Control provides an alternative input method.
9.4. AssistiveTouch and Guided Access
AssistiveTouch provides on-screen controls for users with difficulty using physical buttons. When combined with Guided Access, it can help users access essential functions without needing to press the physical buttons on the device.
- Enable AssistiveTouch: Go to Settings > Accessibility > Touch > AssistiveTouch and turn the feature on.
- Customize Menu: Customize the AssistiveTouch menu to include frequently used functions.
- Use Guided Access: Start a Guided Access session in the desired app.
- Control with AssistiveTouch: Use the AssistiveTouch menu to access functions like volume control, Home button, and more.
Guided Access keeps the user within the app, while AssistiveTouch provides an alternative way to access essential functions.
By combining Guided Access with these accessibility features, you can create a more inclusive and supportive experience for individuals with disabilities, ensuring that they can use their iPhone 12 to its full potential.
10. Case Studies: Real-World Applications of Guided Access
To illustrate the versatility and effectiveness of Guided Access, here are several case studies showcasing its real-world applications in various settings:
10.1. Case Study 1: Special Education Classroom
Setting: A special education classroom for students with autism spectrum disorder.
Challenge: Students often become distracted by other apps on their iPads, making it difficult to keep them focused on their learning activities.
Solution: The teacher implemented Guided Access to lock students into specific educational apps during class time. They also disabled the Home button and touch input in certain areas of the screen to prevent accidental navigation.
Outcome: The teacher reported a significant improvement in student focus and engagement. Students were less likely to become distracted, and they were able to complete their learning activities more efficiently.
10.2. Case Study 2: Geriatric Care Facility
Setting: A geriatric care facility for elderly residents with cognitive impairments.
Challenge: Residents often struggle to use iPads due to their complex interface and numerous options. They may accidentally navigate to unintended apps or change settings, causing confusion and frustration.
Solution: The staff implemented Guided Access to lock residents into simple, user-friendly apps designed for seniors. They also disabled the volume buttons and touch input in certain areas of the screen to prevent accidental changes.
Outcome: The residents were able to use the iPads more independently and confidently. They enjoyed using the apps for entertainment, communication, and cognitive stimulation, improving their overall quality of life.
10.3. Case Study 3: Retail Kiosk
Setting: A retail store using iPads as kiosks to display product information and collect customer feedback.
Challenge: Customers were often tempted to use the iPads for other purposes, such as browsing the web or playing games, which interfered with the intended use of the kiosks.
Solution: The store implemented Guided Access to lock the iPads into the kiosk app. They also disabled the Home button and touch input in certain areas of the screen to prevent unauthorized access.
Outcome: The iPads remained focused on their intended purpose, providing customers with valuable product information and collecting useful feedback for the store.
10.4. Case Study 4: Speech Therapy Session
Setting: A speech therapy session for a child with a speech delay.
Challenge: The child was easily distracted during therapy sessions, making it difficult to keep them focused on their speech exercises.
Solution: The therapist used Guided Access to lock the child into a speech therapy app. They also disabled the Home button and touch input in certain areas of the screen to prevent distractions.
Outcome: The child was able to focus on their speech exercises more effectively, resulting in improved progress and better therapy outcomes.
These case studies demonstrate the diverse applications of Guided Access and its potential to enhance focus, accessibility, and security in various settings.
FAQ: Answering Your Questions About Guided Access
Here are some frequently asked questions about Guided Access on iPhone 12:
1. What is Guided Access?
Guided Access is an accessibility feature on iPhone that restricts the device to a single app and allows you to control which features are available. It is designed to help users stay focused, prevent unauthorized access, and simplify the device interface.
2. How do I enable Guided Access on my iPhone 12?
To enable Guided Access, go to Settings > Accessibility > Guided Access and turn the feature on. You will also need to set a passcode and configure other options.
3. How do I start a Guided Access session?
To start a Guided Access session, open the desired app and triple-click the side button (power button). Then, tap “Start” in the upper-right corner of the screen.
4. How do I end a Guided Access session?
To end a Guided Access session, triple-click the side button and enter your passcode. Then, tap “End” in the lower-left corner of the screen.
5. What if I forget my Guided Access passcode?
If you forget your Guided Access passcode, you will need to restore your iPhone to factory settings. This process will erase all data on your device, so it’s essential to have a backup.
6. Can I use Touch ID or Face ID to end a Guided Access session?
Yes, you can enable Touch ID or Face ID to end Guided Access sessions. To do this, go to Settings > Accessibility > Guided Access > Passcode Settings and turn on the “Touch ID” or “Face ID” switch.
7. Can I disable the hardware buttons during a Guided Access session?
Yes, you can disable the Sleep/Wake button and volume buttons during a Guided Access session. To do this, triple-click the side button, enter your passcode, tap “Options,” and turn off the switches for the desired buttons.
8. Can I disable touch input during a Guided Access session?
Yes, you can disable touch input during a Guided Access session. To do this, triple-click the side button, enter your passcode, tap “Options,” and turn off the “Touch” switch.
9. Can I set a time limit for a Guided Access session?
Yes, you can set a time limit for a Guided Access session. To do this, triple-click the side button, enter your passcode, tap “Options,” and turn on the “Time Limit” switch. Then, set the desired duration.
10. Can I use Guided Access with other accessibility features?
Yes, Guided Access can be used with other accessibility features such as VoiceOver, Zoom, Switch Control, and AssistiveTouch to create a more tailored and supportive experience for individuals with disabilities.
By understanding these frequently asked questions, you can effectively use Guided Access to enhance the usability, security, and accessibility of your iPhone 12.
Guided Access on the iPhone 12 offers a versatile solution for enhancing focus, ensuring safety, and improving accessibility. Whether you’re a parent managing your child’s screen time, a professional seeking to minimize distractions, or someone who needs accessibility support, Guided Access provides the tools you need. For more detailed guides and information, visit conduct.edu.vn. Our resources can further assist you in navigating the complexities of digital device management and ethical technology use. If you have any further questions or need assistance, please reach out to us at 100 Ethics Plaza, Guideline City, CA 90210, United States, or contact us via WhatsApp at +1 (707) 555-1234. We’re here to help you make the most of your digital experience!