Sharpening chisels with a honing guide offers precision and consistency, essential for achieving razor-sharp edges. At CONDUCT.EDU.VN, we emphasize the importance of proper tool maintenance for optimal woodworking performance. Using a honing guide ensures accurate angles and repeatable results, even for beginners. Learn about the right honing angle, sharpening stones and effective method from our experts.
1. Understanding the Basics of Chisel Sharpening
Chisels are fundamental tools in woodworking, used for shaping, cutting, and refining wood. A sharp chisel is not only more efficient but also safer to use. Dull chisels require more force, increasing the risk of slips and accidents. Regular sharpening is crucial for maintaining optimal performance and extending the life of your tools. There are several methods for sharpening chisels, but using a honing guide offers significant advantages, especially for those new to woodworking or seeking consistent results.
1.1. Why Sharpening Chisels is Important
- Enhanced Precision: Sharp chisels allow for cleaner and more accurate cuts, which is essential for detailed work.
- Increased Safety: Sharp tools require less force, reducing the risk of slipping and potential injury.
- Improved Efficiency: A sharp chisel cuts through wood more easily, saving time and effort.
- Extended Tool Life: Regular maintenance, including sharpening, prevents excessive wear and tear, prolonging the life of your chisels.
1.2. The Role of a Honing Guide
A honing guide is a tool that holds the chisel at a consistent angle while sharpening. This ensures that the bevel is sharpened evenly across the blade, resulting in a precise and consistent edge.
- Consistency: Honing guides maintain a consistent angle, eliminating the guesswork involved in freehand sharpening.
- Accuracy: They help achieve a precise bevel, which is critical for optimal cutting performance.
- Ease of Use: Honing guides make the sharpening process more accessible, especially for beginners.
- Repeatability: Once set, the honing guide allows for repeatable sharpening sessions, ensuring consistent results every time.
2. Essential Tools and Materials
Before you begin sharpening your chisels, gather the necessary tools and materials. Having everything on hand will streamline the process and ensure a successful outcome.
2.1. Honing Guide
A high-quality honing guide is the cornerstone of this method. Look for a guide that is durable, easy to adjust, and capable of securely holding a variety of chisel sizes. Popular options include the Veritas MK.II Honing Guide and basic honing guides, which work well with a shop-made jig.
2.2. Sharpening Stones
Sharpening stones, also known as whetstones, are abrasive surfaces used to grind and polish the chisel’s edge. They come in various grits, each serving a specific purpose.
- Coarse Stone (200-400 grit): Used for repairing damaged edges and removing significant amounts of material.
- Medium Stone (1000-2000 grit): Used for initial sharpening and refining the edge after using a coarse stone.
- Fine Stone (4000-8000 grit): Used for polishing the edge to achieve maximum sharpness.
- Extra Fine Stone (8000+ grit): Used for final polishing and achieving a razor-sharp edge.
There are two main types of sharpening stones:
- Water Stones: These stones require water as a lubricant. They cut quickly but wear down faster than oil stones.
- Oil Stones: These stones require oil as a lubricant. They are more durable but cut slower than water stones.
2.3. Lapping Plate or Flattening Stone
A lapping plate or flattening stone is used to keep your sharpening stones flat. Over time, sharpening stones can develop an uneven surface, which can affect the quality of your sharpening. A flat stone is essential for achieving a consistent bevel.
2.4. Honing Solution
Depending on the type of sharpening stone you are using, you will need either water or honing oil.
- Water: Use clean water for water stones. Some people add a drop of dish soap to help with lubrication and prevent rust.
- Honing Oil: Use a high-quality honing oil specifically designed for oil stones. Avoid using household oils, as they can become gummy and clog the stone.
2.5. Soft Cloth or Leather Strop
A soft cloth or leather strop is used to remove the burr from the back of the chisel and further polish the edge after sharpening.
2.6. Angle Setting Jig or Protractor
An angle setting jig or protractor is used to accurately set the honing guide to the desired bevel angle.
3. Setting Up Your Sharpening Station
Before you begin sharpening, set up a dedicated sharpening station in your workshop. This will help you stay organized and focused on the task at hand.
3.1. Preparing the Sharpening Stones
- Water Stones: Soak the water stones in water for about 10-15 minutes before use. This ensures that the stone is fully saturated and ready to cut. Keep the stone wet during sharpening by adding water as needed.
- Oil Stones: Apply a thin layer of honing oil to the surface of the oil stone before use. Keep the stone lubricated during sharpening by adding oil as needed.
3.2. Setting the Honing Guide
Use an angle setting jig or protractor to set the honing guide to the desired bevel angle. The most common bevel angles for chisels are 25 degrees for general use and 30-35 degrees for heavy-duty use.
- Primary Bevel: This is the main bevel on the chisel. A 25-degree angle is suitable for most tasks.
- Secondary Bevel (Micro-Bevel): This is a small bevel at the very edge of the chisel, typically 2-3 degrees steeper than the primary bevel. It enhances the sharpness and durability of the edge.
3.3. Securing the Chisel in the Honing Guide
Place the chisel in the honing guide, ensuring that the blade is centered and securely clamped. Tighten the screws or knobs on the honing guide to hold the chisel in place.
4. Step-by-Step Guide to Sharpening Chisels with a Honing Guide
Follow these steps to sharpen your chisels with a honing guide and achieve a razor-sharp edge.
4.1. Flattening the Back of the Chisel
The first step in sharpening a chisel is to flatten the back of the blade. This ensures that the entire edge is in contact with the sharpening stone, resulting in a consistent bevel. This step only needs to be done once when you first get the chisel or when the back is not perfectly flat.
- Prepare the Lapping Plate: Ensure your lapping plate or flattening stone is clean and flat.
- Lubricate the Surface: Apply water or honing oil to the surface of the lapping plate.
- Position the Chisel: Place the back of the chisel flat on the lapping plate, with the edge facing away from you.
- Flattening Motion: Apply light pressure and move the chisel back and forth in a figure-eight motion. Focus on flattening the first inch or two of the back near the cutting edge.
- Check for Flatness: Periodically check the back of the chisel for flatness using a straightedge. Continue lapping until the entire surface is uniformly flat.
4.2. Grinding the Primary Bevel
If the chisel is damaged or has a dull edge, you may need to grind the primary bevel before honing. This step removes material quickly and establishes the initial bevel angle.
- Prepare the Coarse Stone: Ensure your coarse sharpening stone is clean and lubricated.
- Position the Honing Guide: Place the honing guide with the chisel on the coarse stone, ensuring that the bevel is in contact with the surface.
- Grinding Motion: Apply moderate pressure and move the honing guide back and forth along the stone, maintaining a consistent angle.
- Check the Bevel: Periodically check the bevel to ensure that it is being ground evenly. Continue grinding until you have established a consistent bevel across the entire edge.
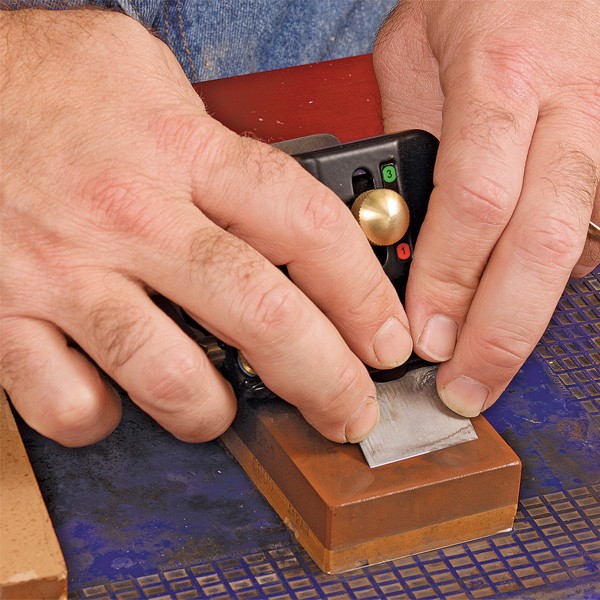
4.3. Honing the Secondary Bevel
Honing is the process of refining the edge of the chisel using progressively finer sharpening stones. This step creates a polished and razor-sharp edge.
- Prepare the Medium Stone: Ensure your medium sharpening stone is clean and lubricated.
- Position the Honing Guide: Place the honing guide with the chisel on the medium stone, ensuring that the bevel is in contact with the surface.
- Honing Motion: Apply light pressure and move the honing guide back and forth along the stone, maintaining a consistent angle. Focus on honing the secondary bevel, which is a small bevel at the very edge of the chisel.
- Repeat with Fine and Extra Fine Stones: Repeat the honing process with progressively finer sharpening stones, using light pressure and maintaining a consistent angle. This will further polish the edge and create a razor-sharp finish.
4.4. Removing the Burr
As you hone the chisel, a small burr will form on the back of the blade. This burr must be removed to achieve a truly sharp edge.
- Prepare the Fine Stone: Ensure your finest sharpening stone is clean and lubricated.
- Position the Chisel: Remove the chisel from the honing guide and place the back of the blade flat on the fine stone.
- Removing the Burr: Apply very light pressure and move the chisel back and forth along the stone, focusing on the very edge of the blade. This will remove the burr.
- Test for Sharpness: Test the sharpness of the chisel by carefully slicing through a piece of softwood. A sharp chisel should cut cleanly and effortlessly.
4.5. Stropping the Edge
Stropping is the final step in sharpening a chisel. It further polishes the edge and removes any remaining imperfections.
- Prepare the Strop: Apply a small amount of honing compound to the surface of the leather strop.
- Position the Chisel: Place the bevel of the chisel flat on the strop, with the edge facing away from you.
- Stropping Motion: Apply very light pressure and move the chisel away from the edge, maintaining a consistent angle.
- Repeat on the Back: Turn the chisel over and repeat the stropping motion on the back of the blade.
- Test for Sharpness: Test the sharpness of the chisel by carefully slicing through a piece of softwood. A sharp chisel should cut cleanly and effortlessly.
5. Maintaining Your Sharpened Chisels
Proper maintenance is essential for keeping your chisels sharp and in good condition.
5.1. Regular Honing
Hone your chisels regularly, even if they don’t feel dull. Regular honing will keep the edge sharp and prevent the need for more aggressive grinding.
5.2. Cleaning and Oiling
After each use, clean your chisels with a soft cloth and apply a thin layer of oil to prevent rust.
5.3. Proper Storage
Store your chisels in a safe place where they won’t be damaged or come into contact with other tools. Consider using a chisel roll or a dedicated storage rack.
6. Choosing the Right Honing Guide
Selecting the right honing guide is crucial for achieving consistent and accurate sharpening results. There are several types of honing guides available, each with its own set of features and benefits.
6.1. Veritas MK.II Honing Guide
The Veritas MK.II Honing Guide is a popular choice among woodworkers for its precision and ease of use. It features a clamping mechanism that securely holds the chisel in place and allows for precise angle adjustments.
- Pros:
- Precise angle adjustments
- Secure clamping mechanism
- Durable construction
- Cons:
- Higher price point
6.2. Basic Honing Guides
Basic honing guides are a more affordable option that still provides accurate and consistent sharpening results. These guides typically consist of a simple frame with rollers that ride along the sharpening stone.
- Pros:
- Affordable price point
- Simple and easy to use
- Compatible with a shop-made jig for angle setting
- Cons:
- Less precise angle adjustments
- May require additional setup for accurate angle setting
6.3. Considerations When Choosing a Honing Guide
- Price: Honing guides range in price from affordable to high-end. Consider your budget and the features that are most important to you.
- Ease of Use: Look for a honing guide that is easy to set up and use, especially if you are new to sharpening.
- Precision: Choose a honing guide that allows for precise angle adjustments to ensure consistent sharpening results.
- Durability: Select a honing guide that is made from high-quality materials and is built to last.
7. Advanced Sharpening Techniques
Once you have mastered the basics of sharpening chisels with a honing guide, you can explore some advanced techniques to further refine your skills.
7.1. Creating a Micro-Bevel
A micro-bevel is a small bevel at the very edge of the chisel, typically 2-3 degrees steeper than the primary bevel. It enhances the sharpness and durability of the edge.
- Set the Honing Guide: Set the honing guide to an angle that is 2-3 degrees steeper than the primary bevel.
- Hone the Edge: Hone the edge of the chisel on a fine sharpening stone, using light pressure and maintaining a consistent angle.
- Test for Sharpness: Test the sharpness of the chisel by carefully slicing through a piece of softwood. A sharp chisel with a micro-bevel should cut even more cleanly and effortlessly.
7.2. Using a Leather Strop with Honing Compound
A leather strop with honing compound can be used to further polish the edge of the chisel and remove any remaining imperfections.
- Prepare the Strop: Apply a small amount of honing compound to the surface of the leather strop.
- Position the Chisel: Place the bevel of the chisel flat on the strop, with the edge facing away from you.
- Stropping Motion: Apply very light pressure and move the chisel away from the edge, maintaining a consistent angle.
- Repeat on the Back: Turn the chisel over and repeat the stropping motion on the back of the blade.
- Test for Sharpness: Test the sharpness of the chisel by carefully slicing through a piece of softwood. A sharp chisel that has been stropped should have a mirror-like finish and cut with exceptional ease.
7.3. Hollow Grinding
Hollow grinding involves creating a concave bevel on the chisel using a grinding wheel. This technique makes it easier to hone the edge, as only the edges of the bevel need to be in contact with the sharpening stone.
- Prepare the Grinding Wheel: Ensure your grinding wheel is clean and properly dressed.
- Grind the Bevel: Carefully grind the bevel of the chisel on the grinding wheel, using light pressure and maintaining a consistent angle.
- Hone the Edge: Hone the edge of the chisel on a fine sharpening stone, using light pressure and maintaining a consistent angle.
- Test for Sharpness: Test the sharpness of the chisel by carefully slicing through a piece of softwood. A sharp chisel that has been hollow ground should be easy to hone and maintain.
8. Troubleshooting Common Sharpening Problems
Even with a honing guide, you may encounter some common problems during the sharpening process. Here are some tips for troubleshooting these issues.
8.1. Chisel Not Getting Sharp
- Problem: The chisel is not getting sharp, even after honing.
- Solution:
- Ensure that you are using a sharp sharpening stone. If the stone is dull, it will not effectively grind the edge of the chisel.
- Check the angle of the honing guide. If the angle is too shallow, the edge will not be properly sharpened.
- Make sure that you are removing the burr from the back of the chisel. The burr can prevent the edge from becoming truly sharp.
8.2. Uneven Bevel
- Problem: The bevel is uneven, with one side being more sharpened than the other.
- Solution:
- Ensure that the chisel is centered in the honing guide. If the chisel is not centered, one side of the bevel will be more exposed to the sharpening stone.
- Apply even pressure to both sides of the honing guide while sharpening. Uneven pressure can cause the bevel to become skewed.
8.3. Chisel Slipping in Honing Guide
- Problem: The chisel is slipping in the honing guide, making it difficult to maintain a consistent angle.
- Solution:
- Ensure that the chisel is securely clamped in the honing guide. Tighten the screws or knobs on the honing guide to hold the chisel in place.
- Use a honing guide with a secure clamping mechanism. Some honing guides have a more robust clamping system that prevents the chisel from slipping.
9. Safety Precautions
Sharpening chisels involves working with sharp tools and abrasive surfaces. It is essential to take proper safety precautions to prevent injury.
9.1. Wear Safety Glasses
Always wear safety glasses to protect your eyes from flying debris.
9.2. Use a Firm Grip
Maintain a firm grip on the honing guide and the chisel to prevent slipping.
9.3. Keep Fingers Away from the Edge
Keep your fingers away from the edge of the chisel while sharpening to avoid cuts.
9.4. Work in a Well-Lit Area
Work in a well-lit area to ensure that you can see what you are doing and avoid mistakes.
9.5. Store Sharpening Stones Safely
Store your sharpening stones in a safe place where they won’t be damaged or cause injury.
10. The Importance of Ethical Tool Maintenance
Maintaining your tools isn’t just about preserving their physical condition; it’s also an ethical practice. By taking care of your tools, you reduce waste, minimize the need for replacements, and contribute to a more sustainable approach to woodworking. Ethical tool maintenance reflects a commitment to responsible craftsmanship and environmental stewardship. At CONDUCT.EDU.VN, we believe that ethical practices in woodworking extend beyond tool maintenance to encompass the entire creative process.
10.1. Environmental Responsibility
- Reduce Waste: Proper tool maintenance extends the life of your tools, reducing the need for frequent replacements and minimizing waste.
- Sustainable Practices: By caring for your tools, you contribute to a more sustainable approach to woodworking, conserving resources and reducing your environmental footprint.
10.2. Ethical Craftsmanship
- Respect for Tools: Ethical tool maintenance reflects a respect for the tools you use, recognizing their value and importance in the woodworking process.
- Responsible Use: By maintaining your tools properly, you ensure that they are safe and efficient, reducing the risk of accidents and promoting responsible tool use.
10.3. Community and Collaboration
- Sharing Knowledge: Ethical tool maintenance involves sharing knowledge and best practices with others, promoting a culture of learning and collaboration within the woodworking community.
- Supporting Local Craftspeople: By maintaining your tools, you reduce the need for new purchases, supporting local craftspeople and businesses that specialize in tool repair and maintenance.
11. Frequently Asked Questions (FAQ)
11.1. What is the best angle for sharpening chisels?
The best angle for sharpening chisels depends on the type of work you will be doing. A 25-degree angle is suitable for general use, while a 30-35 degree angle is better for heavy-duty tasks.
11.2. How often should I sharpen my chisels?
You should sharpen your chisels whenever they become dull or lose their edge. Regular honing can help maintain the sharpness of your chisels and prevent the need for more aggressive sharpening.
11.3. Can I use oil stones instead of water stones?
Yes, you can use oil stones instead of water stones. Oil stones are more durable but cut slower than water stones.
11.4. What is a lapping plate used for?
A lapping plate is used to keep your sharpening stones flat. Over time, sharpening stones can develop an uneven surface, which can affect the quality of your sharpening.
11.5. How do I remove the burr from the back of the chisel?
To remove the burr from the back of the chisel, place the back of the blade flat on a fine sharpening stone and apply very light pressure while moving the chisel back and forth.
11.6. What is stropping?
Stropping is the final step in sharpening a chisel. It further polishes the edge and removes any remaining imperfections.
11.7. Do I need a honing guide to sharpen chisels?
While it is possible to sharpen chisels freehand, a honing guide can help you achieve more consistent and accurate results, especially if you are new to sharpening.
11.8. What is a micro-bevel?
A micro-bevel is a small bevel at the very edge of the chisel, typically 2-3 degrees steeper than the primary bevel. It enhances the sharpness and durability of the edge.
11.9. How do I maintain my sharpened chisels?
To maintain your sharpened chisels, hone them regularly, clean them after each use, and store them in a safe place.
11.10. Where can I find more information on ethical tool maintenance?
You can find more information on ethical tool maintenance on CONDUCT.EDU.VN. We offer a variety of resources and guidance on responsible woodworking practices.
12. Resources for Further Learning
To deepen your understanding of chisel sharpening and woodworking ethics, consider the following resources:
- Fine Woodworking Magazine: A leading publication for woodworkers, offering articles, videos, and tutorials on a wide range of topics.
- Woodworking Workshops: Attend a woodworking workshop to learn from experienced instructors and gain hands-on experience.
- Online Forums and Communities: Join online forums and communities to connect with other woodworkers, ask questions, and share your knowledge.
- Books on Woodworking: Read books on woodworking to learn about different techniques, tools, and materials.
13. Conclusion
Sharpening chisels with a honing guide is a fundamental skill for any woodworker. By following the steps outlined in this guide, you can achieve a razor-sharp edge and improve the performance of your tools. Remember to maintain your chisels regularly and practice ethical tool maintenance to ensure that your tools last a lifetime. At CONDUCT.EDU.VN, we are committed to providing you with the resources and guidance you need to excel in woodworking and uphold the highest standards of ethical craftsmanship.
Achieving and maintaining sharp chisels greatly enhances your woodworking endeavors. Understanding the value of ethical conduct and responsible methods ensures not only the longevity of your tools but also promotes sustainable woodworking practices. If you’re eager to delve deeper into woodworking ethics and discover more detailed guidance, we invite you to visit conduct.edu.vn for extensive resources and professional advice. Contact us at 100 Ethics Plaza, Guideline City, CA 90210, United States, or give us a call on Whatsapp at +1 (707) 555-1234.