Guided Access on iPhone XR locks your device to a single app and lets you control feature availability. This article from CONDUCT.EDU.VN will guide you through setting up and using this helpful tool, ensuring focused usage or providing a safe experience for children. Master device control with our detailed steps and best practices, including accessibility settings, session management, and troubleshooting tips. Discover everything you need to know about Guided Access passcodes, accessibility features, and iPhone restrictions.
1. Understanding Guided Access on iPhone XR
Guided Access is an accessibility feature on iPhones, including the iPhone XR, that allows you to lock the device into a single app. This is particularly useful in scenarios where you want to limit the user to a specific task or app, such as when a child is using the device for educational purposes or when you want to prevent accidental navigation during a presentation. By understanding Guided Access, you can create a more controlled and focused environment on your iPhone XR.
1.1. What is Guided Access?
Guided Access is a built-in feature designed to restrict an iOS device, like the iPhone XR, to a single application. According to Apple’s support documentation, it also lets you disable certain hardware buttons and screen areas. This can be beneficial in many situations.
1.2. Why Use Guided Access on iPhone XR?
- Parental Control: Limit children to educational apps or games, preventing them from accessing other apps or making unauthorized purchases.
- Focus and Productivity: Stay focused on a single task by disabling distracting features and apps.
- Accessibility: Assist individuals with cognitive or motor skill challenges by simplifying the device interface.
- Kiosk Mode: Use an iPhone XR as a dedicated kiosk device for specific tasks, such as displaying information or collecting data.
1.3. Key Features of Guided Access
- Single App Mode: Restricts the device to a single app, preventing users from navigating to other apps.
- Hardware Button Control: Disables the Home button, volume buttons, and other hardware buttons.
- Touch Restriction: Disables touch input on specific areas of the screen.
- Time Limit: Sets a time limit for Guided Access sessions.
- Passcode Protection: Requires a passcode to exit Guided Access mode.
- Siri Integration: Allows starting Guided Access sessions using Siri voice commands.
2. Setting Up Guided Access on iPhone XR: A Step-by-Step Guide
Before you can start using Guided Access, you need to enable and configure it in the Settings app. This section provides a detailed, step-by-step guide on how to set up Guided Access on your iPhone XR.
2.1. Enabling Guided Access
-
Open Settings: Locate and tap the “Settings” app icon on your iPhone XR’s home screen.
-
Navigate to Accessibility: Scroll down and tap on “Accessibility”.
-
Find Guided Access: Scroll down to the “General” section and tap on “Guided Access”.
-
Enable Guided Access: Toggle the “Guided Access” switch to the “on” position. The switch will turn green when enabled.
2.2. Configuring Passcode Settings
-
Tap Passcode Settings: In the Guided Access settings, tap on “Passcode Settings”.
-
Set Guided Access Passcode: Tap on “Set Guided Access Passcode”.
-
Enter a Passcode: Enter a passcode that you want to use to exit Guided Access mode. You will be prompted to enter it twice to confirm.
-
Enable Touch ID or Face ID (Optional): You can also enable Touch ID or Face ID as an alternative way to end a Guided Access session. Toggle the “Touch ID” or “Face ID” switch to the “on” position.
2.3. Setting a Time Limit (Optional)
-
Navigate to Time Limits: In the Guided Access settings, tap on “Time Limits”.
-
Enable Time Limit: Toggle the “Time Limit” switch to the “on” position.
-
Set Sound: Select the sound to play when the time limit is reached.
-
Speak Warning: Enable or disable speaking a warning message before the time limit is reached.
 Guided Access Passcode Settings on iPhone
Alt text: Guided Access setup screen showcasing passcode and Face ID options on iPhone XR.
2.4. Configuring Accessibility Shortcut (Optional)
- Navigate to Accessibility Shortcut: In the main Accessibility settings, scroll down and tap on “Accessibility Shortcut”.
- Select Guided Access: In the list of accessibility features, tap on “Guided Access” to select it. This allows you to quickly enable Guided Access by triple-clicking the Side button.
3. Starting a Guided Access Session on iPhone XR
Once you have set up Guided Access, you can start a session in any app. This section explains how to initiate a Guided Access session and customize the restrictions.
3.1. Initiating Guided Access
-
Open the Desired App: Open the app that you want to use in Guided Access mode. For example, if you want to lock the device to a specific game, open that game.
-
Triple-Click the Side Button: Quickly press the Side button (the power button) three times in a row. This will activate the Guided Access interface.
-
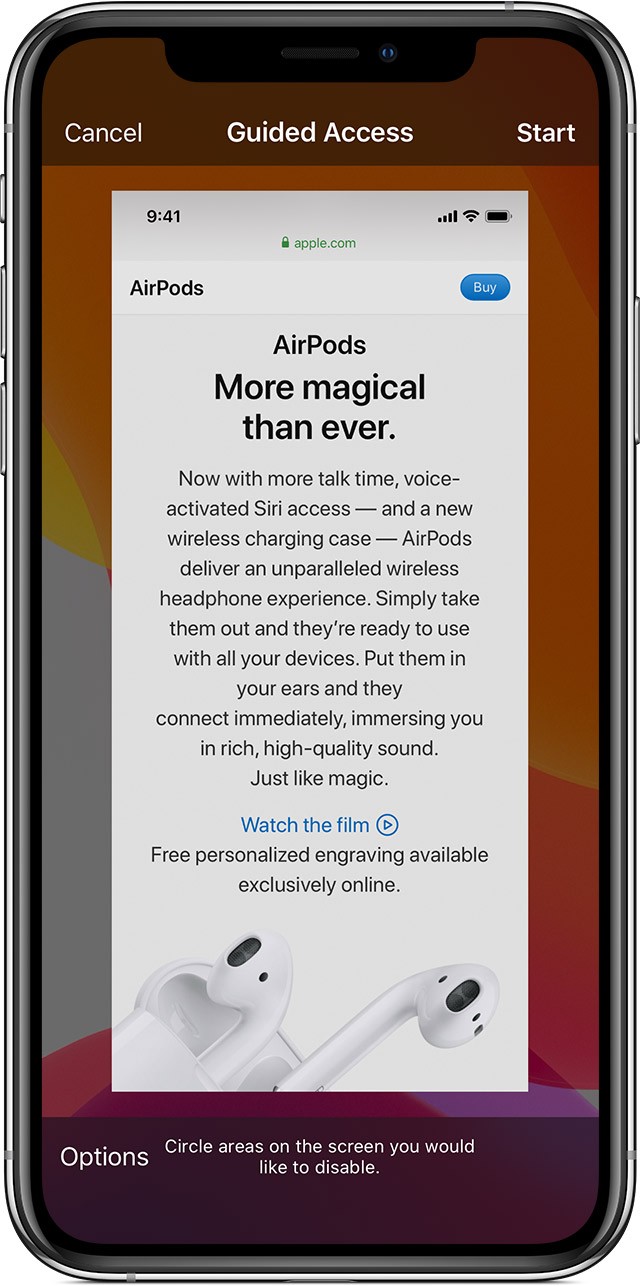
Configure Restrictions (Optional): Before starting Guided Access, you can configure restrictions such as disabling touch input on certain areas of the screen or disabling hardware buttons.
- Disable Touch Input: Use your finger to draw circles around the areas of the screen that you want to disable. You can move or resize the circles as needed. To remove a circle, tap the “X” inside it.
-
Start Guided Access: Tap the “Start” button in the upper-right corner of the screen.
-
Enter Passcode (If Required): If you have set a Guided Access passcode, you will be prompted to enter it to confirm that you want to start the session.
3.2. Using Siri to Start Guided Access
- Open the Desired App: Open the app that you want to use in Guided Access mode.
- Activate Siri: Activate Siri by saying “Hey Siri” or by holding down the Side button.
- Tell Siri to Turn on Guided Access: Say “Turn on Guided Access”. Siri will then initiate a Guided Access session in the current app.
3.3. Customizing Restrictions During a Session
During a Guided Access session, you can adjust the restrictions as needed.
-
Triple-Click the Side Button: Quickly press the Side button three times in a row to bring up the Guided Access options.
-
Enter Passcode (If Required): If you have set a Guided Access passcode, you will be prompted to enter it.
-
Tap Options: Tap the “Options” button at the bottom of the screen.
-
Configure Options: Turn on or off the options that you want to change. The available options include:
- Sleep/Wake Button: Disables the Sleep/Wake button.
- Volume Buttons: Disables the volume buttons.
- Motion: Limits how the device responds to motion.
- Keyboards: Disables the keyboard.
- Touch: Disables touch input on the entire screen.
- Dictionary Lookup: Enables or disables the Look Up feature.
- Time Limit: Sets a time limit for the session.
-
Tap Done: After configuring the options, tap “Done” in the upper-right corner of the screen.
4. Controlling Features Available During Guided Access
Guided Access provides granular control over which features are available during a session. This allows you to tailor the device experience to the specific needs of the user.
4.1. Available Options and Their Functions
-
Sleep/Wake Button: Disabling this option prevents the user from turning off the screen or putting the device to sleep.
-
Volume Buttons: Disabling this option prevents the user from adjusting the volume.
-
Motion: Limiting motion restricts the device’s response to shaking or tilting. For example, the screen won’t rotate, and shaking the device won’t trigger any actions.
-
Keyboards: Disabling the keyboard prevents the user from typing text. This is useful if you want to limit the user to read-only content.
-
Touch: Disabling touch input on the entire screen prevents the user from interacting with the app. This can be useful for displaying a static image or video.
-
Dictionary Lookup: Enabling this option allows the user to use the Look Up feature when selecting text.
-
Time Limit: Setting a time limit automatically ends the Guided Access session after the specified duration.
Alt text: Illustration showing the Guided Access settings menu with options to customize device features.
4.2. Step-by-Step Configuration of Features
- Start a Guided Access Session: Initiate a Guided Access session in the desired app.
- Triple-Click the Side Button: Quickly press the Side button three times in a row to bring up the Guided Access options.
- Enter Passcode (If Required): If you have set a Guided Access passcode, you will be prompted to enter it.
- Tap Options: Tap the “Options” button at the bottom of the screen.
- Toggle Options: Turn on or off the options that you want to change.
- Tap Done: After configuring the options, tap “Done” in the upper-right corner of the screen.
5. Ending a Guided Access Session on iPhone XR
Ending a Guided Access session is straightforward and can be done using the passcode, Touch ID, or Face ID, depending on your settings.
5.1. Using Passcode to End Session
- Triple-Click the Side Button: Quickly press the Side button three times in a row to bring up the Guided Access options.
- Enter Passcode: Enter your Guided Access passcode.
- Tap End: Tap the “End” button in the upper-left corner of the screen.
5.2. Using Touch ID or Face ID to End Session
- Triple-Click the Side Button: Quickly press the Side button three times in a row to bring up the Guided Access options.
- Authenticate with Touch ID or Face ID: Use Touch ID or Face ID to authenticate.
- Tap End: Tap the “End” button in the upper-left corner of the screen.
6. Troubleshooting Common Issues with Guided Access
While Guided Access is a useful feature, you may encounter some issues while using it. This section provides solutions to common problems.
6.1. Forgetting the Guided Access Passcode
If you forget your Guided Access passcode, you will need to restore your iPhone XR to factory settings. This will erase all data on your device, so it is important to have a backup.
-
Connect to Computer: Connect your iPhone XR to your computer using a USB cable.
-
Open iTunes or Finder: Open iTunes (on older macOS versions) or Finder (on newer macOS versions).
-
Put Device in Recovery Mode: Follow the steps to put your iPhone XR in recovery mode:
- Quickly press and release the Volume Up button.
- Quickly press and release the Volume Down button.
- Press and hold the Side button until you see the recovery mode screen.
-
Restore iPhone: In iTunes or Finder, you will see a message asking if you want to restore or update your iPhone. Click “Restore”.
-
Follow Instructions: Follow the on-screen instructions to restore your iPhone to factory settings.
-
Restore from Backup (Optional): After the restore is complete, you can restore your data from a backup.
6.2. Guided Access Not Starting
If Guided Access is not starting when you triple-click the Side button, make sure that the Accessibility Shortcut is configured correctly.
- Open Settings: Locate and tap the “Settings” app icon on your iPhone XR’s home screen.
- Navigate to Accessibility: Scroll down and tap on “Accessibility”.
- Tap Accessibility Shortcut: Scroll down and tap on “Accessibility Shortcut”.
- Select Guided Access: In the list of accessibility features, make sure that “Guided Access” is selected.
6.3. Screen Not Responding to Touch
If the screen is not responding to touch during a Guided Access session, make sure that the “Touch” option is enabled in the Guided Access options.
- Triple-Click the Side Button: Quickly press the Side button three times in a row to bring up the Guided Access options.
- Enter Passcode (If Required): If you have set a Guided Access passcode, you will be prompted to enter it.
- Tap Options: Tap the “Options” button at the bottom of the screen.
- Enable Touch: Make sure that the “Touch” option is turned on.
- Tap Done: After configuring the options, tap “Done” in the upper-right corner of the screen.
7. Best Practices for Using Guided Access
To ensure you’re getting the most out of Guided Access, here are some best practices to keep in mind:
7.1. Choosing a Secure Passcode
Select a passcode that is difficult to guess but easy for you to remember. Avoid using common passcodes like “1234” or “0000.” Consider using a longer, more complex passcode to enhance security.
7.2. Regularly Testing Guided Access
Periodically test Guided Access to ensure it’s functioning as expected. This is particularly important if you’ve made any changes to your device’s settings or updated the iOS version.
7.3. Educating Users on Limitations
If you’re using Guided Access to restrict access for others, such as children or individuals with cognitive impairments, explain the limitations and purpose of Guided Access to them. This can help prevent frustration and confusion.
7.4. Backing Up Your Device Regularly
Regularly back up your iPhone XR to iCloud or your computer. This ensures that you can restore your data if you forget your Guided Access passcode or encounter any other issues.
8. Advanced Uses of Guided Access
Beyond basic parental control and focus enhancement, Guided Access can be used in more advanced and creative ways:
8.1. Creating Interactive Kiosk Experiences
Set up an iPhone XR as an interactive kiosk by locking it to a specific app designed for information display or data collection. This is useful for trade shows, museums, and retail environments.
8.2. Assisting Users with Cognitive Disabilities
Simplify the iPhone XR interface for users with cognitive disabilities by locking it to essential apps and disabling distracting features. This can help improve their independence and quality of life.
8.3. Enhancing Focus for Students
Help students stay focused during study sessions by locking their iPhone XR to educational apps and disabling notifications and other distractions.
9. Accessibility Features Complementing Guided Access
Guided Access works seamlessly with other accessibility features on the iPhone XR to provide a comprehensive and customizable user experience.
9.1. VoiceOver
VoiceOver is a screen reader that describes what’s happening on the screen. Combining VoiceOver with Guided Access can be beneficial for visually impaired users who need to use a specific app.
9.2. Zoom
Zoom magnifies the entire screen, making it easier for users with low vision to see content. Using Zoom with Guided Access can help visually impaired users focus on a specific area of an app.
9.3. Switch Control
Switch Control allows users to interact with their iPhone XR using one or more switches. Combining Switch Control with Guided Access can be beneficial for users with motor skill challenges.
10. How Guided Access Enhances Digital Well-being
In today’s digital age, maintaining a healthy balance with technology is crucial. Guided Access contributes to digital well-being by promoting focused usage and reducing distractions.
10.1. Reducing Screen Time
By limiting access to specific apps and features, Guided Access helps reduce overall screen time and encourages users to engage in other activities.
10.2. Minimizing Distractions
Guided Access minimizes distractions by disabling notifications, hardware buttons, and other potential interruptions. This allows users to focus on the task at hand and improve their productivity.
10.3. Promoting Mindful Usage
Guided Access encourages mindful usage by prompting users to intentionally choose which apps and features they want to access. This can help them develop a more conscious relationship with technology.
11. Guided Access vs. Other Restriction Methods
While Guided Access is a powerful tool for restricting access on the iPhone XR, it’s essential to understand how it compares to other methods.
11.1. Screen Time
Screen Time is a built-in feature that allows you to monitor and limit your own or your child’s device usage. Unlike Guided Access, Screen Time provides more comprehensive controls, such as setting daily time limits for specific apps or categories of apps.
11.2. Restrictions (Parental Controls)
The Restrictions feature (now integrated within Screen Time) allows you to block access to certain apps, features, and content. While Restrictions offers broader control over the device, Guided Access provides more granular control within a single app.
11.3. MDM Solutions
Mobile Device Management (MDM) solutions are designed for organizations that need to manage and secure a large number of devices. MDM solutions offer advanced features such as remote device configuration, app deployment, and security policy enforcement.
12. Real-World Examples of Guided Access Usage
Guided Access is a versatile tool that can be applied in various real-world scenarios to enhance focus, security, and accessibility.
12.1. Special Education Settings
In special education settings, Guided Access can be used to create a structured and distraction-free learning environment for students with autism or other cognitive disabilities.
12.2. Museums and Art Galleries
Museums and art galleries can use Guided Access to lock iPads to interactive exhibits, preventing visitors from accessing other apps or settings.
12.3. Restaurants and Retail Stores
Restaurants and retail stores can use Guided Access to lock iPads to point-of-sale (POS) systems, ensuring that employees only have access to the necessary apps.
13. Future Enhancements to Guided Access
Apple is continuously improving its software and accessibility features. Here are some potential enhancements that could be added to Guided Access in the future:
13.1. Remote Management
Allowing parents or administrators to remotely manage Guided Access settings on multiple devices would be a valuable addition.
13.2. Enhanced Time Limits
Providing more granular control over time limits, such as setting different time limits for different days of the week, would be beneficial.
13.3. Integration with Focus Modes
Integrating Guided Access with Focus Modes would allow users to automatically enable Guided Access when a specific Focus Mode is activated.
14. Addressing Misconceptions About Guided Access
There are several misconceptions about Guided Access that need to be addressed to ensure users understand its capabilities and limitations.
14.1. Guided Access is Only for Kids
While Guided Access is commonly used for parental control, it’s a versatile tool that can benefit users of all ages and abilities.
14.2. Guided Access is a Security Feature
While Guided Access can enhance security by restricting access to certain apps and features, it’s not a replacement for robust security measures such as strong passcodes and two-factor authentication.
14.3. Guided Access is Difficult to Use
Guided Access is relatively easy to set up and use, thanks to its intuitive interface and step-by-step instructions.
15. Legal and Ethical Considerations
When using Guided Access, it’s essential to consider the legal and ethical implications, particularly when restricting access for others.
15.1. Privacy
Respect the privacy of others by only restricting access to their devices with their consent.
15.2. Autonomy
Balance the need to protect or assist others with their right to autonomy and self-determination.
15.3. Transparency
Be transparent about the purpose and limitations of Guided Access, and explain why you are using it to restrict access.
16. Impact of Guided Access on User Experience
Guided Access can have a significant impact on user experience, both positive and negative, depending on how it’s implemented.
16.1. Positive Impacts
Enhanced focus, reduced distractions, increased accessibility, and improved security.
16.2. Negative Impacts
Frustration, confusion, and a sense of restriction if not implemented properly.
17. Guided Access in Business and Enterprise Settings
Guided Access isn’t just for personal use; it also has valuable applications in business and enterprise environments.
17.1. Securing Company Devices
Businesses can use Guided Access to secure company-owned iPhones and iPads, ensuring they’re used only for work-related tasks.
17.2. Streamlining Workflows
By locking devices to specific apps, companies can streamline workflows and improve employee productivity.
17.3. Protecting Sensitive Information
Guided Access can help protect sensitive company information by preventing unauthorized access to other apps and settings.
18. Guided Access and Compliance Standards
In certain industries, Guided Access can help organizations meet compliance standards by restricting access to sensitive data and ensuring devices are used in a secure manner.
18.1. HIPAA Compliance
Healthcare organizations can use Guided Access to lock iPads to electronic health record (EHR) systems, ensuring compliance with HIPAA regulations.
18.2. PCI DSS Compliance
Retailers can use Guided Access to lock iPhones to point-of-sale (POS) systems, ensuring compliance with PCI DSS standards.
18.3. GDPR Compliance
Organizations can use Guided Access to restrict access to personal data, helping them comply with GDPR regulations.
19. How to Provide Feedback on Guided Access
Apple encourages users to provide feedback on its products and services, including Guided Access.
19.1. Using the Feedback Assistant App
The Feedback Assistant app allows you to submit bug reports, feature requests, and other feedback directly to Apple.
19.2. Contacting Apple Support
You can also contact Apple Support to provide feedback on Guided Access or to get help with any issues you’re experiencing.
19.3. Participating in Apple Beta Programs
Apple Beta Programs allow you to test pre-release versions of iOS and provide feedback on new features and improvements.
20. Resources for Learning More About Guided Access
There are numerous resources available for learning more about Guided Access and its capabilities.
20.1. Apple Support Website
The Apple Support website provides comprehensive documentation and tutorials on Guided Access.
20.2. Online Forums and Communities
Online forums and communities, such as the Apple Support Communities, are great places to ask questions and share tips on using Guided Access.
20.3. YouTube Tutorials
YouTube is a valuable resource for finding video tutorials on Guided Access and its various features.
Guided Access on iPhone XR is a powerful tool that can enhance focus, security, and accessibility. By understanding its features, best practices, and advanced uses, you can create a more controlled and customized device experience.
Understanding and utilizing Guided Access effectively can significantly improve digital safety, focus, and accessibility. Whether it’s for parental control, enhancing productivity, or accommodating users with special needs, Guided Access provides a versatile solution for managing device usage. For more detailed guides and resources on how to implement and optimize these features, visit CONDUCT.EDU.VN. Our platform offers comprehensive support and insights into creating a safer and more productive digital environment.
If you need further assistance or have any questions about CONDUCT.EDU.VN, please contact us.
Address: 100 Ethics Plaza, Guideline City, CA 90210, United States.
Whatsapp: +1 (707) 555-1234
Website: conduct.edu.vn
FAQ: Guided Access on iPhone XR
1. What is Guided Access on iPhone XR?
Guided Access is an accessibility feature that locks your iPhone XR into a single app, allowing you to control which features are available for use.
2. How do I enable Guided Access on my iPhone XR?
To enable Guided Access, go to Settings > Accessibility > Guided Access and toggle the switch to the on position.
3. Can I set a time limit for Guided Access sessions?
Yes, you can set a time limit in the Guided Access settings. When the time limit is reached, the session will automatically end.
4. What should I do if I forget my Guided Access passcode?
If you forget your passcode, you will need to restore your iPhone XR to factory settings, which will erase all data on your device.
5. How do I disable touch input on certain areas of the screen during a Guided Access session?
During a Guided Access session, use your finger to draw circles around the areas of the screen that you want to disable.
6. Can I use Siri to start a Guided Access session?
Yes, you can use Siri to start a session by saying “Turn on Guided Access” after opening the desired app.
7. How do I end a Guided Access session?
To end a session, triple-click the Side button, enter your Guided Access passcode, and tap End.
8. What options can I control during a Guided Access session?
You can control options such as the Sleep/Wake button, volume buttons, motion, keyboards, touch, dictionary lookup, and time limit.
9. Is Guided Access only for parental control?
No, Guided Access can be used in various scenarios, such as enhancing focus, creating interactive kiosk experiences, and assisting users with cognitive disabilities.
10. How does Guided Access help with digital well-being?
Guided Access helps reduce screen time, minimizes distractions, and promotes mindful usage of technology, contributing to better digital well-being.