Navigating the world of digital design requires precision, and understanding How To View Guides In Photoshop is crucial. This comprehensive guide provides you with step-by-step instructions on effectively using rulers and guides to align and position objects in your projects, brought to you by CONDUCT.EDU.VN, your trusted resource for enhancing digital skills. Discover tips and techniques to streamline your design workflow, ensuring professional results every time and mastering Photoshop composition, layout techniques, and design precision.
1. What Are Photoshop Guides and Why Are They Important?
Photoshop guides are non-printing lines that help you align elements precisely within your design. They are essential because they provide a visual framework, ensuring consistency and accuracy in your layouts.
- Improved Accuracy: Guides help you align elements perfectly, reducing errors.
- Consistent Design: Use guides to maintain uniform spacing and alignment across your project.
- Faster Workflow: With guides, you can quickly position elements without constant adjustments.
According to a study by the American Institute of Graphic Arts, using guides can reduce design time by up to 15% while significantly improving the visual consistency of the final product.
2. How to Show Rulers in Photoshop
Displaying rulers is the first step in utilizing guides effectively. Rulers are located at the top and left of your workspace, providing a visual scale for precise measurements.
- Step 1: Open Photoshop and load your document.
- Step 2: Go to the View menu in the top menu bar.
- Step 3: Select Rulers. Alternatively, use the shortcut Ctrl+R (Windows) or Cmd+R (Mac).
The rulers will now appear along the top and left edges of your document window.
3. How to Customize Ruler Units in Photoshop
Changing the ruler units allows you to work in a measurement system that best suits your project, whether it’s inches, pixels, or millimeters.
- Step 1: Go to the Edit menu (Photoshop menu on Mac) and select Preferences then Units & Rulers.
- Step 2: In the Units & Rulers dialog box, find the Rulers section.
- Step 3: Choose your preferred unit of measurement from the dropdown menu (e.g., pixels, inches, centimeters).
- Step 4: Click OK to save your changes.
Setting the correct units ensures your guides are accurate and relevant to your design needs.
4. How to Create Horizontal and Vertical Guides in Photoshop
Creating guides involves dragging them from the rulers onto your canvas. This allows you to define specific alignment points.
- Horizontal Guides:
- Step 1: Hover your cursor over the top ruler.
- Step 2: Click and drag down onto your canvas. A horizontal guide will appear.
- Step 3: Position the guide at your desired location.
- Vertical Guides:
- Step 1: Hover your cursor over the left ruler.
- Step 2: Click and drag right onto your canvas. A vertical guide will appear.
- Step 3: Position the guide at your desired location.
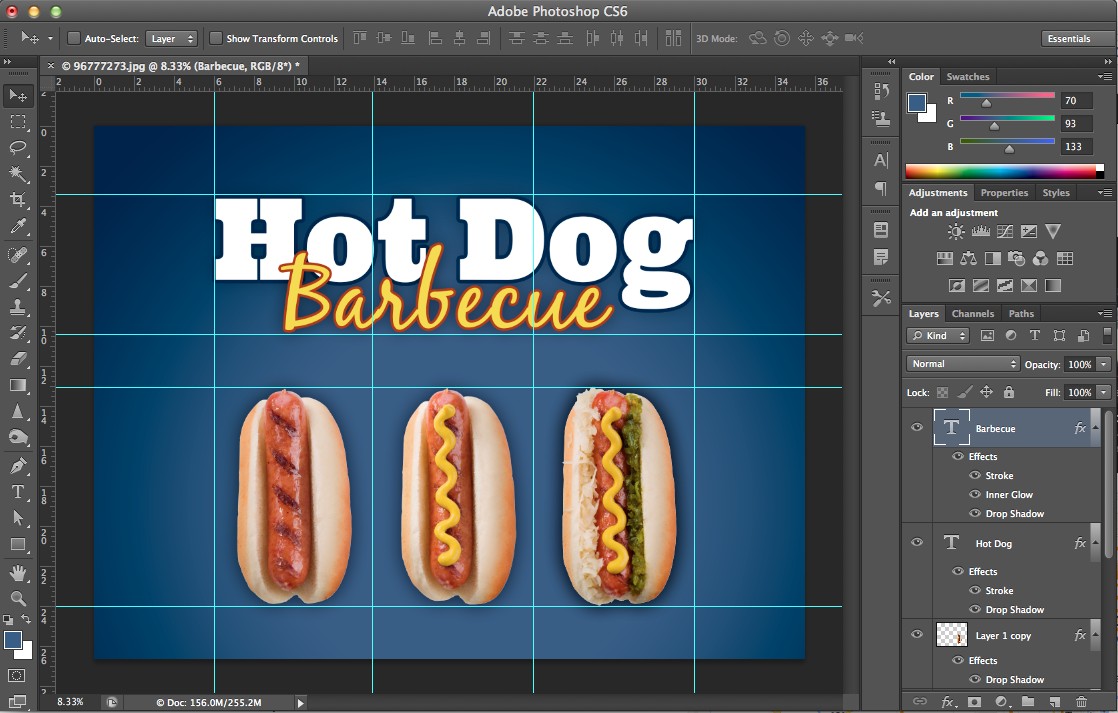 Creating horizontal and vertical guides in Photoshop
5. How to Precisely Position Guides Using Coordinates in Photoshop
For exact placement, you can use the guide’s coordinates. This is useful for creating symmetrical layouts.
- Step 1: Show the rulers (Ctrl/Cmd + R).
- Step 2: Select the Move Tool (V).
- Step 3: Click on the guide you want to position.
- Step 4: Look at the X (horizontal) or Y (vertical) coordinate in the Options Bar at the top.
- Step 5: Enter the desired coordinate value and press Enter.
Using coordinates ensures your guides are placed with pixel-perfect accuracy.
6. How to Create Guides Based on Percentage in Photoshop
Creating guides based on percentages is beneficial for responsive design, ensuring elements align correctly regardless of screen size.
- Step 1: Go to View > New Guide.
- Step 2: In the New Guide dialog box, select Horizontal or Vertical.
- Step 3: Enter the percentage value in the Position field (e.g., 50% for the center).
- Step 4: Click OK.
Percentage-based guides automatically adjust to the document’s dimensions, making them ideal for responsive layouts.
7. How to Lock Guides in Photoshop to Prevent Accidental Movement
Locking guides prevents accidental movement, ensuring they remain in their intended positions.
- Step 1: Go to the View menu.
- Step 2: Select Lock Guides.
When guides are locked, you cannot move them until you unlock them using the same steps.
8. How to Clear All Guides in Photoshop Quickly
If you need to start fresh, clearing all guides at once can save time.
- Step 1: Go to the View menu.
- Step 2: Select Clear Guides.
All guides will be removed from your canvas, providing a clean slate for new alignments.
9. How to Change Guide Color and Style in Photoshop
Customizing the appearance of guides can improve visibility, especially when working with complex designs.
- Step 1: Go to the Edit menu (Photoshop menu on Mac) and select Preferences then Guides, Grid & Slices.
- Step 2: In the Guides, Grid & Slices dialog box, find the Guides section.
- Step 3: Choose a new Color from the dropdown menu or click the color box to select a custom color.
- Step 4: Select a Style (Line or Dot).
- Step 5: Click OK to save your changes.
Choosing contrasting colors and styles makes guides easier to see against different backgrounds.
10. How to Use Smart Guides in Photoshop for Dynamic Alignment
Smart Guides provide real-time feedback as you move elements, dynamically aligning them with other objects on the canvas.
- Step 1: Go to the View menu.
- Step 2: Select Smart Guides.
As you move objects, Smart Guides will display temporary guides, aligning edges and centers with nearby elements.
11. How to Create a Grid Layout Using Guides in Photoshop
Creating a grid layout with guides is essential for structured designs like websites or brochures.
- Step 1: Show the rulers (Ctrl/Cmd + R).
- Step 2: Go to View > New Guide Layout.
- Step 3: In the New Guide Layout dialog box, specify the number of Columns and Rows.
- Step 4: Adjust the Width and Height of the columns and rows.
- Step 5: Set the Gutter (spacing between columns and rows).
- Step 6: Click OK.
This creates a precise grid system, ensuring all elements are consistently aligned.
12. How to Use Guides for Image Cropping in Photoshop
Guides can help you crop images to specific proportions, maintaining visual harmony.
- Step 1: Create guides to define the desired crop area.
- Step 2: Select the Crop Tool (C).
- Step 3: Drag the crop boundaries to align with the guides.
- Step 4: Press Enter to crop the image.
Using guides ensures your images are cropped to the exact dimensions you need.
13. How to Align Layers to Guides in Photoshop
Aligning layers to guides ensures elements are precisely positioned relative to each other.
- Step 1: Ensure your guides are visible.
- Step 2: Select the layer you want to align.
- Step 3: Use the Move Tool (V) to drag the layer. As you move it close to a guide, it will snap into place.
This method guarantees precise alignment, creating a polished and professional look.
14. How to Create Guides for Typography Alignment in Photoshop
Precise typography alignment is crucial for readability. Guides can help you maintain consistent baselines and margins.
- Step 1: Create horizontal guides to define the top and bottom of your text area.
- Step 2: Create additional guides for baseline alignment (the bottom of your text).
- Step 3: Use these guides to position your text elements accurately.
Consistent typography alignment enhances readability and visual appeal.
15. How to Save and Load Guide Layouts in Photoshop
Saving guide layouts allows you to reuse them across multiple projects, maintaining consistency.
- Saving a Layout:
- Step 1: Go to View > New Guide Layout.
- Step 2: Configure your guides.
- Step 3: Click Save Preset.
- Step 4: Name your preset and click Save.
- Loading a Layout:
- Step 1: Go to View > New Guide Layout.
- Step 2: Click Load Preset.
- Step 3: Select your saved preset and click Load.
Saving and loading layouts saves time and ensures design consistency across projects.
16. How to Use the Perspective Grid in Photoshop
The Perspective Grid is a powerful tool for creating realistic perspective in your designs.
- Step 1: Go to View > Perspective Grid > Show Grid.
- Step 2: Adjust the grid using the controls to match your desired perspective.
- Step 3: Use the grid to align and place elements, creating a sense of depth.
The Perspective Grid is particularly useful for architectural renderings and 3D compositions.
17. How to Create Circular Guides in Photoshop
While Photoshop doesn’t have a direct way to create circular guides, you can use shapes to achieve a similar effect.
- Step 1: Create a circle using the Ellipse Tool (U).
- Step 2: Set the Fill to none and the Stroke to a contrasting color.
- Step 3: Position the circle as needed.
This provides a visual guide for creating circular layouts or aligning elements along a circular path.
18. How to Convert Shapes to Guides in Photoshop
Converting shapes to guides allows you to use complex shapes as alignment tools.
- Step 1: Create a shape using any of the shape tools.
- Step 2: Go to View > New Guide.
- Step 3: Choose either Horizontal or Vertical based on how you want to orient the guide. Photoshop will automatically align the guide to the center of the shape.
This is useful for aligning elements along irregular shapes or paths.
19. How to Use Guides with the Slice Tool in Photoshop
Guides can help you precisely define slices for web design, ensuring each element is correctly sectioned.
- Step 1: Create guides to define the boundaries of your slices.
- Step 2: Select the Slice Tool (C).
- Step 3: Drag the slice boundaries to align with the guides.
- Step 4: Save your slices for web using File > Export > Save for Web (Legacy).
Using guides ensures your slices are accurate and consistent.
20. How to Use Guides for Video Editing in Photoshop
Photoshop can be used for basic video editing, and guides can help you create consistent titles and lower thirds.
- Step 1: Create guides to define the safe areas for titles and text.
- Step 2: Add your text or graphics within these guides.
- Step 3: Export your video using File > Export > Render Video.
Guides ensure your video elements are correctly positioned and visible on different screens.
21. How to Use Guides for Mockup Creation in Photoshop
Guides are essential for creating accurate and visually appealing mockups.
- Step 1: Create guides to define the screen dimensions and key elements of your mockup.
- Step 2: Place your designs within these guides.
- Step 3: Use Smart Objects to easily update the content of your mockup.
Guides ensure your mockups are proportional and aligned correctly.
22. How to Use Guides for Icon Design in Photoshop
Precise alignment is crucial for icon design. Guides help you create consistent and visually balanced icons.
- Step 1: Create guides to define the boundaries and key elements of your icon.
- Step 2: Design your icon within these guides, ensuring all elements are aligned.
- Step 3: Export your icon in the appropriate format (e.g., SVG, PNG).
Guides ensure your icons are consistent and visually appealing.
23. How to Use Guides for Pattern Design in Photoshop
Creating seamless patterns requires precise alignment. Guides help you ensure your pattern tiles align perfectly.
- Step 1: Create guides to define the boundaries of your pattern tile.
- Step 2: Design your pattern within these guides, ensuring all edges match up.
- Step 3: Use Edit > Define Pattern to save your pattern.
Guides ensure your patterns are seamless and visually appealing.
24. How to Use Guides for Photo Compositing in Photoshop
When compositing multiple photos, guides help you align elements from different images seamlessly.
- Step 1: Create guides to define key alignment points in your composition.
- Step 2: Use these guides to align elements from different photos, creating a cohesive image.
- Step 3: Use masking and blending techniques to blend the images together.
Guides ensure your photo composites are realistic and visually appealing.
25. How to Troubleshoot Guide Visibility Issues in Photoshop
Sometimes guides may not be visible due to various reasons. Here’s how to troubleshoot:
- Check if Rulers are Visible: Ensure rulers are displayed (Ctrl/Cmd + R).
- Check if Guides are Hidden: Go to View > Show > Guides to toggle guide visibility.
- Check Guide Color: Ensure the guide color contrasts with your background (Edit > Preferences > Guides, Grid & Slices).
- Check Zoom Level: Guides may disappear at very high zoom levels.
- Restart Photoshop: Sometimes, a simple restart can resolve display issues.
Addressing these common issues ensures your guides are always visible when you need them.
26. Understanding the Difference Between Guides, Grids, and Smart Guides in Photoshop
Photoshop offers different alignment tools, each serving a unique purpose.
- Guides: User-defined lines for precise alignment.
- Grids: Predefined сет of lines for structured layouts.
- Smart Guides: Dynamic, context-sensitive guides that appear as you move elements.
Understanding the differences helps you choose the right tool for your specific needs.
27. Advanced Guide Techniques for Complex Layouts in Photoshop
For complex layouts, consider using advanced techniques:
- Nested Guides: Create guides within guides for hierarchical alignment.
- Guide Presets: Save and load guide layouts for consistent design.
- Shape-Based Guides: Convert shapes to guides for unique alignment patterns.
These techniques provide greater control and precision for intricate designs.
28. How to Integrate Guides into Your Photoshop Workflow
Making guides a part of your regular workflow can significantly improve your design process.
- Start with Guides: Begin by setting up guides before placing any elements.
- Use Guide Presets: Save and reuse guide layouts for recurring projects.
- Customize Guide Appearance: Choose colors and styles that work best for you.
- Practice Regularly: The more you use guides, the more intuitive they become.
Integrating guides into your workflow ensures consistency, accuracy, and efficiency.
29. Best Practices for Using Guides in Professional Design Projects
Adhering to best practices ensures your use of guides is effective and professional.
- Plan Your Layout: Determine the key alignment points before creating guides.
- Use Consistent Spacing: Maintain uniform spacing between elements.
- Lock Guides: Prevent accidental movement by locking guides in place.
- Review Your Design: Ensure all elements are correctly aligned before finalizing your project.
Following these best practices helps you create polished and professional designs.
30. The Future of Alignment Tools in Photoshop: What’s Next?
As Photoshop evolves, so do its alignment tools. Expect to see:
- AI-Powered Alignment: Intelligent alignment suggestions based on design principles.
- Improved Smart Guides: More context-sensitive and dynamic Smart Guides.
- Enhanced Grid Systems: More flexible and customizable grid layouts.
Staying updated with the latest features ensures you’re always using the most efficient alignment techniques.
FAQ Section
1. How do I show guides in Photoshop?
To show guides, go to the View menu and select Show, then choose Guides. Alternatively, make sure rulers are visible (Ctrl/Cmd + R) and drag guides from the rulers onto your canvas.
2. How do I hide guides in Photoshop?
To hide guides, go to the View menu, select Show, and uncheck Guides. This toggles the visibility of your guides.
3. How do I change the color of guides in Photoshop?
Go to Edit > Preferences > Guides, Grid & Slices. In the Guides section, choose a new color from the dropdown menu or select a custom color by clicking the color box.
4. How do I lock guides in Photoshop?
To lock guides, go to the View menu and select Lock Guides. This prevents accidental movement of your guides.
5. How do I create a guide at a specific percentage in Photoshop?
Go to View > New Guide. In the dialog box, select Horizontal or Vertical and enter the percentage value in the Position field.
6. How do I clear all guides in Photoshop?
To clear all guides, go to the View menu and select Clear Guides. This removes all guides from your canvas.
7. What are Smart Guides in Photoshop?
Smart Guides are dynamic guides that appear as you move elements, helping you align them with other objects on the canvas. Enable them by going to View > Smart Guides.
8. How do I save a guide layout in Photoshop?
Go to View > New Guide Layout, configure your guides, and click Save Preset. Name your preset and click Save.
9. How do I load a saved guide layout in Photoshop?
Go to View > New Guide Layout, click Load Preset, select your saved preset, and click Load.
10. How do I move a guide in Photoshop?
Select the Move Tool (V), hover your cursor over the guide, and click and drag to move it to your desired location.
Mastering how to view guides in Photoshop is a cornerstone of precise and professional design. By following the steps outlined in this guide, you can enhance your alignment techniques, streamline your workflow, and create visually stunning projects. Remember, consistent practice and exploration of these tools will further refine your skills.
Ready to take your design skills to the next level? Visit CONDUCT.EDU.VN for more in-depth tutorials, tips, and resources to help you master Photoshop and other essential design tools. Our comprehensive guides provide clear, actionable steps to help you achieve your creative goals.
For further assistance or inquiries, contact us at:
Address: 100 Ethics Plaza, Guideline City, CA 90210, United States
WhatsApp: +1 (707) 555-1234
Website: CONDUCT.EDU.VN
Unlock your full design potential with conduct.edu.vn! Embrace ethical design practices, enhance your skills, and create impactful visuals with our expert guidance. Explore our website today and transform your creative vision into reality.