By Luke Bridwell, Content Creator at conduct.edu.vn
Alt text: Keepers in Iron Badger faction board showcasing components like relics, waystations, and faithful retainers, essential for crafting a winning strategy in Root.
The Keepers in Iron, often affectionately called “Badgers,” are a formidable and engaging faction within the intricate world of Root. Learning to effectively command the Badgers is a journey of continuous discovery. The more you immerse yourself in their mechanics and strategies, the better you will become at understanding their nuances and adapting to the ever-shifting dynamics of the game board. Known for their remarkable flexibility, the Badgers offer a plethora of strategic options. This comprehensive guide serves as your compass, illuminating the most effective choices as you navigate the complexities of each game scenario. Mastering the Badgers is a deeply rewarding experience, unlocking a powerful and adaptable playstyle.
This guide is designed to be a valuable resource for both players new to the Keepers in Iron and seasoned veterans looking to refine their tactics. It is a living document, constantly revisited and reevaluated to stay current with the evolving Root meta. As the game landscape shifts, so too must the strategies and approaches to playing the Badgers.
For a wealth of additional insights and articles about Root, be sure to explore The Woodland, your central hub for all things Root-related content.
Keepers-in-Iron-Guide-1Download
In this guide, we will delve into:
Cliff Notes: Badger Strategy Essentials
How do They Win? Unlocking Victory with Relics and Strategic Actions
The Keepers in Iron possess a substantial inherent scoring potential, primarily derived from their relics. With a possible 27 victory points attainable through relic recovery and an additional 8 points from completing relic columns, the Badgers boast one of the highest base point ceilings directly from their faction board. Your path to victory will largely hinge on accumulating victory points through the strategic delving and recovering of your relics, supplemented by opportunistic scoring from battles against enemy pieces and the crafting of valuable items.
Relics: The Heart of Badger Victory
Alt text: Badger Relic tokens in Root, showcasing different types: Figures, Tablets, and Jewelry, each with front and back values crucial for scoring.
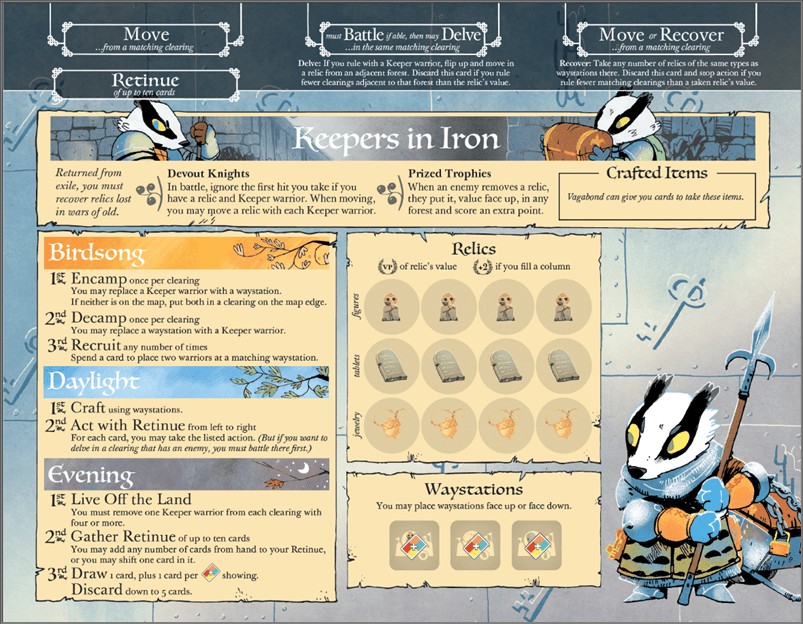
As outlined in the Law of Root, the Keepers in Iron utilize “twelve relic tokens of three distinct types: figures, tablets, and jewelry. Each relic type is represented by four tokens. The front of each relic displays its type, while the back reveals a point value of 1, 2, or 3, with two relics of each type valued at 3.” These relic tokens are initially placed in the forests surrounding the clearings on the game board. Your objective is to strategically “delve” these relics, bringing them out of the forests and into clearings, and subsequently “recover” them at your waystations to amass victory points.
Retinue: The Engine of Badger Actions
The retinue is the central action mechanism for the Keepers in Iron, located prominently at the top of their faction board. Similar to the Eyrie Dynasties’ Decree, the Badger player allocates cards to their retinue at the end of their turn to enable actions in subsequent turns. In essence, cards added to the retinue unlock specific actions, and failure to meet certain conditions associated with each action column may result in card discards.
The retinue is structured into three columns: “move,” “battle and then may delve,” and “move or recover.” Each card placed in a column allows the corresponding action to be performed in clearings matching the suit of the card. For instance, a card in the “move” column enables movement actions originating from clearings of that suit. The “battle and then may delve” column allows you to initiate battles in clearings of the matching suit where Badger warriors are present, with the option to delve a relic from an adjacent forest into the clearing after the battle. Crucially, delving is possible even if no enemy pieces are present in the clearing. The “move or recover” column functions similarly for movement, while also allowing for the recovery of relics from clearings containing a waystation of the matching suit.
Two specific conditions can trigger card discards from the retinue. During the delve action, if the Badgers do not rule more clearings in the forests surrounding the delved forest than the value of the relic, the card used for the delve action is discarded. Similarly, during the recovery action, if the Badgers do not rule more clearings of the matching waystation suit than the value of the recovered relic, the card used for recovery is discarded.
It is vital to understand that, unlike the Eyrie Decree, you will never lose a card from your retinue simply by choosing not to perform an action or by taking only partial actions. There is no discard trigger associated with the “move” column. In the “battle and then may delve” column, you can opt not to delve after battling, thus avoiding the discard trigger. Likewise, you can choose not to recover a relic even if you are eligible to do so. Therefore, the potential for card discard arises only when you actively choose to perform a delve or recover action and fail to meet the ruling requirements. Consider that sometimes it is strategically advantageous to battle without delving, setting up for a more impactful turn later where the potential card discard is outweighed by the gains.
The Badgers thrive on establishing a robust retinue early in the game, as it forms the cornerstone of their action economy. You begin with three bird cards in your retinue, the “Faithful Retainers,” one in each column. Adding cards to your retinue early unlocks more actions sooner. More actions typically translate to a higher scoring potential and greater board control. While factions in Root have varying limitations on their engine growth, the Badgers’ primary limitation is the retinue’s maximum capacity of 10 cards, rather than restrictions on adding cards per turn. Therefore, maximizing your retinue’s action potential early provides the flexibility needed for consistent relic recovery, recruiting, and crafting.
In the initial turns, aiming to add at least two, ideally three, cards to your retinue to reach its capacity is a sound strategy. However, as you gain experience, you might adjust this, opting to add only one card in certain turns to prioritize warrior recruitment or crafting improvements or items. Reducing the number of cards added to the retinue will slow down your action engine’s development, potentially delaying consistent relic recovery. The following framework illustrates an ideal retinue-building approach:
Round 1-3: Aim to accumulate 8-10 cards in your retinue.
- Round One – Add 3 cards (Retinue total = 6)
- Round Two – Add 2 or 3 cards (Retinue total = 8 or 9)
While prioritizing retinue expansion, be aware that this might initially limit your warrior presence on the board. Adding cards is generally easier in the early game as other factions are also focused on establishing their own engines.
Another crucial point is to avoid discarding retinue cards prematurely, especially in the first few rounds. While discarding becomes a strategic tool later in the game for action curation, early discards can severely limit your action potential when you need them most, potentially leaving you vulnerable as other players exert board pressure. Refrain from discarding cards in rounds one to three, unless absolutely necessary to secure a high-value three-point relic in a highly contested area where immediate scoring is critical. The Badgers benefit significantly from a near-maximum action capacity, and early discards hinder this. However, strategic discarding is valuable for tailoring your available actions later. Discarding too early, however, can restrict your options when you require both actions and warriors to respond to table pressure.
Waystations: Crafting Hubs and Card Draw Generators
Alt text: Badger Waystation token in Root, double-sided to represent different relic types for crafting and recovery, essential for card draw and strategic flexibility.
Waystations serve as the Badgers’ building infrastructure. Each waystation is double-sided, displaying two different relic types, one on each side. Critically, each waystation on the board increases your card draw by one at the end of the evening phase, potentially granting up to four additional cards per turn! Waystations also function as the Badgers’ crafting locations.
Ideally, the Badgers should aim to establish waystations in clearings of two different suits. This goal provides strategic consistency. Typically, one suit will become your primary “recovery suit,” where you strategically place waystations to maximize relic recovery efficiency per card in the “move or recover” column of your retinue. The “off-recovery suit” (the suit where you are not primarily focused on relic recovery) aids in your warrior recruitment consistency. Placing waystations early is vital due to the significant card draw advantage they provide, fueling your engine with action cards, craftable points/improvements, and recruitment opportunities.
As the game progresses, anticipate opponents targeting your waystations to limit your card draw and restrict your presence to fewer clearings. Therefore, prioritize securing edge clearings with multiple building slots to maintain multiple waystations even when confined to a single clearing. This also enhances recovery action efficiency, allowing recovery of different relic types within the same clearing if you have waystations showing those types.
Card Uses: Balancing Retinue, Recruiting, and Crafting
Cards are a versatile resource for the Badgers, serving three key roles, each with varying importance depending on the game state. The Badgers face constant pressure in deciding how to best utilize their cards, as all three uses are crucial for success. The following list ranks card uses from most to least important in typical scenarios, although adaptability based on game context is key:
-
Retinue:
-
Suited Cards: Suited cards are always valuable actions, though their utility is somewhat constrained by their suit-matching requirement. Prioritize suited cards for the “battle/delve” and “recover/move” columns. In the “battle and then may delve” column, use suited cards in clearings where you can delve multiple times in a single round (explained further in the “battle and may delve” section). In the “move or recover” column, suited cards should ideally match the suit of clearings you rule for recovery and where your waystations are located. However, placing suited cards in the “move or recover” column carries the risk of opponents targeting warriors in those clearings to disrupt your recovery potential.
-
Bird Cards: Bird cards are highly prized for the retinue due to their unparalleled flexibility. They are best utilized in the “move” or “move or recover” action columns. Bird cards also offer the advantage of concealing your turn’s intentions from other players. However, a retinue without bird cards is not necessarily weak; it simply necessitates more careful planning during your turn.
-
-
Recruiting:
-
Suited Cards: Recruiting should almost always be done using suited cards. Given the priority of bird cards for the retinue, suited cards become the primary means of deploying warriors. Recruiting with suited cards requires matching the suit of the waystation you are recruiting from. Therefore, having waystations in two different suits significantly improves your ability to draw a card matching a waystation suit for recruitment.
-
Bird Cards: Bird cards offer recruitment flexibility, but their value is generally higher as retinue actions. However, if you face a board wipe, a bird card can be invaluable, allowing you to recruit in any clearing suit, regardless of your starting location, to re-establish board presence. If you anticipate a board wipe, holding onto a bird card or two can be a prudent preemptive measure.
-
-
Crafting:
Crafting is the third demand on the Badgers’ card resources, often making it a difficult decision to prioritize crafting. However, the Badgers’ rapid card cycling means you will frequently encounter numerous craftable items and abilities. While relic scoring is paramount, high-value point items like “coins” appearing in the mid-to-late game, especially if you have waystations in the required suited clearings, should be seriously considered for crafting. Crafting priorities are discussed in more detail later in this guide.
Faction Abilities: Devout Knights and Prized Trophies
Devout Knights: Resilience in Battle and Relic Mobility
Alt text: Devout Knights ability icon for Keepers in Iron in Root, highlighting defensive prowess and relic movement, key to Badger combat strategy.
“Devout Knights” is an ability that will likely draw the attention, and potentially the ire, of your opponents. It grants the Badgers a significant combat advantage: in any battle where they have at least one relic and one warrior present, they negate the first hit they would take. Ambushes bypass this negation, and subsequent hits in the same battle are not negated.
This ability is potent defensively, but even more so offensively. The capacity to engage in battles against single warriors and consistently avoid losses (except against ambushes) is exceptionally powerful. However, because this ability is tied to relic presence, anticipate opponents targeting your warriors when Devout Knights is not active, as this becomes the most direct way to weaken your board presence and inflict costly warrior losses.
The second crucial component of Devout Knights is the ability to move relics with warriors. Keepers may move one relic with each warrior they move. While this is generally not a limiting factor, it is good practice to bring 2-3 more warriors than the number of relics you intend to delve when preparing to battle for delving purposes.
Prized Trophies: Incentivizing Relic Destruction
Alt text: Prized Trophies ability icon for Keepers in Iron in Root, showing relics and victory points, indicating bonus points for opponents who destroy Badger relics.
“Prized Trophies” dictates that your relics are worth an extra victory point when destroyed, and the opponent who destroys a relic gets to place it in a forest of their choosing. This effectively incentivizes opponents to target your relics, offering them a significant point reward for overcoming Devout Knights and battling through your defenses.
Based on experience, it is strongly advised never to leave more than two relics in a single clearing. Opponents will capitalize on this, and the resulting point swing could propel them into a commanding, potentially insurmountable lead. Extra relics do not amplify the Devout Knights ability, making clustering relics strategically unwise. If you must have multiple relics on the board, disperse them as widely as possible to minimize the point reward an opponent gains from attacking warriors guarding relics. In recent gameplay experience, minimizing relic presence on the board is generally advantageous, as even a single relic can be a major incentive for opponents to engage you in battle for the bonus points.
Birdsong Phase Strategy: Encamp, Decamp, and Recruit
Encamp: Strategic Waystation Placement
Alt text: Encamp Birdsong action icon for Keepers in Iron in Root, depicting a waystation being placed, symbolizing strategic planning for future turns.
The “Encamp” action is all about strategically planning your future turns. You encamp to place a waystation, setting the stage for subsequent relic recovery, crafting, or recruitment. Throughout your turn, continuously evaluate which clearings would be most beneficial for waystation placement. Assess your hand, identify prevalent suits, and aim to place a waystation in a clearing matching the most common suit, unless you already have a waystation in a clearing of that suit. The interplay between “Live off the Land” (an evening action that removes warriors if you have too many in specific clearings) and “Encamp” is crucial and will be discussed later. However, strategically leaving single Badger warriors scattered across the map provides flexibility in waystation placement.
When encamping, prioritize placing the waystation side that corresponds to the relic type you intend to recover first. The backside should feature the relic type you plan to recover later. If you encamp on turn 1 (a common Badger opening), aim to have the waystation side facing up that matches relics you intend to recover in your second or third scoring burst. Furthermore, place the waystation side for earlier relic recovery in your primary “on-suit” clearing (the suit matching your recovery focus). The waystation side for later relics can be placed in an “off-suit” clearing (a suit not prioritized for recovery) to support recruitment consistency.
“Encamp” also serves as your comeback mechanism. If you have no waystations or warriors on the map, you can place a warrior and a waystation in any clearing on the map edge. When utilizing this, aim for proximity to relics you need to delve and a clearing suit where you hold multiple cards. Rapidly re-establishing board presence is crucial to regaining momentum and scoring points after a setback.
Decamp: Waystation Relocation (Situational)
Alt text: Decamp Birdsong action icon for Keepers in Iron in Root, showing a waystation being removed, representing tactical repositioning but less common than destruction by opponents.
Frankly, “Decamp” is rarely utilized. Allowing opponents to destroy your waystations is often strategically acceptable, as the single victory point gained by decamping is typically insignificant compared to the Badger’s high scoring potential. Consider decamping primarily if you require multiple clearings displaying the same relic type on waystations to enhance consistency, or if you placed a waystation earlier in an off-suit clearing and need to relocate it to your planned encamping clearing.
Recruit: Warrior Deployment and Card Management
Alt text: Recruit Birdsong action icon for Keepers in Iron in Root, depicting warriors being added, highlighting the card-dependent nature of Badger recruitment.
Badger recruitment decisions are heavily influenced by card availability and strategic priorities. In low-reach games (games with fewer players or factions that exert less board pressure), prioritize card allocation to the retinue over immediate recruitment. In high-reach games (more players, more aggressive factions), aim to recruit at least once per turn to maintain board presence and effectively counter red factions. The rationale behind these contrasting strategies is that in low-reach games, where opponents are less likely to actively remove your warriors, prioritizing retinue development and action economy is more beneficial than focusing on warrior numbers. Conversely, in high-reach games, where losses are frequent due to increased combat, consistent recruitment is essential to sustain a strong warrior presence.
Badger warriors are, in a sense, expensive to deploy. While each recruitment action adds two warriors and can potentially burst recruit a large number at once, the recruitment process is highly conditional and can be hampered by hand composition. Recruitment requires matching the suit of a waystation on the map, and cards are often needed for retinue actions or crafting.
As previously mentioned, waystations in multiple suits enhance recruitment consistency. This is another reason to prioritize retinue development early, enabling you to discard cards for recruitment when necessary. Hand composition can be unpredictable; you might draw primarily one or two suits, or even lack cards matching a waystation suit. Minimize warrior losses and utilize Devout Knights to deter attacks, preserving your warrior strength.
Daylight Phase Tactics: Craft, Move, Battle then Delve, Move or Recover, and Score
Craft: Prioritizing Card Draw, Points, and Movement
Alt text: Craft Daylight action icon for Keepers in Iron in Root, showcasing items being crafted, emphasizing strategic item selection for Badger victory.
Badger crafting priorities are tiered based on strategic impact:
-
Card Draw: Maximizing card draw is paramount for the Badgers. Every additional card enhances flexibility, providing more options for recruitment, item crafting, and strategic retinue card discards and replacements. Each extra card represents increased tactical maneuverability.
-
Victory Points: Craftable point items are the second priority. The Badgers only require approximately six extra points from crafting and battles to secure victory if they recover three columns of relics. Use this knowledge to guide your item crafting choices. However, in games where achieving three relic columns is unlikely, prioritize crafting 2 or 3-point items when available, as they become more critical for closing the point gap and securing a win.
-
Movement Enhancements: Craftable improvements that boost movement (e.g., Boat Builders, Corvid Planners) are the lowest priority but still valuable. Wait to craft these until the turn they are needed, as crafting occurs before movement, mitigating the impact of Saboteurs. These improvements enhance flexibility for recruitment and retinue actions. Certain maps, particularly Lake and Winter, make movement enhancements more crucial.
Move: Strategic Positioning and Retinue Card Management
Alt text: Move Daylight action icon for Keepers in Iron in Root, showing warriors moving, highlighting the importance of mobility for Badger relic strategy.
Cards in the “move” column are never discarded. Starting with a bird card in this column (Faithful Retainer), consider adding another bird card early for maximum flexibility, or a suited card matching clearings you intend to control for relic recovery. Suited cards introduce the risk of movement blockage if passage through the suited clearing is restricted. Prioritize bird cards for this column to maintain adaptability.
This column generally doesn’t require more than two cards in the initial rounds, with a potential third card added in the mid-game for enhanced movement flexibility. Movement is crucial for the Badgers, enabling them to reach clearings connected to multiple forests for relic delving. Certain clearings offer significantly greater access to forests than others, as illustrated in the map breakdowns below, which show clearing connectivity to surrounding forests.
Battle then Delve: Aggressive Relic Acquisition and Board Control
Alt text: Battle then Delve Daylight action icon for Keepers in Iron in Root, combining combat and relic acquisition, a core Badger action for scoring and control.
A crucial strategic tip before discussing columns with potential card discards: if you must discard a bird card, especially a Faithful Retainer, prioritize discarding a Faithful Retainer before other bird cards. Faithful Retainers are removed from the game when discarded, denying cards to other factions by permanently locking them as retinue actions.
A fundamental concept for mastering the Badgers is understanding their actions operate on two axes, both centered on clearing rule: ruling 3 clearings surrounding a forest for relic delving, and ruling 3 clearings of the same suit for relic recovery at a matching waystation. The critical decision is which axis to prioritize. Generally, de-emphasize the “battle/delve” axis, except possibly in round 1.
Focusing on ruling three forests around a relic is often inefficient and challenging. Inefficient because most forests contain only one or two relics, limiting your relic acquisition per turn. Challenging because numerous factions can counter your rule or manipulate clearing control (e.g., Lizard Gardens, Eyrie Lord of the Forest, Woodland Alliance sympathy, Corvid Snares). These mechanics make ruling and moving into those clearings increasingly difficult after the early game.
Consider a revised approach to the “battle/delve” column. This column can enable you to battle 3-5 times in a single clearing, effectively eliminating all enemy pieces from that location. This strategy allows you to place multiple cards of a single suit in the “battle and then may delve” column, move to a matching clearing adjacent to multiple relics, and then battle and delve repeatedly until you secure all desired relics (remembering the relic movement rule). This allows efficient movement to your target, acquisition of desired relics, and strategic retreat for relic recovery in the same turn. By the second or third battle in a clearing, resistance is likely minimal, allowing you to focus on delving and managing potential card discards.
Regarding card discards in this column: prioritize discarding suited cards first, as they offer less flexibility for future recovery actions. Aim to delve at least two relics per turn using “battle and then delve.” Your limit on delving and discarding should be determined by whether the recovered points make you an overbearing target, inviting attacks, and whether you can recover all delved relics. Ideally, recover all delved relics, leaving at most one remaining. The Badgers can recover from behind, so consistent scoring without becoming the primary target is key to determining delve quantity.
Discarding cards in “battle and delve” is effective because most forests are within two moves of a recovery clearing. Even at choke points, battling and delving can secure relics beyond your immediate clearing. As shown in map analyses, many clearings provide access to three or more forests, offering the potential to acquire multiple relics.
Clearing prioritization for delving depends on game stage. Early game, target clearings with 0-1 enemy pieces to minimize losses. Late game, prioritize clearings offering access to multiple relics of the same type (2-3). If that’s not possible, delve as many relics as feasible to score them in subsequent turns.
Battle as Policing: As the Badgers’ popularity rises, the meta becomes more hostile. Policing the table can build goodwill and demonstrate your engagement in the game’s dynamics. However, prioritize policing actions that advance your game. Target the other red faction to preemptively address future aggression when you approach victory. Police clearings with multiple buildings/tokens to remove for extra points. Police clearings where you can delve relics, continuing your scoring engine. Don’t let the table dictate your game at your expense; play to win.
Landmark Specific Strategy: The Lost City: If playing with the Lost City landmark, your suited battle cards are always active in the Lost City clearing. Utilize this advantage freely, as you will always gain value from battle actions there.
Move or Recover: Maximizing Relic Recovery Efficiency
Alt text: Move or Recover Daylight action icon for Keepers in Iron in Root, highlighting relic retrieval as a key scoring action for the Badger faction.
The Badgers aim to maximize relic recovery per turn. In games with limited opponent aggression, delving relics for Devout Knights might be less critical, but in high-aggression games, consistent relic recovery is vital for locking in points and securing victory.
Maximizing recovery efficiency hinges on ruling two to three clearings matching the suit of the recovery clearing. This is because successful recovery, without card discard, can be repeated as long as you meet the ruling condition. For example, if you know a clearing has three tablets valued at 1, 2, and 3, recovering all three in a turn can yield at least six points (potentially more with column bonuses) while only requiring rule in two clearings of a single suit to avoid card discard. When recovering a relic, you count the number of clearings you rule whose suit matches the recovery clearing.
Generally, prioritize ruling three matching clearings, as each relic type has two 3-value relics. A hidden Badger strength is that ruling two matching clearings with waystations allows you to battle and delve in a third matching clearing, leave a warrior there, and then return to your waystation clearings to recover all relics, ruling three clearings and avoiding card discard.
Experienced players will attempt to disrupt your rule of three clearings, making recovery more difficult. Therefore, prioritize recovering 3-value relics earlier in the game when maintaining rule in three clearings is easier.
Movement within the “move or recover” action is primarily used to return from delving clearings to your recovery clearings. When moving back, leave warriors behind to be removed by “Live off the Land.” Spreading out warriors provides more encamping options and mitigates the negative impact of “Live off the Land.”
Scoring: Relic Values and Column Bonuses
Alt text: Badger scoring example in Root, showing relic columns filled for Figures, Tablets, and Jewelry, illustrating point accumulation from relics and column bonuses.
The example scoring scenario above yields 2 points from the figure relic, 1 point from the tablet relic, 3 points from the jewelry relic, and 2 bonus points from the completed column, totaling 8 points.
Relic recovery scoring is central to Badger victory. As mentioned, relics themselves provide 27 potential points. Completing a column by recovering one of each relic type grants an additional two victory points, totaling a possible 8 bonus points from columns. Playing the Badgers effectively involves calculating the points needed to win and strategizing accordingly. The Badgers, like the Riverfolk Company and the Underground Duchy, can reliably estimate their scoring potential and plan their game accordingly.
Each relic type (jewelry, tablets, figures) can yield 9 points if all four relics of that type are recovered, with values of 1, 2, 3, and 3. Completing two columns averages 17.5 points. This places the Badgers in a similar position to the Riverfolk Company, requiring approximately 12 additional points to reach the 30-point victory threshold. Even scoring the minimum values for the first column yields a modest 5 points (3 from relics, 2 from column bonus).
However, achieving the next set of minimum relic points increases your score to 13 points (5 from the first column, 6 from relics in the second column, and 2 from the second column bonus). Completing a third column brings your total to 24 points (13 from previous columns, 9 from relics in the third column, and 2 from the third column bonus)! This is significant because scoring 24 points from three columns is a reasonable minimum target, with the remaining points needed for victory supplemented by enemy pieces and crafted items. Every point gained from other sources reduces the number of relics needed to win.
Calculate the points needed to win and prioritize actions that contribute to that goal. While this applies to all factions, the Badgers, like the Moles and Otters, can consistently project their scoring and plan strategically.
Given the fear factions have of the Badgers’ scoring burst potential, planning how to secure the remaining 12.5 points is crucial. Achieving even three relic columns can be challenging; two columns is a more attainable target. Secure the remaining points from items and enemy pieces to ensure victory.
Daylight Strategy Wrap Up – The Hit and Run Tactic
Against experienced opponents, the Badgers will face frequent attacks, particularly in high-reach games. The “Badger Hit and Run” tactic, as described in this guide, effectively counters this pressure. Execute the hit and run by moving from map edges into clearings for delving, battling, and acquiring relics, then retreating back to your recovery clearings. This tactic makes you difficult to police, as you operate away from other factions, and relics are removed from the board, denying opponents scoring opportunities.
Most factions, after moving into a clearing for battle, cannot abandon it in the same turn. However, the Badgers’ “Move-Battle-Move” action sequence enables a hit-and-run approach. As illustrated below, positioning along the map edge allows for battles and delves in central clearings, securing relics and then retreating for recovery. The Lost City landmark further enhances this tactic, but in the example game, the Cats’ Keep placement necessitated battling in alternative clearings.
Evening Phase Operations: Live off the Land, Gather Retinue, Draw and Discard
Live off the Land: Managing Warrior Distribution
Alt text: Live off the Land Evening action icon for Keepers in Iron in Root, depicting warriors being removed, highlighting the need for strategic warrior placement to avoid losses.
“Live off the Land” can deplete a critical resource: warriors. Minimize warrior losses from this action. Leaving a single badger warrior in a clearing is often preferable to losing warriors to “Live off the Land.” If an opponent battles that lone warrior, they expend a battle action to achieve what “Live off the Land” would have done automatically. If the warrior survives until your next turn, you gain encamping flexibility and recruit more warriors.
As previously discussed, “Live off the Land” and “Encamp” are interconnected. Since “Live off the Land” triggers warrior removal if you have four or more warriors in a clearing, strategically leaving warriors behind as you move across the map provides encamping options and prevents “Live off the Land” from triggering unnecessarily.
Gather Retinue: Strategic Card Allocation
Alt text: Gather Retinue Evening action icon for Keepers in Iron in Root, showing cards being added to the retinue, emphasizing strategic action planning for future turns.
Strategic card allocation to the retinue is crucial. In low-reach games, prioritize adding cards to the “move” and “move or recover” columns in round 1, and then to the “battle” and “move or recover” columns at the end of round 2. In high-reach games, prioritize adding cards to the “move” and “battle then delve” columns to proactively police opponents and limit their warrior count.
Retinue gathering has been discussed throughout this guide, but “Shifting Retainers,” another evening action, deserves mention. This action is less frequently used, as discarding and replacing retinue cards is generally preferred. However, in games where you are not discarding cards through delving or recovering, “Shifting Retainers” becomes relevant. Overloading the “battle” column with 5+ cards and then shifting a card (usually a bird) to the “move or recover” column can be a viable strategy in specific scenarios.
Draw and Discard: Card Management and Retinue Fuel
Alt text: Draw and Discard Evening action icon for Keepers in Iron in Root, depicting cards being drawn and discarded, highlighting efficient hand management for Badgers.
The Badgers should rarely discard cards. Cards should ideally be used for retinue actions, warrior recruitment, or crafting. If you reach the discard phase with surplus cards, add them to the retinue to maximize action potential for the following turn.
Luke’s Cliff Notes for New Badger Players: Essential Badger Strategy
- Play from Behind! The Badgers’ massive scoring potential allows for significant point deficits to be overcome. Leading early can make you a prime target for experienced players, hindering your path to victory.
- Add Two Cards per Turn to Retinue Until 10 Cards. Maximize your action engine quickly.
- Turn 1: Deploy Both Waystations. Establish your crafting and card draw engine immediately.
- Avoid Delving Rounds 1-3 if Retinue Card Discard is Likely. Prioritize building an 8-10 action retinue before risking discards.
- After Round 3 (with 8-10 Actions), Discarding Cards for Battle and Delve is Acceptable. Focus on relic acquisition and scoring, understanding the discard risk. Rule three matching clearings to safeguard recover cards from discard.
- Never Keep More Than One Relic per Clearing. Minimize opponent scoring opportunities from Prized Trophies. Only delve if you can recover the relic that turn if the newly gained relic would put you over one relic per clearing.
- Leave Warriors Behind After Moving to Mitigate Live off the Land. These warriors offer encamping flexibility.
- Ensure Sufficient Movement to Return Relics to Recovery Clearings. Plan your movement and relic transport effectively.
Maps: Optimal and Challenging Terrains for the Keepers in Iron
Autumn (or Summer) Map: Badger Paradise
Alt text: Root Autumn map, highlighting favorable terrain for Keepers in Iron due to connected clearings and relic access.
The Autumn (or Summer) map is exceptionally favorable for the Badgers. Numerous connected clearings, especially with randomized clearing suits, can create easily defensible suit groups, facilitating rule in three clearings for recovery. Accessing relics from all forests is straightforward on this map, with most starting positions being within three moves of every forest.
Winter Map: Badger Challenge
Alt text: Root Winter map, showcasing challenging terrain for Keepers in Iron due to chokepoints and limited central access.
The Winter map poses challenges for the Badgers. While two clearings offer access to all forests, opponents will likely contest these. Avoid being trapped on one side of the map. Starting in the bottom middle clearings is generally preferable, but the top string of clearings can be strong if it features multiple clearings of the same suit, providing access to the central clearings within two moves.
Lake Map: Navigational Hurdles
Alt text: Root Lake map, illustrating navigational challenges for Keepers in Iron due to the lake and chokepoints, requiring ferry access.
The Lake map can be difficult for the Badgers. The lake restricts movement if the ferry is inaccessible. Focus your game in the northern and eastern map sections, and consider a late-game push down the side to secure relics beyond bottom chokepoints to end the game quickly. Chokepoints are prevalent on this map, requiring careful awareness.
Mountain Map: Strategic Path Control
Alt text: Root Mountain map, showing favorable terrain for Keepers in Iron after map opens up, with central clearing access and path removal benefits.
The Mountain map is another strong choice for the Badgers. After paths open, numerous connected paths provide access to the central clearings for relic delving. If playing with the Lost City landmark replacing the Tower in the Pass, your battle actions are always active there, and ruling that clearing counts for any suit. Path removal supplements Badger scoring, but be mindful that it also benefits other factions. Avoid setting up in the bottom clearing with a path, as red factions will exploit this for round 1 attacks.
Picking Badgers and Set Up: Hand, Factions, Map, and Turn Order Considerations
Hand Composition
When considering the Badgers, a hand with more bird cards is generally better. Having at least one bird card is recommended for newer players. Experienced players can succeed even without initial bird cards due to high card draw, but bird cards enhance early game consistency. If your hand is solely suited cards, ensure these match your starting clearings for recruitment or are suitable for retinue actions (movement or battling).
Faction Pool Composition
Generally, avoid picking the Badgers if the other three factions are red factions (Eyrie, Marquise, Lizards). The Badgers thrive with fewer aggressive factions and fewer clearings starting with warriors during setup.
Map Selection
As discussed in detail above, Autumn (Summer) and Mountain maps are ideal for the Badgers. Winter and Lake maps present greater challenges due to chokepoints and restricted movement.
Turn Order
The Badgers can succeed in any turn order position but are stronger earlier in the turn order, allowing them to establish their engine before facing significant opponent pressure.
FAQ: ADSET and Mulligan Rule
Based on the March 17th FAQ, in ADSET (Advanced Setup) Root games, if the Badgers cannot set up due to a lack of two adjacent clearings on the map edge, they are mulliganed out of the draft. This is rare, occurring only in specific scenarios where other players strategically space out starting warriors to deny adjacent clearings to the Badgers on edge, potentially on the Mountain map. Be aware of this edge case, which requires the first three players to intentionally block Badger setup.
Share this:
Like this:
Like Loading…