Fishmon are a unique and elusive gameplay element in Dave the Diver, designed to challenge players who have progressed further into the main storyline. These rare fish species exclusively appear on weekends, adding an exciting weekly hunt for completionists and players seeking extra in-game currency. Every Saturday, Udo, your trusty guide, will provide a cryptic clue about the latest Fishmon, hinting at its type, potential location, and any special requirements for capture. Time is of the essence as these Fishmon only remain available until Sunday night, disappearing until the following weekend.
Udo providing a tip about the elusive Fishmon, initiating the weekend hunt.
While primarily aimed at players striving for 100% completion, successfully catching Fishmon also yields a substantial monetary reward each Monday. This bonus ranges from 1,000 to 2,500 gold, scaling based on your Fishmon collection progress.
Spoiler Warning: As Fishmon are an endgame mechanic, the following guide contains information about late-game areas and story elements. Proceed with caution if you wish to avoid spoilers.
Tips for Catching Fishmon in Dave the Diver
Catching Fishmon requires a blend of strategy, the right equipment, and a little bit of luck. Here’s a breakdown of essential tips and information to aid your Fishmon hunting endeavors:
Prioritize Sniper Rifles: Fishmon are notably resilient, often surviving initial shots. It’s highly recommended to utilize your most upgraded sniper rifle when engaging them. Even the powerful Death Sniper Rifle, known for its instant death ability on regular fish, will merely render Fishmon unconscious on the first hit. Exercise caution with follow-up shots, as a second hit is usually fatal.
Equipping a high-level sniper rifle is crucial for efficiently catching Fishmon.
Let’s dive into the specifics for each Fishmon encounter:
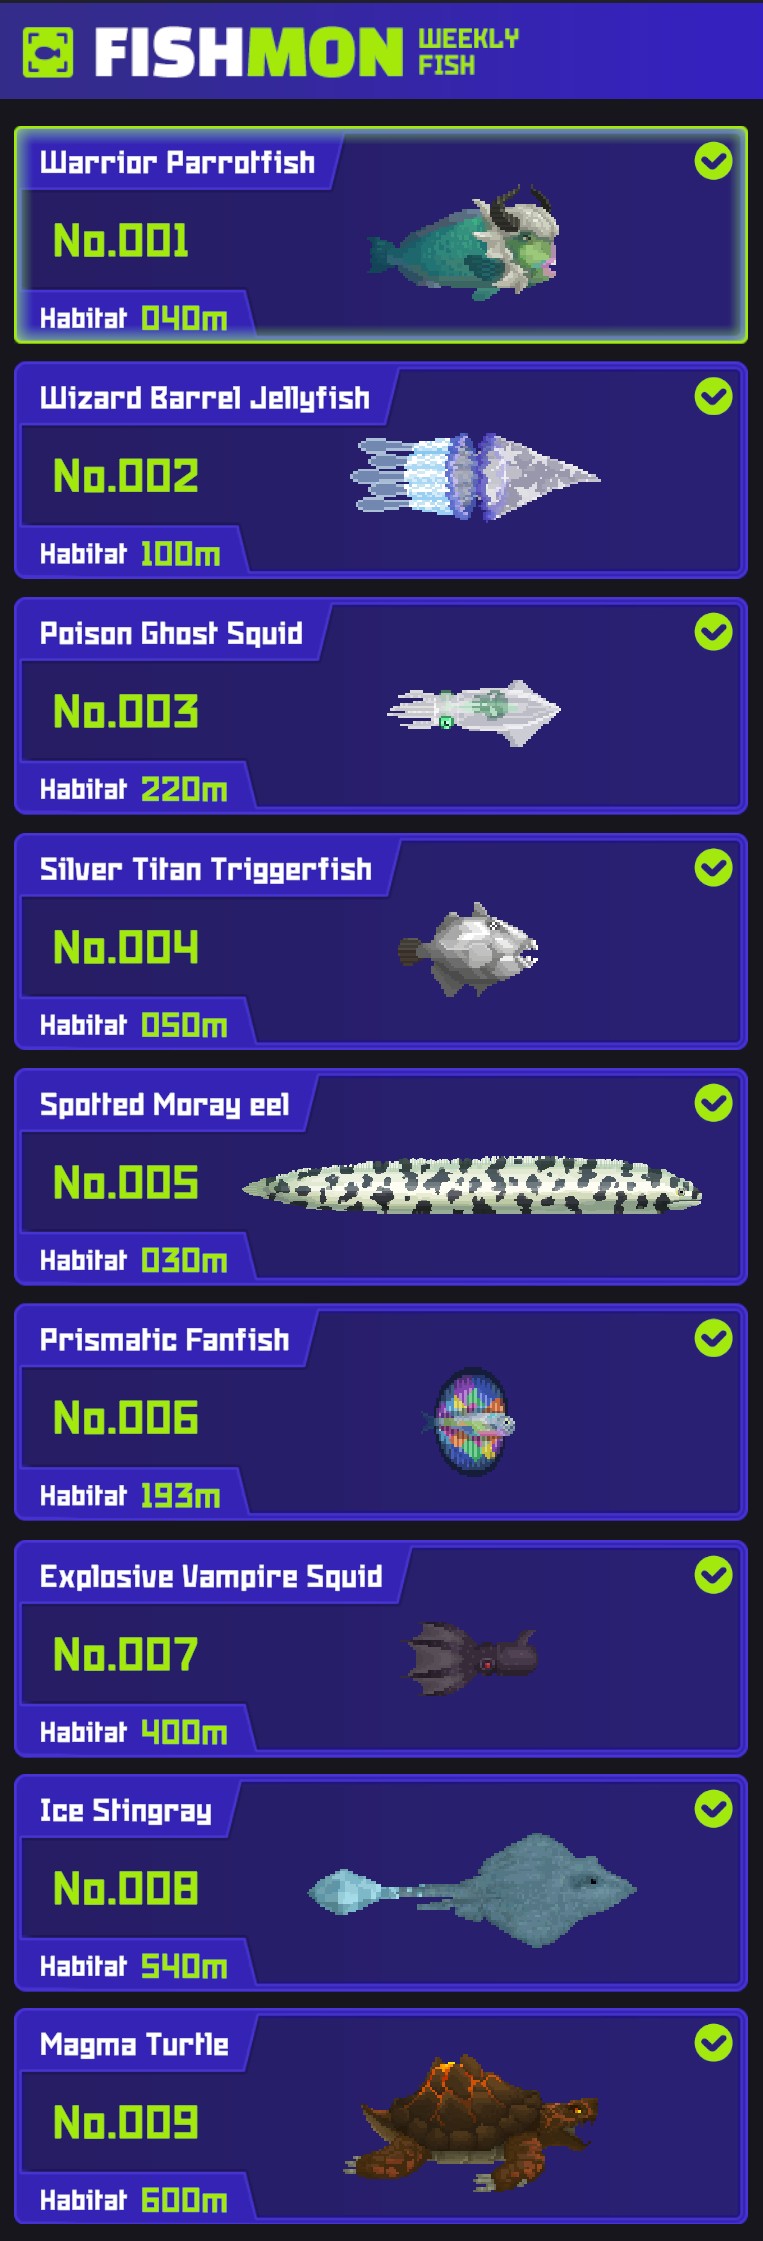
1. Warrior Parrotfish
- Location: Blue Hole Shallows, near the surface, often on the left side.
- Catching Strategy: The Warrior Parrotfish charges aggressively. Exploit this behavior by waiting for it to charge and then shooting it from behind. Headshots are ineffective and will negate damage.
The Warrior Parrotfish requires a strategic shot from behind during its charge attack.
2. Wizard Barrel Jellyfish
- Location: Near the Yellow Shipwreck in the Blue Hole.
- Catching Strategy: This Fishmon has teleportation abilities. Maintain distance and utilize your sniper rifle to engage it effectively from afar before it can teleport away.
Engage the teleporting Wizard Barrel Jellyfish from a distance with a sniper rifle.
3. Poison Ghost Squid
- Location: Blue Hole Deeps, often sighted on the right side.
- Catching Strategy: The Poison Ghost Squid is invisible without a UV flashlight. Illuminate it with your UV flashlight before attempting to shoot.
Use a UV flashlight to reveal the Poison Ghost Squid before you can target it.
4. Silver Titan Triggerfish
- Location: Edge of the medium depth zones in the Blue Hole, potentially in various locations, but commonly on the right edge.
- Catching Strategy: Elemental weakness is key here. Only Lightning elemental damage will affect the Silver Titan Triggerfish. Equip a Lightning weapon to successfully capture it.
Lightning weapons are essential to damage and capture the Silver Titan Triggerfish.
5. Spotted Moray Eel
- Location: Surface level, easily found during evening dives in the Blue Hole.
- Catching Strategy: This is arguably the easiest Fishmon to catch. It spawns at night near the surface and has no special damage requirements. Any weapon will suffice.
The Spotted Moray Eel is a straightforward catch during evening dives.
6. Prismatic Fan Fish
- Location: Underwater Lake, accessible through a Sea People side quest.
- Catching Strategy: Damaging the Prismatic Fan Fish triggers the spawning of clones. Identify and target the real Fan Fish while eliminating the duplicates. Weapons with multiple projectiles, like the Triple Axel or Penta Axel, are highly effective for clearing out clones.
Dealing with clones is the challenge when catching the Prismatic Fan Fish in the Underwater Lake.
7. Explosive Vampire Squid
- Location: Bottommost section of the Glacial Passage.
- Catching Strategy: Similar to the Spotted Moray Eel, the Explosive Vampire Squid is easy to catch. It consistently spawns in the Glacial Passage’s depths and has no specific damage vulnerabilities. Use a powerful weapon like the Death Sniper Rifle for a quick capture.
The Explosive Vampire Squid is easily located in the Glacial Passage’s deepest area.
8. Ice Stringray
- Location: Ceilings of the first puzzle room in the Glacial Area (top right corner of the map).
- Catching Strategy: Due to its icy nature, the Ice Stringray is vulnerable to Fire or Explosive damage. Utilize weapons with these elemental properties to effectively damage and capture it.
[
9. Magma Turtle
- Location: Caves within the Hydrothermal Vents area. Access by diving straight down in the Glacial Area, entering the cave, and finding a glowing door on the left.
- Catching Strategy: Living in extreme heat has made the Magma Turtle resistant to most damage types. It is exclusively vulnerable to Ice damage. Equip an Ultra Ice Gun or Ice Harpoon Tip to capture this final Fishmon.
[
Conclusion
The Fishmon challenge in Dave the Diver provides engaging weekend content for dedicated players. By understanding their locations, behaviors, and weaknesses, and utilizing this guide, you’ll be well-equipped to catch all nine elusive Fishmon and reap the monetary rewards. Happy hunting, and may your dives be fruitful!