Destiny 2 Dual Destiny Mission Guide offers comprehensive walkthroughs and strategies. At CONDUCT.EDU.VN, discover how to complete the Dual Destiny Exotic mission, unlock Exotic Class items for Prismatic Subclasses, and navigate the challenges of the Pale Heart. Master the mechanics and communication needed to succeed, enhancing your Destiny 2 experience. Explore the best strategies for team coordination, puzzle solving, and encounter tactics, ensuring victory in this demanding mission.
This comprehensive guide will help you understand the complexities of the Dual Destiny mission, offering insights into every encounter and puzzle. Whether you are a seasoned Guardian or a newcomer, this guide will provide you with the knowledge to conquer the Pale Heart and claim your rewards. Let’s dive into the details of the Dual Destiny mission and ensure you are well-prepared for the challenges ahead, focusing on effective strategies and collaborative gameplay.
1. Unlocking the Dual Destiny Mission
Before diving into the Dual Destiny mission itself, you must first unlock it. This process involves a series of steps that, while time-consuming, only need to be completed once. After unlocking it, the mission will remain permanently available on your Pale Heart map. Here’s how to unlock the Dual Destiny mission:
- Complete an Overthrow Run in the Landing: Begin by completing a full run of the Overthrow activity in the Landing zone of the Pale Heart.
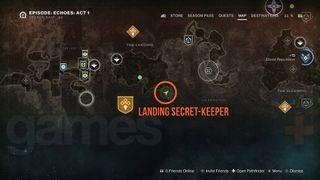
- Locate and Defeat the Hive Lightbearer Secret-Keeper: After completing the Overthrow activity, a message will appear, indicating “A Secret-Keeper of the Witch Queen is near…” This means a Hive Lightbearer has spawned in the area. Locate and defeat this Lightbearer Wizard, which can be found in the southeastern part of the Landing, near the entrance to the Forgotten Deep Lost Sector.
- Complete Overthrow in the Blooming and the Impasse: Next, complete the Overthrow activity in both the Blooming and Impasse zones. Defeat the Hive Secret-Keepers that spawn in these areas as well. The Blooming Secret-Keeper is located in the northeastern part of the region, among the tall rock formations, while the Impasse Secret-Keeper is in the southwest corner, near the entrance to the Broken Deep Lost Sector.
- Follow the Green Light Beam to Savathun’s Crystal Statue: After defeating the Secret-Keepers, follow the vertical beam of green light through the Refraction to the crystal statue of Savathun. Interacting with the statue will grant you a 7-minute buff called “Savathun’s Envoy” and reveal two waypoints.
- Defeat the Dread Expector Bosses and Collect Light and Darkness Orbs: At each waypoint, defeat the Dread Expector bosses and collect the Light and Darkness orbs they drop upon defeat.
- Deposit the Orbs at the Statue of Savathun: Return to the room with the statue of Savathun and deposit the Light and Darkness orbs on the corresponding plates. This action will complete the unlocking process.
Once all these steps are completed, the activity flag for the Dual Destiny Exotic mission will appear, allowing you to start the mission either on the spot or from your map. Now that the mission is unlocked, you’re ready to face its challenges.
2. Preparing for the Dual Destiny Mission
Before starting the Dual Destiny Exotic mission, some preparations are essential to ensure a smoother experience. This mission requires two players, each with specific subclass alignments. Here’s what you need to prepare:
- Subclass Alignment:
- Light Subclass: One player must equip a Light Subclass, such as Solar, Arc, or Void. This player will be designated as “Light Aligned” for the duration of the mission.
- Darkness Subclass: The other player must equip a Darkness Subclass, such as Stasis or Strand. This player will be designated as “Darkness Aligned”.
- Communication: Effective communication between the two players is crucial for success. Clear and concise communication will help in solving puzzles and coordinating combat strategies.
- Symbol Recognition: Familiarize yourself with the symbols from the Vow of the Disciple Raid and the Destiny 2 Preservation mission. These symbols appear throughout the Dual Destiny mission, and recognizing them quickly will save time and reduce confusion. A cheat sheet can be helpful in this regard.
- Gear and Loadout: Choose your gear and loadout carefully, considering the types of enemies you’ll encounter and the challenges you’ll face. Ensure you have a balance of weapons for both ad clear and boss damage.
- Understanding Mechanics: Take the time to understand the mechanics of each encounter before starting the mission. Knowing what to expect will allow you and your partner to react quickly and efficiently.
With these preparations in place, you’ll be well-equipped to tackle the challenges of the Dual Destiny mission.
3. Encounter 1: The Refraction Cavern
The first major encounter in the Dual Destiny mission takes place in the Refraction Cavern. This encounter requires close coordination between the Light and Darkness Aligned players to identify and shoot symbols. Here’s a step-by-step guide to completing this encounter:
- Starting the Encounter: Stand in the corresponding Light and Darkness rings in the cavern to begin the encounter.
- Light Player’s Role:
- Kill two Light-aligned Servile Centurions.
- Collect the Motes of Light they drop.
- Note the two symbols that appear on the plinths near the Light ring.
- Darkness Player’s Role:
- Kill two Dark-aligned Servile Knights.
- Collect the Motes of Light they drop.
- Observe the Darkness splinters with symbols.
- Communication and Execution:
- The Light player communicates the two symbols they see on their plinths to the Darkness player, in the order they appeared.
- The Darkness player shoots the matching splinters in the correct order.
- Successful execution will trigger the message, “Paracausal energy tears through you!”, and teleport both players to the next room.
- Second Room:
- In the second room, the roles are reversed. The Darkness player now identifies the symbols, and the Light player shoots the splinters. This time, three symbols must be matched.
- Communicate the symbols clearly and shoot the splinters in the correct order to teleport to the final room.
- Final Room:
- In the final room, the roles revert to the initial setup. The Light player identifies symbols, and the Darkness player shoots splinters. Four symbols must be matched this time.
- Accurate communication and precise execution are crucial for success.
- After matching the symbols, eliminate any remaining enemies to be teleported to the next area of the mission.
Completing the Refraction Cavern requires effective communication and coordination. Clear communication about the symbols and precise shooting are key to success.
4. Navigating the Intrusion Section
After completing the Refraction Cavern, you’ll enter the Intrusion section, a massive structure characterized by black Pyramid architecture. This section involves platforming and solving puzzles while fending off enemies. Here’s what you need to know to navigate the Intrusion section:
- Platforming: The Intrusion section is filled with platforming challenges. Be cautious of enemies, especially Taken Phalanxes, and moving objects that can knock you off the platforms. Take your time and coordinate your jumps with your partner.
- Light and Darkness Plates: Throughout the Intrusion section, you’ll encounter pairs of Light and Darkness plates. Standing on these plates will activate mechanisms, such as gravity lifts, that allow you to progress further into the structure.
- The Obelisk Puzzle: Eventually, you’ll reach a large room with an orange barrier blocking the exit. Standing on the Light and Darkness plates in this room will trigger the appearance of a Darkness obelisk surrounded by nine splinters in a clockface pattern.
- Solving the Clockface Puzzle:
- Six of the splinters will emit orange lasers, but each player sees a different arrangement. Only three lasers are common to both players.
- The goal is to identify the three splinters with lasers that both players can see on their clockfaces.
- One player should call out the positions of all six lasers they see, while the other player compares and identifies the three matching positions.
- Both players must simultaneously shoot the matching splinters one by one.
- Successful execution will trigger the message, “Light and Darkness surge, destabilizing an obelisk!”
- Repeat this process two more times to deactivate the barrier.
- Once the barrier is down, proceed through the exit.
The Intrusion section tests your platforming skills and puzzle-solving abilities. Clear communication and precise execution are crucial for navigating this section successfully.
5. The Final Boss Encounter: Selin and Yemiq
After navigating the Intrusion section, you’ll face the final bosses of the Dual Destiny mission: Selin and Yemiq. This encounter combines elements from previous encounters, requiring coordination, symbol recognition, and precise shooting. Here’s how to defeat Selin and Yemiq:
- Initial Engagement: Begin by damaging Selin until they retreat to a nearby Darkness obelisk and summon a shield.
- Wizard Elimination: Both players must kill the Servile Wizards matching their Light/Darkness alignment. These wizards are essential for revealing the symbols needed to break the boss’s shield.
- Symbol Identification and Communication:
- After killing the wizards, the Light player will see three symbols arranged vertically in front of the obelisk.
- The Darkness player will see many splinters with symbols around the obelisk.
- The Light player must read out the symbols from top to bottom, and the Darkness player must shoot the matching splinters in the correct order.
- Damaging Selin: Continue damaging Selin until they retreat again, summoning Yemiq.
- Yemiq’s Phase: Repeat steps 1-4 on Yemiq, but this time the roles are switched for the symbols. The Darkness player reads out the symbols, and the Light player shoots the splinters.
- Clockface Puzzle Phase: After damaging both bosses, they will summon laser clockfaces. Both players must kill the Servile Wizards matching their Light/Darkness alignment near the clockfaces.
- Solving the Clockface Puzzle:
- When a laser pattern appears, both players must identify the one splinter that is shared by both clockfaces.
- One player should call out the positions of all four lasers they see, while the other player compares and identifies the matching position.
- Both players must simultaneously shoot the shared splinter.
- Repeat this process three times to bring down Selin and Yemiq’s shields.
- Final Blows: With the shields down, defeat Selin and Yemiq to complete the encounter.
The final boss encounter tests your coordination, symbol recognition, and shooting skills. Clear communication and precise execution are essential for defeating Selin and Yemiq.
6. The Final Choice: Prepare for Battle or Choose Peace
After defeating Selin and Yemiq, you’ll run across the newly formed bridge and head through the glowing doorway to claim your loot. However, upon attempting to claim your rewards, you and your partner will be unceremoniously trapped and killed. This leads to a final choice that adds an intriguing twist to the mission.
- The Choice: You and your friend must make a choice by following the button prompts on the nearby Darkness splinters: prepare for battle or choose peace?
- Prepare for Battle: If both players choose to prepare for battle, the mission turns into a PvP showdown where you must fight your friend to the death. The victor can then attempt to crush their opponent’s Ghost but ultimately fails and dies.
- Choose Peace: If both players choose peace, they both die without any combat.
Neither outcome affects your Exotic Class item mission reward, and you can both claim them from the plinths after you respawn. However, you do get unique dialogue from Savathun depending on which outcome you choose, adding a narrative layer to the experience.
7. Claiming Your Rewards
Regardless of the choice you and your partner make in the final encounter, the rewards for completing the Dual Destiny Exotic mission remain the same. After respawning, you can both claim your Exotic Class items from the plinths. These items are a significant reward, offering unique perks and enhancing your gameplay experience with Prismatic Subclasses.
8. Tips and Strategies for Success
To maximize your chances of success in the Dual Destiny mission, consider the following tips and strategies:
- Communicate Clearly: Clear and concise communication is paramount. Use callouts for symbols, laser positions, and enemy locations.
- Prioritize Targets: Focus on eliminating high-priority targets first, such as Wizards and Champions, to reduce the pressure on your team.
- Utilize Subclass Abilities: Make the most of your subclass abilities and supers to clear adds, control areas, and deal damage to bosses.
- Coordinate Supers: Coordinate the use of your supers to maximize their effectiveness. For example, use a Well of Radiance for sustained healing and damage buff during boss damage phases.
- Positioning: Maintain good positioning to avoid being overwhelmed by enemies and to have clear lines of sight for shooting symbols and splinters.
- Weapon Loadout: Choose a balanced weapon loadout that includes weapons for both ad clear and boss damage. Consider using weapons with perks that enhance damage against specific enemy types.
- Practice Symbol Recognition: Familiarize yourself with the symbols from the Vow of the Disciple Raid and the Preservation mission. Practice recognizing them quickly to save time during the encounters.
- Stay Calm: The Dual Destiny mission can be challenging, so it’s important to stay calm and focused. If you encounter difficulties, take a break and reassess your strategy.
By following these tips and strategies, you can increase your chances of successfully completing the Dual Destiny mission and claiming your rewards.
9. Understanding Symbol Callouts
In the Dual Destiny mission, accurate symbol callouts are crucial for solving the puzzles and defeating the bosses. Here are some effective strategies for symbol callouts:
- Use Clear and Concise Language: Avoid ambiguity by using clear and concise language when calling out symbols. Refer to the cheat sheet to ensure you’re using the correct names for each symbol.
- Establish a Standard Order: Establish a standard order for calling out symbols to avoid confusion. For example, always call out symbols from top to bottom or left to right.
- Confirm Symbol Recognition: After calling out a symbol, ask your partner to confirm that they recognize it. This helps to ensure that both players are on the same page.
- Repeat Symbols if Necessary: If there is any confusion about a symbol, repeat it clearly and slowly. It’s better to take a few extra seconds to ensure accuracy than to make a mistake.
- Use Visual Aids: If possible, use visual aids such as screenshots or drawings to help communicate the symbols more effectively.
By following these strategies, you can ensure that your symbol callouts are clear, accurate, and effective, leading to greater success in the Dual Destiny mission.
10. Common Mistakes to Avoid
Even with careful preparation and clear communication, it’s easy to make mistakes in the Dual Destiny mission. Here are some common mistakes to avoid:
- Incorrect Subclass Alignment: Ensure that each player has the correct subclass alignment (Light or Darkness) before starting the mission. This is essential for activating plates and interacting with symbols.
- Poor Communication: Lack of communication or unclear communication can lead to confusion and mistakes. Always communicate clearly and concisely with your partner.
- Rushing: Rushing through the encounters can lead to mistakes and unnecessary deaths. Take your time and focus on executing the mechanics correctly.
- Ignoring Adds: Ignoring the adds can quickly lead to being overwhelmed. Prioritize eliminating adds to reduce the pressure on your team.
- Incorrect Symbol Callouts: Incorrect symbol callouts can lead to failed attempts. Double-check your symbol callouts to ensure accuracy.
- Failing to Coordinate Supers: Failing to coordinate supers can lead to wasted opportunities. Coordinate the use of your supers to maximize their effectiveness.
- Neglecting Positioning: Neglecting positioning can lead to being easily killed by enemies. Maintain good positioning to avoid being overwhelmed.
By avoiding these common mistakes, you can increase your chances of successfully completing the Dual Destiny mission and claiming your rewards.
11. Best Weapon Loadouts for the Dual Destiny Mission
Choosing the right weapon loadout can significantly impact your success in the Dual Destiny mission. Here are some recommended weapon loadouts:
- Primary Weapon:
- Auto Rifle: A high-rate-of-fire auto rifle like “Quicksilver Storm” is excellent for clearing adds.
- Pulse Rifle: A pulse rifle like “Graviton Lance” is effective for both ad clear and dealing damage to higher-health enemies.
- Special Weapon:
- Fusion Rifle: A fusion rifle like “Null Composure” is great for burst damage against bosses and tougher enemies.
- Shotgun: A shotgun like “Ikelos_SG_v1.0.3” is effective for close-range engagements and dealing high damage to bosses.
- Heavy Weapon:
- Linear Fusion Rifle: A linear fusion rifle like “Threaded Needle” is ideal for sustained damage against bosses.
- Rocket Launcher: A rocket launcher like “Gjallarhorn” is excellent for burst damage and clearing groups of enemies.
Additionally, consider using weapons with perks that enhance damage against specific enemy types, such as Taken or Unstoppable Champions. A balanced loadout that includes weapons for both ad clear and boss damage will help you handle any situation you encounter in the Dual Destiny mission.
12. Adapting to Different Team Compositions
While the Dual Destiny mission is designed for two players with specific subclass alignments, it’s possible to adapt your strategy based on your team composition. Here are some tips for adapting to different team compositions:
- Communicate Your Strengths: Clearly communicate your strengths and weaknesses to your partner. This will help you develop a strategy that plays to your strengths and compensates for any weaknesses.
- Adjust Roles: Adjust your roles based on your team composition. For example, if one player is more comfortable with ad clear, they can focus on eliminating adds while the other player focuses on solving puzzles.
- Coordinate Abilities: Coordinate your abilities to maximize their effectiveness. For example, use a Well of Radiance to provide sustained healing and damage buff during boss damage phases.
- Utilize Mods: Utilize armor mods to enhance your abilities and compensate for any weaknesses. For example, use mods that increase your weapon reload speed or reduce incoming damage.
- Experiment: Don’t be afraid to experiment with different strategies and loadouts. The best strategy for your team may depend on your individual playstyles and preferences.
By adapting to different team compositions, you can increase your chances of successfully completing the Dual Destiny mission, regardless of your team’s specific strengths and weaknesses.
13. Troubleshooting Common Issues
Despite careful preparation and execution, you may encounter issues while running the Dual Destiny mission. Here are some common issues and how to troubleshoot them:
- Unable to Start the Mission: Ensure that you have completed all the steps required to unlock the mission. If you are still unable to start the mission, try restarting your game or console.
- Difficulty with Symbol Recognition: If you are having difficulty recognizing the symbols, refer to the cheat sheet and practice recognizing them quickly. If necessary, take a break and reassess your strategy.
- Stuck in the Environment: If you get stuck in the environment, try using your abilities to move around or ask your partner to help you. If you are still unable to move, try restarting the encounter.
- Connectivity Issues: If you are experiencing connectivity issues, check your internet connection and try restarting your router. If the issue persists, contact your internet service provider.
- Game Crashes: If your game crashes, restart your game or console. If the issue persists, try updating your graphics drivers or reinstalling the game.
By knowing how to troubleshoot these common issues, you can minimize downtime and get back to completing the Dual Destiny mission.
14. Advanced Strategies for Speedrunning
For experienced players looking to optimize their completion time, here are some advanced strategies for speedrunning the Dual Destiny mission:
- Optimize Movement: Optimize your movement by using techniques such as sliding, jumping, and grappling to traverse the environment quickly.
- Pre-Damage Bosses: Pre-damage bosses before starting the encounter to reduce the amount of time required to defeat them.
- Coordinate Supers: Coordinate the use of your supers to maximize their effectiveness. For example, use a Well of Radiance to provide sustained healing and damage buff during boss damage phases.
- Utilize Damage Buffs: Utilize damage buffs such as Empowering Rift or High-Energy Fire to increase your damage output.
- Skip Encounters: If possible, skip unnecessary encounters to save time. However, be careful not to skip any encounters that are required to progress through the mission.
- Practice: Practice makes perfect. Run the mission multiple times to familiarize yourself with the layout, enemy spawns, and puzzle solutions.
By implementing these advanced strategies, you can significantly reduce your completion time and achieve faster speedruns of the Dual Destiny mission.
15. How to find other players
Finding a teammate for the Dual Destiny mission is crucial for success, as it requires two players with specific subclass alignments. Here are several ways to find other players:
- Destiny 2 Companion App: The Destiny 2 Companion App is a great tool for finding fireteams. You can create a listing for the Dual Destiny mission or browse existing listings to find players who are also looking for a team.
- Online Forums: Online forums such as Reddit’s r/DestinyTheGame and Bungie’s official forums are great places to find players. You can post a message indicating that you are looking for a teammate for the Dual Destiny mission.
- Discord Servers: Discord servers dedicated to Destiny 2 are another excellent resource. Many servers have channels specifically for finding fireteams.
- Social Media: Social media platforms such as Twitter and Facebook can also be used to find players. Post a message indicating that you are looking for a teammate for the Dual Destiny mission, and include relevant hashtags such as #Destiny2 and #DualDestiny.
- In-Game Chat: Use the in-game chat to ask if anyone is interested in running the Dual Destiny mission. You may be able to find a teammate who is already in the game.
When looking for a teammate, be sure to specify your subclass alignment and any other relevant information, such as your experience level and preferred playstyle. This will help you find a teammate who is a good fit for your needs.
16. Optimizing Your Build for the Dual Destiny Mission
Optimizing your build is essential for maximizing your effectiveness in the Dual Destiny mission. Here are some tips for optimizing your build:
- Choose the Right Subclass: Choose a subclass that is well-suited for the Dual Destiny mission. For example, a Well of Radiance Warlock is great for providing sustained healing and damage buff during boss damage phases.
- Select Complementary Exotics: Select exotic armor pieces and weapons that complement your subclass and playstyle. For example, if you are using a Well of Radiance Warlock, consider using the Lunafaction Boots exotic armor to increase your weapon reload speed.
- Utilize Mods: Utilize armor mods to enhance your abilities and compensate for any weaknesses. For example, use mods that increase your weapon reload speed or reduce incoming damage.
- Optimize Stats: Optimize your stats to maximize your effectiveness in combat. For example, increase your Resilience to reduce incoming damage and your Recovery to increase your health regeneration rate.
- Consider Weapon Perks: Consider the perks on your weapons when choosing your loadout. For example, look for weapons with perks that enhance damage against specific enemy types, such as Taken or Unstoppable Champions.
- Test Your Build: Test your build in a variety of situations to see how it performs. This will help you identify any weaknesses and make adjustments as needed.
By optimizing your build, you can significantly increase your effectiveness in the Dual Destiny mission and improve your chances of success.
17. Using The Environment To Your Advantage
In the Dual Destiny mission, the environment can be both a challenge and an asset. Here are some ways to use the environment to your advantage:
- Utilize Cover: Utilize cover to protect yourself from enemy fire. Stay behind walls, pillars, and other objects to avoid being hit.
- Use High Ground: Use high ground to gain a tactical advantage over your enemies. From high ground, you can see enemies more easily and have a better line of sight for shooting.
- Exploit Chokepoints: Exploit chokepoints to funnel enemies into a narrow area, making them easier to eliminate.
- Use Explosive Hazards: Use explosive hazards such as explosive barrels to damage or eliminate groups of enemies.
- Take Advantage of Gravity Lifts: Take advantage of gravity lifts to quickly move between different areas of the environment.
- Use Environmental Objects for Cover: Use environmental objects such as crates and barrels for cover. These objects can provide temporary protection from enemy fire.
By using the environment to your advantage, you can gain a tactical edge over your enemies and increase your chances of success in the Dual Destiny mission.
18. Maintaining Momentum During Encounters
Maintaining momentum during encounters is crucial for completing the Dual Destiny mission efficiently. Here are some tips for maintaining momentum:
- Keep Moving: Keep moving to avoid being an easy target for enemies. Don’t stay in one place for too long.
- Communicate: Communicate with your teammate to coordinate your actions. Let them know when you are moving, when you are engaging enemies, and when you need help.
- Prioritize Targets: Prioritize targets to eliminate the most dangerous enemies first. Focus on enemies that are dealing the most damage or that are disrupting your team’s strategy.
- Use Abilities Frequently: Use your abilities frequently to clear adds, control areas, and deal damage to bosses. Don’t save your abilities for a special occasion.
- Reload Strategically: Reload strategically to avoid running out of ammo at the wrong time. Reload when you are in cover or when your teammate is engaging enemies.
- Stay Focused: Stay focused on the task at hand. Avoid distractions and concentrate on executing your team’s strategy.
By maintaining momentum during encounters, you can complete the Dual Destiny mission more efficiently and increase your chances of success.
19. Adapting To Enemy Types
The Dual Destiny mission features a variety of enemy types, each with its own strengths and weaknesses. Here’s how to adapt to different enemy types:
- Taken: Taken enemies are highly mobile and can teleport frequently. Use weapons with high accuracy and stability to track their movements.
- Dread: Dread enemies are heavily armored and can withstand a lot of damage. Use weapons with high impact and armor-piercing rounds to penetrate their armor.
- Servile: Servile enemies are weak but can overwhelm you in large numbers. Use weapons with high rate of fire and area of effect to clear them quickly.
- Wizards: Wizards can cast powerful spells and shield themselves and their allies. Use weapons with high damage output and anti-barrier rounds to break their shields and eliminate them quickly.
- Champions: Champions are powerful enemies with unique abilities and immunities. Use the appropriate champion mods on your weapons to stun and defeat them.
By adapting to different enemy types, you can maximize your effectiveness in combat and increase your chances of success in the Dual Destiny mission.
20. Effective Team Roles and Responsibilities
In the Dual Destiny mission, establishing clear roles and responsibilities for each player can significantly enhance your team’s performance. Here are some effective team roles and responsibilities:
- Ad Clearer: The ad clearer is responsible for eliminating adds and keeping the area clear of enemies. They should use weapons with high rate of fire and area of effect.
- Puzzle Solver: The puzzle solver is responsible for identifying symbols, communicating their positions, and shooting the correct splinters. They should be familiar with the symbols from the Vow of the Disciple Raid and the Preservation mission.
- Boss Damager: The boss damager is responsible for dealing damage to the bosses. They should use weapons with high damage output and sustained DPS.
- Support: The support player is responsible for providing healing, buffs, and crowd control. They should use subclasses and abilities that enhance their team’s survivability and damage output.
By assigning clear roles and responsibilities, you can ensure that each player knows what they need to do and that your team is working together effectively.
FAQ Section
Here are 10 frequently asked questions about the Dual Destiny mission in Destiny 2:
- What are the subclass requirements for the Dual Destiny mission?
- One player must use a Light subclass (Solar, Arc, Void), and the other must use a Darkness subclass (Stasis, Strand).
- How do I unlock the Dual Destiny mission?
- Complete an Overthrow run in the Landing, Blooming, and Impasse, defeat the Hive Secret-Keepers, follow the green light to Savathun’s statue, defeat Dread Expector bosses, and deposit the orbs.
- What are the key mechanics in the mission?
- Symbol recognition, clockface puzzle solving, and Light/Darkness alignment coordination.
- What are the best weapons to use in the mission?
- Weapons with high damage output, anti-barrier capabilities, and good add-clearing potential.
- How important is communication in this mission?
- Communication is crucial for coordinating actions, calling out symbols, and solving puzzles effectively.
- What should I do if I get stuck in the environment?
- Try using abilities to move, ask your partner for help, or restart the encounter if necessary.
- Can I complete the Dual Destiny mission solo?
- No, the Dual Destiny mission requires two players due to its mechanics.
- What rewards do I get for completing the mission?
- You will receive Exotic Class items for Prismatic Subclasses.
- What is the “Prepare for Battle or Choose Peace” choice at the end?
- It’s a narrative choice with unique dialogue but does not affect the mission rewards.
- What if we can’t recognize the symbols quickly enough?
- Practice beforehand, use a cheat sheet, and communicate clearly to ensure accurate callouts.
Facing difficulties in finding reliable information on the ever-changing regulations? Confused by conflicting standards and unsure how to apply them effectively? Concerned about the ethical implications of your actions and the potential legal ramifications of non-compliance?
Visit CONDUCT.EDU.VN for detailed guidelines and valuable resources on rules of conduct, offering clarity and confidence in navigating complex situations. Contact us at 100 Ethics Plaza, Guideline City, CA 90210, United States. WhatsApp: +1 (707) 555-1234. Website: conduct.edu.vn.