In this Diablo 4 Spiritborn Jaguar Endgame Build Guide, we will explore a powerful and engaging setup designed for tackling Torment 2 and 3 difficulties. While Diablo 4 builds often lean towards simplified, one-button gameplay for maximum efficiency, this Spiritborn build takes a different approach. Inspired by the fun and active playstyle of the Unleashed Hunter leveling build, this Jaguar iteration prioritizes engaging gameplay, impressive Area of Effect (AOE) damage, and robust survivability through substantial healing. Forget monotonous button mashing; this build is about dynamic action and visual flair.
This build was rigorously tested during the review phase, progressing from level 60 to Paragon 150, comfortably clearing content up to Torment 3. While time constraints prevented extensive Torment 4 testing at the time, the build demonstrated significant potential and, more importantly, remained consistently fun and engaging to play. It effortlessly handled world bosses, tormented bosses like Andariel and Duriel, Nightmare Dungeons, Helltides, and various other endgame activities in Tier 2. With optimized gear, including Ancestral items and Tempering Manuals, it is fully capable of excelling in Torment 3.
The foundation of this Diablo 4 build lies in the synergy of several potent Unique items, which, since Patch 2.0 and the Vessel of Hatred expansion, are considerably more accessible. By the time you reach Torment difficulty, you’ll likely have accumulated a substantial collection of Uniques. Your gear progression should focus on acquiring items with beneficial affixes such as resistances, core stats, attack speed, critical strike chance, critical damage vs. vulnerable enemies, ultimate skill damage, and movement speed, alongside cooldown reduction. If you encounter difficulty obtaining specific items, target summonable bosses or utilize specific offerings at the Undercity in Kurast. Seasonal Quest Rewards, Mercenary Caches, and Season progression also offer valuable loot. Furthermore, the Mercenary Den’s Bartering system provides a quick method to enhance your Aspects by purchasing and deconstructing aspect bundles to imprint improved versions.
Gameplay with this build dynamically adapts based on your gear optimization and the content you’re facing. Initially, with less cooldown reduction, you will rely more on your core skill, Rake. However, as you refine the build towards its optimal state, cooldowns become negligible, allowing for near-constant uptime on buffs, debuffs, and your ultimate skill. This culminates in a whirlwind of fire claws and tornado-like devastation, all while leaping across the screen with abandon. The build’s inherent healing from Vigor expenditure mitigates the chaos of numerous on-screen effects, ensuring survivability amidst intense combat.
Remember these key steps to unleash the Fire Wolverine within:
Diablo 4 Fire Wolverine Spiritborn Endgame Build: Skill Tree Breakdown
This build primarily utilizes skills from the Jaguar tree, supplemented by single skills from both the Gorilla and Eagle trees. The Jaguar skill tree centers on melee fire damage, emphasizing high critical strike chance, damage, and attack speed. We combine this with the Eagle’s Vortex skill to group enemies and the Gorilla’s Armored Hide for crucial damage reduction.
The skill unlock order is flexible, particularly for endgame characters with ample skill points. However, if you are adopting this build earlier, prioritize progressing down the Jaguar tree to unlock the ultimate skill and key passive. Subsequently, circle back to acquire supplementary passives and buffs.
The core strategy for skill allocation is to maximize your core attack, Rake, for AOE damage and cooldown reduction. Attacking with Rake is also a vital healing component of the build. As you level, unlock Ravager for a significant buff, the Eagle’s Vortex to pull enemies into melee range, and Counterattack to bolster dodge chance and critical damage (up to 30%). Focus on progressing down the Jaguar tree to quickly access the ultimate skill. Prioritize Potent & Furnace for damage and critical damage buffs. Finally, obtain The Hunter and its enhancements before securing the crucial Key Passive, Adaptive Stances.
Adaptive Stances is paramount as it grants a +50% bonus to all core stats each time you switch skill lines. This ensures that the demanding stat requirements on your Paragon Board’s rare and magic nodes are consistently met, especially during combat where skill line rotation is frequent. Lastly, incorporate damage reduction from the Gorilla tree and further passive boosts according to your gear and playstyle. This build offers flexibility, allowing for personal experimentation with passives.
Adapt your skill choices to complement your gear and preferred playstyle. The essential elements are a reliable source of Vulnerable, a consistent healing mechanism, and sufficient damage to enable constant Ultimate cooldown resets.
| Skill | Points |
|---|---|
| Thrash | 1 |
| Enhanced Thrash | 1 |
| Rake | 5 |
| Enhanced Rake | 1 |
| Advantageous Rake | 1 |
| Vigorous | 3 |
| Vortex | 1 |
| Enhanced Vortex | 1 |
| Replenishing Vortex | 1 |
| Focal Point | 1 |
| Diminishment | 3 |
| Apex | 3 |
| Mirage | 3 |
| Unrestrained Power | 3 |
| Ravager | 5 |
| Enhanced Ravager | 1 |
| Measured Ravager | 1 |
| Armored Hide | 1 |
| Enhanced Armored Hide | 1 |
| Endurance | 1 |
| Fueled | 3 |
| Counterattack | 5 |
| Counterattack Enhancement | 1 |
| Reinforced Counterattack | 1 |
| Potent | 3 |
| Furnace | 3 |
| Unrestrained | 3 |
| Endurance | 1 |
| Fueled | 3 |
| Potent | 3 |
| Furnace | 3 |
| The Hunter | 5 |
| Harmonious Hunter | 1 |
| Exalted Hunter | 1 |
| Resolution | 3 |
| Sustenance | 3 |
| Spiritual Attunement | 1 |
| Supremacy | 3 |
| Adaptive Stances | 1 |


Spirit Hall Choices for Jaguar Domination
Our Spirit Hall choices further reinforce the Jaguar theme. We aim to maintain maximum ferocity and amplify the effectiveness of our Jaguar skills.
Selecting Jaguar in the Spirit Hall initially provides a damage boost after repeated Jaguar skill usage. A second Jaguar selection enhances Ferocity accumulation, granting +1 Ferocity upon enemy kill or boss damage, ensuring near-permanent Ferocity maximization during active play.
Diablo 4 Jaguar Spiritborn Endgame Build: Gear, Aspects, and Tempering
This build’s effectiveness is significantly influenced by gear. Prioritize the unique farming methods mentioned earlier to acquire the necessary items, ideally with Greater Affixes, to maximize power and advance into Torment 3 and 4.
Legendary Aspects and Unique Item Powers
Focus on acquiring gear with affixes that enhance Dexterity, Cooldown Reduction, Critical Strike Chance, Counterattack & Passive skill ranks, Critical Damage, Vulnerable Damage, Life, and Armor. Elemental resistances become increasingly important as you progress into Torment 3 and 4, often addressed through Mythic items in true endgame builds.
Helmet: Loyalty’s Mantle
- +x All Stats
- +x% Damage
- +x% Critical Strike Chance
- x% Damage Reduction
- + 3-4 ranks Velocity
- While your Spirit Hall choices match, their bonuses are 100% more potent, and Skills with that Base Spirit cost 60% less and have a 60% reduced Cooldown.
Loyalty’s Mantle is an exceptional helmet choice, providing a substantial 60% cooldown reduction. The additional stats, damage, and flat damage reduction are highly beneficial. Greater Affixes on this item can further enhance its effectiveness.
Chest Armor: Jacinth Shell
- +x Max Life
- +x Life on Hit
- +x% Damage Reduction while Injured
- +3 to Endurance
- Spending Vigor Heals you for ~10% of your Maximum Life.
- Every second, your active Cooldowns now drain 10% of your Maximum Life to reduce their durations by 3 seconds.
Jacinth Shell is the cornerstone of this build. It enables near-zero cooldowns by sacrificing life, which is immediately replenished by spending Vigor. Spamming Rake while your ultimate is on cooldown becomes a life-sustaining action, simultaneously reducing cooldowns. This creates an engaging “pay attention” dynamic, as neglecting to attack can be detrimental. However, during active combat, its synergy is remarkable.
Gloves: Fell Soothsayer Aspect
- Fell Soothsayer Aspect: When you cast an Incarnate Skill, enemies around you become Vulnerable for 5 seconds. Killing a Vulnerable enemy echoes 55% [15 – 55]% of the killing blow’s Base damage to another Nearby enemy. (Spiritborn Only)
With frequent Incarnate skill usage, the Fell Soothsayer Aspect ensures near-constant Vulnerable status on enemies across the screen. The damage echo effect triggers chain reactions, amplifying AOE damage significantly.
- Affixes:
- + Critical Strike Chance
- + Critical Strike Damage
- + Dexterity
- + Attack Speed
- + Vulnerable Damage
- + Armor
- Temper: Lucky Hit Chance to Immobilize
- Temper: Ultimate Damage
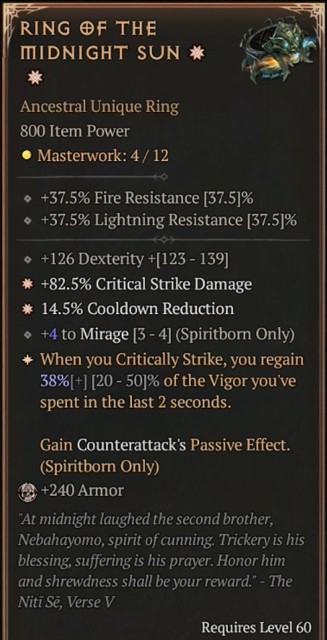
Leg Armor: Tassets of the Dawning Sky
- +x All Stats
- +x% Movement Speed
- +2.5% Maximum Resistance to All Elements
- +35.0% Resistance to All Elements
- When you take damage from a Non-Physical damage type, you gain 15.0%[+] Maximum Resistance to that damage type for 6 seconds. This effect can only apply to one damage type at a time.
Tassets of the Dawning Sky provides substantial resistances, especially with Greater Affixes to Resistance to All Elements. While alternative leg armor options exist for players prioritizing offense, the robust defense offered by these pants is invaluable, particularly in higher Torment levels.
Boots: Rakanoth’s Wake
- +18.0% Movement Speed
- +75.0% Non-Physical Damage
- +35.0% Resistance to All Elements
- 8.8% Cooldown Reduction
- When you cast a Skill with a Cooldown, you explode, dealing X Fire damage.
Rakanoth’s Wake boots are exceptional for resistance stacking and offer valuable movement speed, cooldown reduction, and a significant boost to non-physical damage (encompassing all damage types for this build). The on-cast fire explosion synergizes perfectly with our fire-damage focus and frequent cooldown skill usage.
Weapon: Two-Handed Polearm
Two-handed Polearms offer inherent “Damage to Vulnerable Enemies,” a crucial stat for this build. Quarterstaves provide block chance, which is less relevant, while Glaives offer “Damage to Elites.” Consider your preference between Vulnerable damage and Elite damage when choosing a weapon type.
- Aspect of the Wild Claws: Rake manifests a Spirit Jaguar which also casts Rake at a random enemy, dealing [90 – 130]% Base damage. (Spiritborn Only)
Aspect of the Wild Claws is highly recommended, especially when amplified by a two-handed weapon. It effectively doubles your Rake output, providing substantial AOE damage, even to targets outside your immediate focus.
- Affixes:
- + Dexterity
- + Critical Strike Damage
- + Vulnerable Damage
- Temper: Jaguar Augments (Rake or Hunter are best)
- Temper: Wordly Finesse or Sharpened Finesse (Core Skill damage, Ultimate Damage, Critical Strike Damage)
Alternative Weapon: Glaive – Wushe Nak Pa
- +313.0% Ultimate Damage
- +42 Vigor On Kill
- +3 to Supremacy
- +16.0% Critical Strike Chance
- Casting an Ultimate Skill grants you its matching Primary Spirit Hall Bonus and increases All Skill Ranks by 10[+] for 15 seconds.
- Your Ultimate Skills each gain an additional Skill Type:
- The Seeker is a Focus Skill.
- The Hunter is a Mobility Skill.
- The Devourer is a Potency Skill.
- The Protector is a Defensive Skill.
Wushe Nak Pa is a unique Glaive designed for ultimate-centric builds. The +3 to Supremacy is particularly valuable. Consider this option if you acquire it, especially a Star version with enhanced ultimate bonuses. While you sacrifice Vulnerable damage and potential Greater Affixes, the ultimate skill enhancements can significantly empower The Hunter.
Amulet: Aspect of Plains Power
- Aspect of Plains Power: Lucky Hit: Up to a 25%[+] chance to create a Mystic Circle for 10 seconds. Casting a Jaguar Skill in Mystic Circles empowers them to keep your Ferocity at Maximum and increase your damage by [5 – 10]%[x] per stack while you remain within. (Spiritborn Only)
Aspect of Plains Power generates a Mystic Circle beneath you, providing a damage buff and maintaining maximum Ferocity while inside. Given the build’s high Lucky Hit chance, this circle is frequently active, offering a substantial advantage against bosses and during prolonged engagements.
- Affixes:
- + Critical Strike Chance
- + Cooldown Reduction
- + Attack Speed
- + Passive Skills
- + Max Life
- Temper: Ultimate Damage
- Temper: Jaguar Efficiency (Hunter Cooldown Reduction)
Ring 1: Accelerating Aspect
- Accelerating Aspect: Critical Strikes with Core Skills increase your Attack Speed by 30.0%[+] for 5 seconds.
High attack speed is critical for both damage output and survivability in this build. Accelerating Aspect, triggered by Rake’s frequent critical strikes, ensures consistent attack speed maximization.
- Affixes:
- + Critical Strike Chance
- + Attack Speed
- + Critical Damage or Vulnerable Damage
- Temper: Vulnerable Damage
- Temper: Jaguar Efficiency (Hunter Cooldown Reduction)
Ring 2: Ring of the Midnight Sun
- Implicit Modifiers:
- +12.5% Resistance to All Elements
- +5.0% Resistance to All Elements
- Unique Modifiers:
- +69.2% Damage to Elites
- +10.0% Attack Speed
- +3 to Mirage
- +50.0% Critical Strike Damage
- Critical Strikes restore 30%[+] of the Vigor you have spent in the last 2 seconds, increased by your Critical Strike Damage Bonus. Gain Counterattack’s Passive Effect.
Ring of the Midnight Sun is perfectly synergistic with this build. It provides valuable resistances, damage to elites, attack speed, and critical strike damage. Crucially, it restores Vigor on critical strikes, mitigating resource constraints and further enhancing sustain when combined with Paragon points. The included Counterattack passive effect is also a significant bonus.
Gems and Runewords
Gems and Runewords offer further customization. Runewords are expansion-specific but may be obtainable through trading. Gem drop rates seem to increase with Paragon level.
- Weapon: Topaz (Ultimate Damage) or Emeralds (Critical Damage).
- Armor: Emeralds (Dexterity). ZanGar Runeword (Ultimate cast grants +12% Crit Strike Chance for 5s, stacking up to 20%).
- Jewelry: Skulls (Armor). Alternatively, Diamonds for resistances if armor is sufficient.
Mercenary Choice: Varyana, The Berserker Crone
Varyana is the optimal Mercenary choice due to her attack speed buffs, directly enhancing the build’s core mechanics. Recruit Varyana early and level her Rapport by defeating Elites to unlock her skill points.
For Reinforcements, Raheir, The Shieldbearer, can provide Fortify for added defense. However, Varyana’s consistent attack speed buff is generally more impactful.
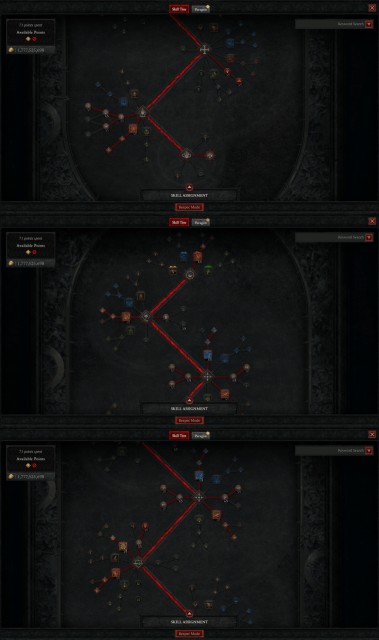
Paragon Boards: Charting Your Endgame Path
This Diablo 4 build guide focuses on progression through Torment 1-3. Torment 4 optimization necessitates Mythic items and highly refined gear, which will be addressed in a separate, dedicated guide focused on advanced Diablo 4 Build Guides.
Paragon progression is crucial for Torment difficulty. Prioritize Ancestral gear with Greater Affixes and strategically level your Paragon Boards and Glyphs. The Scroll of Amnesia allows for easy Paragon and Skill Point resets, facilitating experimentation.
Starting Board
- Navigate right and up towards the Glyph socket, prioritizing Dexterity nodes.
- Glyph: Wildfire
- For every 5 Dexterity in range: +2.0% Fire Damage.
- Bonus: Lucky Hit: Fire damage has up to 30% chance to reduce cooldowns by 0.5s.
- Requirement: +40 Dexterity in range.
- Legendary Bonus: +1.0%[x] Fire Damage.
- Level Wildfire to 15 initially to maximize radius, then prioritize radius on subsequent Glyphs before leveling to 45.
- After Glyph placement, take Dexterity nodes downwards (optional Health nodes based on survivability), then magic and rare nodes above the Glyph.
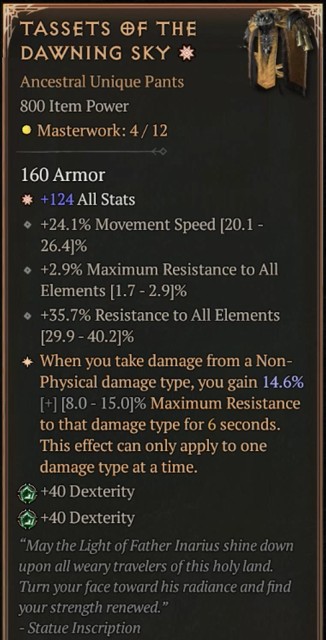
Second Board: Sapping
- Board Effect: Casting 3 Gorilla, Jaguar, Eagle, or Centipede skills in a row restores 15% Vigor and +30% damage for 5s.
- Essential for Vigor management during gear acquisition.
- Place Legendary Node optimally, prioritize Opportunist and the node to the right.
- Glyph: Ritual (in Glyph socket)
- For every 5 Intelligence in range: +2.0% Mystic Circle potency.
- Bonus: In Mystic Circle: +10%[x] damage, -10%[x] damage taken.
- Requirement: +25 Intelligence in range.
- Legendary Bonus: +5.0%[x] Damage.
- Prioritize Intelligence nodes within Glyph radius. The Mystic Circle buff significantly enhances survivability and damage, especially in Torment 3.
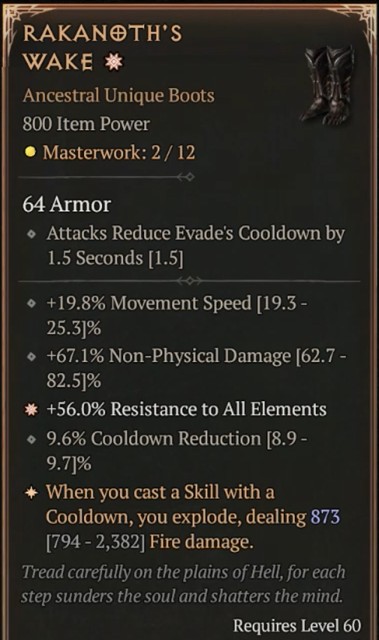
Third Board: In-Fighter
- Board Effect: Dodge/Block and attack: +2% Attack Speed, +1% damage for 5s (stacks to 9).
- Legendary Node provides dodge and attack speed, allowing gear flexibility.
- Glyph: Hone (in Glyph socket)
- For every 5 Strength in range: +2.0% Jaguar skill damage.
- Bonus: Jaguar skill damage: +1%[+] Critical Strike Chance for 6s (stacks to 10%).
- Requirement: +25 Strength in range.
- Legendary Bonus: +8%[x] Critical Strike Damage.
- Prioritize damage nodes near Glyph. Optional survivability nodes available. Maximize Critical Strike Chance and Damage.
Fourth Board: Revealing
- Board Effect: Lucky Hit: 30% chance to Knock Down Vulnerable enemies. +30%[x] damage to Crowd Controlled enemies.
- Adds crowd control utility.
- Glyph: Innate (in Glyph socket)
- For every 5 Strength in range: +2.0% Incarnate skill damage.
- Bonus: Incarnate skill cast: -15%[x] damage reduction for 7s.
- Requirement: +25 Strength in range.
- Legendary Bonus: +5.0%[x] Damage.
- Rare nodes near Glyph provide Vulnerable and Crowd Controlled enemy damage. Enhances survivability for Torment 3 progression. Take attack speed nodes en route to the Legendary Node.
Fifth and Sixth Boards: Aim for Convergence or Drive boards and Turf or Spirit Glyphs for further endgame optimization (beyond the scope of this initial Torment 1-3 guide).
Final Thoughts on Diablo 4 Build Guides and the Spiritborn Jaguar
This Diablo 4 Spiritborn Jaguar build is deliberately designed to be engaging and active, departing from simplistic “press-to-win” builds. It offers a refreshing and versatile playstyle within the Spiritborn class. The Jaguar build is exceptionally fun, boasting excellent clear speed even with suboptimal gear and without overly complex Paragon board min-maxing.
Embrace the build’s dynamic nature and participate actively in combat. There’s always an engaging skill to utilize, ensuring a constantly stimulating gameplay experience. This build captures the essence of a self-healing Wolverine archetype within Diablo 4, highly recommended for players seeking an exhilarating and adaptable playstyle capable of Torment 4 progression with further refinement.
Stay tuned for more Diablo 4 build guides and content. Share your class preferences and season priorities to help us create the Diablo 4 build guides you need! Explore the Diablo IV Wiki and Diablo 4 Map for additional resources, and look forward to our upcoming Class Build Leveling and Endgame Guides!