Hot Questions About EasyTether
How to Bypass Carrier Tethering Blocks (e.g., T-Mobile, MetroPCS) with EasyTether
Many mobile carriers attempt to detect and block tethering by inspecting the user agent string in your HTTP traffic. This string, which identifies your web browser, varies between different browsers. Fortunately, you can easily circumvent this restriction by modifying the user agent string within your computer’s web browser. This simple tweak allows you to bypass tethering detection and utilize your data connection freely.
EasyTether Free vs. Paid Versions: Understanding the Differences
EasyTether comes in both free (Lite) and paid versions. The EasyTether Lite version has limitations: it blocks secure websites (HTTPS, port 443), including services like Gmail, Facebook, Amazon, and eBay. It also restricts UDP-based applications, such as L2TP VPNs, most instant messaging apps, and online gaming on Xbox 360, PS3, and Wii, after a certain usage period. Upgrading to a paid/activated version removes these restrictions entirely, providing unrestricted access to all internet services and applications.
Is EasyTether a Subscription or a One-Time Purchase? Are There Additional Tethering Fees?
EasyTether is a one-time purchase application, not a subscription service. There are no recurring tethering fees from us. EasyTether utilizes your existing mobile data connection, just like any other app on your smartphone (e.g., email or YouTube). Therefore, you are subject to your mobile carrier’s data plan and fees, not ours.
It’s important to note that while many data plans are advertised as “unlimited,” they often have data caps. Carriers may throttle your bandwidth if you exceed a certain amount of data usage per month, typically several gigabytes. Check your carrier’s terms and conditions for details on your data plan’s limitations.
Using EasyTether on Multiple Computers and Operating Systems
Yes, you can install the computer-side software on multiple computers or different operating systems with a single license. An EasyTether license is linked to one smartphone, allowing you to set up tethering on as many computers as needed. The easiest way to configure EasyTether on a new computer is by re-running the setup wizard directly from the EasyTether application on your smartphone.
Will EasyTether Void My Phone’s Warranty?
No, using EasyTether will not void your phone’s warranty. Unlike many other tethering apps, EasyTether does not require root access to your Android device. It operates using official Android APIs as a standard, low-privilege application. This ensures it adheres to your phone manufacturer’s guidelines and does not compromise your warranty.
EasyTether Compatibility with Latest Android Versions
EasyTether is designed for broad compatibility, working with all Android versions from 1.5 up to Android 9, including Android 8, 7, 6, 5, 4, and 2. For newer Android versions, it’s essential to update the computer-side software to the latest version available on our drivers page.
Specific compatibility notes:
- Android 9+: Ensure you are using computer-side software version 1.3.4 or later for Windows, b15 or later for macOS, or 0.8.9 or later for Linux/BSD.
- Android 4.2.2+: Use any computer-side software version released after 2014 (v1.3+, b7+, 0.8+). For optimal performance and compatibility, we recommend upgrading to the latest version.
Pre-Purchase Questions about EasyTether
How to Purchase EasyTether: Buying Options Explained
You have several convenient options to purchase EasyTether activation codes:
- Directly from our website: Buy EasyTether activation code from our site. We accept payments via PayPal, and major credit and debit cards. Upon successful payment, you will immediately receive your EasyTether Lite activation code.
- Google Play Store: Purchase directly through the Google Play Store app on your Android smartphone. For detailed information on payment methods and purchasing through Google Play, refer to Google’s Google Play Store Help.
- Amazon App Store: EasyTether is also available for purchase on the Amazon App Store.
Purchasing and Activation FAQs
Re-installing EasyTether Purchased from Google Play or Amazon App Store
For EasyTether copies purchased through Google Play or the Amazon App Store, you do not need an activation code for re-installation. To re-install, simply download the pre-activated version directly from the store where you made your purchase. First, uninstall any free EasyTether versions currently on your smartphone.
In some cases, particularly with Google Play Store purchases, certain carriers may restrict the visibility of tethering applications, preventing you from re-downloading your purchase for free. This is never an issue with Amazon App Store purchases. If you encounter this issue with a Google Play purchase, locate your Google order number (instructions on how to find it are available here) and contact us. We will provide an alternative download link for you.
These instructions apply specifically to the smartphone-side application. For re-downloading the computer-side software, please refer to the instructions in the Using EasyTether on Multiple Computers and Operating Systems section.
Re-activating EasyTether Purchased from Mobile Stream
If you purchased EasyTether directly from Mobile Stream, do not attempt to download pre-activated versions from Google Play or Amazon App Stores. Instead, activate your Mobile Stream purchase by entering the five-digit activation code provided in your purchase confirmation email. This code should be entered into the free EasyTether Lite app, which you can download from the Google Play Store or directly from our site. You might need to enable “Unknown sources” in your phone’s settings (Settings → Applications → Unknown sources) to install the app from our site.
If you receive an “Activation code is invalid” error, it’s likely because you have changed smartphones. Activation codes are tied to your device’s unique IMEI/MEID number. To resolve this, email us your phone’s IMEI/MEID (exactly as displayed in EasyTether → Activate EasyTether → Enter code) along with your purchase confirmation email or the email address used for purchase. We will assist you with the reactivation process.
Troubleshooting Purchase Issues via Google Play
Occasionally, users encounter issues purchasing EasyTether through the Google Play Store. This is often due to a known bug in the Google Play system where Google Checkout may fail to authorize payment, causing the Play Store to freeze during the download process. Order processing is managed entirely by Google, and as developers, we have no control over these payment issues.
If you experience purchase problems:
- Contact Google Play Support: Report the issue to the Android Market support team.
- Request a Refund: If the purchase fails, request a refund for the order, keeping in mind Google Play’s refund policies and allowed refund period (consult Google Play policies). Consider purchasing through an alternative method as described in the How to Purchase EasyTether: Buying Options Explained section. If the refund period has expired, send your order number to our support email. We will arrange a direct download link from our site.
Installation (General) Questions
Resolving Issues Copying Downloaded Drivers from Phone to Computer
Generally, Android smartphones support file copying via USB as a standard feature, independent of EasyTether. If you are having trouble, ensure you follow these steps and consult your phone’s user guide for specific instructions if needed.
- Connect via USB: Connect your Android smartphone to your computer using a USB data cable.
- Mount SD Card: On your Android device, pull down the notification bar and tap “Mount” or a similar option. This action makes your phone’s SD card accessible from your computer as a removable drive.
- Locate and Copy Drivers: Look for the EasyTether computer-side software packages in the “downloads” folder on your phone’s SD card. Copy these files to your computer’s hard drive before running the installers. Do not run the installers directly from the mounted SD card. Once copied, launch the installer on your computer and follow the on-screen instructions.
Re-installation After Upgrading from EasyTether Lite to Paid Version
No, you do not need to reinstall the computer-side software when you upgrade from EasyTether Lite to the paid version. The same applies to smartphone-side application updates. Only reinstall the computer-side software if explicitly instructed to do so, typically when upgrading to a significantly newer version of EasyTether or when troubleshooting specific issues.
Installing EasyTether on AT&T Smartphones
Installing EasyTether on AT&T smartphones is now straightforward. Download EasyTether Lite directly from the Google Play Store and follow the standard installation prompts. If you cannot find the app in the Google Play Store, contact our support team, and we will provide instructions to work around this issue.
Installation (Windows) Troubleshooting
“EasyTether Requires Service Pack for Windows” Error
This error indicates that your Windows operating system is outdated and requires a service pack update. EasyTether needs the latest service packs to function correctly. Please refer to the official Microsoft articles for instructions on updating your Windows version:
- Windows Vista: How to obtain the latest Windows Vista service pack
- Windows XP: How to obtain the latest Windows XP service pack
“Installation Ended Prematurely” Error on Windows
If you encounter an “Installation ended prematurely” message or a similar error when installing EasyTether on your Windows computer, especially Windows XP, driver signing settings might be the cause.
For Windows XP users:
- Go to Control Panel → System → Hardware tab → Driver Signing.
- Verify that the “Warn – Prompt me each time to choose an action” option is selected. If it is already selected, or if you are using Windows 8.1, 8, 7, or Vista, the issue might be interference from third-party applications.
Try temporarily disabling any third-party security software or applications that could potentially block the installation of non-WHQL (Windows Hardware Quality Labs) drivers. After installation, you can re-enable these applications.
“This Installation Package is Not Supported by This Processor Type” Error
This error typically occurs when you attempt to install the 64-bit EasyTether computer-side software package (easytether_x64.msi) on a 32-bit version of Windows. Download the unified installation package instead, as it supports both 32-bit and 64-bit Windows systems.
It’s important to note that having a 64-bit processor does not automatically mean you are running a 64-bit version of Windows. To determine whether your computer is running a 32-bit or 64-bit version of Windows, consult Microsoft’s support article.
Connection (General) Issues
VPN Connectivity Problems with EasyTether
EasyTether supports various VPN protocols, but compatibility depends on the VPN type and your EasyTether version.
- TCP and UDP-tunneled VPNs (SSL/TLS-based, L2TP, Cisco VPN – some types): These VPN types should generally work seamlessly with the paid/activated or unexpired free trial version of EasyTether. Ensure you are using a full version to avoid feature limitations.
- PPTP VPN: PPTP VPNs are not supported through EasyTether directly because GRE (Generic Routing Encapsulation) passthrough cannot be implemented on non-rooted smartphones. As a workaround, configure the PPTP VPN directly on your Android phone: go to Settings → Wireless & networks → VPN settings, set up your VPN connection there, and activate it on your phone before establishing the EasyTether connection from your computer. In the EasyTether app on your phone, set the “Resolver” option to “Built-in” instead of the default “Google Public DNS.”
- IPSec VPN: IPSec VPNs face the same limitations as PPTP VPNs. Use the same workaround: configure and activate the IPSec VPN on your phone first, then connect with EasyTether from your computer, ensuring the “Resolver” option is set to “Built-in.”
Tethering Android to PS3, Xbox 360, or Wii Consoles
To tether your Android phone to gaming consoles like PS3, Xbox 360, or Wii, you will need:
- Ethernet Cable: For physical connection to your console. Wii also requires the official Wii LAN Adapter from Nintendo (compatibility with third-party USB-to-Ethernet adapters may vary).
- Computer with Ethernet Port and EasyTether: A computer with a functional Ethernet port and a fully installed and configured EasyTether setup.
- Paid/Activated or Trial EasyTether: A smartphone with a paid/activated EasyTether version or an unexpired trial. These instructions will not work with the free, feature-limited version of EasyTether.
Connection Setup:
-
Enable Internet Connection Sharing (ICS) on your computer: Configure ICS for the EasyTether network adapter (not for the Ethernet port connecting to your console).
- Windows 7/Vista: Control Panel → Network and Internet → Network and Sharing Center → Change adapter settings (left sidebar) → Right-click the EasyTether network adapter (usually named “Local Area Connection N” where N is a number) → Properties → Sharing tab → Enable “Internet Connection Sharing”. If you see “Home networking connection”, select the Ethernet connection where your console will be connected.
- Windows XP: Control Panel → Network connections → Right-click the EasyTether network adapter → Properties → Sharing tab → Enable “Internet Connection Sharing”. Again, if “Home networking connection” is available, select the appropriate Ethernet connection.
-
Establish EasyTether Connection: Connect EasyTether from your computer and confirm the internet connection is working on your computer.
-
Connect Console: Connect your Xbox 360 / PS3 / Wii to your computer’s Ethernet port using an Ethernet cable. For Wii, use the USB-to-Ethernet adapter. Your console should now be able to access the internet through the EasyTether connection shared from your computer.
“Error code 67 registration failure PCS vision username and/or password may be incorrect” Message
This error message is not related to EasyTether. EasyTether does not display this error. This message indicates you are attempting to use your phone’s built-in tethering feature, which often requires a specific tethering plan from your carrier.
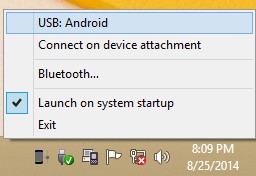
When using EasyTether, do not enable the built-in “Internet sharing” or “tethering” mode on your smartphone. Instead, when connecting your phone to your computer, select “Charge only” or “Disk drive” mode on your phone, and then click “USB: Android” in the EasyTether taskbar menu on your computer:
EasyTether Icon Missing from Windows Taskbar
If the EasyTether icon is not visible in your Windows taskbar, follow these steps to restore it:
-
Start EasyTether Manually: Open the Windows Start menu → All Programs → EasyTether. Left-click on “EasyTether” to manually launch the application. If “EasyTether” is not listed in your Start menu, ensure you have installed the core computer-side package from our drivers page.
-
Check Taskbar Icons: Look for the EasyTether icon in the Windows taskbar, usually located in the lower-right corner of your screen (system tray). If it’s not immediately visible, click the small Up arrow (or right-left arrow in Vista/XP) to expand the hidden icons area.
-
Restart EasyTether Process: If the icon is still missing, open Windows Task Manager (Ctrl+Shift+Esc), go to the “Processes” tab, find “easytthr.exe”, right-click on it, and select “End Process.” Then, relaunch EasyTether from the Start menu (step 1).
-
Access EasyTether Menu: Once the icon is visible in the taskbar, right-click on the EasyTether icon. You should see the EasyTether popup menu:
-
Connect via USB: Click the “USB: Android” option. If you see “No devices to connect” instead, refer to the Troubleshooting “No Devices to Connect” Error section.
Troubleshooting “No Devices to Connect” Error in Windows Taskbar Menu
Seeing “No devices to connect” instead of “USB: Android” in the EasyTether taskbar menu indicates a problem with device recognition. Device recognition is primarily dependent on the computer-side USB drivers and your phone’s USB settings, and is generally independent of the smartphone-side EasyTether application.
-
Enable USB Debugging: The first step is to check USB debugging settings on your smartphone. Go to Settings → Developer options → USB debugging and ensure it is enabled. (On older Android versions, this setting might be under Settings → Applications → Development → USB debugging). If “Developer options” is not visible in Settings, you may need to enable it by going to Settings -> About phone and tapping “Build number” multiple times until “Developer options” are enabled.
-
Vendor-Specific USB Drivers: If the problem persists, install supplementary USB drivers specific to your phone manufacturer.
- Samsung Smartphones: Install the Samsung USB driver from our site or the Samsung support site. Many Samsung phones since May 2011 include these drivers on built-in installation media.
- LG Smartphones (including Verizon models): Install the LG USB driver from the LG support page (preferred) or from our site. For LG devices running Android 5.0 or later, ensure you use PTP mode when connecting (MTP mode is often the default).
- Huawei Smartphones (including Verizon/T-Mobile/Vodafone models): Install the Huawei USB driver from the built-in installation media (the virtual CD-ROM drive that Huawei phones mount when connected). Huawei devices can have buggy USB debugging implementations. For best results, disconnect your phone, turn off USB debugging, reboot your phone, re-enable USB debugging, and then reconnect.
- Motorola Smartphones: Ensure USB mass storage mode is active on your phone, as some Motorola devices may ignore USB debugging in “Charge only” mode. If this doesn’t work, install the Motorola USB driver from their site.
- Casio G’zOne Commando: Install the Casio USB driver package (e.g., C771 USB Driver V1.0.11.0.msi) from the built-in installation media of your phone.
Connection (Windows) Troubleshooting
Cannot Open Web Pages After Successful EasyTether Connection
If you have established an EasyTether connection but cannot browse the internet, disable any other active network connections on your computer. Before connecting via EasyTether, disable any other LAN (Ethernet) or Wi-Fi connections on your computer. This ensures that EasyTether becomes the primary internet gateway.
“Connection Failed. Enable EasyTether Network Adapter in Network Connections” Error
This error message indicates that the EasyTether network adapter driver may have been disabled or removed.
-
Windows 10 Upgrade: If you recently upgraded to Windows 10, you likely need to update the EasyTether computer-side software to version 1.3.3 or later. Download the latest version from the EasyTether drivers page.
-
Other Windows Versions: If you are not using Windows 10, check Device Manager for the EasyTether network adapter.
- Open Device Manager (search for “Device Manager” in the Start menu).
- Expand “Network adapters.”
- Look for “EasyTether Remote NDIS Network Device” or a similar entry. If it has a warning icon or is disabled (greyed out):
- Enable Adapter: Right-click the EasyTether adapter and select “Enable.”
- If Adapter is Missing: If the adapter is not listed, disconnect your phone, close the EasyTether tray agent (if running), uninstall the EasyTether software from your computer, reboot, and then reinstall the latest version of the EasyTether computer-side software.
Unexpected “Connection Closed” or “Connection Dropped” Messages
If you experience frequent “Connection closed” or “Connection dropped” errors:
- Update Smartphone App: Ensure your smartphone-side EasyTether application is updated to version 1.1.18 or higher. Check the version number in the EasyTether app on your phone.
- Disable Task Killers: If you use any third-party task killer or task manager apps on your phone, either disable them entirely or add EasyTether to their exception list. These apps can sometimes prematurely close EasyTether processes running in the background, leading to connection drops.
Browser Still Trying to Dial-Up After Switching from Dial-Up
If your web browser is still attempting to use a dial-up connection even after you’ve switched to EasyTether, you may need to adjust your Internet Explorer settings.
- Open Internet Explorer: Launch Internet Explorer (even if you primarily use a different browser).
- Disable Dial-Up: Go to Tools → Internet Options (or Service → Options depending on your IE version) → Connections tab → LAN settings. Ensure “Automatically detect settings” is checked and “Use a proxy server for your LAN” is unchecked. Alternatively, in some IE versions, you might find an option like “Never dial a connection” or “Do not use dial-up connections” to enable.
Connection (Mac OS X) Specific Issues
ADB on Mac OS X Stops Recognizing Device After EasyTether Driver Install
Caution: This advice is intended for software developers using the Android SDK on macOS. If you are not a developer using ADB, you can disregard this section.
Installing the EasyTether driver on macOS can sometimes interfere with ADB (Android Debug Bridge) recognizing your Android device. To resolve this temporarily when you need to use ADB:
-
Unload EasyTether Driver: Open Terminal and run the command:
sudo kextunload /System/Library/Extensions/EasyTetherUSBEthernet.kextThis command unloads the EasyTether driver, allowing ADB to function correctly again.
-
Reload Driver (when needed): When you need to use EasyTether again, reload the driver using the command:
sudo kextload /System/Library/Extensions/EasyTetherUSBEthernet.kext
Connecting (Linux) Guide
Tethering with Ubuntu, Fedora, and Other Linux Distributions
To tether using EasyTether on Linux, first install the appropriate computer-side package from our drivers page. Refer to any distribution-specific notes below for additional configuration steps.
Establishing Connection:
-
Via USB: For EasyTether version 0.8.5 and later, USB hotplug is supported out-of-the-box. Ensure you enable the USB service within the EasyTether app on your phone before connecting the device to your computer.
Alternatively, open a command-line terminal (e.g., Terminal, Konsole) and run the following command as root:
/usr/bin/easytether-usb -
Via Bluetooth: First, pair your phone with your Linux computer using Bluetooth settings. Once paired, open a command-line terminal and run the following command as root:
/usr/bin/easytether-bluetooth xx:xx:xx:xx:xx:xxReplace
xx:xx:xx:xx:xx:xxwith your phone’s actual Bluetooth address, which is displayed in the EasyTether app on your phone’s main screen.You can use the
sudocommand to execute commands as root. EasyTether version 0.8.4 and later versions are designed for security: they drop root privileges (using a dedicated unprivileged user) and operate within a chroot(2) jail. Root privileges are only required to create the TUN/TAP interface and, on some Linux distributions, to access the USB device.
Distribution-Specific Notes:
-
Arch Linux and Derivatives (i686/x86_64): Configure the
tap-easytethernetwork interface on each successful connection attempt:systemctl start dhcpcd@tap\x2deasytetherAlternatively, enable and start the
dhcpcdservice for all network interfaces once:systemctl enable dhcpcd systemctl start dhcpcdFor ARM architectures, restart the
systemd-networkdservice once. -
Mageia 6: Mageia binaries rely on
systemd-resolved. Ensure/etc/resolv.confis a symbolic link to/run/systemd/resolve/resolv.conf(or edit/etc/nsswitch.confaccordingly) for DNS resolution to work correctly. -
openSUSE Leap: Automatic network interface configuration is only supported when using
wickednetwork management. -
Ubuntu 20.04, Mint 20, 19: Restart
systemd-networkdonce:systemctl restart systemd-networkd -
Ubuntu 18.04: Enable and start
systemd-networkdasifupdownscripts are no longer used by default:systemctl enable systemd-networkd systemctl start systemd-networkd -
Ubuntu 16.04, Debian 9/8, Mint 18: These versions offer near out-of-the-box USB hotplug support. Add the following line to your
/etc/network/interfacesfile:source-directory interfaces.d -
Ubuntu 14.04, Debian 7: Full USB hotplug support is available. No manual configuration is typically needed.
Connecting (OpenWrt / LEDE Router) Guide
Using EasyTether with OpenWrt / LEDE-based Routers
These instructions are for EasyTether router-side software version 0.8.9 and later.
- OpenWrt/LEDE Basics: Ensure you have basic knowledge of OpenWrt/LEDE, including package installation and administration via web UI or SSH.
- EasyTether Basics: Understand EasyTether fundamentals, particularly the importance of USB debugging on your Android device.
- Install Router-Side Package: Download and install the EasyTether router-side package from our drivers page onto your router. We provide ZIP archives for each supported OpenWrt/LEDE release, containing packages for all platforms, mirroring the structure of official OpenWrt / LEDE download pages (for dependency packages like
kmod-tun). Archives are categorized by “flavors”:- -openssl: Uses the OpenSSL library. Larger size, may not be suitable for routers with 4MB flash ROM.
- -mbedtls: Uses the mbedTLS library (libmbedtls) for a smaller footprint. Currently unavailable due to licensing restrictions.
- -tiny: Minimal build, requires only
kmod-tun. Use for older phones (pre-Android 4.2.2) or routers with very limited flash ROM. - -bluez: Includes the
easytether-bluetoothbinary. Bluetooth tethering on routers is uncommon, so this flavor is generally not published. Request via email if needed.
- Enable USB and Connect: Enable the USB feature in the EasyTether phone-side application on your Android device and connect it to your router via USB cable.
- RSA Key Generation: Cryptography-enabled builds generate an RSA key pair on the first launch. Wait, especially with
-mbedtlsflavor on low-end routers (up to 30 seconds). - Connection Status: Check the EasyTether phone-side application status. It should change to “Connection established.” On Android 4.2.2+, you’ll see an RSA fingerprint prompt – accept it.
- Configure OpenWrt Interface: Using the OpenWrt web UI, configure the EasyTether network interface (
tap-easytether) to use DHCP and add it to your WAN zone. Alternatively, configure via SSH by adding to/etc/config/network:config interface 'wan' option ifname 'tap-easytether' option proto 'dhcp'
Troubleshooting Router Connection:
- “Connection established” not appearing: First, ensure your router recognizes your phone’s ADB interface. Log into your router via SSH and run
/usr/bin/easytether-usb -l. If it shows nothing, follow system-agnostic parts of the Troubleshooting “No Devices to Connect” Error section. Also, check if the “tun” kernel module is loaded usinglsmod. - “Connection established” but no internet: Log into your router via SSH and verify
tap-easytetheris properly configured. Test withping 192.168.117.1(should receive replies) and check name resolution.
Connecting (FreeBSD / DragonFly BSD) Guide
Tethering with FreeBSD or DragonFly BSD
For FreeBSD and DragonFly BSD, follow the Linux-oriented USB setup wizard in the phone-side application for initial steps (computer-side package installation, USB debugging). BSD-specific steps are outlined below. (Note: tapX refers to tap0 unless otherwise specified).
- Restart devd(8): Restart
devd(8)to use configuration files in/usr/local/etc/devdin addition to the standard location. - Optional: Non-Default Interface: Optionally, add
-ttapXoption to the action line in/usr/local/etc/devd/easytether-usb.confto use a non-default network interface. - Optional: DHCP Configuration: Optionally, add
ifconfig_tapX="DHCP"to yourrc.conf(5). On FreeBSD,ifconfig_DEFAULT="DHCP"will also work. - Clone Interface and Restart: Add
tapXto thecloned_interfacesvariable inrc.conf(5)and apply changes withservice netif restart tapX. - Enable USB and Connect: Ensure USB service is enabled in EasyTether on your phone and connect it to your computer. Wait for the status to change to “Connection established.” On Android 4.2.2+, accept the RSA fingerprint prompt.
- Manual DHCP (if needed): If you didn’t configure
ifconfiginrc.conf(5), rundhclient tapXmanually. - Verify Configuration: Check the configuration with
ifconfig tapXon your computer. Local address should be192.168.117.2/24, remote address192.168.117.1.
Troubleshooting BSD Connection:
- “Connection established” not appearing: First, ensure your computer recognizes the ADB interface. If
/usr/local/bin/easytether-usb -lshows nothing, follow system-agnostic steps from Troubleshooting “No Devices to Connect” Error. Check if theif_tapkernel module is loaded usingkldstat. - “Connection established” but no internet: Verify
tapXnetwork interface is properly configured. Test withping 192.168.117.1(should reply) and check name resolution.
If Nothing Helps: Further Assistance
My Problem Is Not Described Here
If you are experiencing an issue not covered in this guide, please provide a detailed description of your problem. The more information you provide, the better we can assist you in troubleshooting and finding a solution.