This Elden Ring Bleed Build Guide unveils a thrilling approach to conquering the Lands Between, perfect for newcomers seeking a potent and engaging playstyle right from the start. Embrace the Warrior class, not just for its initial weaponry, but for the immediate access to dual-wielding prowess.
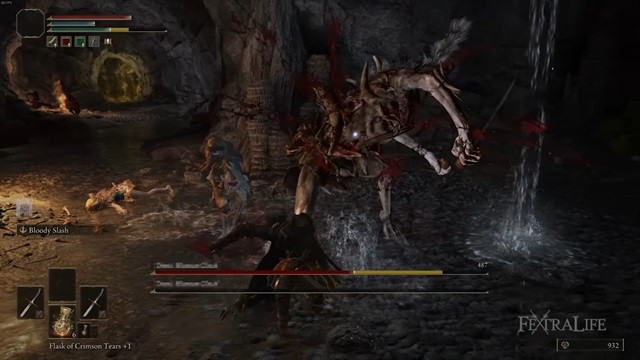
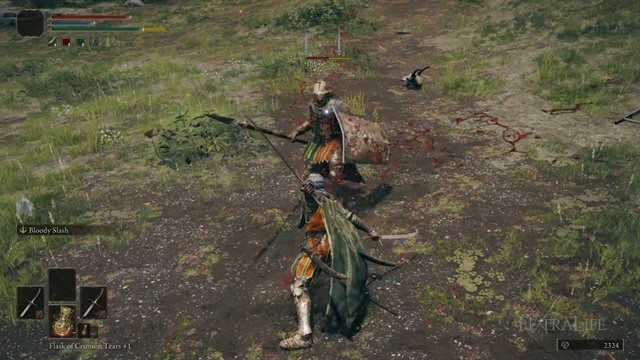
The Bloodblade build is a dual curved sword setup designed to rapidly inflict the Hemorrhage status effect. By unleashing a flurry of swift attacks with curved swords enhanced by the Bloody Slash Ash of War, you’ll overwhelm your foes, filling their bleed gauge and triggering devastating bursts of damage.
- Class: Warrior
- Flask Allocation: Full HP
- Weapons: Dual Scimitars, or any pair of Curved Swords
- Shield: None
- Armor: Heaviest Armor for Medium Roll
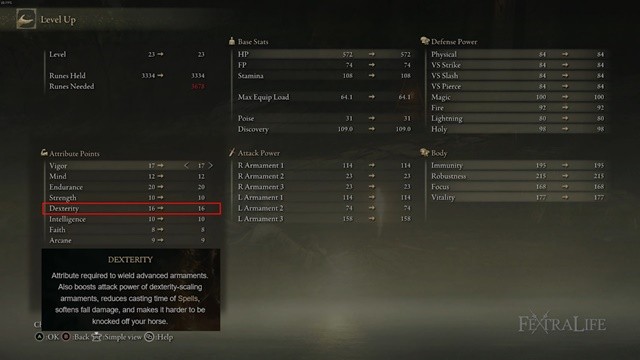
- Primary Stats: Endurance, Vigor
- Secondary Stats: Dexterity
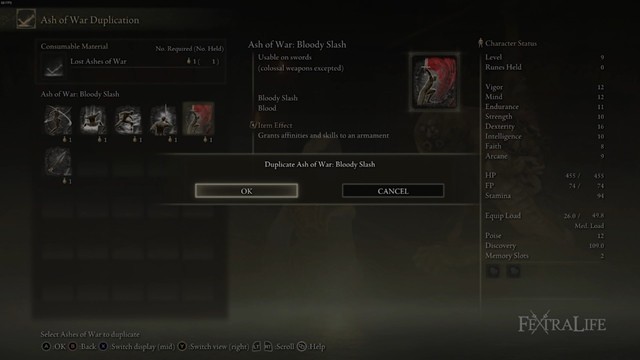
- Skills: Ash of War: Bloody Slash
- Spells: None
Explore over 110 Elden Ring Builds to discover diverse classes and playstyles. The Bloodblade build is particularly recommended for players who are new to Elden Ring.
| Beginner Builds | Level 50 Builds | Level 100 Builds | Level 150 Builds | Level 150-200 Builds |
|---|---|---|---|---|
| Bloodblade | Blood Dragon | Blood DancerDragon Knight | Sanguine SamuraiVenomous BloodbladeDragon WarriorSerpent SamuraiHowling Starfist | Crimson DuelistSanguine SpellbladeGrim ReaperBloody Ballerina |
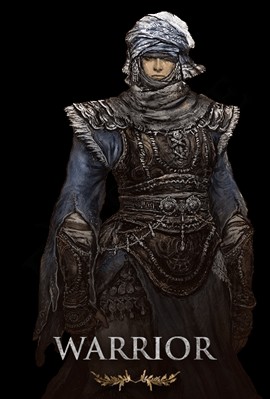
Warrior Class: Your Bleed Build Foundation
For this potent Elden Ring build, the Warrior class serves as the ideal starting point. Its inherent dual scimitars and the ability to dual-wield from the outset provide a significant early game advantage. Scimitars are renowned for their rapid attack speed and swift moveset, crucial for this build’s focus on inflicting Bleed. By imbuing both scimitars with a Blood affinity via Ashes of War, each rapid strike contributes to filling the enemy’s Bleed meter, culminating in the Hemorrhage status effect.
Attribute Allocation for the Bloodblade Build
When distributing your attribute points for the Bloodblade build, prioritize Vigor and Endurance. Aim to elevate both of these stats to 20 as swiftly as possible. The order is flexible – you can alternate or focus on one before the other – but achieving 20 in both should be your initial goal. Following this, channel your points into Dexterity to amplify your weapon damage and overall offensive capabilities.
Core Attributes for Bleed Efficiency
- Vigor (to 20): Enhances your health pool, enabling you to withstand substantial hits and trade blows effectively, crucial for consistently applying bleed procs.
- Endurance (to 20): Bolsters your Stamina, essential for executing dodge rolls to evade enemy attacks and stringing together strategic combos to maximize bleed buildup.
- Dexterity (Remaining Points): Maximize the damage output of your Scimitars and curved swords, directly scaling with your primary weapons.
Equipment Guide for the Elden Ring Bloodblade
Weapon Recommendations: Dual Curved Swords Dominate
- Scimitars: The preferred choice due to their inherent speed and starting availability for the Warrior class.
- Daggers: A faster alternative, but may struggle against enemies not susceptible to bleed.
- Other Curved Swords: Experiment with different curved swords that allow dual-wielding to find your preferred moveset.
As previously emphasized, Scimitars excel in this build due to their rapid strikes, facilitating swift bleed gauge accumulation before needing to reposition away from enemy attacks. While Scimitars are recommended, the core strategy remains adaptable. You can successfully implement this build using dual straight swords or even daggers. Curved Swords are favored because of their fast attacks and effective combo strings that synergize perfectly with the bleed focus. Daggers, while exceptionally fast, can be less effective against standard enemies where outright damage is preferable to bleed infliction. Ultimately, experiment with various weapon types to discover what aligns best with your personal playstyle within the bleed build framework.
Acquiring and Duplicating the Bloody Slash Ash of War
Essential to this build is the Bloody Slash Ash of War. To obtain it, venture to Fort Haight. To equip Bloody Slash on both weapons, duplication is necessary. Purchase a Lost Ashes of War from the merchant in the southwest Weeping Peninsula for 3000 Runes. Gain access to Roundtable Hold by encountering Margit, the Fell Omen at the gate of Stormveil Castle and allowing him to defeat you (or by defeating him). Speak to Melina at the Site of Grace afterward, and she will transport you to Roundtable Hold. There, locate Smithing Master Hewg to duplicate the Ash of War, enabling you to apply Bloody Slash to both your chosen curved swords.
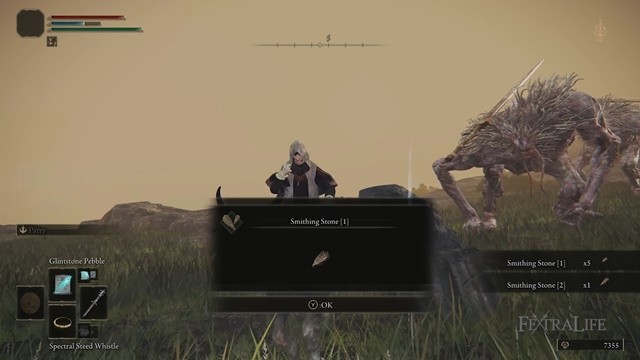
Weapon Upgrade Path for Bloody Scimitars
Weapon upgrades are crucial for enhancing damage output. An efficient early method is to locate the stone statue in Stormhill and have the patrolling trolls destroy it, yielding Smithing Stones. Supplement this by exploring Limgrave Tunnels for additional Smithing Stones. These resources should enable you to upgrade your scimitars to approximately +2. If further upgrades are desired, farming soldiers at Gatefront Ruins can provide more Smithing Shards. Gatefront Ruins also presents an opportunity to acquire improved armor while farming, making it a worthwhile location.
Talisman Choices to Enhance the Bloodblade
- Green Turtle Talisman: Essential for stamina-intensive builds, significantly accelerating stamina recovery, allowing for more frequent attacks and dodges.
- Erdtree’s Favor: A versatile talisman boosting Stamina, HP, and Equip Load, enabling heavier armor, increased survivability, and greater attack frequency.
These talismans synergize exceptionally well with the Bloodblade build. The Green Turtle Talisman directly addresses the stamina demands of constant attacking and dodging, while Erdtree’s Favor provides a comprehensive buff to key attributes, enhancing both offensive and defensive capabilities.
Bloodblade Gameplay Strategy in Elden Ring
The core combat strategy for this Elden Ring Warrior Build revolves around relentless, rapid attacks to quickly fill the enemy’s bleed status bar. Hemorrhage, when triggered, inflicts substantial health depletion. The bleed mechanic in Elden Ring operates by gradually filling a hidden gauge on enemies with each successful bleed weapon strike. The fill rate depends on the weapon’s bleed buildup and the enemy’s bleed resistance. Enemies also possess a bleed gauge which functions similarly to the player’s poison or scarlet rot buildup.
Crucially, the bleed gauge begins to deplete immediately when attacks cease. Therefore, sustained aggression is key to maximizing bleed procs. Hit-and-run tactics with prolonged pauses between attacks are less effective. Instead, engage with flurries of three to four strikes, briefly reposition, and re-engage with another rapid burst to maintain bleed pressure.
However, aggressive play requires caution. The anticipation of an imminent bleed proc can tempt overly aggressive maneuvers, leading to unnecessary risks. Prioritize a balance between bleed buildup and survivability. Avoid reckless aggression, as some enemies will punish overextension severely.
In certain encounters, particularly against formidable bosses, focus on securing an initial bleed proc and then transition to a more conventional combat approach. This mitigates the risk of overly aggressive play and allows for opportunistic bleed procs without relying solely on them for damage.
A vital aspect of the bleed mechanic is that subsequent bleed procs on the same enemy become progressively harder to achieve. Each successful Hemorrhage increases the enemy’s bleed resistance, requiring more hits to trigger subsequent procs. The second bleed will necessitate more attacks than the first, and the third even more than the second. Be mindful of this escalating resistance and avoid over-committing to bleed procs after the initial application.
Mastering the Bloody Scimitars: Attack Techniques
To maximize bleed application with dual scimitars, prioritize specific attacks. The sprinting L1 attack is exceptionally effective. This maneuver propels you forward with a rapid double slash from both weapons, delivering four hits in quick succession. This significantly contributes to bleed buildup, far exceeding the buildup of single or double hits.
The jumping L1 attack is another powerful tool. It executes a cross-slash animation, also hitting four times, making it ideal for rapidly inflicting bleed. These two attacks, sprinting L1 and jumping L1, should be your primary offensive actions whenever opportunities arise. While regular L1 attacks are necessary, actively seek openings to utilize sprint and jump L1 attacks for optimal bleed application. Rolling L1, delivering three hits, is a viable alternative when sprinting or jumping attacks are not feasible. Incorporate roll L1, jump L1, or sprint L1 attacks after evading enemy attacks to punish openings. If time permits, follow up with an additional L1 attack to further bleed buildup. Exercise restraint, but consistently aim to incorporate running and jumping L1 attacks into your combat flow.
The Bloody Slash Ash of War delivers a potent blood-infused forward slash after a brief wind-up, reminiscent of Sekiro’s combat style. It inflicts substantial damage, but its angled trajectory can make landing hits challenging against smaller, more agile enemies due to Elden Ring’s precise hitboxes. Bloody Slash excels against larger enemies with more generous hitboxes.
The wind-up animation necessitates careful timing. Optimal usage is after a backward dodge, allowing for a counter-attack during enemy openings. Increasing Vigor enhances survivability when using Bloody Slash, as it consumes a portion of your health. Bloody Slash provides valuable range and vertical reach, enabling you to hit airborne enemies or those positioned on ledges. While not a spammable ability, Bloody Slash is a situational powerhouse for burst damage and ranged engagements.
Advanced Bloodblade Build Tips
Utilizing the Blessed Dew Talisman
The Blessed Dew Talisman complements this build by mitigating the health cost of using Bloody Slash. It provides passive health regeneration, offsetting the self-damage from the Ash of War and reducing reliance on healing flasks when utilizing the ability frequently. Consider replacing Erdtree’s Favor with the Blessed Dew Talisman to maintain stamina recovery from the Green Turtle Talisman while incorporating health regeneration, if desired.
Armor Optimization for Trading Blows
Prioritize the heaviest armor possible while maintaining a medium roll. Achieving 51 Poise or higher on your armor is recommended to withstand single hits from most enemy attacks without being staggered. Farm or purchase heavier armor to maximize physical defense. Trading blows is sometimes necessary to secure bleed procs, and heavier armor minimizes damage taken during these exchanges. However, never sacrifice medium roll for heavier armor, as mobility is crucial for dodging attacks and maintaining offensive pressure.
Weapon Versatility and Experimentation
Remember, Scimitars are a suggestion, not a limitation. Experiment with different weapon types and curved swords to find your preferred playstyle within the bleed build framework. Scimitars are recommended for their accessibility and early-game effectiveness for the Warrior class, but other curved swords or even weapon categories might resonate more with your individual preferences and combat style as you progress through Elden Ring.
This concludes the Elden Ring Warrior Bleed Build Guide. Stay tuned for more Elden Ring builds and Shadow of the Erdtree content. For item locations and guidance on your Elden Ring journey, consult the Elden Ring Map.