Embark on your journey to conquer the Lands Between and claim the coveted platinum trophy in Elden Ring. This comprehensive guide will serve as your roadmap to achieving 100% completion in FromSoftware’s critically acclaimed open-world RPG. Whether you’re a seasoned Souls veteran or a newcomer to the challenging yet rewarding world of Elden Ring, this platinum guide will provide you with a step-by-step approach to unlock every trophy and master the game.
- Estimated Trophy Difficulty: 6-7/10 (Skill and build dependent, can be significantly easier with rune farming and optimized builds)
- Approximate Time to Platinum: 60-100 Hours (Highly variable based on player skill, exploration habits, and use of save backups)
- Offline Trophies: 42 (1 Platinum, 3 Gold, 14 Silver, 24 Bronze)
- Online Trophies: 0 (Platinum achievable entirely offline)
- Missable Trophies: 5 (Endings, Legendary Armaments, and a missable boss if specific NPC questlines are failed)
- Glitched Trophies: None reported
- Difficulty Settings: None (Difficulty is fixed but player progression and build choices heavily influence perceived difficulty)
- Minimum Playthroughs: 1 (Recommended with save backups to obtain all endings)
- PS4/PS5 Autopop & Save Transfer: Save Transfer = YES, Autopop = NO (PS4 saves can be transferred to PS5, but trophies do not autopop)
- PS4/PS5 Crossbuy: Yes
- Post-Game Free Roam / Level Select: Partially – Leyndell, Royal Capital significantly changes after a certain point, altering exploration. However, access to all trophy-related bosses and ending steps remains available after the final boss before NG+.
- Release Date: February 25, 2022
Introduction to your Elden Ring Platinum Journey
Welcome, Tarnished, to the ultimate Elden Ring platinum trophy guide! FromSoftware has crafted a sprawling and intricate world in Elden Ring, filled with formidable foes, hidden secrets, and a vast array of challenges. This guide is meticulously designed to help you navigate this world efficiently and unlock the platinum trophy in a single playthrough, saving you valuable time and effort. While Elden Ring’s difficulty is renowned, platinum is absolutely attainable with strategic planning and the right approach.
To maximize efficiency and obtain all three endings in a single playthrough, we will leverage save game backups. This technique, detailed further in the guide, is crucial for unlocking all ending-related trophies without committing to multiple full playthroughs. This roadmap will lead you through the essential areas, point out missable content, and ensure you don’t overlook any crucial steps on your path to platinum. For in-depth combat strategies against bosses, refer to dedicated Elden Ring boss guides. Location names throughout this guide are linked to interactive maps for easy navigation within the expansive Lands Between.
Before diving into the roadmap, let’s address some frequently asked questions to set you on the right path.
Frequently Asked Questions for Elden Ring Platinum Hunters
-
Can I obtain legendary weapon and talisman trophies by trading with other players?
- Yes! Legendary armaments and talismans dropped by other players will count towards the respective trophies. This can be especially helpful for acquiring items from different builds or playthroughs. However, remember that legendary ashen remains and legendary sorceries/incantations cannot be traded; these must be acquired personally within your game world.
-
Is it possible to achieve platinum in a single playthrough of Elden Ring?
- Absolutely! This guide is structured around a single playthrough approach. By carefully following the roadmap and utilizing save backups for the different endings, you can secure the platinum trophy efficiently.
-
Can I earn the platinum trophy while playing entirely offline?
- Yes, Elden Ring’s platinum is fully obtainable offline. While online play offers features like item duplication with friends and helpful player messages, neither is necessary for platinum.
-
What items can be duplicated with other players to ease the platinum grind?
- You can duplicate runes, talismans, weapons, and armor (provided they are not upgraded). Unfortunately, key upgrade materials like smithing stones, spells, and ashes of war cannot be dropped or duplicated.
-
Which character build is recommended for a smoother platinum experience?
- The Astrologer (mage) starting class is often recommended for beginners. Its ranged combat style provides a safer approach to many encounters, minimizing the need for close-quarters dodging. For an easier early game, prioritize obtaining the Meteorite Staff and Rock Sling spell early on. Later in the game, spells like Comet Azur paired with the Cerulean Hidden Tear can trivialize many boss encounters. The Mimic Tear ashen remains summon is also incredibly powerful and can significantly aid in boss battles.
-
Should I rush through the game, focusing only on main bosses?
- No, exploration is key in Elden Ring. This roadmap guides you through essential areas and side content necessary for trophies, endings, and character progression. Thorough exploration will yield valuable items, upgrade materials, and a richer game experience.
-
Is it possible to save after defeating the final boss?
- Yes, you can save after defeating the final boss, the Elden Beast. Crucially, do not interact with the statue immediately after the boss fight until you have created your save backup. Interacting with the statue triggers an ending, and without a backup, you’ll need another playthrough for the other endings.
-
Are there missable trophies in Elden Ring?
- Yes, there are missable trophies. These are primarily tied to specific endings and legendary items, all of which are clearly highlighted in this guide and roadmap.
-
Are any bosses missable in Elden Ring?
- Yes, Lichdragon Fortissax is potentially missable if you progress Fia’s questline in a specific way and defeat her. However, this guide will ensure you encounter and defeat all trophy-related bosses. Remember, you can still access all bosses after completing the main story before starting New Game Plus.
-
Are all Shardbearers essential for the main story progression?
- No, surprisingly, only a subset of Shardbearers are mandatory for simply completing the game. However, for platinum, defeating all Shardbearers and other key bosses is necessary.
-
Does progressing towards one ending prevent me from obtaining others in the same playthrough?
- Yes, certain late-game actions can lock you into a specific ending. To avoid this, do not complete the final step of the Lord of Frenzied Flame ending before defeating the final boss. Complete all steps for the Age of Stars ending and all but the final step for the Lord of Frenzied Flame ending before the final boss. This allows you to use save backups to achieve all three endings efficiently.
-
Do weapons crafted from Boss Remembrances count towards legendary armaments?
- No, unfortunately not. Despite their golden appearance when dropped, only legendary armaments found within the game world itself count towards the “Legendary Armaments” trophy.
-
How do I back up and restore my save file on PlayStation 4 and PlayStation 5?
- PS5: Settings > Saved Data and Game/App Settings > Saved Data (PS5) > Upload to Cloud Storage. Important: Disable auto-sync to prevent accidental overwriting of your backup (Settings > Saved Data and Game/App Settings > Saved Data (PS5) > Sync Saved Data > Auto-Sync Saved Data = Disabled). To restore, Settings > Saved Data and Game/App Settings > Saved Data (PS5) > Download from Cloud Storage.
- PS4: Settings > Application Saved Data Management > Saved Data in System Storage > Upload to Online Storage (PS Plus) or Copy to USB Storage Device. To restore, Settings > Application Saved Data Management > Saved Data in Online Storage/USB Storage Device > Download to System Storage.
-
How do I back up and restore saves on PC (Steam)?
- Save files are typically located at:
C:Users[YourUsername]AppDataRoamingEldenRing. For extra safety, also back up:C:Program Files (x86)Steamuserdata. Copy these folders to a separate location. To restore, overwrite the existing folders with your backups.
- Save files are typically located at:
-
How do I back up and restore saves on Xbox One/Xbox Series X|S?
- Xbox save management relies heavily on cloud saves. To create a manual backup (less reliable than PlayStation or PC methods), disconnect from the internet, play for a short period offline, then reconnect to force a cloud save. Double-check cloud sync status. To restore, after performing ending steps, press the Home button, navigate to Elden Ring, press Options, Manage Game, Saved Data, select your Gamertag, Delete Saved Data, Delete from Console (repeat if necessary until save is gone). Restart the game to force a cloud save download. This method is less precise and carries a higher risk of losing progress, so PlayStation or PC are recommended for multi-ending playthroughs.
Step-by-Step Elden Ring Platinum Roadmap
This roadmap is designed to guide you through Elden Ring efficiently, ensuring you unlock all trophies in a single playthrough using save backups for multiple endings. Follow each step carefully to avoid missing any crucial content.
Step 1: Exploring Limgrave and Weeping Peninsula, Defeating Early Bosses
If you find Elden Ring challenging initially, remember you can adjust the difficulty curve by over-leveling. Right from the start, farming runes and leveling up is viable. The Astrologer class is beginner-friendly due to its ranged capabilities. Consider investing heavily in Intelligence and Vigor early on for a smoother experience. If possible, a friend who has progressed further can drop endgame gear and runes to accelerate your leveling significantly. Alternatively, explore rune farming methods (search for “Elden Ring infinite rune farm”).
Begin your journey in Limgrave. Rest at the Gatefront Site of Grace and speak to Melina to receive the Spectral Steed Whistle, allowing you to summon Torrent, your mount. Travel to the Church of Elleh Site of Grace and speak to Renna (the witch) near the smithing table. She will gift you the Spirit Calling Bell, enabling you to summon spirit ashes for aid in combat.
From Gatefront, proceed northwest to encounter Margit, the Fell Omen, the first major boss guarding Stormveil Castle. Don’t be discouraged by initial defeats. After a few attempts, rest at a Site of Grace, and you’ll be invited to the Roundtable Hold, the game’s hub area. Accept the invitation.
Margit can be a significant early challenge. Before tackling him again, strengthen your character. Explore Limgrave and the Weeping Peninsula (south of Limgrave) to collect Golden Seeds (flask charges) and Sacred Tears (flask potency) to upgrade your flasks at any Site of Grace. These upgrades dramatically increase your survivability. Gather Smithing Stones to upgrade your weapons, increasing your damage output. All regions, including Limgrave, Weeping Peninsula, Caelid, and Dragonbarrow, are accessible from the start, providing ample early upgrade resources. Remember to collect Map Fragments (pillar icons on the fogged map) to reveal the map of each region.
A worthwhile detour early on is to Caelid to acquire the Meteorite Staff and Rock Sling spell. While not mandatory for trophies, this powerful combination is easily accessible from the start and significantly simplifies early and mid-game boss encounters. The Meteorite Staff, already at S-tier Intelligence scaling, boosts Gravity spells like Rock Sling, which stuns many bosses.
Image alt text: Map of Weeping Peninsula in Elden Ring, highlighting its early game accessibility for platinum trophy preparation.
Explore the Weeping Peninsula thoroughly. Venture to Castle Morne at the southernmost tip and defeat the trophy boss Leonine Misbegotten.
If Leonine Misbegotten proves too difficult, you can always return later when stronger. This guide points out trophy bosses in their earliest accessible locations, but all can be revisited after the main story.
Once you feel adequately prepared, return to Margit, the Fell Omen and defeat him. Proceed through Stormveil Castle, navigating its intricate paths, and ultimately confront and defeat Shardbearer Godrick.
Step 2: Conquering Raya Lucaria Academy
After defeating Godrick, your next objective is the Academy of Raya Lucaria in the Liurnia of the Lakes region.
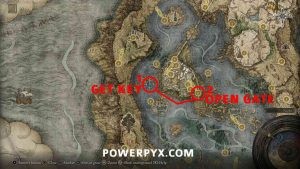
To enter the Academy, you’ll need the Academy Glintstone Key. Locate it behind the sleeping Glintstone Dragon near the Temple Quarter and Crystalline Woods Sites of Grace (location 1 on the image below).
Image alt text: Location of the Academy Glintstone Key in Elden Ring, showing the dragon and key icon on the map for platinum guide users.
You don’t need to fight the dragon; simply grab the key behind it. Use the key at the seal at the South Raya Lucaria Gate Site of Grace (location 2). Within the Academy, you’ll face two trophy bosses: Red Wolf of Radagon and Rennala, Queen of the Full Moon. Defeat both. If you get lost within the Academy, consult a detailed Academy walkthrough. After Rennala, proceed to Caria Manor.
Step 3: Initiating the Age of Stars Ending Questline
Caria Manor is crucial for the Age of Stars ending. Navigate through the manor and defeat the trophy boss Royal Knight Loretta. Immediately after Loretta, you’ll reach the area behind Caria Manor, the Three Sisters, with three towers. Enter Ranni’s Rise (the northernmost tower) and speak to Ranni (who reveals herself to be Renna). Agree to work for her, exhausting all dialogue options. Speak to her two spectral servants downstairs: Iji and Seluvis.
Step 4: Radahn, Nokron, and Further Age of Stars Steps
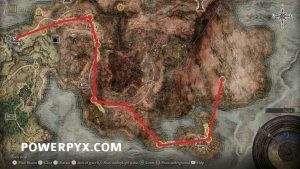
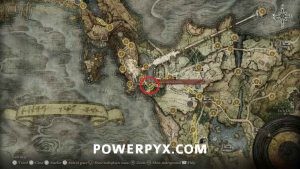
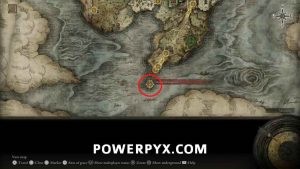
Now it’s time to confront Shardbearer Radahn in Caelid (recommended level 70+). Travel to the Impassable Greatbridge Site of Grace in Caelid. If the portal on the bridge is active, use it to teleport directly to Redmane Castle. If not, cross the bridge, ascend the slope to the left, and navigate around the castle to find a ladder leading to the walls. Enter Redmane Castle Plaza. Speak to the festival announcer, then proceed through the church and take the elevator down to a portal that teleports you to the Radahn boss arena.
Image alt text: Map of Caelid region in Elden Ring, indicating Redmane Castle and Fort Haight for Radahn boss fight and Nokron access in this platinum guide.
Defeating Radahn causes a meteor to strike Limgrave, creating a crater northwest of Fort Haight Site of Grace. This crater leads to Nokron, Eternal City. Look for floating rocks in the sky to locate the crater.
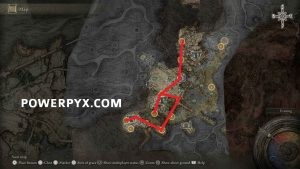
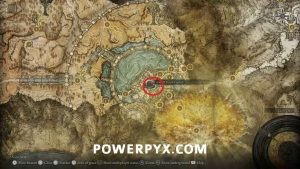
Carefully descend into the crater and navigate the platforms down to Nokron. Explore Nokron thoroughly, as it contains three trophy bosses: Mimic Tear, Valiant Gargoyle, and Regal Ancestor Spirit. Nokron is labyrinthine; following a dedicated Nokron walkthrough is recommended.
Image alt text: Map of Nokron, Eternal City in Elden Ring, highlighting its complex layout for platinum trophy hunters.
At the end of Nokron, you’ll find the Fingerslayer Blade in a chest. Return to Ranni’s Rise and give the Fingerslayer Blade to Ranni. Continue speaking to her until she gives you the Carian Inverted Statue.
Travel to the Study Hall Entrance Site of Grace and use the Carian Inverted Statue at the altar. This inverts the building, allowing you to descend. Navigate the inverted Study Hall (drop down onto wooden beams to reach an elevator) to reach the Divine Tower of Liurnia. At the top of the tower, find the Cursemark of Death, an item needed for the Lichdragon Fortissax boss fight and Fia’s questline.
Step 5: Ainsel River and Further Age of Stars Progression
Return to the Three Sisters area behind Caria Manor. Renna’s Rise (northernmost tower) will now be accessible. Enter and ascend to find a portal at the top. Use it to teleport to Ainsel River Main.
In Ainsel River Main, locate the stone coffin directly ahead of your starting point. Pick up the Miniature Ranni item from the coffin. Rest at the nearby Site of Grace. You’ll now have the option to “Talk to Miniature Ranni” at the Site of Grace menu. Exhaust all dialogue options by repeatedly talking to her. She will task you with defeating the Baleful Shadow within this area.
Follow the Ainsel River path to Nokstella, Eternal City. Continue through Nokstella until you reach the Nokstella Waterfall Basin Site of Grace. Shortly after, you’ll encounter the Baleful Shadow NPC. Defeat it to obtain the Discarded Palace Key.
Use the Discarded Palace Key to open the chest in Rennala’s boss room in the Raya Lucaria Grand Library. The chest contains the Dark Moon Ring.
Step 6: Securing the Age of Stars Ending
Return to the location where you defeated the Baleful Shadow and continue along the path, traversing the Lake of Rot to reach the Grand Cloister. In the Grand Cloister, drop down and interact with the coffin in the bloody water to the left. This transports you to the boss fight against Astel, Naturalborn of the Void.
After defeating Astel, proceed forward to Moonlight Altar. If the path is sealed, ensure you have acquired the Dark Moon Ring from Rennala’s chest. In the Moonlight Altar region (southwest Liurnia plateau), head to the northeastern edge towards the Cathedral of Manus Celes. In the ruins, drop into the cave system on the right. At the end, you’ll find Ranni. Speak to her and pledge your allegiance to secure the Age of Stars ending option after the final boss. Ranni will leave behind the legendary armament Dark Moon Greatsword. Collect it.
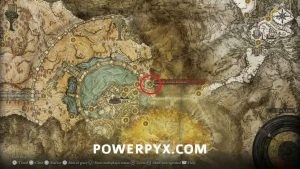
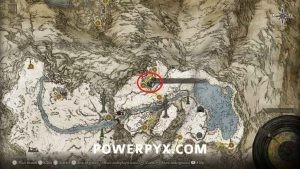
Step 7: Altus Plateau and Shardbearer Rykard
With the Age of Stars ending secured for now, head towards The Ravine in northeast Liurnia. Navigate through Ravine-Veiled Village, which leads to the trophy boss Magma Wyrm Makar.
Image alt text: Map showing the path to Altus Plateau in Elden Ring, crucial for platinum trophy progression.
After defeating Magma Wyrm Makar, you’ll reach Altus Plateau. From Altus Plateau, head to Mt. Gelmir to confront trophy bosses Godskin Noble and Shardbearer Rykard. Ascend Mt. Gelmir (avoid the Full-Grown Fallingstar Beast if desired – ride around it and jump off the large rock behind it) to reach Volcano Manor.
At Volcano Manor, speak to Lady Tanith on the throne to receive the Manor Key. In the corridor beside her, open the first door on the right. In this room, strike the wall on the right to reveal a secret passage to the town behind Volcano Manor. Navigate through the town to find a portal to Rykard’s boss arena. Alternatively, complete Lady Tanith’s assassination quests to be teleported directly to Rykard.
Step 8: Leyndell, Royal Capital and Mohg, the Omen
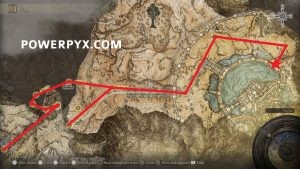
With at least two Great Runes (Godrick’s and Radahn’s suffice), you can enter Leyndell, Royal Capital. Enter the gate in the northeast of Altus Plateau, guarded by the mandatory boss Draconic Tree Sentinel.
Image alt text: Map of Altus Plateau region in Elden Ring, guiding platinum trophy hunters through Leyndell’s entrance and Volcano Manor access.
Within the Royal Capital, follow the main story path, which leads to boss fights against Godfrey, the First Lord and Shardbearer Morgott. After Morgott, interact with the thorns behind his arena and rest at the Site of Grace to progress the story. Crucially, before leaving Leyndell, acquire the missable legendary armament Bolt of Gransax.
Finally, descend into the Royal Capital Sewers and defeat Mohg, the Omen. To reach Mohg, start at the Avenue Balcony Site of Grace. (Refer to a specific guide for the sewer path if needed). Defeating Mohg, the Omen is a step towards the Lord of Frenzied Flame ending. After defeating Mohg, fast travel out of the sewers. Do not proceed further into the secret altar area behind Mohg and absolutely do not interact with the red door at the end of that path. Interacting with the red door locks you into the Lord of Frenzied Flame ending, preventing you from obtaining the other endings in this playthrough without restoring a save. We’ll return to this area in Step 11.
Step 9: Mountaintops of the Giants and Haligtree Access
With the Rold Medallion obtained from Morgott, travel to the Avenue Balcony Site of Grace in Leyndell. Ascend the stairs, follow the path east, and open the large gate. This leads to a wooden elevator out of the capital. Follow the path along the city walls to another large elevator to the Forbidden Lands. Continue along the single path to the Grand Lift of Rold. Present the Rold Medallion to activate the lift, which will take you to the Mountaintops of the Giants. Remember this elevator, as it has another important function soon.
In the Mountaintops of the Giants, head north to Castle Sol. Defeat the trophy boss Commander Niall. Behind Commander Niall, find the Haligtree Secret Medallion (Left).
For the second piece, Haligtree Secret Medallion (Right), go to the Village of the Albinauries Site of Grace in Liurnia. Ascend the hill past the fire-throwing enemy. At the path’s end, hit or touch the barrel to reveal Albus, an NPC disguised as a barrel. Speak to him to receive the second medallion piece.
Return to the Grand Lift of Rold. This time, select “Switch Action” to present the Haligtree Secret Medallion. This will take you to the western Mountaintops. Travel to Ordina, Liturgical Town. Enter the Evergaol in Ordina and light all four statues to reveal a portal to Miquella’s Haligtree and Elphael.
In Haligtree and Elphael, you’ll encounter three more trophy bosses: Shardbearer Mohg (Lord of Blood), Loretta, Knight of the Haligtree, and Shardbearer Malenia. Malenia is notoriously difficult; if you struggle, consider returning after completing the endings. At least you’ll have unlocked access to her area.
Step 10: Cleanup Before the Endgame
Your next mandatory boss is the Fire Giant, located in the southeast Mountaintops of the Giants.
Behind the Fire Giant’s arena, cross the large chain to reach the Forge of the Giants Site of Grace (look for a path along the left wall of the forge). Rest at this Site of Grace and speak to Melina. Agree to her proposal to set the Erdtree aflame (unlocks a story trophy). This action transports you to the final main region, Crumbling Farum Azula. Fast travel will be temporarily disabled but will reactivate after resting at the first Site of Grace in Farum Azula.
Setting the Erdtree aflame also triggers Fia (Deathbed Companion) to relocate from Roundtable Hold to Deeproot Depths (if she hasn’t already). This allows you to complete the final steps for the secret boss Lichdragon Fortissax. Fast travel to Deeproot Depths and defeat Lichdragon Fortissax now.
Ensure you’ve picked up the missable legendary armament Bolt of Gransax in Leyndell if you haven’t already. It becomes inaccessible after defeating Maliketh.
Return to Crumbling Farum Azula. This region contains three trophy bosses: Godskin Duo (mandatory), Dragonlord Placidusax (optional), and Maliketh, the Black Blade (mandatory). Defeat them in this order.
Defeating Maliketh returns you to Leyndell, where your final mandatory boss encounter is Hoarah Loux the Warrior (not the final boss of the game). After Hoarah Loux, only the true final boss and endings remain. If you’re still missing any trophy bosses, now is the ideal time to locate and defeat them.
Step 11: Final Boss and Securing Endings with Save Backups
Proceed through the path behind Hoarah Loux’s arena to initiate the final boss fight against Radagon of the Golden Order & Elden Beast. After defeating the Elden Beast, rest at the Site of Grace but do not interact with the statue or markings on the ground yet. This is the crucial point to back up your save.
Ending Procedure:
- Save Backup: Follow the save backup instructions for your platform (PS5, PS4, or PC) detailed in the FAQ section.
- Elden Lord Ending: Reboot the game. Interact with the statue after the Elden Beast to trigger the Elden Lord Ending.
- Restore Save: Restore your save file from the backup you created.
- Age of Stars Ending: Reboot the game. Interact with the blue summon sign for Ranni on the floor to trigger the Age of the Stars Ending.
- Restore Save Again: Restore your save file once more.
- Lord of Frenzied Flame Ending: Complete the remaining steps for the Lord of Frenzied Flame Ending. Return to the sewers beneath Leyndell where you defeated Mohg, the Omen. Proceed to the secret altar area behind his boss room. Navigate the parkour path, unequip all armor, and interact with the red door at the end to receive the Frenzied Flame Proscription. Then, interact with the statue after the Elden Beast to trigger the Lord of Frenzied Flame Ending.
Step 12: Platinum Trophy Cleanup
After obtaining all three endings via save backups, either choose “NO” when prompted to start New Game Plus or restore your save to before the endings. Now focus on collecting any remaining legendary armaments, talismans, ashen remains, sorceries, and incantations required for the platinum trophy. If you missed any bosses, you can still revisit their locations. For truly missable items or trophies, New Game Plus is an option, but ideally, this guide has helped you avoid needing it.
Useful Tips, Tricks, and Guides:
(Links to external resources as provided in the original article)
Elden Ring Trophy Guide
| Trophy Image | Trophy Name | Description |
|---|---|---|
| Elden Ring | Obtained all trophies | |
| Earn all other trophies in Elden Ring to unlock Platinum (DLC not required). | ||
| Elden Lord | Achieved the “Elden Lord” ending | |
| Missable, doing one ending locks you out of the other endings for that playthrough. As a workaround you must manually back up your save before triggering any ending, then copy it back to do the next ending. Completing the steps for “Lord of Frenzied Flames Ending” would also lock you out of this ending » Elden Ring – How to Get All Endings | ||
| Age of the Stars | Achieved the “Age of the Stars” ending | |
| Missable, doing one ending locks you out of the other endings for that playthrough. As a workaround you must manually back up your save before triggering any ending, then copy it back to do the next ending. Killing the questgiver NPC Renna/Ranni (Witch) would also make you miss this ending » Elden Ring – How to Get All Endings | ||
| Lord of Frenzied Flame | Achieved the “Lord of Frenzied Flame” ending | |
| Missable, doing one ending locks you out of the other endings for that playthrough. As a workaround you must manually back up your save before triggering any ending, then copy it back to do the next ending » Elden Ring – How to Get All Endings | ||
| Shardbearer Godrick | Defeated Shardbearer Godrick | |
| This mandatory Boss can be found in Stormveil Castle and will be the first Shardbearer you will have to face. » Elden Ring Boss Guide – All Bosses | ||
| Shardbearer Radahn | Defeated Shardbearer Radahn | |
| This mandatory Boss can be found in Redmane Castle on the island southeast of Caelid. Head there after progressing through the Age of the Stars questline. At the Impassable Bridge that leads to the castle, use the teleporter to get teleported into the Castle itself. There, after listening to the announcer, talk to him and tell him you are ready. Head through the church and down the elevator and towards the next teleporter, which will take you to the huge boss arena. » Elden Ring Boss Guide – All Bosses | ||
| Shardbearer Morgott | Defeated Shardbearer Morgott | |
| This mandatory Boss can be found in Leyndell, the Royal Capital. This will be the final boss of the Capital and you will fight him at the Elden Throne. Defeating him will grant you access to the Mountaintop of the Giants. » Elden Ring Boss Guide – All Bosses | ||
| Shardbearer Rykard | Defeated Shardbearer Rykard | |
| This optional Boss can be found in the Volcano Manor on Mt. Gelmir. There are actually 2 ways to reach this fight. You can either accept all the requests from the head of the Volcano Manor and kill 3 NPCs; or after obtaining the key from her you can navigate through the whole Prison Town in the Volcano and find a teleporter to the arena at the end. It is up to you. In the fight itself you will first have to pick up the sword there and equip it to kill the boss – it has no stat requirements and is just a gimmick weapon. You will first have to defeat the Serpent and then Rykard himself. » Elden Ring Boss Guide – All Bosses | ||
| Shardbearer Malenia | Defeated Shardbearer Malenia | |
| *This optional Boss can be found at the bottom of Ephael at the bottom of Haligtree. In order to reach this area you will have to first head into Village of the Albinauries and not far from the Site of Grace find an NPC pretending to be a barrel (just behind the fire thrower guy). He will give you one half of the Medallion needed. Afterward head to the Lakeside Crystal Cave and after finishing it talk to the Girl with the Wolf on the other side of the cave and go through her dialogue in which she will tell you where to find the other half. Refresh at the Site of Grace, talk to her again and she will turn into Ashen Remains. » Elden Ring Boss Guide – All Bosses | ||
| Shardbearer Mohg | Defeated Shardbearer Mohg | |
| In order to fight the optional Boss Shardbearer Mohg you will first have to gain access to the western section of Mountaintop of the Giants which leads to Haligtree – see How to Reach West Mountaintops. Once in the western snowy area head to the spot on the map below where you will find a teleporter with a puddle of blood in front of it. Head through it and finish Moghwyn Palace to reach him at the end. » Elden Ring Boss Guide – All Bosses | ||
| Maliketh the Black Blade | Defeated Maliketh the Black Blade | |
| This mandatory Boss will be the final Boss of Farum just before getting back to the Capital for the final stretch of the game. » Elden Ring Boss Guide – All Bosses | ||
| Hoarah Loux the Warrior | Defeated Hoarah Loux the Warrior | |
| This mandatory Boss will be your final roadblock before reaching the last boss of the game. After clearing Farum you will be back in the Capital and at the Elden Throne you will fight Hoarah Loux. » Elden Ring Boss Guide – All Bosses | ||
| Dragonlord Placidusax | Defeated Dragonlord Placidusax | |
| This optional Boss can be found in Farum, the last location of the game. From the Beside the Great Bridge Site of Grace head back to the elevator you came from to this Site. Head outside and drop down the ledge in front of you to a lower ledge. From there follow the rocks and at the floor with skeletons interact with the only empty “grave” to lay down. After a cutscene you will be teleported to the boss area. » Elden Ring Boss Guide – All Bosses | ||
| God-Slaying Armament | Upgraded any armament to its highest stage | |
| You will have to either upgrade a normal weapon to +25 or a special weapon to +10. Check Elden Ring All Smithing Stone Locations & Elden Ring all Somber Smithing Stone Locations on how to get them. You can get a free highest level Stone while progressing through the game towards the optional Boss Malenia. | ||
| Legendary Armaments | Acquired all legendary armaments | |
| MISSABLE TROPHY There are 9 legendary armaments in the game. Legendary Armament #8: Bolt of Gransax is extremely missable because the town it is in gets destroyed at the end of the game and you can no longer reach most items there. Both the Legendeary Weapons and Talismans can be obtained by receiving them from other players in co-op. » Elden Ring All Legendary Armament Locations | ||
| Legendary Ashen Remains | Acquired all legendary ashen remains | |
| There are 6 legendary ashen remains in the game: » Elden Ring All Legendary Ashen Remains Locations | ||
| Legendary Sorceries and Incantations | Acquired all legendary sorceries and incantations | |
| There are 7 legendary sorceries / incantations in the game: » Elden Ring All Legendary Sorceries & Incantations Locations | ||
| Legendary Talismans | Acquired all legendary talismans | |
| There are 8 Legendary Talismans in the game. Both the Legendeary Weapons and Talismans can be obtained by receiving them from other players in co-op. » Elden Ring All Legendary Talisman Locations | ||
| Rennala, Queen of the Full Moon | Defeated Rennala, Queen of the Full Moon | |
| The optional Boss Rennala, Queen of the Full Moon is the final boss of Academy of Raya Lucaria. She grants you a Great Rune which will allow you to respec your skillpoints. While technically being optional you should focus on defeating her early since she is a necessary step towards the Age of the Stars Ending. » Elden Ring Boss Guide – All Bosses | ||
| Lichdragon Fortissax | Defeated Lichdragon Fortissax | |
| MISSABLE TROPHY – can be missed if you kill the NPC “Fia” (non-hostile friendly NPC) after she appears in Deeproot Depths This boss requires several steps to reach it. This is technically missable if you were to kill Fia (friendly non-hostile NPC) at the end before doing the boss fight, but you’d have to intentionally go out of your way to mess this up. 1. (Step 1-5 in video) Go through the steps of Age of the Stars Ending until you receive the “Carian Inverted Statue” from Renna. 2. Use “Carian Inverted Statue” at Study Hall Entrance. This will put the building upside down, allowing you to navigate through it. 3. Make your way through the Study Hall Building, drop down the ledges to the chandeliers and from there to the wooden beams and the elevator. Use the elevator, then head outside through the door, follow the linear path forward over the castle wall to reach the Divine Tower of Liurnia. At the top of the Tower you find the Cursemark of Death. You need to give this to Fia later! 4. After reaching the mandatory story area “Crumbling Farum Azula” (after Fire Giant boss), the Roundtable Hold will be on fire. Now go find Fia in Deeproot Depths. To get there you need to head through Nokron, Eternal City and defeat the Valiant Gargoyle (see its boss trophy). In the room where you fought Valiant Gargoyle there’s the Great Waterfall Basin site of grace and in front of it is a coffin. Interact with the coffin to be brought to the secret area “Deeproot Depths”. 5. Go through Deeproot Depths (from where you spawn go straight and follow the roots) until you reach site of grace “Across the Roots”. Straight ahead of this site of grace is the boss area but first you will encounter 5 of Fia’s Champions, defeat all of them here. 6. Afterward talk to Fia who will be sitting at the edge of the area where you fought her 5 Champions in Deeproot Depths. Pick “No, I want to be Held” > “Talk in Secret” > “Talk in Secret” > “Give Cursemark of Death” (that’s the item you found in Divine Tower of Liurnia). 7. Fast travel back and forth and talk to her each time to refresh her dialogues, do this a few times until she says “This is Goodbye, My Dear”. Fast travel back here one more time and you will find her dead body. 8. Interact with her dead body and select “Yes” to enter the Deathbed Dream. This brings you to the Lichdragon Fortissax boss fight.* » Elden Ring Boss Guide – All Bosses | ||
| Godskin Duo | Defeated Godskin Duo | |
| *The mandatory Boss Godskin Duo can be found in the final area of the game, Farum, before the ending and you will run into them while progressing through the area towards Maliketh the Black Blade. » Elden Ring Boss Guide – All Bosses | ||
| Fire Giant | Defeated Fire Giant | |
| The mandatory Boss Fire Giant can be found in the southeast part of the Mountaintop of the Giants and has to be defeated in order to reach the Forge of the Giants. » Elden Ring Boss Guide – All Bosses | ||
| Dragonkin Soldier of Nokstella | Defeated Dragonkin Soldier of Nokstella | |
| The optional Boss Dragonskin Soldier of Nokstella can be found in the west section of Ainsel River. You can reach this area by using the Ainsel River Well in the east of Liurnia. » Elden Ring Boss Guide – All Bosses | ||
| Regal Ancestor Spirit | Defeated Regal Ancestor Spirit | |
| The optional Boss Regal Ancestor Spirit can be found in the Hallowhorn Grounds in the Ancestral Woods. This is the second version of the deer boss, similar to the one in Siofra River, and for this one you will go through Nokron, Eternal City (you have to go there during one step of the Age of the Stars Ending). Just like with the other Ancestor Spirit from Siofra River, you will have to light braziers in the area and interact with the deer corpse at the Hallowhorn Grounds afterward. There are 6 braziers in the area, see below: » Elden Ring Boss Guide – All Bosses | ||
| Valiant Gargoyle | Defeated Valiant Gargoyle | |
| *The optional Boss Valiant Gargoyle can be found in a hidden area in the north of Siofra River. Head to the northern section or the area and look for floating Jellyfish. They are your lead that you are on the right track. In the Jellyfish area you can drop down to a ledge and follow the path to the aqueducts of the river where you will find this boss fight. It is also your roadblock towards reaching Lichdragon Fortissax. » Elden Ring Boss Guide – All Bosses | ||
| Margit, the Fell Omen | Defeated Margit, the Fell Omen | |
| The optional Boss Margit, the Fell Omen is technically optional because of the possibility of skipping the Stormveil Castle but in reality he is pretty much your first mandatory boss fight in the game. He can be found at the end of the Castleward Tunnel in Stormhill. » Elden Ring Boss Guide – All Bosses | ||
| Red Wolf of Radagon | Defeated the Red Wolf of Radagon | |
| The optional Boss Red Wolf of Radagon is the halfway boss of the Academy of Raya Lucaria on your way to Rennala, Queen of the Full Moon. You will have to clear the area when going towards the Age of the Stars Ending. » Elden Ring Boss Guide – All Bosses | ||
| Godskin Noble | Defeated Godskin Noble | |
| The optional Boss Godskin Noble can be found at the Temple of Eiglay in Volcano Manor. You can reach him by navigating through the Volcano town. In order to reach the Volcano Town in the first place you will have to accept the Volcano Manor Request from the Lady with the Bodyguard in the main foyer of the manor and with the key open the first door in the right in the hallway. There you can find an illusory wall which will be the start of your path into the volcano town. » Elden Ring Boss Guide – All Bosses | ||
| Magma Wyrm Makar | Defeated Magma Wyrm Makar | |
| The optional Boss Magma Wyrm Makar can be found at Ruin-Strewn Precipice Overlook at the end of the Ravine when heading from Liurnia to Altus Plateau. For most players this will be a mandatory fight but you can actually skip the fight by using an elevator, but since you have to get the trophy anyway you shouldn’t bother with the elevator. » Elden Ring Boss Guide – All Bosses | ||
| Godfrey the First Lord | Defeated Godfrey the First Lord | |
| The mandatory Boss Godfrey the First Lord can be found in the Capital and will be a roadblock towards Shardbearer Morgott. You can find him in the upper area of the Capital. » Elden Ring Boss Guide – All Bosses | ||
| Mohg, the Omen | Defeated Mohg, the Omen | |
| The optional Boss Mohg, the Omen can be located in the Sewers underneath the Royal Capital. Head to the Avenue Balcony Site of Grace in the Capital. From there head downstairs, through the door and turn immediately left and jump the fence there. Approximately below the foot of the dragon corpse you will find a well. Keep heading down and at the end you will find Mohg, the Omen. Behind the Altar is a hidden path that will lead you towards Lord of the Frenzied Flame Ending as well. When the capital gets destroyed you can instead find a sewer grate that leads you to the sewers. » Elden Ring Boss Guide – All Bosses | ||
| Mimic Tear | Defeated Mimic Tear | |
| The optional Boss Mimic Tear can be found in Nokron, Eternal City. While it is optional you will run into it while clearing Nokron towards the Age of the Stars Ending. » Elden Ring Boss Guide – All Bosses | ||
| Loretta, Knight of the Haligtree | Defeated Loretta, Knight of the Haligtree | |
| The optional Boss Loretta, Knight of the Haligtree can be found in the Haligtree area. She will be a roadblock on your way towards Malenia the Shardbearer. Check the description for Malenia on how to reach Haligtree. » Elden Ring Boss Guide – All Bosses | ||
| Astel, Naturalborn of the Void | Defeated Astel, Naturalborn of the Void | |
| The optional and missable Boss Astel, Naturalborn of the Void can be found in an isolated section in the south of Ainsel River. You will reach this area through a coffin in the Lake of Rot. This boss is optional but you will defeat it when following the steps towards the Age of the Stars Ending. This boss is your final boss on your way to securing the Ending. » Elden Ring Boss Guide – All Bosses | ||
| Leonine Misbegotten | Defeated Leonine Misbegotten | |
| The optional Boss Leonine Misbegotten can be found at the southmost edge of the Weeping Peninsula. In order to find it you will have to progress through Castle Morne and at the upper levels jump down to a wooden plank to reach the area behind the castle. From there keep heading down towards the beach to find it. » Elden Ring Boss Guide – All Bosses | ||
| Royal Knight Loretta | Defeated Royal Knight Loretta | |
| The optional Boss Royal Knight Loretta is the only boss you will find in Caria Manor. She is a roadblock towards the Age of the Stars Ending and you will defeat her automatically when progressing towards this Ending. » Elden Ring Boss Guide – All Bosses | ||
| Elemer of the Briar | Defeated Elemer of the Briar | |
| The optional Boss Elemer of the Briar can be found in The Shaded Castle in Altus Plateau. He is completely optional and does not award you progress towards other bosses. » Elden Ring Boss Guide – All Bosses | ||
| Ancestor Spirit | Defeated Ancestor Spirit | |
| The optional Boss Ancestor Spirit can be found in Hallowhorn Grounds in Siofra River underground region. In order to fight it you will have to light up 8 Braziers in the area and afterward interact with the deer corpse at the Hallowhorn Grounds. » Elden Ring Boss Guide – All Bosses | ||
| Commander Niall | Defeated Commander Niall | |
| The optional Boss Commander Niallcan can be found in Castle Sol in the Mountaintop of the Giants. Defeating him is also a step towards finding Haligtree region which will lead you to more bosses. » Elden Ring Boss Guide – All Bosses | ||
| Roundtable Hold | Arrived at Roundtable Hold | |
| In order to reach the Roundtable Hold you will have to die to Margit, the Fell Omen a few times. Afterward when sitting at a Site of Grace, Melina will offer to take you there. Agree to go with her. Roundtable Hold is a sort of hub area where you find merchants and a smith. | ||
| Great Rune | Restored the power of a Great Rune | |
| Defeating one of Shardbearers or Rennala will grant you a Great Rune which you will have to then activate at a Divine Tower. Apart from Mohg and Morgott sharing a Tower, every other one has their own Divine Tower you will have to visit. Rennala’s Great Rune has no activation, it simply allows you to respec your stats by talking to her. Godrick’s Divine Tower (reachable through the Limgrave Tower Bridge Site of Grace in Stormveil Castle) Radahn’s Divine Tower (have to access it from the side of the Tower) Malenia’s Divine Tower (reachable through the Divine Bridge Site of Grace in the Capital, a teleporter will be on the left side of the area with the Golem right in front of the Site of Grace) | ||
| Erdtree Aflame | Used kindling to set the Erdtree aflame | |
| Automatic from story progression. It will unlock after talking to Melina at the Forge of the Giant Site of Grace, you go there after defeating the mandatory boss “Fire Giant”, which is a necessary step on your way to the endboss and cannot be missed. |


Changelog:
- 2022-03-23 – Ease of use improvements to Roadmap: Added Screenshots highlighting the path in red, thus making it easier to see where to go. Relinked all named locations to jump straight to that point on the sites of grace page, thus you no longer need to scroll there. For Lichdragon Fortissax some of the steps turned out to be optional and have further been narrowed down in the Roadmap to minimize what you need to look out for. Everything rechecked and up to date for Patch 1.04!