- Estimated Trophy Difficulty: 6.5/10
- Approximate Platinum Time: 60-70 hours
- Offline Trophies: 54 (1, 2, 7, 44)
- Online Trophies: 0
- Missable Trophies: None (Chapter Select available post-story)
- Glitched Trophies: None reported
- Difficulty Affects Trophies?: Yes, Hard Difficulty completion required for platinum
- Minimum Playthroughs: 2 (Easy/Normal + Hard)
- Free-Roam / Chapter Select After Story?: Chapter Select, no traditional free roam. Progress carries over in New Game Plus / Hard Mode.
- Release Date: April 10, 2020
Introduction to the Final Fantasy VII Remake Trophy Guide
Welcome to the ultimate Final Fantasy VII Remake Trophy Guide! This comprehensive guide is designed to help you unlock every trophy and achieve the coveted platinum trophy in Final Fantasy VII Remake, applicable to both the Intergrade PS5 and original PS4 versions. As the first installment in the remake series, FF7 Remake significantly expands the Midgar portion of the original game, introducing a wealth of new content, side quests, and collectibles.
Earning the platinum trophy in Final Fantasy VII Remake essentially requires 100% game completion. This means gathering all key collectibles (excluding Accessories, Armor, and Materia), completing all 26 side quests, and overcoming the challenges the game throws at you. A minimum of two playthroughs is necessary: your initial playthrough to unlock Hard difficulty, followed by a Hard difficulty run to earn specific trophies. Crucially, nothing is missable thanks to the Chapter Select feature unlocked after your first completion, allowing you to revisit any chapter and collect any remaining items or trophies. For those who have already platinumed the PS4 version, save data can be synced to the PS5 Intergrade version from the title screen, automatically unlocking all trophies, including platinum.
Step 1: First Playthrough on Easy Difficulty – Collectibles, Side Quests, and Chapter-Specific Trophies
Begin your trophy journey with a playthrough on Easy difficulty (or any difficulty of your preference, excluding Hard which is initially locked). Hard difficulty becomes accessible only after completing the game on any other difficulty setting, mandating at least two playthroughs. Post-story completion, Chapter Select is unlocked, ensuring no trophy is permanently missable, though replaying entire chapters can be time-consuming.
During this initial playthrough, prioritize achieving 100% completion within each chapter. Focus on completing all available Side Quests, gathering essential collectibles such as Music Discs, Weapons, and Dresses (aim for 3 of the 9 dresses), and securing the semi-missable Chapter-specific trophies.
Side Quests:
- Side Quests are clearly marked on your map with a green icon. While there are 26 side quests in total, only 24 can be completed in a single playthrough due to mutually exclusive quests in Chapter 9. The remaining two will be tackled via Chapter Select later. Consult the Final Fantasy VII Remake Walkthrough & Side Quests for a detailed list, locations, and availability of each side quest.
- In Chapter 9, it’s crucial to complete the Side Quests “The Party Never Stops” and “A Dynamite Body” instead of “The Price of Thievery” and “Shears’ Counterattack”. “The Party Never Stops” is essential as it counts towards a Johnny Incident, required for a separate trophy. Choosing “The Price of Thievery” will lock you out of the Johnny Incident trophy. These quest paths are determined by your choices in Chapter 9. Create a manual save upon reaching the playground with Aerith in Chapter 9 and follow the specific choices outlined in “The Party Never Stops Requirements” guide.
- Utilize the World Map (Touchpad) and press to review available Side Quests in each chapter, ensuring you’ve completed them all before progressing. Side Quests are available in Chapters 3, 8, 9, and 14.
Collectibles:
Semi-Missable Chapter Trophies: (These can be obtained via Chapter Select, but require chapter replay)
- Chapter 3 – Heavenly Dart Player
- Chapter 4 – Biker Boy
- Chapter 6 – Cleanup Crew
- Chapter 7 – In Lockstep
- Chapter 8 – Crate Annihilator
- Chapter 9 – Sultan of Squat
- Chapter 9 – Dancing Queen
- Chapter 9 – Returning Champion
- Chapter 14 – Whack-a-Box Wunderkind
- Chapter 14 – Peeress of Pull-Ups
- Chapter 14 – Divine Gratitude
While this may seem like a lot to keep track of, Final Fantasy VII Remake is designed to be relatively linear, with most items and objectives in plain sight. Semi-missable trophies are primarily associated with minigames. If you encounter a minigame, be aware there’s likely a trophy tied to it. Play thoroughly, collect what you can, and remember you can always mop up anything missed via Chapter Select or during your Hard playthrough. Defer Battle Intel Reports and Enemy Skills completion until after your initial playthrough.
Step 2: Chapter Select for Missed Side Quests and Colosseum Grinding
Upon completing the main story, you gain access to Chapter Select and Hard Difficulty. Chapter Select mode also doubles your XP and triples your AP gains, making it ideal for post-game cleanup and grinding.
Return to Chapter 9 using Chapter Select to complete the two side quests you skipped in your first playthrough: “The Price of Thievery” and “Shears’ Counterattack”. If you completed all other side quests in Step 1, unlocking these final two will grant you the “Best in the Business” trophy for completing all side quests.
Afterward, proceed to the Chapter 14 Colosseum to grind your characters to level 50 and max out all 12 Magic Materia. Maxing out Materia is necessary for completing Battle Intel Reports. Set the game difficulty to Classic in the Game Options to enable AI-controlled combat in the Colosseum, allowing for effortless grinding without manual input. Chapter 14 Colosseum is preferable for grinding due to having three party members, maximizing Materia leveling efficiency compared to the Chapter 9 Colosseum with only two. Complete any remaining Battle Intel Reports (20 in total). Refer to the Final Fantasy VII Remake All Battle Intel Reports and Final Fantasy VII Remake All Materia Locations guides for assistance.
Step 3: Hard Difficulty Playthrough and Hard Mode Exclusive Trophies
Initiate your Hard Difficulty playthrough using Chapter Select ( > System > Chapter Selection). All your progress from previous playthroughs, including equipment and character levels, is carried over, essentially functioning as a New Game Plus. However, in Hard Mode, item usage is completely restricted. Consult the “Hardened Veteran” trophy description for specific tips and optimal character builds for this difficulty.
During this Hard playthrough, adopt a minimalist approach, focusing solely on the main story path and ignoring all side quests and optional activities, initially. This is crucial for acquiring the next set of dresses needed for trophy completion. Certain trophies are exclusive to Hard Mode due to specific enemies only appearing on this difficulty. Focus on obtaining these now: “Master of Mimicry” .
IMPORTANT: SKIP SIDE QUESTS FOR DRESSES! To unlock the next three dresses, avoid completing any side quests in Chapter 3. This ensures Tifa’s “Mature” dress is automatically selected, as skipping quests prevents the “Discovery” event that leads to choosing her other dresses. Similarly, skipping Chapter 8 side quests grants a new dress for Aerith, and skipping Chapter 9 side quests unlocks a new dress for Cloud. This strategy will net you 6 out of 9 dresses by the end of this playthrough. In Chapter 3, you will need to complete at least one side quest to progress the story; the specific quest doesn’t matter for dress acquisition. Skip all others.
Step 4: Obtaining the Final Three Dresses
By this stage, you should only be missing the final three bridal dresses. Use Chapter Select to revisit Chapter 3. This time, trigger Tifa’s “Discovery” event and select your final dress option (either “Exotic” or “Sporty”). Complete Chapter 3 to save your choice and exit to Chapter Select.
Next, jump to Chapter 8 via Chapter Select. Complete 3 out of the 6 available side quests in this chapter, and then finish Chapter 8. This will unlock Aerith’s last dress. Skipping Chapters 4-7 is safe; your dress choices carry over to Chapter 9 automatically.
Finally, in Chapter 9, choose the opposite set of side quests from your first playthrough. Complete these quests and continue playing to the end of Chapter 9 to unlock Cloud’s final dress.
If you are still missing any dresses, refer to the detailed guide: Final Fantasy VII Remake How to Get All Bridal Outfits (Dresses).
Useful Tips, Tricks, and Guides:
Final Fantasy VII Remake Trophy Guide – Detailed Trophy Breakdown
For DLC Trophy Guides, see:
» Final Fantasy VII Remake Intermission (Yuffie) DLC Trophy Guide & Roadmap
| Trophy Icon | Trophy Name | Trophy Description | Icon |
|---|---|---|---|
| Master of Fate | Earn all FINAL FANTASY VII REMAKE trophies. | ||
| Description: Earn all other trophies in Final Fantasy 7 Remake Part 1 to unlock Platinum (DLC and other VII Remake Parts not required). | |||
| Onetime Gig | Complete Chapter 1. | ||
| Description: Automatic story-related trophy, cannot be missed – see Chapter 1 Walkthrough. | |||
| Description: Automatic story-related trophy, cannot be missed – see Chapter 2 Walkthrough. | |||
| Description: Automatic story-related trophy, cannot be missed – see Chapter 3 Walkthrough. | |||
| Description: Automatic story-related trophy, cannot be missed – see Chapter 4 Walkthrough. | |||
| Description: Automatic story-related trophy, cannot be missed – see Chapter 5 Walkthrough. | |||
| Description: Automatic story-related trophy, cannot be missed – see Chapter 6 Walkthrough. | |||
| Description: Automatic story-related trophy, cannot be missed – see Chapter 7 Walkthrough. | |||
| Description: Automatic story-related trophy, cannot be missed – see Chapter 8 Walkthrough. | |||
| Description: Automatic story-related trophy, cannot be missed – see Chapter 9 Walkthrough. | |||
| Description: Automatic story-related trophy, cannot be missed – see Chapter 10 Walkthrough. | |||
| Description: Automatic story-related trophy, cannot be missed – see Chapter 11 Walkthrough. | |||
| Description: Automatic story-related trophy, cannot be missed – see Chapter 12 Walkthrough. | |||
| Description: Automatic story-related trophy, cannot be missed – see Chapter 13 Walkthrough. | |||
| Description: Automatic story-related trophy, cannot be missed – see Chapter 14 Walkthrough. | |||
| Description: Automatic story-related trophy, cannot be missed – see Chapter 15 Walkthrough. | |||
| Description: Automatic story-related trophy, cannot be missed – see Chapter 16 Walkthrough. | |||
| Description: Automatic story-related trophy, cannot be missed – see Chapter 17 Walkthrough. | |||
| Description: Automatic story-related trophy, cannot be missed – see Chapter 18 Walkthrough. | |||
| Description: Automatic story-related trophy, cannot be missed. This will be the first trophy you unlock, for defeating the first group of enemies at the start of the game. | |||
| Description: You can view enemy’s weaknesses by using the Assess ability, automatically unlocked in Chapter 3. Once you use Assess, the weakness will be shown on a popup-screen in the top right corner. You can also look up weaknesses outside of battle by pressing (Main Menu) > Enemy Intel (the ones you used Assess on have a magnifier symbol). Enemies are weak against a certain status element (Fire, Ice, Thunder, Wind). Using the correct element will unlock the trophy. For example, the weakness of the first Boss “Scorpion Sentinel” is Thunder. So you could use Barret’s Thunder Magic to get the trophy in the first mission. | |||
| Description: Some enemies will occasionally bind your party members with unblockable attacks. If your character is bound and unable to act, quickly switch to a different character and attack. This will free the bound party member and unlock the trophy. For example, you can do this against the very first boss “Scorpion Sentinel”. When you stand in front of it, it will sometimes grab you and hold you in the air. Press / to switch to the other party member and attack before it finishes its grapple sequence. Odds are this will come naturally over the course of the game. | |||
| Description: Automatic story-related trophy, cannot be missed. When you attack an enemy enough times they will “stagger” (=getting stunned). You can do this as early as the first guard dog you encounter. Over the course of the story you will automatically stagger hundreds of enemies. | |||
| Description: See trophy “Disc Jockey”. | |||
| Description: See trophy “Best in the Business”. | |||
| Description: To max out a weapon’s proficiency you must use its unique combat ability in battle many times. Each use levels up the proficiency. During combat, attack enemies with > Upgrade Weapons (unlocked in Chapter 3) > select Character > it will show you the weapon overview. On the right side it shows a movie preview the weapon’s ability, under the movie preview it shows the name of the move (e.g. Focused Thrust under Buster Sword weapon). Below that it says Proficiency %. You need 100% with all weapons in the game! » Final Fantasy 7 (VII) Remake – All Weapon Locations Note: it doesn’t count Cloud’s starting weapon “Buster Sword”. You can get it with his second obtained weapon “Iron Blade”. | |||
| Description: Materia are the magic spells you find and buy throughout the game (e.g. Fire, Healing etc). To level up a materia you need to earn AP with it (basically the XP for your magic spells). You gain AP from every combat encounter. Actively using a Magic Spell levels it up faster, but you always get AP for every battle even if you don’t use it. So simply have the same Materia equipped for a while and this should unlock at some point in Chapter 3. To equip Materia, press > Materia & Equipment > Select Character (e.g. Cloud) > to slot a Materia into your weapon or accessory. | |||
| Description: You unlock your first Summon (Ifrit) automatically in Chapter 3, cannot be missed. You will receive a tutorial prompt about this. Once you have it, equip it by pressing > Materia & Equipment > Select Character (e.g. Cloud) > to open the Command Menu and select Summons at the bottom. The trophy pops instantly when selecting this option. » Final Fantasy 7 (VII) Remake – All Summons | |||
| Description: Chapter 4 / Motorcycle Mini-Game (very start of chapter) This trophy is based either on how much health you finish the Bike Sequence with (at least 80%) or on how many attacks you get hit with that slow you down (soldier’s thrown bombs, drone’s shock, Roche’s electricity on floor). You can only get hit by 2 of those attacks that make you slow down. If you get hit a 3rd time Jessie says “Hit the breaks if you cannot avoid attacks” which voids the trophy. Just try not to get hit and not taking damage. This is best done on easy difficulty. The Bike Sequence takes place at the very start of the chapter and lasts around 10 minutes. First you drive in a tunnel where some enemies on bikes and drones will attack you. You can accelerate with and slow down with or use your special hits. Try to get as much damage in as possible. When he is about to use a melee bike slam, drive sideways and it won’t hit you if you’re far enough away. On the first playthrough of the chapter you will probably miss this trophy. Either keep a Save Game at the end of Chapter 3 so you can reload and repeat immediately, or do it via Chapter Select after the story. | |||
| Description: Chapter 3 / Objective: Talking Strategy / Area: Residential Area After you rescued Johnny in Chapter 3 you will go back to Seventh Heaven Bar with Tifa. At this point the story objective forces you to use the Darts Minigame to pass time. This is where you can get the trophy. If you missed this you can replay Chapter 3 via Chapter Select after the story (you also come back to the bar once more in Chapter 4). To beat the leaderboard highscore you must win the Darts Minigame in 7 throws or less (6 throws being the bare minimum possible). The record is 8. Getting it in 8 throws won’t unlock the trophy, it has to be 7 to beat the leaderboard. You need to clear 301 points total to win. The easiest method is to make 5 throws in the bullseye (5 x 50 = 250 points), 1 throw in T17 (3 x 17 = 51 points). This way you can finish in 6 darts, allowing you to mess up 1 throw and still get it in 7 total. You don’t even need to hit the red center of the bullseye, hitting the green ring around it still gives 50 points. On each throw the cursor will be shaking. Put the cursor over the bullseye and steer against the cursor shake (so if you notice the cursor pulling to the right you very slightly pull left to keep it centered). When the cursor narrows down to a yellow circle you make your throw – it will hit exactly where you’re aiming. So basically you need to get 2 things right: balance the cursor wobble and have perfect timing. You only have 2 opportunities per dart to have a perfectly narrow cursor. Always throw on the 2nd opportunity. It’s better to ignore the 1st opportunity and balance out the cursor wobble instead to make it stay in the center. If you mess up you can pause and quit the minigame immediately to retry it. You don’t need to finish it every time, that would only waste time. It takes quite a lot of practice but you can retry as often as you want. | |||
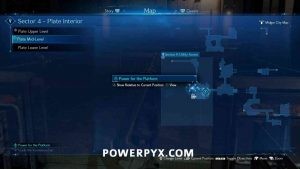
| Description: Chapter 6 / Objective: Power for the Platform / Area: Plate Mid Level (Section H Utility Access) In Chapter 6 when you climb past the wall with big fans that blow out air, Tifa will make a comment that she spotted something behind one of the fans and a purple “Discovery” icon is added on the map. You won’t be able to reach this right away. After you return from turning off all 3 Sun Lamps you are supposed to use the big cargo elevator. But instead of doing so, head west from the cargo elevator to find a smaller elevator (direction where you had to climb past some fans that blow out air). These two screenshots show the elevator location: | |||
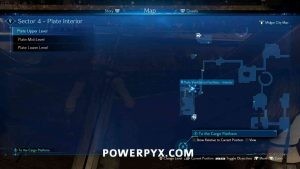
| Description: Chapter 7 / Discovery: Waste Recovery (Objective: Storm the Gates) / Area: Front Gate (Security Ops) When the story forces Cloud, Tifa, Barret to push 3 switches simultaneously in sync to open a door, there will be a purple discovery marker on the map. Use the terminal where the purple marker is. Then you have to use the 3 switches again and push them in sync for 4 times in a row. It will open the vault door to the Waste Recovery room and unlock the trophy. You don’t need to hold on to the keycards you find throughout the level (those are not relevant for the trophy), so feel free to spend them on the Airbuster terminals. The images below show the location of the terminal: | |||
| Description: Chapter 8 – Side Quest: A Verified Hero Requirements: In Chapter 8 complete Side Quests “Kids on Patrol” –> “A Verified Hero“. In “A Verified Hero” Side Quest you get to play Whack-a-Box. This can be repeated after the side quest as many times as you wish. In order to get this trophy you must beat the high score of 30,000 points. It’s only one challenge, not multiple. This challenge consists of smashing some boxes within a time limit. There are 3 colors of boxes: Yellow is for points only, Blue is for points + ATB gauge, Red is for bonus time. The basic strategy for reaching 30,000 is that you must reach as many red time blocks as possible and not get stuck trying to clear all boxes in one area. The only two attacks you’re going to use are holding for a circular sword slash (destroys yellow boxes in 1 hit, blue boxes in 2 hits) and the “Triple Slash” ability of the Iron Blade sword. Be sure to equip the Iron Blade weapon for Cloud, it has the “Triple Slash” Ability. Use Triple Slash twice on those large 1500 point boxes that are blocking your way. Two uses are enough to destroy them, which is the fastest method. From those 1500 point boxes only destroy those that are mandatory to advance, they take too long and give too few points so don’t get stuck with them. What you must do is connect the path from one red time box to the next as fast as possible, doing a few sword slashes where lots of boxes are close together, but not slowing down to destroy small numbers of boxes. Ignore all 1500 point boxes except those mandatory to advance. | |||
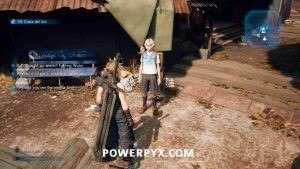
| Description: Automatic story-related trophy, cannot be missed. Unlocks near the end of Chapter 8, just before the Reno boss. The story makes it mandatory for you to go flower picking with Aerith and bring them to the Leaf House (orphanage / school). The trophy will unlock later into the Chapter during Objective “Requests for the Mercenary” when Side Quests become available. Regardless of whether or not you do any side quests, the story makes you go back to Aerith’s house. On your way there, a woman in front of Leaf House will stop you automatically and show you the flower arrangement, at which point the trophy unlocks. There is no way to miss this, so don’t even worry about it. | |||
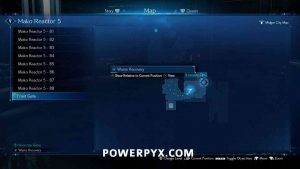
| Description: The earliest you can do this is in Chapter 8, during the free roam section in the Slums (where side quests spawn). There you meet Chadley again, the guy who gave you Battle Intel Reports in Chapter 3 already. Once you’ve completed Battle Reports 1-4 for him, he’ll unlock VR missions for you. Simply talk to Chadley to start the VR mission. The first one you unlock is for defeating the Shiva Summon, which unlocks this trophy. Below is Chadley’s Location in Chapter 8: | |||
| Description: Chapter 9 – Side Quest: Burning Thighs First, you must complete Side Quest “Burning Thighs” in Chapter 9. There are 3 Squat Challenges total (Trainee, Amateur, Pro). The first Squat Challenge (Trainee) is automatically completed as part of the side quest. After completing the quest, you can talk to Jay in the Gym for the Amateur challenge and then challenge Jules for the Pro Challenge. After you did all 3 the trophy unlocks. All you must do is press with the right timing. If you press a button too slow or too fast you’ll fall down which costs you time. The goal is to do more Squats than your opponent. In the last 2 challenges you will get fatigued and must smash when the button shows. The more squats you have done successfully in a row, the faster you can press the buttons without falling down. | |||
| Description: Chapter 9 / Objective: Aerith’s Plan / Area: Honeybee Inn After Aerith has changed into a new dress, she will take you to Honeybee Inn where you’re supposed to get the approval of Andrea to audition for Don Corneo. There will be a forced dancing minigame. The dancing tutorial doesn’t matter for it (but it does give a Music CD Collectible if you get 10x “Great” rating, so do it). For this trophy only the main dance with Andrea matters. It goes on for about 3 minutes. All you do is press the buttons shown on screen when they start to glow (a hexagon around the button will narrow down and start glowing, that’s when you need to press it for a “Great” rating). To get this trophy you must finish the Dance with a very high overall rating. I got 26 x “Great” / 2 x “Good” / 0 x “Bad” when the trophy unlocked. When you’re doing it right, you will see Aerith clapping her hands above her head. If she’s applauding you’ll get the trophy after Cloud puts on his dress after the dance. If Aerith makes a comment like “Well you tried” you have failed. It’s highly recommended you make a manual save before the dance (as soon as you enter Honeybee Inn). Because if you fail you cannot repeat the dance unless you reload a previous save. Here are the required button presses: | |||
| Description: Chapter 9 / Objective: Underground Colosseum / Area: Wall Market After winning the Colosseum Tournament as part of the story (defeated Hell House boss, unmissable), you can go back into the basement of the Colosseum and talk to the NPC there to start sparring sessions. Do the first one that is 1 star difficulty and this trophy will unlock. | |||
| Description: See trophy “Dressed to the Nines”. | |||
| Dressed to the Nines | Obtain all nine bridal candidate outfits. | ||
| Description: » Final Fantasy 7 (VII) Remake – How to Get All Bridal Outfits (Dresses) | |||
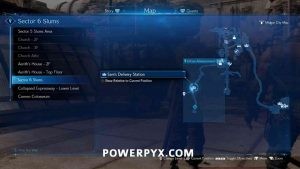
| Description: Chapter 14 / Objective: Intel Gathering / Area: Sector 5 Slums (Children’s Secret Hideout) You can find the Whack-a-Box challenge in Chapter 14, in the Children’s Hideout of the Sector 5 Slums. It’s in the exact same place where the Normal difficulty Whack-a-Box took place in Chapter 8 (Crate Annihilator trophy). You need to have played Side Quest “A Verified Hero” in Chapter 8, that’s the quest that unlocked the Whack-a-Box minigame originally. Just like with the Normal difficulty Whack-a-Box you need to reach 30,000 points in the given time limit to get the trophy. It’s only really 1 challenge and not multiple, every 10,000 points gives a different reward. Like before there are different colors of boxes (red = time, blue = ATB gauge, yellow = just points). Make it your goal to get from one red gate to the next as fast as possible. Getting the time boosts is the key to win. Also use the Iron Blade’s Triple Slash again on the big blue boxes. Two uses of that is enough to destroy a big blue box very quickly. Only destroy the big blue boxes that are directly blocking your path, ignore the optional ones, and instead focus on the areas with many small boxes close together. Hold to use your sweep for destroying small boxes (yellow ones are destroyed in 1 hit, blue ones in 2 hits). | |||
| Description: Chapter 14 – Side Quest: Wavering Heart In Chapter 14, as soon as you can free roam, return to the Gym in Wall Market (Sector 6 Slums) where the Squat Challenge took place in Chapter 9. There will be a quest giver in the gym for Side Quest “Wavering Heart”. Completing this Side Quest automatically completes the first Pull-Up Challenge (Trainee level). After this you need to talk to two other people in the gym – Jay for the Amateur challenge and Jules for Pro challenge. Complete all 3 of them and the trophy will unlock. It’s very similar to the Squat Challenges. All you do is press some buttons in a rhythm. The difference this time is that the button combo you must press changes each round so you need to readjust your button presses. The timing aspect is still the same as with Squats. The more successful pull-ups you do in succession, the faster you can press the buttons and build up more speed. When you get fatigued a button prompt shows up on screen and you must smash this button quickly or else you fall down. The trick to winning is to just do it without falling down. Your opponents will always fall down at some point, as long as you don’t mess up and build up your speed, you will overtake them. | |||
| Description: Chapter 14 / Objective: Over the Wall / Area: Sector 6 Slums (Urban Advancement District) This trophy requires you to have done all side quests on your playthrough (all 24 of 26 possible quests, in chapter 9 you can only get 3/5 quests per playthrough so it’s impossible to do all 26 in one playthrough. It may be enough to just get all quests in Chapter 14 but this is unconfirmed. Getting 24 quests in 1 playthrough will unlock it for certain). If you did the side quests then the Letter from the Angel will spawn at the end of Chapter 14, thanking you for your services to the people. Picking up that letter collectible unlocks the trophy. It’s a blue glowing item on the main path to the last objective in Chapter 14, in plain sight and impossible not to see. This is after returning from the Sewers and turning in your last Side Quests. It’s on the narrow path just before reaching the wall with “Avalanche” sprayed on it. If you go to the wall you’ll also get a Point of No Return warning and can still turn back. For all Side Quests see » Final Fantasy 7 (VII) Remake Walkthrough (All Side Quests). | |||
| Description: » Final Fantasy 7 (VII) Remake – All Johnny Incident Locations» Final Fantasy 7 (VII) Remake – All Collectible Locations (including Johnny Incidents) | |||
| Description: There are 26 Side Quests total. You cannot get all of them on the first playthrough. Only 24 of 26 are possible on the first playthrough. The reason being that in Chapter 9 two side quests The Party Never Stops, A Dynamite Body cancel out The Price of Thievery, Shears’ Counterattack (and vice versa). Depending on your choices in Chapter 9 you will get one or the other. You HAVE TO get the missing 2 quests through Chapter Select. All Side Quests have Quest Givers with a green icon above their head. Only the following Chapters contain Side Quests: Chapter 3, 8, 9, 14. They are also marked on the map by a green icon, except in Chapter 14 where they are not on the map. If you miss a quest you can do it after the story via Chapter Select. To view your completed quests, press Touchpad (Map) > (Quests). After the story you can check your totals under (Main Menu) > System > Play Log > Odd Jobs Completed. Check the links below for pages to each quest (text, screenshots, video guides): » Final Fantasy 7 (VII) Remake – All Side Quest Walkthroughs Chapter 3: Chapter 8: Chapter 9: Chapter 14: | |||
| Description: » Final Fantasy 7 (VII) Remake – All Music Disc Locations» Final Fantasy 7 (VII) Remake – All Collectible Locations (including Music Discs) | |||
| Description: Level 50 is the level cap in FF VII Remake (highest level you can reach). After the first playthrough you unlock Chapter Select and earn twice and much XP. Also equip the EXP Up Materia that you get from the Combat Simulator in Chapter 16. This way you get 4 times as much XP! You’ll probably be Level 30-40 if you did the first playthrough thoroughly. Use Chapter Select to jump to Chapter 9 and play the Colosseum Fights. You can put the game on Classic difficulty so the AI plays for you and you can go away and take a break. Let it grind the Colosseum for you for a while and you’ll be Level 50 in no time! Even if you don’t, you’ll reach Level 50 shortly after starting your Hard Playthrough, so this is basically unmissable on the path to platinum. You can check your character level in the Main Menu (press ). | |||
| Description: There are three ways to increase an enemy’s Stagger %. Using Tifa’s Chi abilities (her default attacks), will increase the % the higher her Chi level, with Whirling Uppercut being the lowest, Omnistrike the middle and Rise and Fall the highest. In order to use Omnistrike / Rise and Fall you must use Tifa’s Unbridled Strength ability which consumes 1ATB and upgrades her moves to cause more stagger increase. Secondly, the True Strike ability learned from Tifa’s 6th weapon, Purple Pain (obtained in Chapter 16), will also increase it by 30% with each use. It costs 1ATB charge. Lastly, Aerith’s Ray of Judgment will increase stagger damage % pretty significantly. For the best enemy to get 300% on, it’s recommended to fight Fat Chocobo in Chadley’s VR simulation, as he has an incredibly long Stagger period. You might have to do this on Normal or Hard difficulty though, as on Easy there’s a good chance he will die before you hit the 300% mark (if you’re already high level). You find Chadley at multiple points in the game, for example Chapter 14 in Sector 5 Slums. The best method is to buff Tifa twice in a row with Unbridled Strength to upgrade her move to Rise and Fall. Build up another 2 ATB charges before Fat Chocobo is staggered. Then use two moves Rise and Fall + Omnistrike. Use your 2 ATB charges to cast True Strike (+60% stagger). Attack with Whirling Uppercut to get 5% stagger increase with each hit and it also builds up more ATB. When you have 1 ATB use True Strike again. This way you can easily get bosses to over 400% stagger in a few seconds. For 300% stagger you can actually do it by just using Unbridled Strength, True Strike is not mandatory but makes it easier. Note: During Chapter 18 there’s a bike sequence with a boss that you’ll automatically stagger to more than 300% but this one doesn’t unlock the trophy! You have to use the legit method. | |||
| Description: » Final Fantasy 7 (VII) Remake – How to Get All Battle Intel Reports | |||
| Description: » Final Fantasy 7 (VII) Remake – All Weapon Locations & How to Get All Weapon Abilities » Final Fantasy 7 (VII) Remake – All Collectible Locations (including Weapons) | |||
| Description: » Final Fantasy 7 (VII) Remake – All Enemy Skill Locations | |||
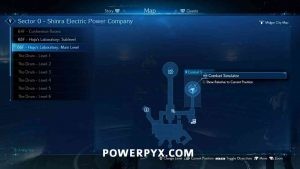
| Description: In order to fight a Malboro, you need to finish the game to unlock Hard Mode. Then, you’ll get a notification that new battles are available in the VR Simulator in Chapter 17 (do not confuse with Chapter 16 Simulator, it’s a new one). Load Chapter 17 and proceed a couple of minutes into it to get a cutscene with Chadley where he’ll tell you he has new Hard-only challenges for you. It’s in the corridor immediately after the first enemy encounter in this chapter (Objective: A Way Out / Area: 66F Hojo’s Laboratory: Main Level), see location image below: The battle with the Malboro is the 5th round of the 13th challenge, named ‘Three-Person Team vs. Monsters of Legend.’ This is exclusive to hard difficulty and not available on lower difficulties. It costs 600 Gil to enter, which should be entirely negligible at this stage of the game. The best team is Cloud, Tifa and Aerith. Cloud is obviously the strongest character, whilst Tifa is great for building Stagger and Aerith is the best healer. The general loadouts and strategies as detailed in ‘Hardened Veteran’ should suffice here, as this iteration of Malboro doesn’t live up to the reputation of its companion in other Final Fantasy games. However, don’t forget to equip at least one of your characters with the ‘Enemy Skill’ Materia so that you can learn Bad Breath, a skill needed for the Master of Mimicry trophy. To get to Malboro, you first need to defeat a Bomb, a Tonberry, a Type-0 Behemoth and then a Bomb and Tonberry together. None of these should pose any threat at this stage if you’re patient and keep your party’s health up. The good thing about these fights being in the Simulator is that it replenishes 50% of your HP and MP after every battle, meaning you can be more liberal with your Healing Spells. Malboro himself is similarly easy. In fact, the most annoying part about this fight is that you have to get hit by Bad Breath to learn the Enemy Skill. Just stand in front of the Malboro until it uses the attack and then heals up. Once that’s done, you can just attack it from behind as it only attacks out of its mouth with Bad Breath, Acid and Test Bite. Roll behind it and attack with Cloud, building up the Stagger bar with Focused Thrust. If it turns around and attacks you, then either try and roll around it to continue your assault or just swap to Tifa to go behind it while it’s engaged with Cloud, again using Focused Strike. Malboro can’t face both characters at once so hit it from both sides with a pincer movement, attacking it with the character who is behind until it turns around, then swap. Malboro has no weaknesses to magic, so Aerith should be your designated healer with Magnify-Cure and she should also have a maxed Cleansing Materia equipped so she can use Esuna on any character who does happen to be hit by Bad Breath. If you’re on top of the fight, you can use her to attack Malboro from afar with normal attacks or Ray of Judgment as he can only attack from up close, but her priority should always be to heal while the other two do the damage. Malboro will go down soon enough and you’ll be rewarded with this trophy. | |||
| Ultimate Weapon | Defeat the Pride and Joy prototype. | ||
| Description: The Pride and Joy Prototype is Final Fantasy VII Remake’s ‘superboss’. You can fight it in the Shinra Combat Simulator in Chapter 17, same place where you fight Malboro. It is only available on HARD difficulty. You must also have completed all Corneo Colosseum challenges in Chapter 9/14 and 13 Shinra Combat Simulator challenges in Chapter 17 (those you can all do on classic/easy). If you’re missing the Aerith solo challenge in the Corneo Colosseum then reload Chapter 9 and accept the challenge IMMEDIATELY after defeating Hell House. This is the only time in the game that Aerith is available at the Colosseum. If you proceed too far, she will leave the party. Location: load chapter 17 (on hard difficulty) and proceed a couple of minutes into it to get a cutscene with Chadley where he’ll tell you he has new hard-only challenges for you. It’s in the corridor immediately after the first enemy encounter in this chapter (Objective: A Way Out / Area: 66F Hojo’s Laboratory: Main Level), see location image below: [ attacks and True Strike to build the Stagger % whilst Cloud uses his strongest abilities like Blade Burst or Triple Slash. Aerith should always heal with Magnify-Cure as soon as a character goes below half health and she can chip away at the enemy’s HP if you’re well-healed. She’s particularly useful for attacking during the Leviathan fight once it takes to the air and circles the arena as Cloud and Tifa really struggle against aerial enemies. The 4th round is the truly hard part. Bahamut alone is a lethal enough foe, never mind summoning Ifrit to join him once he hits half health. The problem is his use of Megaflare, which will instantly deal 9999 damage to all 3 characters. There are only a few ways to survive this: Stagger him before he counts down from 5 (unlikely), have the Reprieve ability from the Level 6 weapon cores which will leave you on 1HP, or cast Manawall (Barrier Materia) which halves all damage taken (5000 instead of 9999 damage). Luckily, he has a short cooldown period after unleashing Megaflare so it gives you enough time for a Curaga. It’s worth saving Cloud and Tifa’s Limit Breaks for Ifrit when he spawns. He can be a real menace and quickly turn the tide against you if you’re not careful, so taking him out is the top priority; Bahamut can wait. Luckily, he has fairly low HP, so one Ascension or Dolphin Flurry can wipe out half his HP bar, or kill him entirely if you’ve saved up both. Bahamut will then start counting down to another Megaflare, but he should be running fairly low on HP by this point and you should kill him with the tried and tested tactics before this happens. After getting through all this, Pride and Joy is a relief and actually quite easy. Similar to Malboro, the best bet is to get behind its legs and just keep attacking it to build the Stagger bar. It will intermittently expel jets of fire which will damage you, but not badly. Its most annoying attack is Catch, where it grabs one of your characters, leaving them unable to move, and eventually uses Brutal Tackle to slam them to the ground and instantly kill them. The only way to stop it is to attack its hand long enough so that it drops the character. What makes this fight easy is that all of its attacks are close range, except Beam Cannon. Therefore, you can keep Aerith out of the way and healing regularly while Cloud and Tifa pound it with physical attacks up close. Even if one of them goes down, she can Raise from afar with very little chance of being interrupted (make sure you have Revival Materia on all 3 characters, you can buy more of it from the vending machine outside the Combat Simulator). Once it goes down, you will be rewarded with the Gotterdammerung, the best Accessory in the game. This grants you a Limit Break at the start of every fight and fills the Limit Gauge gradually during battle (usually 1-2 minutes). This trivializes battles against normal enemies and significantly helps with the remaining bosses on hard difficulty. | |||
| Description: Hard difficulty is unlocked when you finish the game for the first time (on any difficulty). In hard mode enemies have more health and deal more damage. You can’t use items at all, and benches only restore HP, not MP. However, after finishing the game once you do gain 2x XP and 3x AP, meaning you should hit Level 50 quickly and improve Materia faster. For a list of combat tactics, best loadouts and other tips check the guide below. » Final Fantasy 7 (VII) Remake Hard Difficulty Guide – Best Loadout, Tips & Tricks » Final Fantasy 7 (VII) Remake Boss Guide (Hard Difficulty) |
For DLC Trophy Guides, see:
» Final Fantasy VII Remake Intermission (Yuffie) DLC Trophy Guide & Roadmap
Special Thanks / Credits
Massive thanks to the following people for helping in the creation of this guide:
Darth_Krid = Hard difficulty trophy info, various Wiki contributions, Side Quests
Archavia = Various info gathering
« PrevFinal Fantasy VII Remake Trophy List RevealedNext »Final Fantasy VII Remake INTERmission Yuffie DLC Trophy Guide & Roadmap
Shares 0