Submarines in Final Fantasy XIV offer a unique and engaging way to explore Eorzea’s vast underwater world, gather valuable resources, and even bring in substantial Gil. If you’re looking to get started with submarines or optimize your existing fleet, this guide will cover everything you need to know.
Getting Started with Submarines
Before you can command your own fleet of submarines, you’ll need to meet a few prerequisites. First and foremost, you must be part of a Free Company and have access to a Free Company Workshop.
Requirements to Unlock Submarines:
- Free Company Rank 6: Your Free Company must have reached rank 6.
- Free Company House: Your FC needs to own a house in any residential district.
- Free Company Workshop: You must purchase and set up a workshop within your Free Company house.
Once you have these prerequisites in place, you can begin crafting your first submarine, the Shark-class.
Understanding Submarine Stats
Each submarine and its parts come with specific stats that influence its performance on voyages. Understanding these stats is crucial for building effective submarines for different purposes.
- Surveillance: This stat affects the weather patterns your submarine encounters in a sector. Weather conditions influence loot tables, with rarer loot often requiring specific weather. Higher Surveillance increases your chances of encountering favorable weather for better rewards.
- Retrieval: Retrieval determines the yield of items your submarine brings back – poor, normal, or optimal. A higher Retrieval stat means you’re more likely to get an optimal yield, maximizing your loot.
- Speed: Speed impacts the duration of your submarine voyages. Higher Speed reduces voyage time, allowing for more frequent expeditions.
- Range: Range dictates the maximum distance your submarine can travel. A higher Range unlocks access to more distant and potentially more rewarding sectors.
- Favor: Favor influences the number of anomalies detected at a destination, often referred to as “Double Dipping.” More anomalies mean more opportunities for loot within a single voyage.
Image: Shark-class submarine model, the starting submarine build for Free Companies in FFXIV.
Image: Coelacanth-class submarine model, a versatile submarine hull for balanced builds.
Recommended Submarine Builds
Different submarine builds excel at different tasks. Here are some effective builds for various purposes:
Exploration Build
This build prioritizes unlocking new sectors and is ideal when new submarine content is released. It boasts a high Surveillance stat to increase the success rate of discovering uncharted areas.
- Hull: Modified Coelacanth-class Pressure Hull
- Stern: Modified Unkiu-class Stern
- Bow: Modified Unkiu-class Bow
- Bridge: Modified Syldra-class Bridge
Stats: 240 Surveillance / 115 Retrieval / 125 Speed / 165 Range / 195 Favor
This build is excellent for initial exploration. While its Retrieval is lower, its high Surveillance and Favor make it adept at finding new areas quickly.
Surveillance Heavy Builds
When new, desirable loot is introduced, especially rare minions or crafting materials, Surveillance Heavy builds become invaluable. These builds maximize Surveillance and Favor to target sectors with specific weather conditions for the best loot drops.
Surveillance Heavy Build 1:
- Hull: Modified Coelacanth-class Pressure Hull
- Stern: Modified Unkiu-class Stern
- Bow: Modified Syldra-class Bow
- Bridge: Modified Coelacanth-class Bridge
Stats: 220 Surveillance / 120 Retrieval / 130 Speed / 175 Range / 210 Favor
Surveillance Heavy Build 2:
- Hull: Modified Coelacanth-class Pressure Hull
- Stern: Modified Unkiu-class Stern
- Bow: Modified Syldra-class Bow
- Bridge: Modified Syldra-class Bridge
Stats: 220 Surveillance / 120 Retrieval / 90 Speed / 215 Range / 215 Favor
Both Surveillance Heavy builds offer similar Surveillance and Retrieval, but Build 2 sacrifices some Speed for significantly increased Range and Favor, making it suitable for longer voyages and anomaly hunting.
Purpose Builds: Material Farming
Purpose builds are specialized for farming specific materials. While not as versatile, they are highly efficient for accumulating resources like Pure Titanium Ore, Cryptomeria Logs, or Kamacite Ore.
Pure Titanium Ore and Cryptomeria Logs Farming Build:
- Hull: Modified Shark-class Pressure Hull
- Stern: Modified Syldra-class Stern
- Bow: Modified Shark-class Bow
- Bridge: Modified Coelacanth-class Bridge
Stats: 185 Surveillance / 240 Retrieval / 150 Speed / 70 Range / 175 Favor
Kamacite Farming Build:
- Hull: Modified Shark-class Pressure Hull
- Stern: Modified Coelacanth-class Stern
- Bow: Modified Shark-class Bow
- Bridge: Modified Coelacanth-class Bridge
Stats: 175 Surveillance / 205 Retrieval / 155 Speed / 110 Range / 195 Favor
These builds prioritize Retrieval to maximize the yield of targeted materials. The choice between them depends on the specific materials you need to farm.
Gil Farming Builds
Gil farming builds focus on retrieving items that can be sold to NPCs for a high price. Sectors like Unidentified Derelicts, The Wreckage of Discovery, Concealed Bay, and The Wreckage of the Highwind are prime locations for these builds. Items like Extravagant Salvaged Rings, selling for around 27,000 Gil to NPCs, make these voyages highly profitable.
Gil Farming Build 1:
- Hull: Modified Shark-class Pressure Hull
- Stern: Modified Shark-class Stern
- Bow: Modified Shark-class Bow
- Bridge: Modified Syldra-class Bridge
Stats: 140 Surveillance / 205 Retrieval / 145 Speed / 155 Range / 195 Favor
Gil Farming Build 2:
- Hull: Modified Shark-class Pressure Hull
- Stern: Modified Coelacanth-class Stern
- Bow: Modified Shark-class Bow
- Bridge: Modified Shark-class Bridge
Stats: 140 Surveillance / 210 Retrieval / 150 Speed / 145 Range / 175 Favor
Both Gil Farming builds offer a good balance of Retrieval and Speed, ensuring profitable and relatively quick voyages.
Submarine Exploration Areas and Loot Tables
Understanding the different exploration areas and their loot tables is essential for targeted farming. Here are maps and loot information for key sectors:
Image: Map of first set of submarine exploration areas, visually representing sector connections and locations.
Image: Map of second set of submarine exploration areas, expanding on the initial map with further sectors and routes.
Deep Sea Site (First Area):
Image: Loot table for Deep Sea Site, detailing potential item drops and their rarity.
Image: Continued loot table for Deep Sea Site, completing the list of possible rewards.
The Sea of Ash (Second Area):
Image: Loot table for The Sea of Ash, displaying the items obtainable in this volcanic sector.
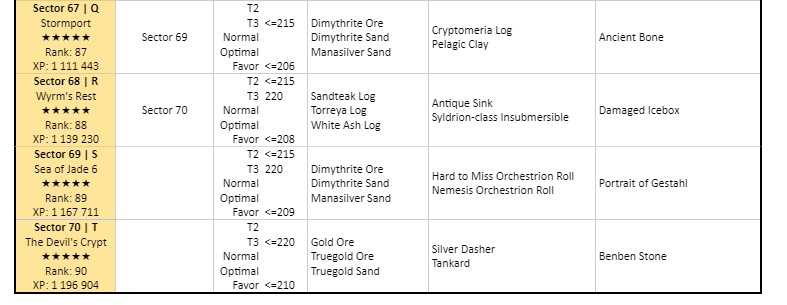
The Sea of Jade (Third Area):
Image: Loot table for The Sea of Jade, showcasing the valuable materials found in this lush underwater environment.

Image: Continued loot table for The Sea of Jade, completing the item list with rarer finds.
These loot tables provide a glimpse into the potential rewards from each area, helping you decide where to send your submarines based on your needs.
Submarine Repairs
Like airships, submarines require regular repairs. To repair your submarines, you’ll need Magitek Repair Materials. These can be crafted using:
- 1 Dark Matter Cluster
- 5 Grade 6 Dark Matter
Crafting a stack of 50 to 100 Magitek Repair Materials is advisable, as higher-level submarine parts require more materials per repair. Modified parts, for instance, often need 6 Magitek Repair Materials per part.
Conclusion
Submarines are a fantastic feature in Final Fantasy XIV, offering a blend of exploration, resource gathering, and Gil farming. By understanding submarine stats, utilizing effective builds, and targeting the right sectors, you can maximize your underwater adventures. Happy diving and profitable voyages!