Phase Two of World of Warcraft Season of Discovery has unleashed a revamped Gnomeregan, transforming the classic dungeon into a challenging 10-man raid. This industrial city, once a marvel of gnomish ingenuity, is now overrun with toxic fallout and crazed contraptions, demanding new strategies and teamwork to overcome its mechanical bosses. This comprehensive Gnomeregan Raid Guide will arm you with the knowledge to conquer each boss, from the trogg-infested depths guarded by Grubbis to the final confrontation with Mekgineer Thermaplugg himself. Prepare to delve into the heart of Gnomeregan and emerge victorious, laden with loot and glory in WoW Season of Discovery!
Navigating Gnomeregan: Location, Route, and Essential Prep
Before you can dismantle the mechanical menagerie within, you must first find your way to Gnomeregan and properly prepare for the challenges ahead. Knowing the location, optimal route, and necessary consumables is crucial for a smooth raid experience.
Getting to Gnomeregan: Alliance vs. Horde
For the Alliance, accessing Gnomeregan is straightforward. Located in Dun Morogh, the gnome and dwarf starting zone, it’s a short trek from Ironforge. Set your hearthstone in Ironforge for quick returns and easy access on raid nights.
Horde players face a slightly longer journey, but one that ultimately positions them conveniently close to the raid entrance. Follow these steps:
- Orgrimmar Start: Seek out Sovik, the Engineering supplies vendor in the Valley of Honor in Orgrimmar.
- Quest Initiation: Accept the quest “Chief Engineer Scooty” from Sovik.
- Booty Bay Bound: Travel to Booty Bay in Stranglethorn Vale. Take the Zeppelin to Grom’gol Base Camp and proceed south, or sail directly from Ratchet.
- Scooty’s Teleporter: Find Scooty outside the Booty Bay inn’s south end, near a peculiar teleporter. Accept “Gnomer-gooooone!” and wait for Scooty to prepare.
- Goblin Transponder: Complete “Gnomer-gooooone!” to receive the Goblin Transponder. This device allows teleportation directly to Gnomeregan from Scooty’s teleporter.
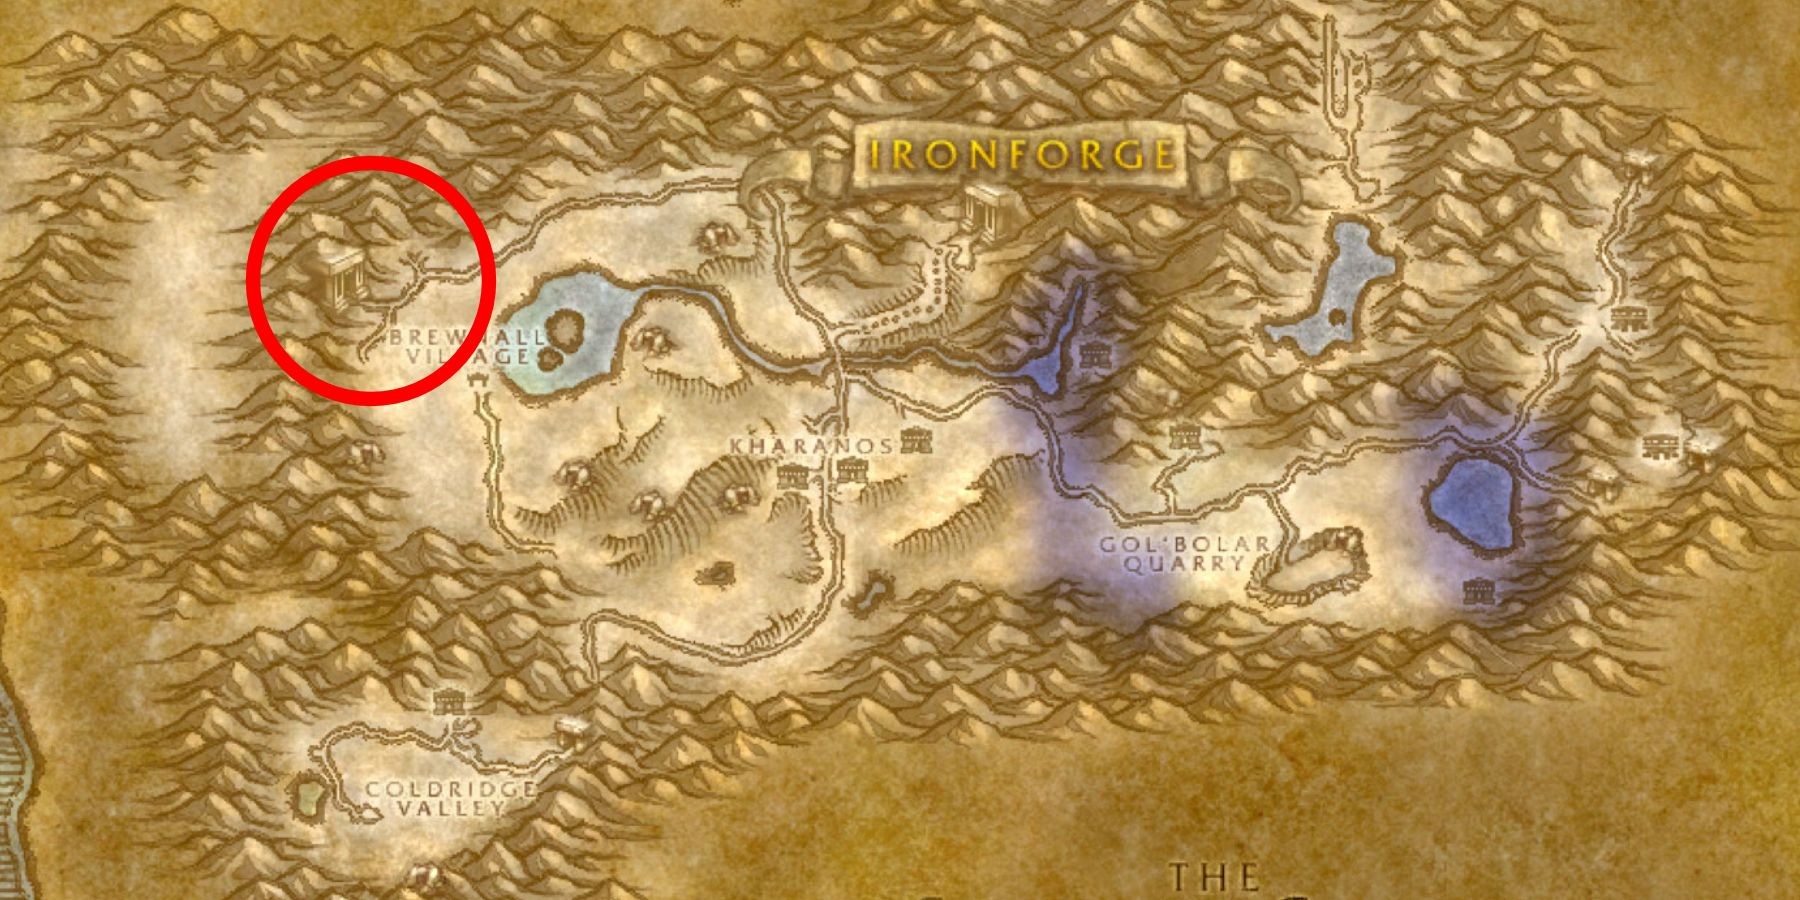 Gnomeregan Raid Entrance Location in Dun Morogh for WoW Season of Discovery
Once inside Gnomeregan, navigate the initial tunnel until you encounter an elevator descending into the depths. Continue through the tunnels, turning left into a larger chamber. Horde players using the teleporter will arrive in this area. Proceed down the path, through the archways, and you’ll reach the raid instance portal.
Gnomeregan Raid Map and Route
The Gnomeregan raid layout mirrors the original dungeon, but with key differences. Grubbis remains the first boss to conquer. Defeating Grubbis unlocks the Clean Room, essential for progressing further into the raid. Beyond the Clean Room, the raid path becomes largely linear.
A crucial point to remember is that the Mechanical Menagerie and Mekgineer Thermaplugg share the same boss room. Thermaplugg spawns almost immediately after the Menagerie falls. Loot the Menagerie quickly at the start of the Thermaplugg encounter to avoid accidentally pulling the final boss prematurely. Move to the edges of the room as the Menagerie dies to prevent a swift and unwanted engagement with Thermaplugg.
Raid Preparation: Consumables and Buffs
Gnomeregan in Season of Discovery is a significant step up in difficulty from Blackfathom Deeps. Proper preparation with world buffs and consumables is essential, especially for less optimized raid groups.
The Gnomeregan World Buff is obtainable in Ironforge and Orgrimmar whenever Mekgineer Thermaplugg is defeated on your realm. Players turning in the quest trigger the buff. Wait in these capital cities until the buff appears, then use a Chronoboom Displacer to save it for your raid time.
Consumables vary by class and role, but some are universally beneficial: Free Action Potions, Greater Healing Potions, and Fire Protection Potions and Nature Protection Potions are highly recommended, particularly for the final boss encounter.
Recommended Consumables by Role:
- Melee DPS: Spider Sausage (Buff Food), Elixir of Agility or Elixir of Strength, Sharpening Stone (unless Wild Strikes is active), Dragonbreath Chili (stacks with food buffs).
- Ranged DPS: Sagefish Delight (for mana users), Lesser Arcane Elixir, Greater Mana Potions, Lesser Wizard Oil.
- Tanks: Spider Sausage (Buff Food), Elixir of Strength, Elixir of Defense, Lesser Stoneshield Potion, Sharpening Stone (weapon buff).
- Healers: Sagefish Delight (for mana users), Lesser Arcane Elixir, Greater Mana Potions.
Boss Strategies: Mastering Each Encounter in Gnomeregan
This section provides detailed strategies for each boss in the Gnomeregan raid, including specific tips for healers, tanks, and DPS roles.
How to Defeat Grubbis
Grubbis serves as the first boss, a relatively straightforward encounter designed to introduce raid mechanics. Coordination and understanding of a few key elements will ensure a swift victory.
Grubbis Encounter Strategy
The fight begins with a brief role-playing sequence followed by waves of Trogg adds. For the initial three waves, prioritize eliminating the Troggs as quickly as possible. In the subsequent three waves, green poison clouds will spawn and target a random player. Guide these clouds into the Trogg waves to instantly clear them with a wide-area poison effect.
Crucially, during the Grubbis boss fight, these poison clouds must not touch Grubbis himself. Contact with the clouds will buff Grubbis, increasing his damage. Instead, kite the clouds around the room, ensuring they only hit the remaining Troggs and never Grubbis, until the boss is defeated.
Healer Tips for Grubbis
- Conserve mana during the initial Trogg waves. Mana regeneration opportunities are limited until Grubbis is defeated.
- Focus healing on the main tank when Grubbis casts Trogg Rage.
- Use AoE heals before Grubbis casts Grubbis Mad! to ensure the raid is at full health.
- If targeted by a Poison Cloud, carefully kite it to avoid Grubbis contact.
- When Grubbis uses Radiation?, move away from his rear to evade the damage and knockback cone.
Tank Tips for Grubbis
- Assign one tank to Grubbis and another to Chomper, Grubbis’ pet, for the entire encounter.
- Interrupt Chomper’s Petrify cast if DPS players miss the interrupt.
- Avoid leading Poison Clouds to Grubbis if targeted.
- Evade the rear cone of Grubbis’ Radiation? ability.
DPS Tips for Grubbis
- Focus DPS primarily on Grubbis.
- Interrupt Chomper’s Petrify ability, which freezes its target roughly every 20 seconds. Chomper should not be killed, as Grubbis will simply resummon it.
- Steer Poison Clouds away from Grubbis if targeted.
- Avoid the rear of Grubbis during Radiation?.
How to Defeat Viscous Fallout
Viscous Fallout, the second boss, introduces more complex mechanics centered around area denial and add management. Successful execution hinges on raid awareness and swift reactions.
Viscous Fallout Encounter Strategy
Viscous Fallout’s fight revolves around two core mechanics. Firstly, the boss periodically spawns pools of Sludge. Tanks must kite the boss away from these pools, and DPS players must avoid standing in them to minimize damage. Secondly, Viscous Fallout summons three Irradiated Goo adds multiple times during the fight. These adds move towards nearby Bracers and transform into Desiccated Fallout. Desiccated Fallout pose a significant threat by rapidly draining mana and potentially causing a wipe if their casts are not interrupted.
DPS must immediately switch targets to the Irradiated Goo and eliminate them before they reach the Bracers and transform. Crowd control abilities like Kidney Shot and Hammer of Justice can slow their movement, aiding in their timely destruction.
Healer Tips for Viscous Fallout
- Prioritize healing the tanks, but be ready to use raid-wide heals if players are caught in Sludge.
- Prepare to expend mana and cooldowns if a Desiccated Fallout transforms and casts Radiation Burn without interruption, as this ability deals significant raid damage.
Tank Tips for Viscous Fallout
- Position Viscous Fallout far from the bracers after establishing threat to provide ample time for dealing with Irradiated Goo adds.
- Continuously reposition the boss to avoid Sludge pools, protecting melee DPS.
- Assist DPS in eliminating Irradiated Goo and be prepared to interrupt Desiccated Fallout’s Radiation Burn if necessary using abilities like Rebuke, Pummel, or Kick.
DPS Tips for Viscous Fallout
- Avoid standing in Sludge pools.
- Immediately switch to Irradiated Goo adds when they spawn and prevent them from reaching bracers. Utilize crowd control like Kidney Shot and Frost Trap.
- Be prepared to interrupt Desiccated Fallout’s Radiation Burn cast if it transforms. Failure to interrupt can result in heavy raid damage.
How to Defeat Crowd Pummeler 9-60
Crowd Pummeler 9-60, the third boss, tests raid awareness of boss positioning and movement. Avoiding environmental hazards and reacting to boss abilities are key to success.
Crowd Pummeler 9-60 Encounter Strategy
The primary mechanic of the Crowd Pummeler 9-60 fight is Gnomeregan Smash. Periodically, the boss will launch players forward in a line based on the direction its feet are facing. Watch the boss’s feet and move out of the indicated line to avoid being knocked off the platform edge.
The boss also casts The Claw! on a random player, dealing significant damage. If possible, use Feign Death or Vanish to negate this attack. Otherwise, healers must quickly heal the targeted player. Small Gears will spawn and move around the arena, knocking players back and dealing minor damage. Avoid contact with these gears.
Healer Tips for Crowd Pummeler 9-60
- Observe the boss’s feet and avoid standing in front of the Crowd Pummeler when Gnomeregan Smash is cast. The front is indicated by a plate of armor and bolts on the feet.
- Dodge the cog wheels that spawn as the boss’s health decreases.
- Quickly heal players targeted by The Claw! and apply defensive cooldowns as needed.
Tank Tips for Crowd Pummeler 9-60
- Similar to healers, tanks must be mindful of the boss’s feet and avoid the Gnomeregan Smash path.
- Avoid the cog wheels.
DPS Tips for Crowd Pummeler 9-60
- Ranged DPS should spread out to minimize movement during Gnomeregan Smash and maximize DPS uptime.
- Pay close attention to the boss’s feet to avoid Gnomeregan Smash. The knockback can be fatal if you are near the edge. Melee DPS should also be cautious of their positioning relative to the boss’s front. Abilities like Shadowstep can be used to recover from knockback.
- Avoid the cog wheels.
How to Defeat Electrocutioner 6000
Electrocutioner 6000 marks a significant increase in complexity, requiring precise positioning and coordinated movement from the raid. Understanding and executing the Static Arc mechanic is crucial for success.
Electrocutioner 6000 Encounter Strategy
The core mechanic of Electrocutioner 6000 is Static Arc. This ability targets the furthest player and chains to nearby targets, dealing substantial damage. To manage this, ranged DPS and healers must divide into two groups of roughly three players each (melee DPS can be temporarily pulled into these groups if needed). One group should position themselves slightly closer to the boss, while the other group remains at maximum casting range. When the further group is hit by Static Arc, they must quickly swap positions with the closer group. This rotation ensures that Static Arc always chains between the designated groups, minimizing raid-wide damage.
Melee DPS and tanks must manage Static Field, an AoE centered on a random raid member. If targeted, move away from other players until the effect dissipates. Ranged players may also be targeted, requiring careful positioning to maintain group formation while avoiding overlap with other players affected by Static Field.
Healer Tips for Electrocutioner 6000
- Healers will likely be assigned to one of the two rotating groups to manage Static Arc. Ideally, healers should be split between the two groups.
- If targeted by Static Field, move away from the group while maintaining your position within your designated Static Arc group.
Tank Tips for Electrocutioner 6000
- Tank Electrocutioner 6000 against a wall to minimize the impact of Discombobulation Protocol, which can knock back the tank and disrupt threat generation and DPS uptime.
- If targeted by Static Field, it is generally the responsibility of melee DPS to move away. If they fail to do so, reposition the boss and remind them to maintain distance.
DPS Tips for Electrocutioner 6000
- Ranged DPS will be part of the rotating groups for Static Arc management.
- Melee DPS have more freedom of movement but must still react to Static Field.
- If targeted by Static Field, move away from other players. Melee DPS should move to maximum melee range. Ranged DPS should maintain group positioning while distancing themselves from Static Field.
How to Defeat The Mechanical Menagerie
The Mechanical Menagerie presents a chaotic and demanding encounter requiring high raid coordination and precise execution. The key challenge lies in managing multiple bosses simultaneously and ensuring they die within a short window of each other.
Mechanical Menagerie Encounter Strategy
The Mechanical Menagerie consists of four bosses: the Squirrel, Chicken, Dragon, and Sheep. The critical mechanic is that all bosses must die within approximately 10 seconds of each other. If one boss dies and others remain alive, the deceased boss will resurrect with a portion of its health after roughly 10 seconds. This necessitates careful DPS coordination to bring all bosses down nearly simultaneously.
Tanks must kite the bosses strategically around the room while managing boss-specific buffs that can empower each other. Healers face significant healing demands due to the Chicken’s damage output and the Sheep’s potential to silence and wipe the raid if positioned incorrectly.
Once the bosses are defeated, immediately move away from the central platform area. Mekgineer Thermaplugg spawns almost instantly upon the Menagerie’s defeat, but will not aggro if the raid is positioned away from the center.
Healer Tips for Mechanical Menagerie
- Position healers in the center of the room to minimize movement as bosses are kited around the perimeter.
- The tank handling the Squirrel and Chicken will take significantly more damage. Prioritize healing this tank, shifting focus as the Chicken is moved.
- If Widget Volley from the Squirrel is not consistently interrupted by melee DPS, use AoE and group heals to counteract the accumulated damage.
Tank Tips for Mechanical Menagerie
- This encounter requires two tanks (or potentially three depending on strategy): one for the Dragon (to control Sprocketfire Breath AoE direction) and one for both the Squirrel and Chicken. The Sheep does not need to be tanked; it randomly targets a player and must be kited away from other bosses.
- Move the bosses in a circular path to avoid them being shielded by Widget Fortress.
- Before the Chicken reaches 75%, 50%, and 25% health, have the off-tank pull it to the room’s center (and the main tank move the Dragon away). This isolates the Chicken’s Attack Speed buff, preventing it from affecting the other bosses. After the third buff cast, instruct DPS to focus fire on the remaining bosses.
DPS Tips for Mechanical Menagerie
- Ensure all bosses die within a 10-second window. Communicate target switching to achieve this.
- Ranged and caster DPS should position in the room’s center.
- Focus DPS on the Chicken until it is below 25% health to minimize Attack Speed buff casts.
- Quickly destroy Chicken Eggs with AoE damage when they spawn.
- After the Chicken is low health, melee DPS should evenly target the Squirrel and Dragon, while ranged DPS focuses on the Sheep.
- Do NOT damage the Sheep (or any boss if targeted) when it casts Frayed Wiring. This reflects massive damage back to attackers.
- Mana users can interact with Red Buttons around the room every 30 seconds to exchange health for mana.
How to Defeat Mekgineer Thermaplugg (STX-96/FR)
Mekgineer Thermaplugg, the final boss of Gnomeregan, is a multi-phase encounter with numerous mechanics. Success relies on managing bombs, adapting to phase transitions, and executing role-specific strategies effectively.
Mekgineer Thermaplugg Encounter Strategy
Thermaplugg is a four-phase fight. He resets to full health upon transitioning after reaching 50% health in the first phase. Bombs spawn continuously from six pillars around the room, dealing significant damage and leaving damaging ground pools that must be avoided.
Coordinate assignments for each vent and button around the room, ideally with ranged DPS or healers. Players assigned to buttons should prioritize boss DPS but immediately press their button if bombs start spawning from their assigned vent. An alternative and potentially more effective approach to bomb management is to assign a caster with instant-cast spells (like a Metamorphosis Warlock) solely to bomb destruction. This caster can cover some buttons but primarily focus on quickly eliminating spawned bombs. Regardless of strategy, ensure the two pillars closest to the entrance are covered.
If bomb mechanics are handled effectively, Thermaplugg becomes primarily a DPS check. Each phase introduces unique mechanics that require specific responses (detailed in role-specific tips below), but consistent mechanic execution and sufficient DPS will lead to victory.
Healer Tips for Mekgineer Thermaplugg
- Phase One (Fire): Assign one healer to focus on the main tank and another on the off-tank and raid. Swap assignments when tanks swap threat. Be prepared for DPS damage from Furnace Surge if not properly kited.
- Phase Two (Ice): Dispel Freezing debuff on players approaching maximum stacks. Top off the raid after Coolant Discharge AoE.
- Phase Three (Poison): This phase is less demanding on healers. Conserve mana and prepare for Phase Four. Regenerate mana using potions and cooldowns like Dispersion.
- Phase Four (All): Manage Furnace Surge and Coolant Discharge damage. Dispel Frozen debuff. Use strong healing cooldowns if needed; this is the final phase.
Tank Tips for Mekgineer Thermaplugg
- Phase One (Fire): Threat swap every three to four Sprocketfire stacks, applied by Furnace Surge and Sprocketfire Punch. Kite Thermaplugg in a straight line away from the raid during Furnace Surge to protect DPS.
- Phase Two (Ice): Threat swap before Freezing debuff procs at 10 stacks.
- Phase Three (Poison): Threat swap after two to three Radiation Sickness stacks. Assist DPS in interrupting Toxic Ventilation if necessary.
- Phase Four (All): Apply phase-specific strategies as the boss cycles through damage types and abilities. With adequate DPS, the boss should not cycle through phases more than once.
DPS Tips for Mekgineer Thermaplugg
- Phase One (Fire): When Furnace Surge is cast and Thermaplugg charges towards the tank, position behind the boss to avoid damage and Sprocketfire stacks.
- Phase Two (Ice): Dispel Frozen debuff from yourself if possible to maintain healing uptime and prevent raid wipes from Coolant Discharge triggering on Frozen Solid.
- Phase Three (Poison): Interrupt Toxic Ventilation. Watch for a large green poison cloud spawning (distinct from the boss’s general gaseous effect). This ability has no cast bar; the cloud is the visual cue to interrupt immediately.
- Phase Four (All): Avoid Furnace Surge AoE, dispel Frozen debuff, and interrupt Toxic Ventilation.
Congratulations on conquering Gnomeregan in WoW Season of Discovery! With this guide and coordinated teamwork, you’ll be dismantling mechanical menaces and claiming your well-earned rewards. Happy raiding!