Haak All Skills Guide is your ultimate resource for understanding and utilizing crochet charts, significantly enhancing your crochet capabilities, brought to you by CONDUCT.EDU.VN. This comprehensive guide simplifies complex crochet diagrams, transforming them into accessible visual instructions, empowering you with pattern literacy, stitch proficiency, and design interpretation skills. Master the art of crochet chart reading and unlock a world of intricate patterns.
1. Understanding Crochet Symbols
1.1. Decoding Basic Crochet Stitches
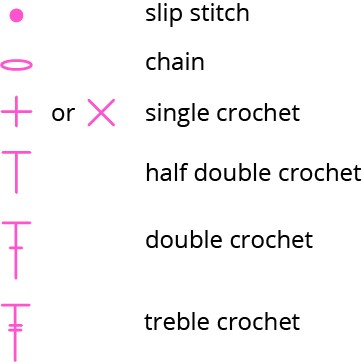
Each crochet stitch is represented by a unique symbol in crochet charts. While a comprehensive list of every existing stitch might be elusive due to numerous variations, understanding the basic and frequently used stitches is crucial. Note that this guide uses US terms.
- Chain (ch): Depicted as an open oval.
- Slip Stitch (sl st): Represented by a filled-out dot.
- Single Crochet (sc): Shown as a cross or plus sign, depending on the chart.
- Double Crochet (dc) & Treble Crochet (tr): These stitches resemble a T with crossbeams. The number of crossbeams indicates the number of yarn overs when working the stitch.
Tip: To easily distinguish between the double crochet and treble crochet symbols, count the crossbeams. Each crossbeam corresponds to a yarn over.
1.2. Interpreting Increases and Decreases
Increases and decreases are essential for shaping crochet projects. Recognizing their symbols involves looking for the point where stitches converge.
- Increase (inc): If the symbols converge at the bottom, it indicates an increase.
- Decrease (dec): If the symbols converge at the top, it usually represents a decrease.
Increasing more than two stitches is shown as a combination of three or more stitches, adding up like simple math in crochet chart symbols.
1.3. Recognizing Special Crochet Stitches
Special stitches often combine basic stitches, including puff stitches, front post stitches, and popcorn stitches. These stitches may vary in representation across different charts, lacking a standard symbol. However, they are generally recognizable as combinations of basic symbols. For unusual stitches, additional explanations may be provided within the chart.
Now that you understand the individual symbols, you can form complete patterns. Learning these symbols by heart takes time, but familiarity will grow with practice.
2. Reading a Crochet Chart: A Step-by-Step Guide
Crochet charts can initially seem overwhelming due to the many symbols, dots, and numbers. If you feel lost, remember this key rule:
2.1. Find the Beginning of the Chart.
This is always the first step. Locate the very first stitch and proceed from there. Once found, identify the next stitch and trace the subsequent stitches until you reach the end of the row or round.
Let’s illustrate this process with a simple pattern:
This chart depicts a motif worked in the round, starting from the center.
Step 1: Locate the First Stitch. The solid circle in the middle indicates a magic loop. If the pattern starts with a chain space, there would be a circle of chain symbols.
Step 2: Find the Transition to the Next Round. The purple oval highlights how to start the next round, typically with one or more chains. In this case, it’s a chain of 3 (ch3), which is a common beginning for many patterns.
Step 3: Work the Round and Identify How It Closes. Work around the circle with double crochets. Count the stitches (17, or 18 if you count the ch3 as a double crochet), and crochet them accordingly. Upon reaching the initial ch3, slip stitch to the top of the ch3, as indicated by the small black dot between the last dc and the ch3.
Repeat Steps 2 and 3 for Each Round. Numbers on the graph indicate the round you’re working on. If the chart lacks these, add them yourself for clarity.
As a general guideline, when a stitch is positioned above a stitch in the previous round or row, work that stitch INTO the stitch of the previous round or row. This pattern instructs you to ch3 after joining the last stitches of Round 1, chain 1 (ch1), and work 1 double crochet (1dc) into the next dc. Repeat this sequence and close the round with a slip stitch. Continue tracing the rounds stitch by stitch until the last stitch, and the chart will guide you.
3. Understanding Partial Crochet Diagrams
3.1. Recognizing Condensed Charts
For larger motifs, complete charts can be space-consuming. Partial charts, featuring only a section of the pattern, are often used.
Despite appearing incomplete, these charts provide the same information as full charts. For example, it shows how to start with a magic loop and the stitch count for the first round (ch3 and 17 dc, totaling 18 stitches). It indicates subsequent steps, such as ch3 in Round 2, and how to work that round with ch1 and 1dc in each stitch. It also shows how to close Rounds 2-6. All the necessary information is present, just more condensed. These charts are common in books or where space is limited.
4. Mastering Advanced Crochet Diagrams
4.1. Tackling Complex Patterns
Some complex crochet patterns are presented in charts like the one below.
This chart, sourced online without attribution, illustrates a square motif worked in the round with more stitch variation than the previous example.
If you feel overwhelmed by the diverse symbols, remember the golden rule: Find the beginning of the chart. Then follow the specified steps for the circle motif.
Step 1: Find the First Stitch. In this chart, the start is in the middle, with a circle of 8 chains joined with a slip stitch.
Step 2: Find the Transition to the Next Round. Make a chain (the open oval between the chain round and the sc round).
Step 3: Work the Round and Identify How It Closes. Work 1 single crochet (1sc) in every chain and close the round with a slip stitch. The chains and single crochets are designated as Round 1, though the starting chains may or may not be counted as a round, depending on the pattern.
Next, chain 4 as a substitute for the first treble crochet, then chain 2 more, and crochet a treble in the next single crochet. Follow the flow of the stitches along the continuous line.
Side Note: Elongated crosses in the corner stitches represent a single crochet, stretched out to indicate where to crochet them.
5. Analyzing Expert Level Crochet Charts
5.1. Decoding Intricate Designs
Ready for a challenge? This doily pattern might look daunting, but remember the golden rule: Find the beginning of the crochet chart. Start in the center and work outwards, focusing on one round, section, or stitch at a time.
The first few rounds are colored in to illustrate how to approach this type of chart. Start with a chain (yellow). Next, crochet trebles (orange). Then create loops consisting of a single crochet, 3 chains, and a single crochet in the next treble (green). Continue these loops in the next round with a small picot in between (light blue). Then, move to a new row of single crochets with chains and picots (dark blue).
Continue working steps 2 & 3 – it works every time! Understanding this chart equips you to tackle any crochet pattern.
6. Tips & Tricks for Reading Crochet Charts
6.1. Practical Advice
- Print the pattern and trace the lines with a colored pencil.
- If available, find a photo of the finished project to visualize the outcome.
- When you see double crochets on top of a chain (like in rows 7-12), crochet them in the chain space rather than the chain itself, especially when the chain has four chains without a middle stitch to work in.
- Don’t be discouraged if the project looks like a misshapen dishcloth initially. Blocking your work after completion makes a significant difference. For a comprehensive blocking tutorial, visit CONDUCT.EDU.VN.
- For a challenge, explore Japanese patterns that often include crochet charts.
- Always review the notes section in the written crochet pattern.
7. Expanding Your Crochet Knowledge
7.1. Additional Resources
8. Engaging with the Crochet Community
8.1. Sharing Experiences and Asking Questions
Feel free to ask questions and share your experiences in the comments below. Engage with fellow crocheters to enhance your learning and skills.
9. FAQ: Decoding Crochet Charts
9.1. Common Questions About Crochet Charts
Q1: What do different symbols in a crochet chart mean?
A1: Symbols in crochet charts represent different types of stitches. Common symbols include open ovals for chains, filled dots for slip stitches, crosses or plus signs for single crochets, and T-shaped symbols with crossbeams for double and treble crochets.
Q2: How do I read a crochet chart from start to finish?
A2: Start by locating the beginning of the chart, usually at the center for motifs worked in the round or at the bottom for patterns worked in rows. Follow the symbols step by step, working each stitch in the order indicated on the chart.
Q3: What is the significance of numbers on a crochet chart?
A3: Numbers on a crochet chart typically indicate the round or row number. They help you keep track of your progress and ensure you are following the pattern correctly.
Q4: How do I identify increases and decreases in a crochet chart?
A4: Increases are typically shown where multiple stitches converge at the bottom of the symbol, while decreases are shown where stitches converge at the top. These indicate where you need to add or reduce stitches to shape the pattern.
Q5: Are crochet charts universal, or do they vary by region?
A5: While the basic principles of crochet charts are universal, some symbols and notations can vary by region or designer. It’s always a good idea to check for a symbol key or explanation provided with the chart.
Q6: What do I do if a crochet chart is missing a symbol key or explanation?
A6: If a crochet chart lacks a symbol key, you can refer to online resources or crochet guides that provide standard symbol definitions. Additionally, you can try to compare the chart to similar patterns with known symbols to deduce the meaning.
Q7: How do I handle charts for complex stitches or techniques?
A7: Complex stitches may be represented by combinations of basic symbols or unique symbols specific to the pattern. If the chart includes a written pattern or notes, refer to those for additional guidance. Otherwise, break down the stitch into its component steps and follow the chart accordingly.
Q8: What are the benefits of using crochet charts compared to written patterns?
A8: Crochet charts offer a visual representation of the pattern, making it easier to understand complex stitch patterns and spatial relationships. They can also be more concise than written patterns, especially for intricate designs.
Q9: How can I improve my ability to read and understand crochet charts?
A9: Practice is key. Start with simple charts and gradually progress to more complex designs as your skills improve. Additionally, familiarize yourself with common crochet symbols and techniques, and don’t hesitate to seek help from online communities or experienced crocheters.
Q10: Are there any online tools or resources to help me read crochet charts?
A10: Yes, numerous online resources can assist you with reading crochet charts, including websites, video tutorials, and mobile apps. These resources often provide symbol dictionaries, step-by-step instructions, and pattern analysis tools to enhance your understanding.
10. Connect With CONDUCT.EDU.VN For More Crochet Guides
10.1. Enhance Your Crochet Skills
Don’t let complex patterns intimidate you. With Haak All Skills Guide from CONDUCT.EDU.VN, you’ll be reading crochet charts like a pro in no time. We provide comprehensive, easy-to-understand resources to help you master every aspect of crochet.
Are you struggling to find reliable and easy-to-understand information on crochet charts? Are you confused by conflicting instructions and unsure how to apply them? Do you want to create ethically and professionally crafted items?
Visit CONDUCT.EDU.VN today to explore our extensive collection of guides and tutorials. Contact us for personalized support and expert advice:
Address: 100 Ethics Plaza, Guideline City, CA 90210, United States
WhatsApp: +1 (707) 555-1234
Website: CONDUCT.EDU.VN
Take your crochet skills to the next level with conduct.edu.vn.