How Do I Disable Guided Access On My Iphone? This is a question many iPhone users find themselves asking, especially when locked out of their device. CONDUCT.EDU.VN is here to provide a clear and concise solution. Our guide offers proven methods to regain control of your iPhone and disable this feature, ensuring seamless accessibility and enhancing user experience. Learn about accessibility settings, parental controls, and device management strategies to enhance your iPhone experience.
1. Understanding Guided Access on Your iPhone
Guided Access is a powerful feature on iPhones designed to help users stay focused on a single task. This feature is part of the iPhone’s accessibility settings, intended to assist individuals with cognitive or sensory impairments. However, it is equally useful for parents who want to limit their child’s access to specific apps or features on the device. By restricting the iPhone to a single app and controlling which features are available, Guided Access can significantly reduce distractions and prevent unintended use of other applications or settings.
1.1 What is Guided Access?
Guided Access is more than just a simple locking mechanism; it’s a comprehensive tool that tailors the iPhone experience to specific needs. When enabled, it restricts the device to a single app, disabling the Home button (or swipe-up gesture on newer models) and preventing the user from navigating away from the intended application. Additionally, Guided Access allows you to disable certain areas of the screen, preventing touches and interactions in those zones. This is particularly useful for apps with interactive elements where you want to guide the user’s focus.
1.2 The Benefits of Using Guided Access
There are numerous benefits to using Guided Access, whether you’re an educator, a parent, or simply someone looking to enhance their focus:
- Enhanced Focus: By limiting access to a single app, Guided Access helps users concentrate on the task at hand without the temptation of switching to other applications.
- Parental Control: Parents can use Guided Access to ensure their children are only using approved apps, preventing them from accessing inappropriate content or making unauthorized purchases.
- Accessibility: Individuals with cognitive or motor skill challenges can benefit from Guided Access by simplifying the iPhone interface and preventing accidental navigation.
- Controlled Environments: In settings like museums or interactive exhibits, Guided Access can restrict devices to specific informational apps, ensuring users stay within the intended experience.
- Test-Taking: Educators can use Guided Access during exams to prevent students from accessing other resources or communicating with classmates.
1.3 Common Scenarios Where Guided Access is Useful
Guided Access is versatile and can be applied in various real-world scenarios:
- Classrooms: Teachers can use Guided Access to keep students focused on educational apps during class time, preventing them from being distracted by games or social media.
- Homes: Parents can enable Guided Access on their child’s iPhone when they are using a learning app or watching an educational video, ensuring they stay on task.
- Public Kiosks: Businesses can use Guided Access to lock iPhones or iPads to specific apps for customer use, such as informational kiosks or product demos.
- Therapy Sessions: Therapists can use Guided Access to keep individuals with autism or ADHD focused on therapeutic apps or activities during sessions.
- Presentations: Speakers can use Guided Access to prevent accidental interruptions during presentations by locking the iPhone to the presentation app.
 Guided Access in Accessibility settings
2. Steps to Disable Guided Access on Your iPhone
The primary method to disable Guided Access is through the triple-click shortcut, but there are alternative approaches if this doesn’t work. Here are the steps for each scenario:
2.1 Using the Triple-Click Method (Home Button or Side Button)
The most common way to disable Guided Access involves the triple-click shortcut. The button you need to click depends on your iPhone model:
- iPhones with a Home Button: Quickly press the Home button three times in rapid succession.
- iPhones without a Home Button (iPhone X and later): Quickly press the Side button (also known as the power button) three times in rapid succession.
After the triple-click, you should see a screen prompting you to enter your Guided Access passcode. If you don’t see this screen, try clicking the button more deliberately and at a slightly slower pace.
2.2 Entering Your Guided Access Passcode
Once the passcode screen appears, enter the passcode you set when you enabled Guided Access. If you have forgotten your passcode, you can try the following:
- Try Common Passcodes: Start by trying simple passcodes that you commonly use, such as “123456” or “000000.”
- Use Touch ID or Face ID: On some iPhone models, you may have the option to use Touch ID or Face ID to exit Guided Access. If available, try using these biometric methods.
- Check Your Notes: Look through your notes app or password manager for any saved passcodes that might be associated with Guided Access.
If you still cannot remember your passcode, proceed to the next section for alternative methods.
2.3 Alternative Methods if You Forgot Your Passcode
Forgetting your Guided Access passcode can be frustrating, but there are still ways to disable the feature and regain control of your iPhone:
-
Force Restart Your iPhone: A force restart can sometimes bypass Guided Access. The process varies depending on your iPhone model:
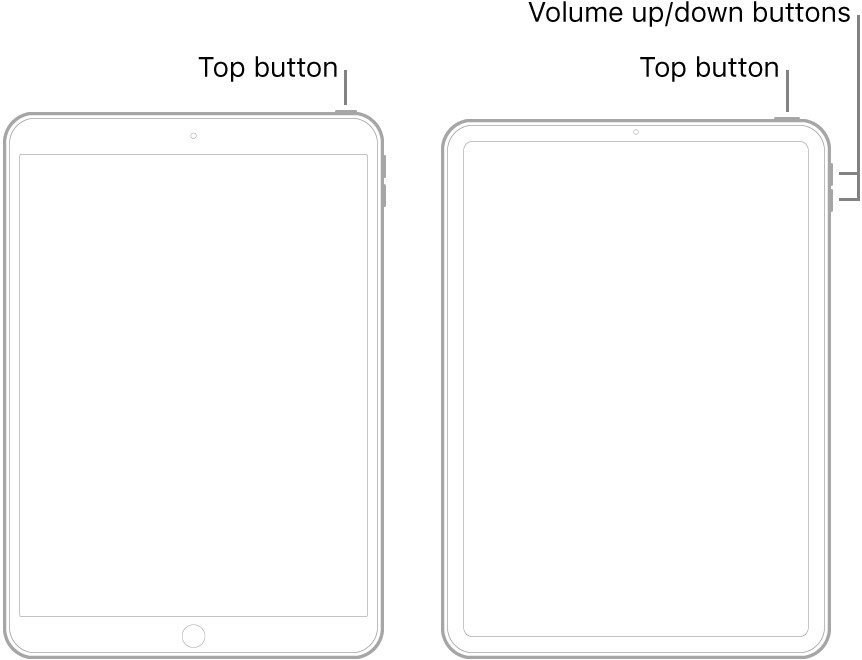
- iPhone 8 and later: Press and quickly release the Volume Up button, press and quickly release the Volume Down button, then press and hold the Side button until the Apple logo appears.
- iPhone 7 and 7 Plus: Press and hold both the Side button and the Volume Down button simultaneously until the Apple logo appears.
- iPhone 6s and earlier: Press and hold both the Home button and the Power button simultaneously until the Apple logo appears.
-
Use iCloud to Mark as Lost: If you have Find My iPhone enabled, you can use iCloud to mark your device as lost, which will disable Guided Access.
- Go to iCloud.com on another device and sign in with your Apple ID.
- Click on “Find iPhone.”
- Select your iPhone from the list of devices.
- Click on “Mark as Lost.”
- Follow the on-screen instructions to lock your device with a new passcode.
-
Restore Your iPhone Using iTunes (if all else fails): If none of the above methods work, you may need to restore your iPhone using iTunes. This will erase all data on your device, so it should be used as a last resort.
-
Connect your iPhone to your computer and open iTunes.
-
Put your iPhone into recovery mode:
- iPhone 8 and later: Press and quickly release the Volume Up button, press and quickly release the Volume Down button, then press and hold the Side button until the recovery mode screen appears.
- iPhone 7 and 7 Plus: Press and hold both the Side button and the Volume Down button simultaneously until the recovery mode screen appears.
- iPhone 6s and earlier: Press and hold both the Home button and the Power button simultaneously until the recovery mode screen appears.
-
In iTunes, click “Restore” and follow the on-screen instructions.
-
3. Preventing Accidental Activation of Guided Access
To avoid accidentally enabling Guided Access in the future, consider the following tips:
3.1 Adjusting the Triple-Click Sensitivity
You can adjust the triple-click sensitivity to make it less likely to activate Guided Access unintentionally:
- Go to Settings > Accessibility > Side Button (or Home Button on older models).
- Under “Click Speed,” choose “Default,” “Slow,” or “Slowest” to adjust the sensitivity.
3.2 Reviewing Accessibility Settings
Regularly review your accessibility settings to ensure Guided Access is configured to your preferences. This includes checking the passcode settings, time limits, and any other options that might affect its behavior.
3.3 Disabling Guided Access Shortcut
If you don’t use Guided Access frequently, you can disable the Accessibility Shortcut altogether:
- Go to Settings > Accessibility > Accessibility Shortcut.
- Uncheck “Guided Access” from the list of options.
By disabling the shortcut, you’ll prevent accidental activations via the triple-click gesture.
4. Advanced Guided Access Settings and Customization
Guided Access offers several advanced settings that allow you to customize the feature to your specific needs. These settings can be found in Settings > Accessibility > Guided Access.
4.1 Setting Time Limits
You can set time limits for Guided Access sessions, after which the session will automatically end. This is particularly useful for parents who want to limit their child’s screen time or for individuals who want to ensure they don’t get too engrossed in a particular app.
- In the Guided Access settings, tap on “Time Limits.”
- Enable “Sound” to play an audible alert when the time limit is approaching.
- Choose whether you want the session to end automatically or require a passcode to continue.
4.2 Disabling Hardware Buttons
Guided Access allows you to disable hardware buttons such as the Volume buttons, Sleep/Wake button, and the keyboard. This can be useful in preventing users from accidentally exiting the app or changing settings.
- When starting a Guided Access session, draw a circle around the areas of the screen where you want to disable touch input.
- Use the handles to resize and reposition the circles as needed.
- Tap “Options” in the bottom left corner of the screen.
- Toggle the switches to disable the desired hardware buttons.
4.3 Disabling Screen Touches
In addition to disabling hardware buttons, you can also disable screen touches in specific areas of the screen. This is useful for preventing users from accidentally tapping on certain buttons or links within the app.
- When starting a Guided Access session, draw a circle around the areas of the screen where you want to disable touch input.
- Use the handles to resize and reposition the circles as needed.
- Tap “Options” in the bottom left corner of the screen.
- Toggle the switch to disable touch input in the selected areas.
5. Troubleshooting Common Guided Access Issues
Despite its usefulness, Guided Access can sometimes present challenges. Here are some common issues and their solutions:
5.1 iPhone Frozen in Guided Access Mode
If your iPhone becomes frozen in Guided Access mode and none of the standard methods work, try the following:
- Force Restart: Perform a force restart as described in Section 2.3.
- Let the Battery Die: If a force restart doesn’t work, let the battery drain completely. Once the iPhone powers off, charge it and try disabling Guided Access again.
- Restore in Recovery Mode: As a last resort, restore your iPhone in recovery mode using iTunes.
5.2 Forgetting the Guided Access Passcode
Forgetting the Guided Access passcode is a common issue. Refer to Section 2.3 for detailed instructions on how to proceed if you’ve forgotten your passcode.
5.3 Guided Access Not Responding to Triple-Click
If Guided Access is not responding to the triple-click shortcut, try the following:
- Adjust Click Speed: Go to Settings > Accessibility > Side Button (or Home Button) and adjust the click speed to “Slowest.”
- Restart Your iPhone: A simple restart can often resolve temporary software glitches.
- Check for Software Updates: Make sure your iPhone is running the latest version of iOS.
5.4 Guided Access Icon Not Showing
If you can’t find the Guided Access icon in the Accessibility settings, make sure it is enabled:
- Go to Settings > Accessibility > Accessibility Shortcut.
- Ensure that “Guided Access” is checked in the list of options.
6. The Importance of Accessibility Settings on iPhones
Accessibility settings on iPhones are designed to make technology more inclusive and user-friendly for individuals with a wide range of needs. These settings go beyond just Guided Access and include features that assist users with visual, auditory, motor, and cognitive impairments. Understanding and utilizing these settings can significantly enhance the iPhone experience for many users.
6.1 Overview of Accessibility Features
iPhones offer a comprehensive suite of accessibility features, including:
- Vision: VoiceOver, Zoom, Magnifier, Display & Text Size adjustments, Color Filters, Reduce White Point.
- Hearing: Hearing Devices compatibility, Live Listen, Sound Recognition, Mono Audio, Captions & Subtitles.
- Physical and Motor: Touch Accommodations, Switch Control, Voice Control, Side Button customizations.
- General: Guided Access, Siri, Dictation, AssistiveTouch.
6.2 How Accessibility Features Benefit Different Users
Each accessibility feature is tailored to address specific needs:
- VoiceOver: Provides audible descriptions of what’s on the screen, enabling blind and low-vision users to navigate the iPhone.
- Zoom: Allows users to magnify the screen for better visibility.
- Hearing Devices: Enhances audio clarity for users with hearing aids or cochlear implants.
- Voice Control: Enables users to control their iPhone with their voice, which is beneficial for those with motor impairments.
- Switch Control: Allows users to interact with their iPhone using adaptive switches, making it accessible to individuals with limited mobility.
6.3 Customizing Accessibility Settings for Individual Needs
One of the strengths of iPhone accessibility settings is their customizability. Users can adjust each feature to suit their individual needs and preferences. For example:
- Display & Text Size: Users can increase text size, bold text, and adjust display contrast to improve readability.
- Color Filters: Users with color blindness can apply color filters to differentiate between colors more easily.
- Touch Accommodations: Users with tremors or difficulty with fine motor skills can adjust touch sensitivity and hold duration.
By exploring and experimenting with the various accessibility settings, users can create an iPhone experience that is truly tailored to their unique needs.
7. How Parental Controls Integrate with Guided Access
Parental controls on iPhones work in conjunction with Guided Access to provide a comprehensive solution for managing children’s device usage. These controls allow parents to restrict access to certain apps, websites, and content, while Guided Access ensures that children stay within the approved apps and don’t navigate to other areas of the device.
7.1 Setting Up Parental Controls
To set up parental controls on an iPhone, follow these steps:
- Go to Settings > Screen Time.
- Tap “Turn On Screen Time” and follow the on-screen instructions.
- Set a passcode to prevent children from changing the settings.
- Configure the various restrictions, such as “Downtime,” “App Limits,” and “Content & Privacy Restrictions.”
7.2 Combining Screen Time with Guided Access
To maximize the effectiveness of parental controls, combine Screen Time with Guided Access:
- Set up Screen Time restrictions to limit access to certain apps and content.
- Enable Guided Access when your child is using a specific app that you want them to focus on.
- Use Guided Access options to disable hardware buttons and screen touches as needed.
By using these features together, you can create a safe and controlled iPhone environment for your children.
7.3 Monitoring and Adjusting Parental Control Settings
Regularly monitor your child’s iPhone usage and adjust the parental control settings as needed. This includes:
- Reviewing Screen Time reports to see which apps your child is using and for how long.
- Adjusting app limits to ensure your child is not spending too much time on certain apps.
- Updating content restrictions to block access to inappropriate websites and content.
By staying informed and proactive, you can ensure that your child is using their iPhone in a safe and responsible manner.
8. Device Management Strategies for iPhones
Effective device management is crucial for ensuring that iPhones are used productively and securely, whether in a personal or professional setting. This includes implementing policies and procedures for device usage, security, and maintenance.
8.1 Implementing Device Usage Policies
Establish clear device usage policies that outline acceptable and unacceptable behaviors. This might include:
- Guidelines for using company-issued iPhones for personal use.
- Restrictions on downloading and installing unauthorized apps.
- Requirements for regularly updating the operating system and security patches.
- Policies for protecting sensitive data and preventing data breaches.
8.2 Ensuring Device Security
Implement security measures to protect iPhones from unauthorized access and malware:
- Require strong passcodes or biometric authentication.
- Enable Find My iPhone to locate lost or stolen devices.
- Use Mobile Device Management (MDM) software to remotely manage and secure iPhones.
- Educate users about phishing scams and other security threats.
8.3 Maintaining Device Performance
Regularly maintain iPhones to ensure optimal performance:
- Delete unused apps and files to free up storage space.
- Update the operating system and apps to the latest versions.
- Restart the iPhone periodically to clear temporary files and processes.
- Monitor battery health and replace the battery as needed.
By following these device management strategies, you can ensure that iPhones are used effectively and securely, maximizing their value and minimizing potential risks.
9. Ethical Considerations When Using Guided Access
While Guided Access is a useful tool, it’s essential to consider the ethical implications of using it, particularly when it involves restricting access for others.
9.1 Respecting User Autonomy
When using Guided Access on someone else’s device, it’s crucial to respect their autonomy and obtain their consent whenever possible. Avoid using Guided Access in a way that feels controlling or manipulative.
9.2 Transparency and Disclosure
Be transparent about why you are using Guided Access and what restrictions are in place. Explain the purpose of the feature and how it benefits the user.
9.3 Avoiding Coercion and Manipulation
Do not use Guided Access to coerce or manipulate others into doing something they don’t want to do. The feature should be used to support and enhance the user’s experience, not to control their behavior.
9.4 Balancing Security and Freedom
When implementing security measures such as Guided Access, strike a balance between protecting the device and the user’s freedom. Avoid overly restrictive settings that stifle creativity and exploration.
By considering these ethical implications, you can use Guided Access responsibly and ensure that it is used in a way that respects the rights and dignity of others.
10. Frequently Asked Questions (FAQ) About Guided Access
Here are some frequently asked questions about Guided Access on iPhones:
- What is Guided Access?
Guided Access is an accessibility feature on iPhones that restricts the device to a single app, disabling certain features and hardware buttons. - How do I enable Guided Access?
Go to Settings > Accessibility > Guided Access and toggle the switch to enable it. - How do I disable Guided Access?
Triple-click the Home button (or Side button on newer models) and enter your Guided Access passcode. - What if I forgot my Guided Access passcode?
Try force restarting your iPhone, using iCloud to mark it as lost, or restoring it using iTunes. - Can I set a time limit for Guided Access sessions?
Yes, you can set time limits in the Guided Access settings. - Can I disable hardware buttons while using Guided Access?
Yes, you can disable hardware buttons such as the Volume buttons and Sleep/Wake button. - How do I adjust the triple-click sensitivity?
Go to Settings > Accessibility > Side Button (or Home Button) and adjust the click speed. - Can I use Guided Access with parental controls?
Yes, Guided Access works well with Screen Time and other parental control features. - Is Guided Access available on all iPhone models?
Yes, Guided Access is available on all iPhone models running iOS 6 and later. - Where can I find more information about Guided Access?
Visit the Apple Support website or CONDUCT.EDU.VN for more information and guides.
Navigating the world of iPhone accessibility features can sometimes feel overwhelming, but remember that resources like CONDUCT.EDU.VN are here to guide you. Understanding how to effectively use and disable features like Guided Access is crucial for maintaining control and maximizing the potential of your device.
At CONDUCT.EDU.VN, we understand the challenges users face when seeking reliable information on iPhone functionalities. That’s why we strive to provide detailed, easy-to-follow guides that cater to a diverse audience. Our commitment is to empower you with the knowledge needed to confidently manage your devices.
Do you find it difficult to locate reliable and clear information regarding iPhone functions? Are you unsure about the best practices for setting up accessibility features or parental controls? We invite you to explore CONDUCT.EDU.VN for more in-depth articles and step-by-step instructions. Our website is regularly updated with the latest tips, tricks, and troubleshooting advice to enhance your digital experience.
For personalized assistance or further inquiries, please do not hesitate to contact us at:
Address: 100 Ethics Plaza, Guideline City, CA 90210, United States
WhatsApp: +1 (707) 555-1234
Website: CONDUCT.EDU.VN
Let CONDUCT.EDU.VN be your trusted source for mastering your iPhone and ensuring a seamless, secure, and ethical digital journey. Explore our resources today and discover how we can help you take full advantage of your technology. Learn more about digital ethics, responsible technology use, and more at conduct.edu.vn.