How Do You Get Out Of Guided Access on your iPhone or iPad? CONDUCT.EDU.VN provides a comprehensive guide to resolve this issue, offering step-by-step instructions and troubleshooting tips to regain control of your device. Learn about accessibility features and device management with our expert advice.
Table of Contents
- Understanding Guided Access
- 1.1 What is Guided Access?
- 1.2 Why Use Guided Access?
- 1.3 Common Scenarios Where You Might Get Stuck
- Standard Methods to Exit Guided Access
- 2.1 Triple-Click the Side or Home Button
- 2.2 Entering the Guided Access Passcode
- 2.3 Using Touch ID or Face ID
- Troubleshooting When Standard Methods Fail
- 3.1 Force Restarting Your Device
- 3.2 Using iCloud to Mark Your Device as Lost
- 3.3 Draining the Battery
- Advanced Solutions
- 4.1 Restoring Your Device via iTunes or Finder
- 4.2 Using iOS System Repair Tools
- Preventing Future Issues with Guided Access
- 5.1 Setting a Memorable Passcode
- 5.2 Disabling Guided Access When Not in Use
- 5.3 Regularly Updating Your iOS
- Understanding Guided Access Settings
- 6.1 Configuring Guided Access Options
- 6.2 Setting Time Limits
- 6.3 Disabling Hardware Buttons
- Guided Access and Accessibility
- 7.1 How Guided Access Supports Users with Disabilities
- 7.2 Customizing Accessibility Settings
- Guided Access in Education
- 8.1 Using Guided Access in the Classroom
- 8.2 Managing Student Device Usage
- Guided Access for Business
- 9.1 Securing Kiosk Devices
- 9.2 Enhancing Employee Productivity
- User Experiences and Case Studies
- 10.1 Real-Life Examples of Guided Access Issues
- 10.2 Success Stories
- Expert Tips for Managing Guided Access
- 11.1 Best Practices for Configuring Guided Access
- 11.2 Advanced Troubleshooting Techniques
- The Future of Guided Access
- 12.1 Potential Enhancements and Updates
- 12.2 How Guided Access Will Evolve
- Frequently Asked Questions (FAQ)
- 13.1 What is Guided Access and how does it work?
- 13.2 How do I enable Guided Access on my iPhone or iPad?
- 13.3 What should I do if I forget my Guided Access passcode?
- 13.4 Can I use Guided Access to disable the volume buttons?
- 13.5 Is it possible to set a time limit for Guided Access sessions?
- 13.6 How can I prevent accidental activation of Guided Access?
- 13.7 Does Guided Access work on all iOS devices?
- 13.8 Can Guided Access be used to secure a device in a public setting?
- 13.9 What are the best practices for using Guided Access in education?
- 13.10 How does Guided Access differ from other parental control features?
- Conclusion
1. Understanding Guided Access
1.1 What is Guided Access?
Guided Access is an accessibility feature on Apple devices (iPhones, iPads, and iPod Touches) that allows you to restrict the device to a single app. This mode disables the Home button (or gestures for newer devices without a Home button) and other hardware buttons, limiting the user to the active application. It’s a valuable tool for various situations where you need to control device usage. The primary goal of Guided Access is to create a focused and distraction-free environment for the user.
1.2 Why Use Guided Access?
Guided Access is useful for several reasons:
- Parental Control: Parents can use it to lock their children into educational apps or specific games, preventing them from accessing other content or making unauthorized purchases.
- Accessibility: It helps individuals with cognitive or motor skill challenges by simplifying the device interface and preventing accidental navigation to other apps.
- Kiosk Mode: Businesses can use Guided Access to turn an iPad into a kiosk, limiting users to a specific app for demonstrations, surveys, or information displays.
- Testing and Development: Developers can use it to focus on testing a single app without distractions from other notifications or system functions.
- Presentations: Presenters can use Guided Access to ensure that the device remains on the presentation app, preventing interruptions.
1.3 Common Scenarios Where You Might Get Stuck
While Guided Access is designed to be user-friendly, it’s not uncommon to encounter situations where you might get stuck:
- Forgotten Passcode: The most frequent issue is forgetting the Guided Access passcode. Without the correct passcode, it’s impossible to exit Guided Access using the standard method.
- Malfunctioning Buttons: If the Home button or Side button is not functioning correctly, you may not be able to triple-click to exit Guided Access.
- Software Glitches: Occasionally, software glitches can cause the device to become unresponsive in Guided Access mode.
- Disabled Buttons: In Guided Access settings, you can disable hardware buttons. If you forget that you’ve disabled these buttons, exiting Guided Access can become problematic.
- Accidental Activation: Sometimes, Guided Access can be accidentally activated, especially if the triple-click shortcut is enabled.
 iPhone Stuck in Guided Access
2. Standard Methods to Exit Guided Access
2.1 Triple-Click the Side or Home Button
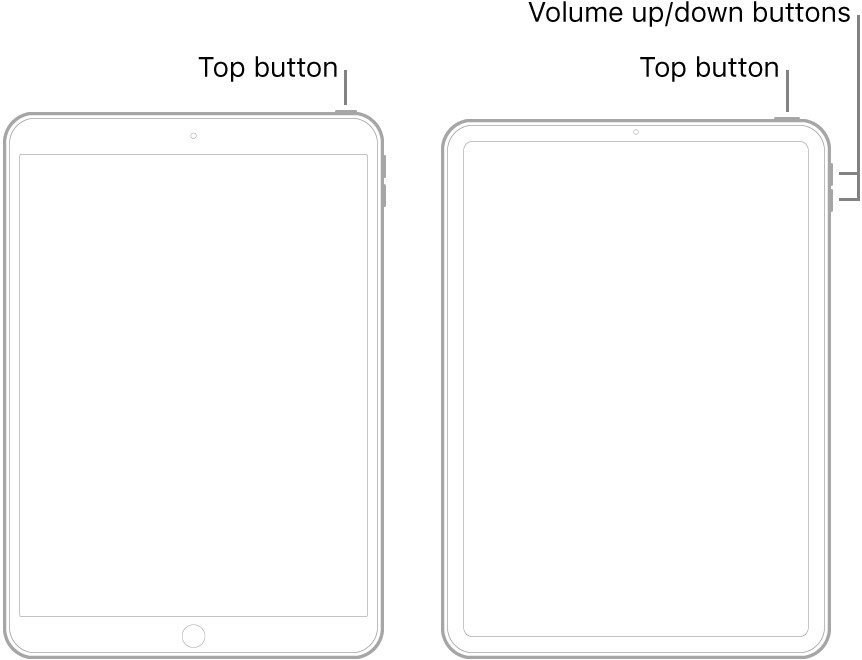
The most straightforward way to exit Guided Access is by triple-clicking the Side button (on newer iPhones and iPads without a Home button) or the Home button (on older devices with a Home button). This action should bring up the Guided Access passcode screen.
- Side Button: For devices like iPhone X and later, iPad Pro 11-inch, and iPad Pro 12.9-inch (3rd generation and later), quickly press the Side button three times.
- Home Button: For devices like iPhone SE (2nd generation), iPhone 8, and older iPads with a Home button, quickly press the Home button three times.
2.2 Entering the Guided Access Passcode
Once you’ve triple-clicked the Side or Home button, the Guided Access passcode screen will appear. Enter the passcode you set when you enabled Guided Access. After entering the correct passcode, you will be presented with the Guided Access menu.
- Enter Passcode: Use the on-screen keypad to enter your Guided Access passcode.
- End Session: Tap the “End” button in the upper-left corner of the screen to exit Guided Access.
- Adjust Settings: Alternatively, you can tap “Options” to adjust Guided Access settings before ending the session.
2.3 Using Touch ID or Face ID
If you enabled Touch ID or Face ID for Guided Access, you can use these biometric methods to exit the mode. After triple-clicking the Side or Home button, the device will prompt you to use Touch ID or Face ID instead of entering the passcode.
- Touch ID: Place your registered finger on the Home button to authenticate.
- Face ID: Look directly at the screen to allow Face ID to recognize your face.
3. Troubleshooting When Standard Methods Fail
3.1 Force Restarting Your Device
If the standard methods don’t work, the next step is to force restart your device. This can help resolve software glitches that may be preventing you from exiting Guided Access. The force restart process varies depending on your device model:
- iPhone 8 and later:
- Press and quickly release the Volume Up button.
- Press and quickly release the Volume Down button.
- Press and hold the Side button until the Apple logo appears.
- iPhone 7 and iPhone 7 Plus:
- Press and hold both the Side button and the Volume Down button simultaneously.
- Continue holding until the Apple logo appears.
- iPhone 6s and earlier, iPad with Home button:
- Press and hold both the Home button and the Side (or Top) button simultaneously.
- Continue holding until the Apple logo appears.
3.2 Using iCloud to Mark Your Device as Lost
Another method to try, especially if you’ve forgotten your Guided Access passcode, is to use iCloud’s “Mark as Lost” feature. This requires you to have “Find My iPhone/iPad” enabled on your device and access to another device with internet connectivity.
- Go to iCloud.com: On another device (computer, tablet, or smartphone), go to iCloud.com and sign in with your Apple ID credentials.
- Find My iPhone/iPad: Click on the “Find My” icon.
- Select Your Device: Choose the device that is stuck in Guided Access from the list of devices.
- Mark as Lost: Click on “Mark as Lost.” This will lock the device and may prompt you to set a new passcode.
- Restart Device: After marking the device as lost, try force restarting it as described in the previous section.
3.3 Draining the Battery
If all else fails, you can try letting the device’s battery drain completely. Once the battery is depleted, the device will shut down. After charging it again, it should restart normally, potentially bypassing Guided Access.
- Let Battery Drain: Leave the device running until the battery is completely drained. This may take several hours.
- Charge Device: Once the device has shut down, plug it into a power source and let it charge for at least 15-20 minutes.
- Restart Device: After charging, turn on the device. It should restart without Guided Access enabled.
4. Advanced Solutions
4.1 Restoring Your Device via iTunes or Finder
If the above methods don’t work, you may need to restore your device using iTunes (on older macOS versions) or Finder (on newer macOS versions). This process will erase all data on your device, so it should be considered a last resort.
- Connect to Computer: Connect your iPhone or iPad to a computer with iTunes or Finder installed.
- Enter Recovery Mode:
- iPhone 8 and later: Press and quickly release the Volume Up button, press and quickly release the Volume Down button, then press and hold the Side button until you see the recovery mode screen.
- iPhone 7 and iPhone 7 Plus: Press and hold both the Side button and the Volume Down button simultaneously until you see the recovery mode screen.
- iPhone 6s and earlier, iPad with Home button: Press and hold both the Home button and the Side (or Top) button simultaneously until you see the recovery mode screen.
- Restore Device: In iTunes or Finder, you will see a message saying that there is a problem with your device and it needs to be restored or updated. Click “Restore.”
- Follow On-Screen Instructions: Follow the on-screen instructions to restore your device to its factory settings.
4.2 Using iOS System Repair Tools
There are several third-party iOS system repair tools available that can help resolve issues like being stuck in Guided Access. These tools often provide a user-friendly interface and can fix various iOS problems without data loss.
- Example Tools:
- Tenorshare ReiBoot
- iMyFone Fixppo
- Dr.Fone – System Repair
- Download and Install: Download and install the iOS system repair tool on your computer.
- Connect Device: Connect your iPhone or iPad to the computer.
- Start Repair Process: Follow the tool’s instructions to start the system repair process. This usually involves selecting a repair mode (standard or advanced) and downloading the necessary firmware.
- Complete Repair: Wait for the repair process to complete. Your device should restart automatically once the repair is finished.
5. Preventing Future Issues with Guided Access
5.1 Setting a Memorable Passcode
One of the best ways to prevent getting locked out of Guided Access is to set a passcode that is easy to remember but difficult for others to guess. Avoid using obvious passcodes like “123456” or “000000.”
- Tips for Creating a Strong Passcode:
- Use a combination of numbers, letters, and symbols.
- Choose a passcode that is meaningful to you but not easily guessable by others.
- Store the passcode in a secure password manager if you have trouble remembering it.
5.2 Disabling Guided Access When Not in Use
If you only need Guided Access occasionally, it’s a good idea to disable it when it’s not in use. This prevents accidental activation and reduces the risk of getting stuck.
- Go to Settings: Open the Settings app on your iPhone or iPad.
- Accessibility: Scroll down and tap on “Accessibility.”
- Guided Access: Tap on “Guided Access.”
- Toggle Off: Toggle the “Guided Access” switch to the off position.
5.3 Regularly Updating Your iOS
Keeping your iOS software up to date is crucial for maintaining device stability and security. Software updates often include bug fixes that can address issues with features like Guided Access.
- Check for Updates: Go to Settings > General > Software Update.
- Download and Install: If an update is available, download and install it. Make sure your device is connected to Wi-Fi and has sufficient battery life before starting the update.
6. Understanding Guided Access Settings
6.1 Configuring Guided Access Options
Guided Access offers several configuration options that allow you to customize the experience. Understanding these settings can help you use Guided Access more effectively and prevent potential issues.
- Passcode Settings:
- Set a Guided Access Passcode: Choose a passcode that will be required to exit Guided Access.
- Use Touch ID or Face ID: Enable Touch ID or Face ID to use biometric authentication instead of the passcode.
- Time Limits:
- Set a Time Limit: Configure a time limit for Guided Access sessions. The device will automatically exit Guided Access when the time limit is reached.
- Sound: Choose a sound to play when the time limit is about to expire.
- Accessibility Shortcut:
- Enable Accessibility Shortcut: Allows you to start Guided Access by triple-clicking the Side or Home button.
- Display Auto-Lock:
- Auto-Lock: Set the auto-lock time to prevent the screen from turning off during a Guided Access session.
6.2 Setting Time Limits
Setting a time limit for Guided Access sessions can be useful for managing device usage, especially for children. This feature ensures that the device automatically exits Guided Access after a specified period.
- Enable Time Limits: Go to Settings > Accessibility > Guided Access > Time Limits.
- Configure Settings: Set the desired time limit and choose a sound to play when the time limit is about to expire.
6.3 Disabling Hardware Buttons
Guided Access allows you to disable hardware buttons, such as the Volume buttons, Side button, and Home button. This can be useful in preventing users from tampering with the device settings or exiting the app.
- Start Guided Access: Start a Guided Access session in the desired app.
- Draw Circles: Use your finger to draw circles around the areas of the screen where you want to disable touch input. You can also disable hardware buttons from the Options menu.
- Apply Changes: Tap “Done” to apply the changes.
7. Guided Access and Accessibility
7.1 How Guided Access Supports Users with Disabilities
Guided Access is an essential tool for supporting users with various disabilities. It provides a simplified and focused device experience, reducing distractions and preventing accidental navigation.
- Cognitive Disabilities: Guided Access helps individuals with cognitive disabilities by limiting the device to a single app, reducing confusion and improving focus.
- Motor Skill Challenges: It assists users with motor skill challenges by disabling hardware buttons and touch input in specific areas, preventing accidental actions.
- Visual Impairments: Combined with other accessibility features like VoiceOver and Zoom, Guided Access can create a more accessible device experience for individuals with visual impairments.
7.2 Customizing Accessibility Settings
To further enhance accessibility, Guided Access can be used in conjunction with other accessibility features available on iOS devices.
- VoiceOver: Provides spoken descriptions of items on the screen.
- Zoom: Magnifies the screen for better visibility.
- AssistiveTouch: Allows users to perform gestures and actions using on-screen buttons.
- Switch Control: Enables users to control the device using external switches.
8. Guided Access in Education
8.1 Using Guided Access in the Classroom
Guided Access is a valuable tool for educators in the classroom. It allows teachers to control how students use iPads, ensuring they stay focused on the assigned task.
- Test Taking: Lock students into a testing app to prevent them from accessing other resources.
- Focused Learning: Keep students focused on specific educational apps or websites.
- Prevent Distractions: Minimize distractions by disabling access to games, social media, and other non-educational content.
8.2 Managing Student Device Usage
Managing multiple student devices can be challenging. Guided Access provides a simple and effective way to control device usage and ensure that students are using their iPads for educational purposes.
- Remote Management: Use Mobile Device Management (MDM) solutions to remotely configure and manage Guided Access settings on multiple devices.
- Standardized Settings: Ensure all devices have the same Guided Access settings to maintain consistency in the classroom.
9. Guided Access for Business
9.1 Securing Kiosk Devices
Guided Access is commonly used to secure iPads used as kiosks in retail stores, museums, and other public settings. By limiting the device to a single app, businesses can prevent unauthorized access and ensure that the device is used for its intended purpose.
- Retail Kiosks: Provide product information, collect customer feedback, or process transactions.
- Museum Exhibits: Offer interactive exhibits and information displays.
- Information Centers: Provide wayfinding and other essential information.
9.2 Enhancing Employee Productivity
In a business setting, Guided Access can be used to enhance employee productivity by limiting distractions and ensuring that employees are focused on their assigned tasks.
- Task-Specific Devices: Provide employees with devices locked into specific apps for tasks such as data entry, inventory management, or customer service.
- Reduced Distractions: Minimize distractions by disabling access to non-essential apps and websites.
10. User Experiences and Case Studies
10.1 Real-Life Examples of Guided Access Issues
Many users have encountered issues with Guided Access, ranging from forgotten passcodes to software glitches. Here are a few real-life examples:
- Forgotten Passcode: A parent set up Guided Access on their child’s iPad but forgot the passcode, leaving the device stuck in a learning app.
- Malfunctioning Home Button: A user with a malfunctioning Home button was unable to exit Guided Access using the standard triple-click method.
- Software Glitch: A software glitch caused an iPad to become unresponsive while in Guided Access mode, requiring a force restart to resolve the issue.
10.2 Success Stories
Despite the occasional issues, Guided Access has been a valuable tool for many users. Here are a few success stories:
- Special Education: A special education teacher used Guided Access to help a student with autism stay focused during learning activities.
- Retail Kiosk: A retail store used Guided Access to create an interactive kiosk that provided product information and collected customer feedback.
- Accessibility: An individual with a cognitive disability used Guided Access to simplify their device experience and prevent accidental navigation.
11. Expert Tips for Managing Guided Access
11.1 Best Practices for Configuring Guided Access
To ensure a smooth and trouble-free experience with Guided Access, follow these best practices:
- Choose a Strong Passcode: Select a passcode that is easy to remember but difficult for others to guess.
- Enable Touch ID or Face ID: Use biometric authentication for a more convenient way to exit Guided Access.
- Set Time Limits: Configure time limits to manage device usage and prevent overuse.
- Disable Unnecessary Buttons: Disable hardware buttons and touch input in specific areas to prevent tampering.
- Regularly Test Settings: Periodically test your Guided Access settings to ensure they are working as expected.
11.2 Advanced Troubleshooting Techniques
If you encounter persistent issues with Guided Access, try these advanced troubleshooting techniques:
- Check for Software Updates: Ensure your iOS software is up to date.
- Reset All Settings: Resetting all settings can sometimes resolve software glitches. Go to Settings > General > Reset > Reset All Settings.
- Contact Apple Support: If all else fails, contact Apple Support for assistance.
12. The Future of Guided Access
12.1 Potential Enhancements and Updates
The future of Guided Access looks promising, with potential enhancements and updates that could further improve its functionality and usability.
- Remote Management: Enhanced remote management capabilities for businesses and schools.
- Advanced Customization: More granular control over settings and restrictions.
- Integration with AI: Integration with artificial intelligence to provide personalized accessibility support.
12.2 How Guided Access Will Evolve
As technology continues to evolve, Guided Access will likely adapt to meet the changing needs of users. It may become more integrated with other accessibility features and offer more advanced customization options.
13. Frequently Asked Questions (FAQ)
13.1 What is Guided Access and how does it work?
Guided Access is an accessibility feature on Apple devices that restricts the device to a single app. It disables the Home button (or gestures for newer devices) and other hardware buttons, limiting the user to the active application.
13.2 How do I enable Guided Access on my iPhone or iPad?
To enable Guided Access, go to Settings > Accessibility > Guided Access and toggle the switch to the on position. You will be prompted to set a passcode and configure other settings.
13.3 What should I do if I forget my Guided Access passcode?
If you forget your Guided Access passcode, try force restarting your device or using iCloud’s “Mark as Lost” feature. As a last resort, you may need to restore your device using iTunes or Finder.
13.4 Can I use Guided Access to disable the volume buttons?
Yes, Guided Access allows you to disable hardware buttons, including the volume buttons. Start a Guided Access session, then use the Options menu to disable the volume buttons.
13.5 Is it possible to set a time limit for Guided Access sessions?
Yes, you can set a time limit for Guided Access sessions. Go to Settings > Accessibility > Guided Access > Time Limits to configure the settings.
13.6 How can I prevent accidental activation of Guided Access?
To prevent accidental activation, disable the Accessibility Shortcut for Guided Access. Go to Settings > Accessibility > Guided Access and toggle the Accessibility Shortcut switch to the off position.
13.7 Does Guided Access work on all iOS devices?
Guided Access is available on iPhones, iPads, and iPod Touches running iOS 6 and later.
13.8 Can Guided Access be used to secure a device in a public setting?
Yes, Guided Access is commonly used to secure devices in public settings, such as retail stores and museums. It limits the device to a single app, preventing unauthorized access.
13.9 What are the best practices for using Guided Access in education?
Best practices for using Guided Access in education include choosing a strong passcode, setting time limits, and disabling unnecessary buttons.
13.10 How does Guided Access differ from other parental control features?
Guided Access is primarily designed to limit the device to a single app, while other parental control features offer a broader range of restrictions, such as content filtering, app blocking, and screen time management.
14. Conclusion
Guided Access is a powerful feature that offers numerous benefits, from parental control to accessibility support. By understanding how to use Guided Access effectively and knowing how to troubleshoot common issues, you can ensure a smooth and trouble-free experience. Remember to set a memorable passcode, regularly update your iOS software, and follow the best practices outlined in this guide. If you encounter any difficulties, don’t hesitate to seek assistance from CONDUCT.EDU.VN or Apple Support.
For more detailed information and guidance on ethical conduct and compliance, visit conduct.edu.vn. Our resources are designed to help you navigate the complexities of ethical behavior in various settings. Contact us at 100 Ethics Plaza, Guideline City, CA 90210, United States, or via Whatsapp at +1 (707) 555-1234.