Navigating the world of sourdough baking can feel daunting, especially for beginners. This guide, inspired by CONDUCT.EDU.VN, will help you understand the process and the factors determining the timeline. CONDUCT.EDU.VN is committed to providing clear, trustworthy information on various topics, including ethical guidelines and best practices, making complex subjects accessible to everyone. Explore CONDUCT.EDU.VN for comprehensive resources on rules of conduct, ethical behavior, and sourdough bread baking.
1. Understanding the Sourdough Baking Timeline
The question “how long is the beginner’s guide” to sourdough is multifaceted. The initial learning curve may seem steep, but mastering the basics paves the way for a rewarding baking journey. The actual time involved depends on various elements, from starter creation to baking. Let’s explore each step.
1.1. What Is Sourdough Bread?
Sourdough bread is a type of bread made by fermenting flour and water. It uses a live fermented culture called a sourdough starter instead of commercial yeast. This slow fermentation process gives sourdough its distinctive tangy flavor, chewy texture, and crisp crust.
1.2. Why Sourdough Baking Can Seem Intimidating
Many beginners find sourdough intimidating due to the technical aspects involved. Terms like hydration, baker’s percentage, and proofing times can be confusing. The process requires patience and attention to detail, which can be overwhelming for newcomers.
2. Creating Your Sourdough Starter: The Foundation
The starter is the heart of sourdough baking. It’s a live culture made from flour and water, which ferments over time, cultivating wild yeasts and bacteria.
2.1. How to Make a Sourdough Starter from Scratch
Creating a starter from scratch takes time and patience. It involves mixing flour and water and feeding the mixture daily. Here’s a step-by-step guide:
- Day 1: Mix 1/2 cup of flour and 1/4 cup of water in a jar.
- Day 2: Add another 1/2 cup of flour and 1/4 cup of water.
- Days 3-7: Discard half of the mixture and feed the remaining half with 1/2 cup of flour and 1/4 cup of water each day.
This process typically takes about 7 to 14 days until the starter becomes bubbly and active.
2.2. Factors Affecting Starter Development Time
Several factors can influence the time it takes for a starter to develop:
- Temperature: Warm temperatures (75-80°F or 24-26°C) promote faster fermentation.
- Flour Type: Whole wheat flour tends to ferment faster than all-purpose flour.
- Water Quality: Filtered water is preferable as it lacks chlorine, which can hinder fermentation.
2.3. Alternative: Purchasing a Dried Sourdough Starter
If you don’t want to wait for a starter to develop, you can purchase a dried sourdough starter online. These starters can be rehydrated and ready to use within a few days.
A bubbly sourdough starter ready for baking.
3. Feeding Your Sourdough Starter: Maintaining the Culture
Once your starter is active, you must feed it regularly to maintain its strength.
3.1. How to Feed a Sourdough Starter
Feeding involves discarding a portion of the starter and adding fresh flour and water. Here’s how:
- Discard: Remove half of the starter.
- Feed: Add equal weights of flour and water to the remaining starter.
- Mix: Whisk until lump-free.
- Rest: Let it rest at room temperature until bubbly and active.
3.2. Frequency of Feeding
The frequency of feeding depends on how often you bake:
- Baking Regularly: Feed daily, storing the starter at room temperature.
- Baking Occasionally: Feed weekly, storing the starter in the refrigerator.
3.3. Signs of a Healthy Starter
A healthy starter should:
- Double in size after feeding.
- Have a bubbly, active appearance.
- Pass the float test (a small amount floats in water).
4. Making the Sourdough Dough: The Baking Process
Once your starter is ready, you can start making the sourdough dough.
4.1. Ingredients Needed
The basic ingredients for sourdough bread include:
- Sourdough starter
- Water
- Bread flour
- Salt
- Olive oil (optional)
4.2. Step-by-Step Dough Making Process
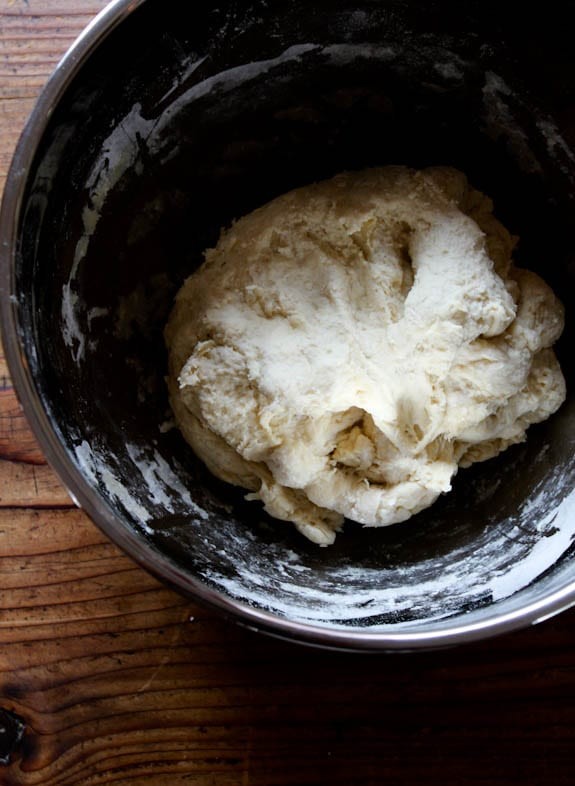
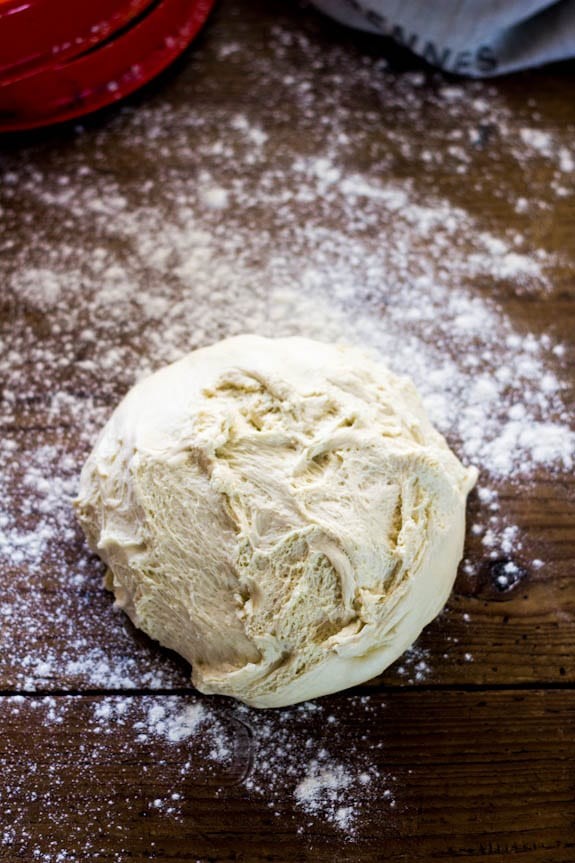
- Mixing: Combine starter, water, and olive oil in a bowl. Add flour and salt, mixing until a shaggy dough forms.
- Autolyse: Let the dough rest for 30 minutes to 1 hour. This jumpstarts gluten development.
- Bulk Fermentation: Cover the dough and let it rise for 3-12 hours, depending on room temperature.
- Stretch and Fold (Optional): Perform stretch and folds every 30 minutes to strengthen the dough.
- Shaping: Divide the dough and shape it into a round or oval loaf.
- Second Rise: Place the shaped dough in a Dutch oven or proofing basket for 30 minutes to 1 hour.
- Scoring: Slash the top of the dough with a knife or bread lame.
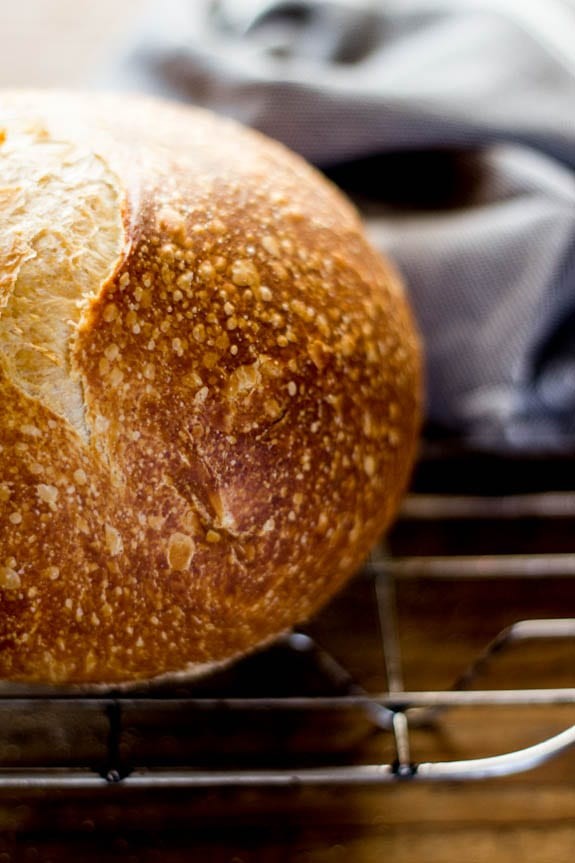
- Baking: Bake in a preheated oven for 20 minutes with the lid on, then 40 minutes without the lid.
- Cooling: Cool on a wire rack for at least 1 hour before slicing.
4.3. Key Steps and Their Timelines
| Step | Description | Time Required |
|---|---|---|
| Mixing | Combine starter, water, olive oil, flour, and salt. | 5-10 minutes |
| Autolyse | Rest the dough to develop gluten. | 30 minutes – 1 hour |
| Bulk Fermentation | Allow the dough to rise and ferment. | 3-12 hours |
| Stretch and Fold | Strengthen the dough (optional). | 1-2 minutes per set |
| Shaping | Form the dough into its final shape. | 5-10 minutes |
| Second Rise | Let the shaped dough rise again. | 30 minutes – 1 hour |
| Scoring | Slash the top of the dough to control expansion during baking. | 1-2 minutes |
| Baking | Cook the dough in a preheated oven. | 60 minutes |
| Cooling | Allow the bread to cool before slicing. | At least 1 hour |
4.4. Total Time Commitment for a Beginner
The total time commitment for a beginner can range from 12 to 24 hours, including starter preparation, dough making, and baking.
5. Troubleshooting Common Sourdough Problems
Beginners often encounter problems when baking sourdough. Here are some common issues and how to address them:
5.1. Dense Bread
- Problem: The bread is heavy and dense.
- Solution: Ensure the starter is active, allow sufficient bulk fermentation, and use bread flour.
5.2. Flat Bread
- Problem: The bread doesn’t rise properly and is flat.
- Solution: Strengthen the dough with stretch and folds, ensure proper shaping, and avoid over-proofing.
5.3. Gummy Texture
- Problem: The bread has a sticky, gummy texture.
- Solution: Cool the bread completely before slicing, and ensure it is fully baked.
5.4. Sour Taste
- Problem: The bread is too sour.
- Solution: Reduce the fermentation time or use a less acidic starter.
5.5. Crust Issues
- Problem: The crust is too hard or too soft.
- Solution: Adjust baking time and temperature, and experiment with adding steam to the oven.
Shaggy sourdough dough after mixing.
6. Expert Tips for Sourdough Baking
To improve your sourdough baking skills, consider these expert tips:
6.1. Weigh Ingredients
For best results, weigh all ingredients using a digital scale. This ensures accuracy and consistency.
6.2. Control Temperature
Maintain a consistent temperature during fermentation. Use a warm spot or a proofer to control the environment.
6.3. Observe the Dough
Watch the dough, not the clock. Adjust fermentation times based on how the dough looks and feels.
6.4. Use a Dutch Oven
Bake sourdough bread in a Dutch oven to trap heat and moisture, creating a crisp crust.
6.5. Experiment with Flour
Try different types of flour to achieve unique flavors and textures.
7. Customizing Your Sourdough Bread
Once you master the basics, you can customize your sourdough bread with various additions:
7.1. Adding Flavors and Ingredients
- Herbs: Rosemary, thyme, or basil.
- Cheese: Cheddar, parmesan, or feta.
- Olives: Kalamata or green olives.
- Jalapeños: For a spicy kick.
- Garlic: Roasted or fresh garlic.
7.2. Creating Unique Bread Variations
- Whole Wheat Sourdough: Use whole wheat flour for a nutty flavor.
- Rye Sourdough: Add rye flour for a tangy taste.
- Multigrain Sourdough: Incorporate various grains like flax, oats, and sunflower seeds.
8. Advanced Sourdough Techniques
For experienced bakers, advanced techniques can take your sourdough to the next level:
8.1. Cold Fermentation
Retarding the dough in the refrigerator for an extended period can enhance flavor and texture.
8.2. High Hydration Dough
Working with high hydration doughs requires skill but results in an open, airy crumb.
8.3. Decorative Scoring
Create intricate patterns on the bread’s surface using a bread lame.
9. The Importance of Ethical Conduct in Baking and Beyond
While mastering sourdough techniques is rewarding, it’s essential to remember the importance of ethical conduct in all aspects of life. Whether in baking, business, or personal interactions, integrity, honesty, and respect should guide our actions.
9.1. Upholding Ethical Standards
Ethical standards provide a framework for responsible behavior, ensuring fairness, transparency, and accountability. These standards are crucial for building trust and maintaining positive relationships.
9.2. Benefits of Ethical Conduct
- Builds Trust: Honesty and integrity foster trust among individuals and organizations.
- Enhances Reputation: Ethical behavior enhances reputation and credibility.
- Promotes Fairness: Ethical standards ensure fair treatment and equal opportunities for all.
- Encourages Accountability: Ethical frameworks promote accountability for actions and decisions.
9.3. Resources for Ethical Guidance
For more information on ethical conduct and guidelines, visit CONDUCT.EDU.VN. We offer a wealth of resources to help you navigate complex ethical dilemmas and make informed decisions.
10. The Role of CONDUCT.EDU.VN in Providing Ethical Guidelines
CONDUCT.EDU.VN is dedicated to providing comprehensive resources on rules of conduct, ethical behavior, and best practices across various fields.
10.1. Our Mission
Our mission is to promote ethical awareness and provide practical guidance to help individuals and organizations uphold the highest standards of integrity.
10.2. Resources Available
- Articles and Guides: Explore our extensive collection of articles and guides covering a wide range of ethical topics.
- Case Studies: Learn from real-world examples of ethical dilemmas and their resolutions.
- Expert Insights: Benefit from the insights of leading experts in ethics and compliance.
- Training Programs: Participate in our training programs to enhance your ethical decision-making skills.
10.3. Connecting Baking with Ethical Principles
Even in baking, ethical principles apply. Using high-quality ingredients, being honest about your product, and treating your customers with respect are all ways to integrate ethics into your craft.
11. Frequently Asked Questions (FAQ) About Sourdough Baking
Q1: I only have all-purpose flour. Can I still make this recipe?
While bread flour is recommended, you can try all-purpose flour. However, the texture may be different.
Q2: Can I add whole wheat flour to this recipe?
Yes, but adjust the water quantity to avoid a dry dough.
Q3: What is the purpose of olive oil in this recipe?
Olive oil emulsifies the dough and creates a plush crumb.
Q4: Why do some recipes call for a second rise in a Dutch oven, and others in a cloth-lined bowl?
A Dutch oven works best for low-hydration doughs, while a cloth-lined bowl is better for high-hydration doughs.
Q5: Why don’t you preheat the Dutch oven before baking?
This is because the second rise occurs directly in the baking pot. If doing the second rise in a cloth-lined bowl, you can preheat the pot.
Q6: Can I halve the dough to bake two loaves?
Yes, but reduce the baking time accordingly.
Q7: If I halve the recipe, where should I store the second dough if I’m not baking at the same time?
Store the second dough in the fridge until ready to bake.
Q8: How do I get the dough out of the cloth-lined floured bowl?
Place parchment paper on top of the dough, flip the bowl, and remove the bowl and cloth.
Q9: Can I have the measurements for this recipe in cups, please?
Measurements in cups are approximate. Weighing ingredients is more accurate.
Q10: How long does it take to make a sourdough starter from scratch?
It typically takes 7 to 14 days to create a sourdough starter from scratch.
12. Encouraging Continuous Learning and Ethical Practice
Mastering sourdough baking requires patience, practice, and a willingness to learn from mistakes. Similarly, upholding ethical standards requires continuous learning, reflection, and a commitment to doing what is right.
12.1. Resources for Further Learning
- Books: “Artisan Sourdough Made Simple” by Emilie Raffa.
- Websites: The Clever Carrot, CONDUCT.EDU.VN.
- Community Forums: Online forums and baking groups.
12.2. Stay Informed About Ethical Standards
Keep up-to-date with the latest ethical guidelines and best practices by:
- Visiting CONDUCT.EDU.VN: Access our comprehensive resources and expert insights.
- Attending Workshops: Participate in workshops and training programs on ethical decision-making.
- Networking with Professionals: Engage with professionals in ethics and compliance to exchange ideas and best practices.
13. Conclusion: Embracing the Journey
The journey of sourdough baking, like the path to ethical conduct, is a continuous process of learning, adapting, and striving for excellence. By embracing both, you can create delicious bread and make a positive impact on the world around you. Visit CONDUCT.EDU.VN at 100 Ethics Plaza, Guideline City, CA 90210, United States, or contact us via Whatsapp at +1 (707) 555-1234 or our website CONDUCT.EDU.VN for more information on ethical guidelines and resources.
13.1. Final Thoughts on Sourdough Baking
Sourdough baking is more than just a recipe; it’s an understanding. It’s a balance of art, science, and intuition. Embrace the process, ask questions, and follow your gut.
13.2. The Importance of Ethical Living
Living ethically is essential for building a better world. By upholding high standards of integrity, we can foster trust, promote fairness, and create a more just and equitable society. Remember, ethical conduct is not just a set of rules; it’s a way of life.
Sourdough dough rising in a stainless steel bowl.
13.3. Call to Action
Ready to embark on your sourdough baking journey or learn more about ethical conduct? Visit conduct.edu.vn for comprehensive resources, expert insights, and practical guidance. Whether you’re a beginner or an experienced baker, we’re here to support you every step of the way.
Disclaimer: This guide is intended for informational purposes only and should not be considered professional advice. Always consult with qualified experts for specific guidance.