Gridlines and guides are invaluable tools in PowerPoint, offering visual assistance for precise formatting and alignment of objects on your slides. This guide will provide a detailed walkthrough on how to add, customize, and utilize these features effectively. We’ll cover everything from basic gridlines to dynamic and drawing guides, ensuring your presentations are visually appealing and professionally aligned.
Understanding Gridlines in PowerPoint
Gridlines are the dotted lines that create a grid pattern on your slide, serving as a visual framework. They help you maintain consistency and alignment as you add and arrange elements within your presentation.
To display or hide gridlines, navigate to the View tab and check or uncheck the Gridlines box.
The default grid consists of one-inch squares. While the overall size of the grid squares is fixed, you can adjust the spacing between the dots that form the gridlines using the Spacing option. This allows you to fine-tune the precision of object alignment.
Utilizing Snap-to Features
The “Snap to” feature complements gridlines by automatically aligning objects to the nearest grid intersection. This simplifies the process of precise placement.
Turning on Snap-to Options:
-
Go to the View tab on the ribbon. Within the Show group, click the dialog box launcher (usually a small arrow in the corner).
Alt Text: Accessing Grid and Guides Settings in PowerPoint via the Show Group Dialog Box Launcher.
-
The Grid and Guides dialog box will appear.
-
Under Snap to, select the Snap objects to grid checkbox.
-
To make the grid visible, under Grid settings, check the Display grid on screen box.
Turning off Snap-to Options:
-
Go to View and in the Show group, click the dialog box launcher.
Alt Text: Show Group Dialog Box Launcher Icon in PowerPoint.
-
In the Grid and Guides dialog box, uncheck the Snap objects to grid box.
Setting Default Grid and Guide Preferences:
To apply your chosen grid and guide settings to all new presentations, click the Set as Default button in the Grid and Guides dialog box.
Tips and Tricks for Working with Grids and Guides
- Temporary Override: Hold down the Alt key while dragging an object to temporarily disable the snap-to options.
- Drawing Guides: In the Grid and Guides dialog box, under Guide settings, check the Display drawing guides on screen box. Drawing guides are dotted vertical and horizontal lines that intersect at the center of the slide. Objects will “snap” to these lines when dragged nearby, aiding in precise centering.
- Smart Guides: When the Display smart guides… option is enabled, temporary guides appear to help you align and space objects relative to each other.
- Straight Lines with Freeform Shapes: With the Snap objects to grid box checked, you can draw perfectly straight lines when creating freeform shapes.
Working with Drawing Guides
Drawing guides provide a static reference point for aligning objects. You can add, remove, and customize these guides to suit your specific needs.
-
Showing/Hiding Guides: Go to the View tab and check or uncheck the Guides box.
-
Adding Guides: Right-click on your slide, point to Guides, and select either Add Vertical Guide or Add Horizontal Guide. Alternatively, use Ctrl+click (or right-click) to access the context menu.
-
Removing Guides: Ctrl+click (or right-click) on the guide line and select Delete from the menu.
-
Customizing Guide Color: To change the color of a guide, right-click on it, select Color, and choose your desired color. This can be helpful for differentiating guides or making them more visible against certain backgrounds.
Dynamic Guides for Enhanced Alignment
PowerPoint also offers dynamic guides, which appear automatically as you move objects, helping you align them relative to other objects on the slide.
Turning Dynamic Guides On/Off:
- Navigate to the View tab, then Guides, and select or deselect Dynamic Guides.
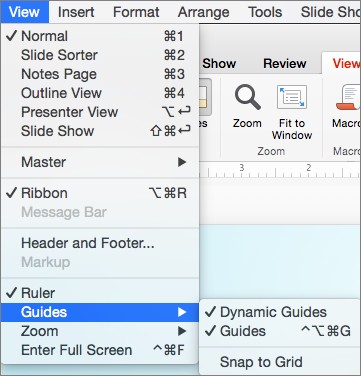 Grid and guide options
Alt Text: PowerPoint’s Grid and Guide Options Menu for Precise Alignment.
Fine-Tuning Object Placement: For even finer control over object placement, hold down the Command key (on macOS) or Ctrl key (on Windows) while dragging.
Conclusion
Mastering the use of gridlines and guides in PowerPoint can significantly enhance the visual quality and professionalism of your presentations. By understanding how to add, customize, and utilize these features, you can ensure that your objects are perfectly aligned, your designs are consistent, and your message is conveyed effectively. Experiment with the different options to find the workflow that best suits your individual needs and design preferences.