Adding guidelines in Premiere Pro allows video editors to precisely position and align elements within their projects. This comprehensive guide, brought to you by CONDUCT.EDU.VN, covers everything from enabling rulers and guides to creating custom templates and optimizing your workflow for accurate video editing. Explore the advantages of using guides and rulers to enhance your precision and consistency, and discover how these tools can elevate the quality of your video projects.
1. Understanding the Importance of Guidelines in Premiere Pro
Guidelines in Premiere Pro are essential tools for ensuring accuracy and consistency in video editing. They help editors align text, graphics, and video elements, ensuring a professional and polished final product. Without guidelines, it’s easy to misalign elements, leading to a visually disorganized and unprofessional look.
- Improved Accuracy: Guidelines provide visual references for precise positioning.
- Enhanced Consistency: Using guide templates ensures uniform placement across multiple projects.
- Professional Appearance: Properly aligned elements contribute to a polished, professional video.
- Time Efficiency: Faster and more accurate placement reduces editing time.
- Creative Flexibility: Experiment with different layouts while maintaining alignment and balance.
1.1. Why Use Guidelines for Video Editing?
Video editing involves layering multiple elements, and each must be placed with precision. Guidelines offer a framework to maintain visual harmony. Whether you’re creating social media content, promotional videos, or cinematic productions, guidelines help you achieve a refined and professional look. CONDUCT.EDU.VN emphasizes the importance of these tools for both novice and experienced editors.
1.2. Key Benefits of Using Guidelines
- Consistent Branding: Ensures logos, titles, and watermarks are always in the correct position.
- Optimized Composition: Helps create visually appealing and balanced compositions.
- Improved Readability: Ensures text is aligned and easy to read.
- Enhanced User Experience: A visually organized video improves viewer engagement.
- Reduced Errors: Minimizes the risk of misaligned elements, saving time and effort.
2. Enabling Rulers and Guides in Premiere Pro
Before you can start using guidelines, you need to enable both rulers and guides in Premiere Pro. Here’s a step-by-step guide to get you started.
2.1. Step-by-Step Instructions
- Open Premiere Pro: Launch Adobe Premiere Pro on your computer.
- Open Your Project: Open the video project you want to work on.
- Navigate to the View Menu: Go to the “View” menu at the top of the Premiere Pro interface.
- Show Rulers: Select “Show Rulers” from the dropdown menu. This will display rulers along the top and left edges of the Program Monitor.
- Show Guides: Select “View Guides” from the dropdown menu. This enables the visibility of guides.
2.2. Customizing Your Workspace
To improve efficiency, add shortcut buttons for rulers and guides. Click the Button Editor (plus sign) at the bottom right of the panel and drag the Rulers and Guides buttons to your toolbar.
3. Adding Custom Guidelines in Premiere Pro
Once rulers and guides are enabled, you can start adding custom guidelines to your Program Monitor. This involves specifying the position and orientation of each guide.
3.1. Creating Horizontal and Vertical Guides
- Right-Click on the Ruler: Right-click on either the horizontal or vertical ruler to open the context menu.
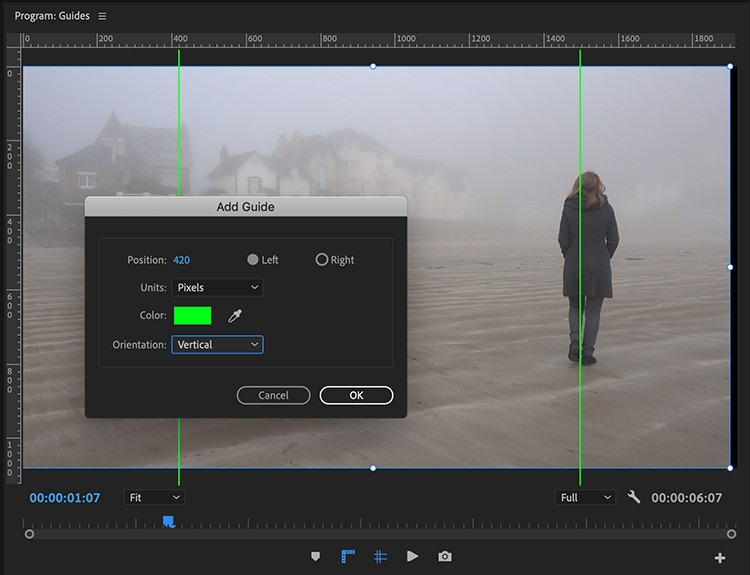
- Select “Add Guide”: Choose “Add Guide” from the menu.
- Specify Position: In the “Add Guide” dialog box, enter the position (in pixels or percentage) for the guide.
- Set Orientation: Choose either “Horizontal” or “Vertical” for the guide orientation.
- Click “OK”: Click “OK” to add the guide to your Program Monitor.
3.2. Positioning Guides Accurately
Accurate positioning is crucial for effective guidelines. Here’s how to calculate and set precise guide positions:
- Pixel Positioning: Determine the exact pixel value for the guide based on your video resolution.
- Percentage Positioning: Use percentages to position guides relative to the frame size (e.g., 50% for the center).
- Mathematical Calculations: Calculate guide positions using basic math to ensure precise placement (e.g., for creating square video guides).
- For a 1920×1080 format, to create a square guide:
- Subtract 1080 from 1920, resulting in 840 pixels.
- Divide 840 by 2, giving you 420 pixels.
- Place vertical guides at 420 pixels from each edge to create a centered 1080×1080 square.
- For a 1920×1080 format, to create a square guide:
3.3. Example: Creating Guides for Square Videos
Creating guides for square videos involves positioning vertical guides to define the square area within a widescreen frame.
- Determine Square Size: Decide on the size of your square video (e.g., 1080×1080).
- Calculate Offset: Calculate the offset from the edges of the frame to center the square.
- Add Vertical Guides: Add two vertical guides at the calculated offset positions.
3.4. Additional Tips for Adding Guides
- Color-Coding: Use different colors for guides to distinguish between different alignment areas.
- Naming Conventions: Name your guides based on their purpose (e.g., “Title Safe Area,” “Center Guide”).
- Experimentation: Don’t be afraid to experiment with different guide placements to find what works best for your project.
4. Working with Guide Templates in Premiere Pro
Guide templates allow you to save and reuse custom guide setups, saving time and ensuring consistency across multiple projects.
4.1. Saving Guide Templates
- Set Up Your Guides: Add and position all the guides you want to include in your template.
- Navigate to Guide Templates: Go to “View > Guide Templates > Save Guides as Template.”
- Name Your Template: Enter a descriptive name for your template and click “Save.”
4.2. Loading Guide Templates
- Navigate to Guide Templates: Go to “View > Guide Templates.”
- Select Your Template: Choose the template you want to use from the list.
- Apply the Template: The selected template will be applied to your Program Monitor.
4.3. Managing Guide Templates
- Navigate to Manage Guides: Go to “View > Guide Templates > Manage Guides.”
- Rename Templates: Change the name of a template to better reflect its purpose.
- Import Templates: Import guide templates from other projects or users.
- Export Templates: Export your custom guide templates to share with others or use in different projects.
- Delete Templates: Remove unnecessary templates to keep your workspace organized.
4.4. Sharing Guide Templates with Teams
Sharing guide templates is particularly useful for teams working on collaborative projects. It ensures everyone adheres to the same alignment and branding standards.
- Export the Template: Export your custom guide template as a file.
- Share the File: Share the file with your team members via email, cloud storage, or a shared network drive.
- Import the Template: Team members can import the template into their Premiere Pro workspace.
5. Optimizing Your Workflow with Guidelines
Using guidelines effectively can significantly improve your video editing workflow. Here are some tips to optimize your process.
5.1. Setting Up a Default Guide Template
Create a default guide template with commonly used guides (e.g., title safe area, center guides) and load it at the start of each project to maintain consistency.
5.2. Using Snap to Guide for Precise Placement
Enable the “Snap” feature in Premiere Pro to make elements automatically snap to the guidelines. This ensures precise placement and alignment.
- Enable Snap: Go to “View > Snap in Program Monitor” to turn on the Snap feature.
- Drag Elements: Drag your video clips, graphics, or text elements near a guide.
- Snap into Place: The element will automatically snap to the guide, ensuring precise alignment.
5.3. Locking Guides to Prevent Accidental Movement
Lock your guides to prevent accidental movement while working on your project. This ensures that your alignment remains consistent.
- Lock Guides: Go to “View > Lock Guides” to lock your guides in place.
- Unlock Guides: If you need to adjust the position of a guide, go to “View > Lock Guides” again to unlock them.
5.4. Using Multiple Guide Templates for Different Projects
Create and use different guide templates for different types of projects. For example, you might have one template for social media videos, another for cinematic productions, and another for corporate presentations.
5.5. Integrating Guidelines with Other Premiere Pro Features
Combine guidelines with other Premiere Pro features like the Essential Graphics panel and the Effects Controls panel to create a streamlined and efficient workflow.
6. Advanced Techniques for Using Guidelines
Explore advanced techniques to further enhance your precision and creativity with guidelines.
6.1. Creating Guides for the Rule of Thirds
The rule of thirds is a fundamental principle of visual composition. Use guidelines to create a grid that divides your frame into thirds, both horizontally and vertically. Place key elements at the intersections of these lines to create a visually appealing composition.
-
Calculate Positions: Calculate the positions for the horizontal and vertical guides to divide the frame into thirds.
-
Add Guides: Add the guides to your Program Monitor at the calculated positions.
-
Compose Your Scene: Position your video clips, graphics, and text elements along the rule of thirds grid to create a balanced and visually interesting composition.
Alt Text: How to use Premiere Pro to help guide the rule of thirds for video editing.
6.2. Using Guides for Title Safe and Action Safe Areas
Ensure that your text and important visual elements are visible on all screens by creating guides for the title safe and action safe areas.
- Determine Safe Area Sizes: Determine the size of the title safe and action safe areas based on your video format.
- Calculate Positions: Calculate the positions for the guides to define these areas.
- Add Guides: Add the guides to your Program Monitor at the calculated positions.
- Keep Elements Within Safe Areas: Ensure that all essential text and visual elements are within the title safe and action safe areas.
6.3. Creating Guides for Motion Graphics
Use guidelines to create precise and consistent motion graphics. Align elements, create animations, and ensure that everything stays within the desired boundaries.
6.4. Using Guides with the Essential Graphics Panel
The Essential Graphics panel in Premiere Pro allows you to create and customize text and graphic elements. Use guidelines to align these elements precisely within your video.
- Create Graphics: Create your text and graphic elements using the Essential Graphics panel.
- Position Elements: Drag the elements onto your Program Monitor and use the guidelines to position them accurately.
- Adjust Alignment: Use the alignment tools in the Essential Graphics panel to fine-tune the placement of your elements.
7. Troubleshooting Common Issues with Guidelines
Even with a clear understanding of how to use guidelines, you may encounter some common issues. Here are some troubleshooting tips to help you resolve them.
7.1. Guides Not Visible
If your guidelines are not visible, ensure that you have enabled both rulers and guides in the View menu.
7.2. Guides Not Snapping
If elements are not snapping to the guidelines, make sure that the “Snap in Program Monitor” option is enabled.
7.3. Guides Moving Accidentally
If your guidelines are moving accidentally, lock them in place by selecting “Lock Guides” in the View menu.
7.4. Incorrect Guide Placement
If your guides are not positioned correctly, double-check your calculations and the values you entered in the “Add Guide” dialog box.
7.5. Template Issues
If you are having trouble loading or saving guide templates, make sure that you have the correct file permissions and that the template file is not corrupted.
8. Real-World Examples of Using Guidelines
Explore real-world examples of how guidelines are used in various video editing projects to enhance precision and visual appeal.
8.1. Social Media Videos
Guidelines are essential for creating social media videos that look professional and engaging. Use them to align text, graphics, and video elements, and to ensure that your videos are optimized for different social media platforms.
-
Consistent Branding: Ensures logos and watermarks are always in the correct position.
-
Optimized Layout: Helps create visually appealing layouts for different screen sizes.
-
Improved Engagement: A well-organized video improves viewer engagement and retention.
Alt Text: Video editor adjusting guidelines in Premiere Pro to make it optimized for various social media platforms.
8.2. Corporate Presentations
Guidelines help create professional and consistent corporate presentations. Use them to align text, charts, and images, and to ensure that your presentations look polished and professional.
- Consistent Branding: Ensures company logos and branding elements are always in the correct position.
- Clear Communication: Helps create clear and easy-to-understand layouts for text and charts.
- Professional Image: A well-organized presentation enhances the company’s professional image.
8.3. Cinematic Productions
Guidelines can also be used in cinematic productions to create visually stunning and well-composed scenes. Use them to align elements, create depth, and enhance the overall visual impact of your film.
- Optimized Composition: Helps create visually appealing and balanced compositions.
- Enhanced Visual Impact: Adds depth and visual interest to your scenes.
- Professional Quality: Contributes to the overall professional quality of your film.
9. The Future of Guidelines in Video Editing
As video editing technology continues to evolve, guidelines are likely to become even more sophisticated and integrated into the editing process.
9.1. AI-Powered Guidelines
Artificial intelligence (AI) could be used to automatically generate guidelines based on the content of your video. For example, AI could analyze your video clips and suggest guide placements that would create a visually balanced and appealing composition.
9.2. Dynamic Guidelines
Dynamic guidelines could adjust their position in real-time based on the movement of elements in your video. This would make it even easier to align elements and create precise animations.
9.3. Integration with Virtual Reality (VR) and Augmented Reality (AR)
As VR and AR become more prevalent, guidelines could be used to create immersive and interactive video experiences. Editors can use guidelines to align elements in 3D space and create realistic and engaging VR/AR content.
9.4. Enhanced Collaboration
Cloud-based collaboration tools could allow multiple editors to work on the same project simultaneously, with shared guidelines ensuring consistency and accuracy.
10. Conclusion: Mastering Guidelines for Professional Video Editing
Mastering the use of guidelines in Premiere Pro is essential for creating professional and visually appealing videos. By understanding how to enable rulers and guides, add custom guidelines, work with guide templates, and optimize your workflow, you can significantly improve the quality of your video projects. Remember to explore advanced techniques, troubleshoot common issues, and stay up-to-date with the latest advancements in video editing technology.
CONDUCT.EDU.VN is committed to providing you with the knowledge and resources you need to excel in video editing and other creative fields.
For more information on video editing best practices and ethical guidelines, visit conduct.edu.vn at 100 Ethics Plaza, Guideline City, CA 90210, United States, or contact us via Whatsapp at +1 (707) 555-1234.
FAQ: Frequently Asked Questions About Guidelines in Premiere Pro
1. What are guidelines in Premiere Pro?
Guidelines are visual aids used in Premiere Pro to help editors precisely align and position elements within their video projects.
2. How do I enable rulers and guides in Premiere Pro?
Go to the “View” menu and select “Show Rulers” and “View Guides.”
3. How do I add a custom guide?
Right-click on a ruler, select “Add Guide,” and specify the position and orientation.
4. What is a guide template?
A guide template is a saved set of custom guidelines that can be reused across multiple projects.
5. How do I save a guide template?
Go to “View > Guide Templates > Save Guides as Template” and name your template.
6. How do I load a guide template?
Go to “View > Guide Templates” and select the template you want to use.
7. How do I lock my guidelines?
Go to “View > Lock Guides” to prevent accidental movement.
8. How do I use guidelines with the Snap feature?
Enable “Snap in Program Monitor” in the View menu, and elements will automatically snap to the guidelines.
9. What are title safe and action safe areas?
Title safe and action safe areas are regions within your video frame where text and important visual elements should be placed to ensure they are visible on all screens.
10. How can guidelines improve my video editing workflow?
Guidelines improve accuracy, consistency, and efficiency by providing visual references for precise positioning and alignment.