Adding guides in Premiere Pro allows you to precisely position graphics and video elements, ensuring a professional and polished look for your projects. This comprehensive guide will explore how to effectively use guides in Premiere Pro, enhancing your video editing workflow and achieving optimal results. From understanding the basics to mastering advanced techniques, this article will cover everything you need to know about adding and utilizing guides in Premiere Pro. At CONDUCT.EDU.VN, we are committed to providing you with the most accurate and useful information to improve your video editing skills and ensure your projects adhere to the highest standards of quality and professionalism. Learn how to add and manage guides, customize templates, and troubleshoot common issues, empowering you to create visually stunning videos with ease and precision.
1. Understanding the Basics of Guides in Premiere Pro
Guides in Premiere Pro are non-printing lines that help you align and position elements within your video frame. They are essential for creating balanced compositions, ensuring consistent branding, and adhering to specific aspect ratios. Understanding the fundamental principles of using guides is crucial for any video editor looking to enhance their workflow.
1.1. What are Guides?
Guides are visual aids that overlay your video frame, allowing you to accurately place text, graphics, and other elements. They can be horizontal, vertical, or diagonal, and you can customize their position and color to suit your needs.
1.2. Why Use Guides?
Using guides offers several benefits:
- Precision: Achieve accurate placement of elements.
- Consistency: Maintain a uniform look across multiple projects.
- Balance: Create visually appealing compositions.
- Branding: Ensure logos and branding elements are consistently positioned.
- Efficiency: Speed up your editing process by eliminating guesswork.
1.3. Types of Guides
Premiere Pro supports different types of guides, including:
- Horizontal Guides: Lines that run horizontally across the screen.
- Vertical Guides: Lines that run vertically across the screen.
- Custom Guides: User-defined guides that can be placed at any angle.
2. Enabling and Displaying Guides in Premiere Pro
Before you can start using guides, you need to enable them in Premiere Pro. This section will guide you through the steps to turn on guides and rulers, ensuring they are visible in your Program Monitor.
2.1. Turning on Rulers
Rulers are essential for adding guides with precision. To enable rulers:
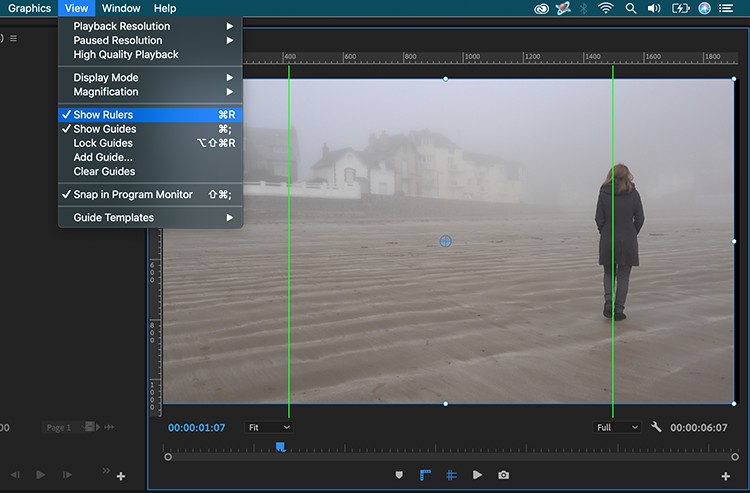
- Go to View in the main menu.
- Select Show Rulers.
- The rulers will now appear along the top and left edges of the Program Monitor.
2.2. Turning on Guides
To display guides in your Program Monitor:
- Go to View in the main menu.
- Select View Guides.
- If guides are already added, they will now be visible. If not, you need to add them as described in the following sections.
2.3. Adding Shortcut Buttons
For quick access, you can add shortcut buttons for rulers and guides to your Program Monitor:
- Click the Button Editor (plus sign) at the bottom right of the Program Monitor panel.
- Drag the Show Rulers and View Guides buttons to the toolbar.
- Now you can toggle rulers and guides with a single click.
3. Adding Custom Guides in Premiere Pro
Adding custom guides allows you to create a personalized grid system tailored to your specific project needs. This section will walk you through the process of adding horizontal and vertical guides with precise pixel or percentage values.
3.1. Adding Horizontal Guides
To add a horizontal guide:
- Right-click on the vertical ruler.
- Select Add Guide.
- In the Add Guide dialog box, enter the desired position in pixels or percentage.
- Ensure the orientation is set to Horizontal.
- Click OK to add the guide.
3.2. Adding Vertical Guides
To add a vertical guide:
- Right-click on the horizontal ruler.
- Select Add Guide.
- In the Add Guide dialog box, enter the desired position in pixels or percentage.
- Ensure the orientation is set to Vertical.
- Click OK to add the guide.
3.3. Using Pixel Values for Precise Placement
Pixel values provide the most accurate way to position guides. For example, if you are working with a 1920×1080 resolution and want to create a square frame in the center:
- Calculate the difference between the width and height: 1920 – 1080 = 840 pixels.
- Divide the difference by two to find the distance from the edges: 840 / 2 = 420 pixels.
- Add two vertical guides at 420 pixels from the left and right edges to create the square frame.
3.4. Using Percentage Values for Flexible Placement
Percentage values are useful for creating guides that adjust automatically to different resolutions. For example:
- Add a horizontal guide at 50% to mark the center of the frame.
- Add horizontal guides at 33.3% and 66.6% to divide the frame into thirds.
- These percentage-based guides will maintain their relative positions regardless of the video resolution.
3.5. Creating Guides for Social Media
Social media platforms often require specific aspect ratios. Use guides to ensure your content fits these requirements:
- For square videos (1:1 aspect ratio), use the pixel value method described above.
- For vertical videos (9:16 aspect ratio), add guides to mark the safe areas for text and graphics.
- Consult the platform’s guidelines to determine the optimal guide positions.
4. Managing and Customizing Guides
Once you have added guides, you can manage and customize them to suit your specific workflow. This includes locking guides to prevent accidental movement, changing their color for better visibility, and removing them when they are no longer needed.
4.1. Locking Guides
To prevent accidental movement of your guides:
- Go to View in the main menu.
- Select Lock Guides.
- Now the guides are fixed in their positions and cannot be dragged.
4.2. Changing Guide Color
Changing the color of your guides can improve their visibility against different backgrounds:
- Go to Premiere Pro (or Edit on Windows) in the main menu.
- Select Preferences > Guides.
- In the Guides dialog box, you can change the color of horizontal and vertical guides.
- Choose a color that contrasts well with your video content.
4.3. Removing Guides
To remove a guide:
- Unlock the guides by deselecting Lock Guides in the View menu.
- Click and drag the guide off the screen.
- Alternatively, you can right-click on the ruler and select Clear Guides to remove all guides.
4.4. Adjusting Guide Positions
To adjust the position of a guide:
- Unlock the guides.
- Click and drag the guide to the new desired position.
- Use the rulers to ensure accurate placement.
5. Using Guides to Position Elements in Premiere Pro
Guides are invaluable for precisely positioning elements such as text, graphics, and video clips. This section will show you how to use guides in conjunction with snapping to achieve perfect alignment.
5.1. Turning on Snapping
Snapping allows elements to automatically align with guides, making it easier to achieve precise placement:
- Go to View in the main menu.
- Select Snap in Program Monitor.
- Now, when you move an element close to a guide, it will snap into alignment.
5.2. Positioning Text
To position text using guides:
- Add text to your video.
- Drag the text element close to a guide.
- The text will snap into alignment with the guide, ensuring precise placement.
- Adjust the text size and font as needed to fit within the guidelines.
5.3. Positioning Graphics
To position graphics using guides:
- Import the graphic into your project.
- Drag the graphic element close to a guide.
- The graphic will snap into alignment with the guide.
- Resize and reposition the graphic as needed to achieve the desired look.
5.4. Positioning Video Clips
To position video clips using guides:
- Add the video clip to your timeline.
- Drag the video clip in the Program Monitor close to a guide.
- The video clip will snap into alignment with the guide.
- Adjust the clip’s size and position to fit within the guidelines.
6. Saving and Sharing Guide Templates
If you find yourself using the same guide setup frequently, you can save it as a template for future use. This section will guide you through the process of saving, renaming, importing, and exporting guide templates.
6.1. Saving Guides as a Template
To save your current guide setup as a template:
- Go to View in the main menu.
- Select Guide Templates > Save Guides as Template.
- Enter a name for the template and click OK.
- The template is now saved and can be accessed in future projects.
6.2. Renaming Guide Templates
To rename a guide template:
- Go to View in the main menu.
- Select Guide Templates > Manage Guides.
- Select the template you want to rename.
- Click the Rename button.
- Enter the new name and click OK.
6.3. Importing Guide Templates
To import a guide template:
- Go to View in the main menu.
- Select Guide Templates > Manage Guides.
- Click the Import button.
- Select the guide template file (.guides) and click Open.
- The template is now imported and available for use.
6.4. Exporting Guide Templates
To export a guide template:
- Go to View in the main menu.
- Select Guide Templates > Manage Guides.
- Select the template you want to export.
- Click the Export button.
- Choose a location to save the guide template file (.guides) and click Save.
- You can now share this template with other users.
6.5. Managing Guide Templates for Team Collaboration
Saving and sharing guide templates is particularly useful for team collaboration:
- Create a standard guide template for your branding elements.
- Export the template and share it with your team.
- Ensure everyone uses the same template to maintain consistency across all projects.
7. Advanced Techniques for Using Guides in Premiere Pro
Beyond the basics, there are several advanced techniques you can use to maximize the effectiveness of guides in Premiere Pro. This section will explore some of these techniques, including creating custom grids and using guides for motion graphics.
7.1. Creating Custom Grids
Custom grids can help you create complex layouts and ensure precise alignment of multiple elements:
- Determine the number of rows and columns you need for your grid.
- Calculate the pixel or percentage values for each guide.
- Add the guides using the methods described in Section 3.
- Save the grid as a template for future use.
7.2. Using Guides for Motion Graphics
Guides are essential for creating accurate and visually appealing motion graphics:
- Use guides to mark the starting and ending points of animations.
- Ensure elements move along consistent paths.
- Create balanced and symmetrical animations.
- Use custom grids to create complex motion graphic layouts.
7.3. Creating Safe Zones for Broadcast
Broadcast television often requires safe zones to ensure text and graphics are visible on all screens:
- Add guides to mark the title safe and action safe areas.
- Ensure all essential elements are within the title safe area.
- Keep important action within the action safe area.
- Consult the broadcast standards for your region to determine the exact safe zone dimensions. Citing sources such as the Society of Motion Picture and Television Engineers (SMPTE) can provide precise guidelines.
7.4. Using Guides for Aspect Ratio Correction
Guides can help you correct aspect ratio issues when working with footage from different sources:
- Add guides to mark the desired aspect ratio.
- Adjust the footage to fit within the guides.
- Crop or scale the footage as needed to achieve the correct aspect ratio.
8. Troubleshooting Common Issues with Guides
Even with a thorough understanding of guides, you may encounter some common issues. This section will provide solutions to these problems, ensuring a smooth and efficient workflow.
8.1. Guides Not Visible
If your guides are not visible:
- Ensure that View Guides is selected in the View menu.
- Check that the guide color is not the same as the background color.
- Make sure the guides are not locked and accidentally dragged off screen.
8.2. Snapping Not Working
If snapping is not working:
- Ensure that Snap in Program Monitor is selected in the View menu.
- Check that the element you are trying to snap is close enough to the guide.
- Make sure the guides are not locked.
8.3. Guides Moving Unexpectedly
If your guides are moving unexpectedly:
- Lock the guides by selecting Lock Guides in the View menu.
- Avoid accidentally clicking and dragging the guides.
8.4. Guide Templates Not Loading
If your guide templates are not loading:
- Ensure that the guide template file (.guides) is not corrupted.
- Try importing the template again.
- Check that the template is compatible with your version of Premiere Pro.
9. The Importance of Adhering to Ethical Guidelines in Video Editing
While Premiere Pro offers powerful tools for visual precision, it’s essential to remember the ethical responsibilities that come with video editing. At CONDUCT.EDU.VN, we emphasize the importance of adhering to ethical guidelines to ensure your work is both visually appealing and morally sound.
9.1. Avoiding Misrepresentation
Video editing can easily manipulate reality. Ethical editing means avoiding misrepresentation of facts or creating misleading narratives. Ensure that your edits do not distort the truth or present information in a biased manner.
9.2. Respecting Privacy
Be mindful of privacy concerns when editing videos. Avoid including private information or images without consent. Respect the rights of individuals to control their own image and personal data.
9.3. Maintaining Objectivity
Strive for objectivity in your editing. Avoid using editing techniques that could unfairly influence viewers’ opinions or emotions. Present information in a balanced and fair way, allowing viewers to form their own conclusions.
9.4. Adhering to Copyright Laws
Always respect copyright laws when using music, images, or footage in your videos. Obtain the necessary permissions or licenses for any copyrighted material you use. Failure to do so can lead to legal consequences.
10. Resources and Further Learning at CONDUCT.EDU.VN
At CONDUCT.EDU.VN, we offer a wealth of resources to help you master video editing and ethical content creation. Explore our website for more articles, tutorials, and guides on Premiere Pro and other essential topics.
10.1. Comprehensive Guides on Video Editing Techniques
Our website features comprehensive guides on various video editing techniques, including color correction, audio editing, and motion graphics. These guides provide step-by-step instructions and practical tips to help you improve your skills.
10.2. Articles on Ethical Content Creation
We publish articles on ethical content creation, covering topics such as responsible journalism, fair representation, and avoiding misinformation. These articles aim to promote ethical practices in the media industry.
10.3. Tutorials on Premiere Pro
Our tutorials on Premiere Pro cover a wide range of topics, from basic editing to advanced techniques. Whether you are a beginner or an experienced editor, you will find valuable information to enhance your workflow.
10.4. Community Forum for Video Editors
Join our community forum to connect with other video editors, share your work, and ask questions. Our forum is a great place to learn from others and get feedback on your projects.
11. Real-World Applications of Guides in Video Production
Guides are used extensively in various video production scenarios to ensure consistency and professionalism. Here are some real-world applications:
11.1. Corporate Branding
In corporate videos, guides ensure that logos, text overlays, and other branding elements are consistently placed across all videos. This helps maintain a unified brand image.
11.2. News Broadcasting
News channels use guides to ensure that lower thirds, tickers, and other on-screen graphics are accurately positioned and do not obscure important information.
11.3. Film Production
Filmmakers use guides to frame shots, ensure proper aspect ratios, and maintain visual consistency throughout the film.
11.4. Social Media Marketing
Social media marketers use guides to create videos that are optimized for different platforms, ensuring that text and graphics are visible on all devices.
12. Case Studies: Successful Use of Guides in Premiere Pro
Examining case studies can provide valuable insights into how guides can be effectively used in Premiere Pro.
12.1. Case Study 1: Creating a Consistent YouTube Channel
A popular YouTuber used guides to create a consistent look for their channel. By using a guide template, they ensured that their intro and outro sequences, as well as their video overlays, were always in the same position. This helped create a professional and recognizable brand.
12.2. Case Study 2: Enhancing a Documentary Film
A documentary filmmaker used guides to frame interviews and ensure that the subjects were always centered in the frame. This helped create a visually appealing and engaging film.
12.3. Case Study 3: Improving Corporate Training Videos
A corporate training department used guides to ensure that text and graphics in their training videos were always legible and did not obscure important information. This helped improve the effectiveness of their training programs.
13. Keeping Up-to-Date with Premiere Pro Updates and New Features
Adobe Premiere Pro is continually updated with new features and improvements. Staying up-to-date with these changes is essential for maximizing your efficiency and creativity.
13.1. Following Adobe’s Official Channels
Follow Adobe’s official website, blog, and social media channels to stay informed about new features, updates, and tutorials.
13.2. Participating in Online Communities
Join online communities and forums to discuss new features and share tips with other Premiere Pro users.
13.3. Attending Workshops and Seminars
Attend workshops and seminars to learn from industry experts and gain hands-on experience with new features.
14. Ensuring Compliance with Industry Standards
Adhering to industry standards is crucial for professional video production. Here’s how guides can help:
14.1. Safe Zones for Television Broadcast
Ensure your videos comply with television broadcast standards by using guides to mark title safe and action safe areas. This guarantees that your content is visible on all screens.
14.2. Aspect Ratios for Different Platforms
Use guides to ensure your videos are properly formatted for different platforms, such as YouTube, Vimeo, and social media channels. This helps avoid cropping and distortion issues.
14.3. Accessibility Guidelines
Comply with accessibility guidelines by using guides to ensure that text and graphics are legible for viewers with visual impairments.
15. Best Practices for Using Guides in Premiere Pro
To maximize the effectiveness of guides in Premiere Pro, follow these best practices:
15.1. Plan Your Layout
Before adding guides, plan your layout and determine the exact positions where you want to place elements.
15.2. Use Templates
Create and use guide templates to maintain consistency across multiple projects.
15.3. Lock Guides
Lock your guides to prevent accidental movement.
15.4. Choose Appropriate Colors
Choose guide colors that contrast well with your video content.
15.5. Regularly Update Your Templates
Regularly update your guide templates to reflect changes in your branding or platform requirements.
16. Ethical Considerations in Using Guides
While guides are technical tools, their use also involves ethical considerations:
16.1. Avoiding Deceptive Framing
Ensure that your framing does not deceive viewers or misrepresent the context of your video.
16.2. Respecting Cultural Sensitivities
Be mindful of cultural sensitivities when framing shots and avoid using guides in a way that could be offensive or disrespectful.
16.3. Ensuring Accuracy
Use guides to ensure that on-screen graphics and text are accurate and do not mislead viewers.
17. Future Trends in Video Editing and the Role of Guides
As video editing technology continues to evolve, guides will remain an essential tool for precision and consistency. Future trends include:
17.1. Integration with AI
AI-powered tools may automate the process of adding guides and suggesting optimal layouts.
17.2. Enhanced Collaboration
Cloud-based collaboration platforms may allow multiple editors to work on the same project using shared guide templates.
17.3. Virtual and Augmented Reality
Guides will play an increasingly important role in creating immersive experiences for virtual and augmented reality.
18. Conclusion: Mastering Guides for Professional Video Editing
Mastering the use of guides in Premiere Pro is essential for achieving professional-quality video editing. By understanding the basics, managing and customizing guides, and following best practices, you can enhance your workflow and create visually stunning videos. Remember to adhere to ethical guidelines and stay up-to-date with the latest trends and updates. At CONDUCT.EDU.VN, we are committed to providing you with the resources and information you need to succeed in the world of video editing.
19. Call to Action
Ready to take your video editing skills to the next level? Visit CONDUCT.EDU.VN today to explore our comprehensive guides, tutorials, and resources. Whether you’re a beginner or an experienced editor, you’ll find valuable information to help you create professional and ethical video content. Contact us at 100 Ethics Plaza, Guideline City, CA 90210, United States, or via Whatsapp at +1 (707) 555-1234. Start your journey towards mastering video editing with conduct.edu.vn.
20. Frequently Asked Questions (FAQ) about Guides in Premiere Pro
Here are some frequently asked questions about using guides in Premiere Pro:
20.1. How do I add a horizontal guide in Premiere Pro?
Right-click on the vertical ruler and select Add Guide. In the Add Guide dialog box, enter the desired position in pixels or percentage, and ensure the orientation is set to Horizontal.
20.2. How do I add a vertical guide in Premiere Pro?
Right-click on the horizontal ruler and select Add Guide. In the Add Guide dialog box, enter the desired position in pixels or percentage, and ensure the orientation is set to Vertical.
20.3. How do I lock guides in Premiere Pro?
Go to View in the main menu and select Lock Guides.
20.4. How do I change the color of guides in Premiere Pro?
Go to Premiere Pro (or Edit on Windows) in the main menu, select Preferences > Guides, and change the color of horizontal and vertical guides.
20.5. How do I remove a guide in Premiere Pro?
Unlock the guides by deselecting Lock Guides in the View menu. Click and drag the guide off the screen, or right-click on the ruler and select Clear Guides to remove all guides.
20.6. How do I save a guide template in Premiere Pro?
Go to View in the main menu, select Guide Templates > Save Guides as Template, and enter a name for the template.
20.7. How do I import a guide template in Premiere Pro?
Go to View in the main menu, select Guide Templates > Manage Guides, click the Import button, and select the guide template file (.guides).
20.8. How do I enable snapping in Premiere Pro?
Go to View in the main menu and select Snap in Program Monitor.
20.9. Why are my guides not visible in Premiere Pro?
Ensure that View Guides is selected in the View menu, check that the guide color is not the same as the background color, and make sure the guides are not locked and accidentally dragged off screen.
20.10. How can guides help me create videos for social media?
Guides help you ensure that your videos are properly formatted for different social media platforms, with text and graphics visible on all devices and in the correct aspect ratio. They help you adhere to social media video best practices.