PowerPoint is a powerful tool for creating presentations, but precise alignment and placement of objects can sometimes be challenging. This is where ruler guides come in handy. This guide provides a detailed explanation of How To Add Ruler Guides In Powerpoint and how to use them effectively.
Understanding Ruler Guides and Their Benefits
Ruler guides, also known as drawing guides, are dotted lines (horizontal and vertical) that intersect at the center of your slide. They help you visually align and position objects, ensuring a professional and polished look for your presentations. Using ruler guides in PowerPoint allows for consistent placement across multiple slides, contributing to a more cohesive and visually appealing presentation.
Adding Ruler Guides in PowerPoint
Here’s how to add ruler guides in PowerPoint:
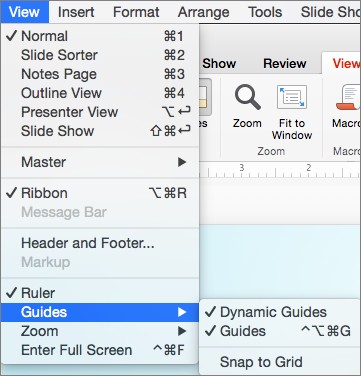
- Navigate to the View Tab: Open your PowerPoint presentation and click on the “View” tab located in the ribbon at the top of the screen.
- Show Guides: In the “Show” group, you’ll find a “Guides” option. Click on the “Guides” checkbox to display the default horizontal and vertical ruler guides.
Customizing Ruler Guides
PowerPoint offers several options for customizing ruler guides to fit your specific needs:
- Adding New Guides: To add more guides, right-click on the slide, select “Guides,” and then choose either “Add Vertical Guide” or “Add Horizontal Guide”. This allows you to create additional guides at specific points on your slide.
- Moving Guides: Click and drag a guide to reposition it. As you drag, PowerPoint displays the distance from the center of the slide, allowing for precise placement.
- Deleting Guides: To remove a guide, simply right-click on it and select “Delete”.
- Changing Guide Color: Right-click on the guide, select “Color,” and choose a color that makes the guide stand out against your slide background.
Using Snap-to Features for Precise Alignment
PowerPoint’s “Snap-to” features enhance the functionality of ruler guides, allowing for even greater precision. Here’s how to enable and use these features:
-
Access the Grid and Guides Dialog Box: In the “View” tab, within the “Show” group, click the dialog box launcher (a small arrow in the bottom-right corner). This opens the “Grid and Guides” dialog box.
-
Enable Snap to Grid: Under the “Snap to” section, check the “Snap objects to grid” box. This will cause objects to automatically align with the nearest gridline intersection.
-
Display Grid: Under “Grid settings,” check the “Display grid on screen” box to visualize the gridlines, further aiding in precise alignment.
Turning Snap-to Options On and Off
You can quickly toggle the “Snap to Grid” feature on or off:
- Via the Ribbon: Select View > Guides > Snap to Grid.
- Temporarily Override Snap-to: Hold down the Alt key (Option key on Mac) while dragging an object to temporarily disable the snap-to feature, giving you more freehand control.
Dynamic Guides for Contextual Alignment
PowerPoint also offers “Dynamic Guides,” which appear automatically as you move objects, helping you align them relative to other objects on the slide.
- Enable Dynamic Guides: Select View > Guides > Dynamic Guides.
 Grid and guide options
Tips for Effective Use of Ruler Guides
- Use Consistent Placement: Leverage ruler guides to maintain consistent object placement across all slides in your presentation.
- Adjust Spacing: While you cannot change the default grid size, the “Spacing” option in the Grid and Guides dialog box allows you to adjust the spacing between the dots that make up each gridline.
- Drawing Straight Lines: If the “Snap objects to grid” box is checked, you can draw perfect straight lines when drawing a freeform shape.
- Fine Control (Mac): For precise control over placement of objects on a slide, hold down Command while dragging.
Considerations for Default Settings
- Set as Default: If you find yourself frequently using the same grid and guide settings, click “Set as Default” in the “Grid and Guides” dialog box. This will apply these settings to all new presentations you open.
Conclusion
Adding and utilizing ruler guides in PowerPoint is essential for creating visually appealing and professionally designed presentations. By mastering the techniques outlined in this guide, you can ensure precise alignment and consistent object placement, elevating the overall quality of your presentations.