Diagonal guides in Illustrator are indispensable for maintaining consistency and precision in your designs. CONDUCT.EDU.VN offers comprehensive insights on leveraging these guides to enhance your creative projects. Mastering diagonal guide creation leads to advanced design proficiency and innovative applications.
1. Understanding the Basics of Guides in Illustrator
Guides in Adobe Illustrator serve as non-printing lines that assist in aligning and positioning objects with accuracy. They are fundamental for creating structured layouts, ensuring symmetry, and maintaining consistent spacing throughout your artwork.
1.1. What are Guides?
Guides are visual aids that do not appear in the final printed or exported artwork. They exist solely to help you align objects, text, and other design elements precisely. They can be straight lines, either horizontal or vertical, or custom shapes that you define.
1.2. Types of Guides in Illustrator
Illustrator offers two primary types of guides:
- Ruler Guides: These are created by clicking and dragging from the rulers at the top and left of the artboard. They are straight lines, either horizontal or vertical.
- Object Guides: These are created by converting existing paths or shapes into guides. This allows for more complex guide shapes, including diagonal lines, curves, and custom forms.
1.3. Why Use Guides?
Guides provide numerous benefits in your design workflow:
- Precision: They ensure accurate alignment and positioning of objects.
- Consistency: They help maintain uniform spacing and layout across your design.
- Efficiency: They speed up the design process by providing visual references.
- Structure: They help create a well-organized and visually appealing layout.
2. Creating Basic Ruler Guides
Before diving into diagonal guides, it’s essential to understand how to create basic ruler guides. These are the foundation for more complex guide setups.
2.1. Displaying the Rulers
If the rulers are not visible, go to View > Rulers > Show Rulers or press Ctrl+R (Windows) or Cmd+R (Mac). The rulers appear at the top and left edges of the artboard.
2.2. Creating Horizontal Guides
To create a horizontal guide, click on the top ruler and drag down onto the artboard. A blue line will appear, indicating the position of the guide. Release the mouse button to place the guide.
2.3. Creating Vertical Guides
To create a vertical guide, click on the left ruler and drag right onto the artboard. A blue line will appear, indicating the position of the guide. Release the mouse button to place the guide.
2.4. Positioning Guides Accurately
You can position guides precisely by:
- Using the Info Panel: With the guide selected, the Info panel (Window > Info) displays the guide’s X and Y coordinates, allowing you to adjust its position accurately.
- Using the Transform Panel: The Transform panel (Window > Transform) also allows you to specify the exact position of the guide.
- Double-Clicking the Ruler: Double-clicking on either ruler brings up a dialog box where you can enter the exact position for the new guide.
3. The Key: Transforming Paths into Diagonal Guides
Turning paths into guides is fundamental for creating diagonal guides in Illustrator. This method allows you to create guides of any shape or angle.
3.1. Drawing a Path
Use any of the drawing tools (Pen Tool, Line Segment Tool, Rectangle Tool, etc.) to create a path on your artboard. This path will be converted into a guide.
3.2. Selecting the Path
Use the Selection Tool (V) to select the path you want to convert into a guide.
3.3. Making Guides
Go to View > Guides > Make Guides. The selected path will transform into a guide, usually a blue line by default.
3.4. Understanding Guide Properties
Once a path is converted into a guide, it inherits guide properties:
- Color: By default, guides are blue, but this can be changed in the Preferences (Edit > Preferences > Guides & Grid).
- Locking: Guides can be locked to prevent accidental movement (View > Guides > Lock Guides).
- Visibility: Guides can be hidden or shown (View > Guides > Hide Guides or View > Guides > Show Guides).
4. Creating Diagonal Guides Using the Line Segment Tool
The Line Segment Tool is a straightforward method for creating diagonal guides. By drawing a line at a specific angle and then converting it into a guide, you can achieve precise diagonal alignment.
4.1. Selecting the Line Segment Tool
Select the Line Segment Tool () from the toolbar. It is often found nested under the Rectangle Tool or other shape tools.
4.2. Drawing a Diagonal Line
Click and drag on the artboard to draw a line. To create a perfectly straight line, hold down the Shift key while dragging. This constrains the line to 0, 45, or 90-degree angles relative to the artboard.
4.3. Specifying the Angle
For more precise control over the angle, you can:
- Use the Transform Panel: After drawing the line, open the Transform panel (Window > Transform). Enter the desired angle in the rotation field.
- Double-Click the Tool: Double-click the Line Segment Tool in the toolbar to open the Line Segment Tool Options dialog. Here, you can specify the length and angle of the line.
4.4. Converting the Line into a Guide
Select the line with the Selection Tool (V) and go to View > Guides > Make Guides. The line will now be a diagonal guide.
5. Using the Rotate Tool for Precision Diagonal Guides
The Rotate Tool offers another precise method for creating diagonal guides. By rotating an existing horizontal or vertical guide, you can create diagonal guides at specific angles.
5.1. Creating a Basic Guide
First, create a horizontal or vertical guide using the ruler method described earlier.
5.2. Selecting the Rotate Tool
Select the Rotate Tool (R) from the toolbar.
5.3. Setting the Rotation Point
Click on the point around which you want to rotate the guide. This point will serve as the pivot for the rotation. To rotate around the intersection of two guides, click at their intersection point.
5.4. Rotating the Guide
- Click and Drag: Click and drag to rotate the guide visually. Hold down the Shift key to constrain the rotation to 45-degree increments.
- Enter a Value: Alternatively, after selecting the Rotate Tool and clicking the rotation point, enter a value in the Rotate dialog box. To open the Rotate dialog, hold the Alt (Windows) or Option (Mac) key while clicking.
5.5. Making a Copy
In the Rotate dialog box, click the Copy button to create a rotated copy of the guide, leaving the original guide in place. Click OK to rotate the original guide.
5.6. Converting the Rotated Line into a Guide
If the rotated line is not automatically a guide, select the rotated line with the Selection Tool (V) and go to View > Guides > Make Guides.
6. Advanced Techniques: Using the Pen Tool for Complex Diagonal Guides
The Pen Tool allows you to create complex and custom-shaped guides. This is particularly useful for creating diagonal guides that follow specific paths or curves.
6.1. Selecting the Pen Tool
Select the Pen Tool (P) from the toolbar.
6.2. Drawing a Path
Click on the artboard to create anchor points and draw a path. To create straight segments, click at each point. To create curved segments, click and drag to create Bezier curves.
6.3. Creating Precise Angles with the Pen Tool
To create precise angles, you can use the Shift key to constrain the angle of the line segments. You can also use the Smart Guides feature (View > Smart Guides) to snap to specific angles or points.
6.4. Editing the Path
Use the Direct Selection Tool (A) to adjust the anchor points and handles of the path. This allows you to refine the shape and angle of the diagonal guide.
6.5. Converting the Path into a Guide
Select the path with the Selection Tool (V) and go to View > Guides > Make Guides. The path will now be a diagonal guide.
7. Utilizing the Polar Grid Tool for Radial and Diagonal Guides
The Polar Grid Tool is excellent for creating radial and diagonal guides, particularly useful in circular designs or layouts that require radiating lines.
7.1. Selecting the Polar Grid Tool
Select the Polar Grid Tool from the toolbar. It’s usually found nested under the Line Segment Tool.
7.2. Drawing a Polar Grid
Click and drag on the artboard to draw a polar grid.
7.3. Adjusting the Grid Parameters
While dragging, you can adjust the grid parameters:
- Concentric Dividers: Use the Up and Down arrow keys to increase or decrease the number of concentric circles.
- Radial Dividers: Use the Left and Right arrow keys to increase or decrease the number of radial lines.
7.4. Specifying Exact Values
For precise control, double-click the Polar Grid Tool in the toolbar to open the Polar Grid Tool Options dialog. Here, you can specify the size, concentric dividers, and radial dividers.
7.5. Converting the Grid into Guides
After drawing the grid, select it with the Selection Tool (V) and go to View > Guides > Make Guides. The grid lines will now be guides.
8. Working with Perspective Grids and Diagonal Guides
Illustrator’s Perspective Grid Tool can be combined with diagonal guides to create complex perspective drawings.
8.1. Enabling the Perspective Grid
Go to View > Perspective Grid > Show Grid. The perspective grid will appear on the artboard.
8.2. Adjusting the Perspective Grid
Use the Perspective Grid Tool to adjust the vanishing points, horizon line, and grid spacing.
8.3. Drawing in Perspective
Use the Shape tools or the Pen tool to draw objects that snap to the perspective grid.
8.4. Creating Guides from Perspective Lines
Select lines from the perspective grid and convert them into guides by going to View > Guides > Make Guides. These guides will follow the perspective lines, aiding in creating accurate perspective drawings.
8.5. Combining Perspective Guides with Diagonal Guides
Create additional diagonal guides using the methods described earlier to further refine the perspective drawing.
9. Aligning Objects to Diagonal Guides
Once you have created your diagonal guides, aligning objects to them is crucial for achieving precise layouts.
9.1. Enabling Smart Guides
Ensure that Smart Guides are enabled by going to View > Smart Guides or pressing Ctrl+U (Windows) or Cmd+U (Mac). Smart Guides help objects snap to guides and other objects.
9.2. Dragging Objects to Align
Drag objects near the diagonal guides. Smart Guides will highlight when the object is aligned to the guide.
9.3. Using the Align Panel
The Align panel (Window > Align) can also be used to align objects to guides. Select the objects and the guide, then choose the appropriate alignment option in the Align panel. Be sure to set the “Align To” option to “Align to Key Object,” then click on the guide to make it the key object.
10. Editing and Managing Guides
Guides are not static; they can be edited, moved, and managed to suit your evolving design needs.
10.1. Selecting Guides
Use the Selection Tool (V) to select guides. If guides are locked, you will need to unlock them first (View > Guides > Unlock Guides).
10.2. Moving Guides
Click and drag selected guides to move them. Hold down the Shift key to constrain movement to horizontal or vertical directions.
10.3. Deleting Guides
Select the guide and press the Delete key, or go to Edit > Cut.
10.4. Clearing All Guides
To remove all guides from the artboard, go to View > Guides > Clear Guides.
10.5. Locking and Hiding Guides
- Locking: Lock guides to prevent accidental movement (View > Guides > Lock Guides).
- Hiding: Hide guides to declutter the artboard (View > Guides > Hide Guides).
11. Customizing Guide Preferences
Illustrator allows you to customize the appearance and behavior of guides through the Preferences dialog.
11.1. Accessing Guide Preferences
Go to Edit > Preferences > Guides & Grid (Windows) or Illustrator > Preferences > Guides & Grid (Mac).
11.2. Changing Guide Color
In the Guides & Grid Preferences, you can change the color of the guides to make them more visible against different backgrounds.
11.3. Changing Guide Style
You can change the style of the guides from solid lines to dashed lines.
11.4. Adjusting Grid Settings
The same dialog also allows you to adjust grid settings, including the grid color, style, and spacing.
12. Practical Applications of Diagonal Guides
Diagonal guides are useful in many design scenarios, enhancing precision and visual appeal.
12.1. Logo Design
Use diagonal guides to create symmetrical and balanced logo designs. They can help align elements at specific angles, ensuring a professional and visually appealing logo.
12.2. Layout Design
In layout design, diagonal guides can help create dynamic and visually interesting compositions. They can be used to align text, images, and other elements in a way that draws the viewer’s eye.
12.3. Illustration
In illustration, diagonal guides can help create perspective, depth, and accurate proportions. They are particularly useful for drawing buildings, landscapes, and other complex scenes.
12.4. Infographics
Use diagonal guides to align data elements, create visual hierarchies, and enhance the overall visual appeal of infographics.
12.5. Pattern Design
Diagonal guides are essential for creating repeating patterns that require precise alignment and symmetry.
13. Integrating Diagonal Guides with Grids
Combining diagonal guides with a grid system can provide a robust framework for your designs, ensuring consistency and visual harmony.
13.1. Setting Up a Grid
Go to Edit > Preferences > Guides & Grid to set up a grid. Specify the gridline every value and the subdivisions.
13.2. Enabling Snap to Grid
Enable Snap to Grid by going to View > Snap to Grid. This will cause objects to snap to the grid lines as you draw and move them.
13.3. Creating Diagonal Guides Aligned to the Grid
Create diagonal guides that align with the grid lines to create a comprehensive design framework.
13.4. Designing within the Grid and Guide Framework
Use the grid and diagonal guides as a foundation for your design, aligning elements to the grid lines and using the guides to create angles and visual interest.
14. Troubleshooting Common Issues with Guides
Even with a good understanding of guides, you may encounter some common issues. Here are some troubleshooting tips:
14.1. Guides Not Visible
If guides are not visible, ensure that they are not hidden (View > Guides > Show Guides) and that the guide color is not the same as the background color in the Preferences.
14.2. Guides Not Snapping
If objects are not snapping to guides, ensure that Smart Guides are enabled (View > Smart Guides) and that Snap to Point is enabled.
14.3. Guides Moving Unexpectedly
If guides are moving unexpectedly, ensure that they are locked (View > Guides > Lock Guides).
14.4. Difficulty Selecting Guides
If you are having difficulty selecting guides, try zooming in or using the Direct Selection Tool (A) to select them individually.
14.5. Guides Not Converting
If a path is not converting to a guide, ensure that the path is selected and that you are using the correct command (View > Guides > Make Guides).
15. Best Practices for Using Guides in Illustrator
Following best practices ensures efficient and effective use of guides in your design workflow.
15.1. Use Layers for Guides
Create a separate layer for guides to keep them organized and easily manageable. This also allows you to lock or hide the guide layer as needed.
15.2. Label Guides Clearly
Label guides with descriptive names to easily identify their purpose. This is particularly useful when working with complex layouts.
15.3. Use Consistent Guide Placement
Maintain consistent guide placement throughout your design to ensure uniformity and visual harmony.
15.4. Review Guides Regularly
Regularly review your guides to ensure they are still relevant and accurate. Delete any unnecessary guides to declutter your workspace.
15.5. Back Up Guide Templates
Create templates with pre-set guides for common design tasks to save time and ensure consistency across projects.
16. Advanced Scripting and Automation for Guides
For advanced users, scripting and automation can significantly enhance the efficiency of creating and managing guides.
16.1. Introduction to Illustrator Scripting
Illustrator supports scripting using JavaScript and other languages. Scripting allows you to automate repetitive tasks and create custom tools.
16.2. Creating Scripts to Generate Guides
You can write scripts to automatically generate guides based on specific parameters, such as angle, spacing, and position.
16.3. Using Scripting to Manage Guides
Scripts can also be used to manage guides, such as locking, hiding, and deleting guides based on specific criteria.
16.4. Resources for Learning Illustrator Scripting
Adobe provides extensive documentation and resources for learning Illustrator scripting. Online communities and forums also offer valuable support and examples.
17. Alternative Software and Plugins for Guide Creation
While Illustrator provides robust guide features, alternative software and plugins can offer additional capabilities.
17.1. VectorScribe Plugin
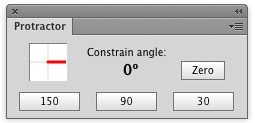
As mentioned earlier, Astutegraphics.com offers VectorScribe, a plugin for Adobe Illustrator that enhances vector design capabilities. Within VectorScribe, the Protractor Panel allows users to alter Illustrator’s default X/Y graph and constrain angles to anything.
With this panel, you can click the “30” button to change the X coordinates to follow a 30° angle. The red line on the panel indicates the currently set angle. If you want a custom angle, just click the box with the red line in it and enter the angle you want.
Once you set an angle, the Illustrator grid will be rotated to match the set angle.
With this set, you can then actually draw at that angle.
Once an angle is set objects traditionally horizontal are created at that angle, shapes and type being the most noticeable. This essentially allows you to work at an angle other than 0°.
17.2. Affinity Designer
Affinity Designer is a vector graphics editor that offers similar guide features to Illustrator, with some unique capabilities.
17.3. Sketch
Sketch is a popular vector design tool, particularly among UI/UX designers, that provides flexible guide and grid systems.
17.4. Adobe XD
Adobe XD is a UI/UX design tool that offers guide features tailored for creating user interfaces and prototypes.
18. Case Studies: Successful Designs Using Diagonal Guides
Examining real-world examples demonstrates the impact of diagonal guides on successful design projects.
18.1. Logo Design for Tech Startups
Many tech startups use logos with dynamic diagonal elements to convey innovation and forward-thinking. Diagonal guides are essential for creating these logos with precision and balance.
18.2. Editorial Layouts in Magazines
Magazines often use diagonal layouts to create visually engaging and dynamic page designs. Diagonal guides help align text, images, and other elements in a way that draws the reader’s eye.
18.3. Infographics for Data Visualization
Infographics that use diagonal lines and elements can effectively communicate complex data. Diagonal guides ensure that these elements are aligned and visually appealing.
18.4. Poster Designs for Events
Poster designs for events often use diagonal elements to create a sense of energy and excitement. Diagonal guides help align text and graphics in a way that captures attention.
19. Staying Updated with the Latest Illustrator Features
Adobe regularly updates Illustrator with new features and enhancements. Staying updated ensures you can leverage the latest tools for creating and managing guides.
19.1. Adobe Creative Cloud Updates
Keep your Adobe Creative Cloud subscription up to date to access the latest versions of Illustrator.
19.2. Adobe Illustrator Blog and Forums
Follow the official Adobe Illustrator blog and forums to stay informed about new features, updates, and best practices.
19.3. Online Tutorials and Courses
Enroll in online tutorials and courses to learn about new Illustrator features and techniques.
19.4. Design Conferences and Workshops
Attend design conferences and workshops to network with other designers and learn from industry experts.
20. Conclusion: Mastering Diagonal Guides for Design Excellence
Mastering diagonal guides in Adobe Illustrator is crucial for achieving precision, consistency, and visual appeal in your designs. By understanding the different methods for creating and managing guides, and by following best practices, you can enhance your design workflow and create stunning visuals. Remember to leverage resources like CONDUCT.EDU.VN for further insights and guidance.
21. Frequently Asked Questions (FAQs)
21.1. What are guides in Adobe Illustrator?
Guides are non-printing lines that help you align and position objects accurately in your designs.
21.2. How do I show or hide guides in Illustrator?
Go to View > Guides > Show Guides or View > Guides > Hide Guides.
21.3. How do I lock or unlock guides in Illustrator?
Go to View > Guides > Lock Guides or View > Guides > Unlock Guides.
21.4. How do I change the color of guides in Illustrator?
Go to Edit > Preferences > Guides & Grid (Windows) or Illustrator > Preferences > Guides & Grid (Mac) and change the color in the Guides section.
21.5. How do I create a diagonal guide in Illustrator?
Draw a line at the desired angle using the Line Segment Tool or Pen Tool, then go to View > Guides > Make Guides.
21.6. How do I align objects to guides in Illustrator?
Enable Smart Guides (View > Smart Guides) and drag the objects near the guides. They will snap into alignment.
21.7. Can I convert any shape into a guide in Illustrator?
Yes, select the shape and go to View > Guides > Make Guides.
21.8. How do I delete a guide in Illustrator?
Select the guide with the Selection Tool and press the Delete key.
21.9. What is the Polar Grid Tool used for in Illustrator?
The Polar Grid Tool is used for creating radial and diagonal guides, particularly useful in circular designs.
21.10. How can scripting help with guides in Illustrator?
Scripting allows you to automate the creation and management of guides, saving time and ensuring consistency.
For more detailed information and guidance on ethical conduct and standards, visit CONDUCT.EDU.VN. Our resources are designed to help you navigate complex situations with confidence. If you have any questions or need further assistance, please contact us at 100 Ethics Plaza, Guideline City, CA 90210, United States, or call us at Whatsapp: +1 (707) 555-1234. You can also visit our website at conduct.edu.vn.