PowerPoint offers several visual aids to help you precisely align and format objects on your slides. These include gridlines, snap-to options, and drawing guides. This article explains How To Display Guides In Powerpoint, customize them, and use them effectively to create visually appealing and professional presentations.
Displaying Gridlines in PowerPoint
Gridlines provide a visual grid on your slide, making it easier to align objects. By default, the grid is composed of one-inch squares, offering a helpful visual cue when formatting your slides.
To turn gridlines on or off:
- Go to the View tab on the PowerPoint ribbon.
- In the Show group, check or uncheck the Gridlines box.
While you cannot directly change the size of the grid squares, you can adjust the spacing between the dots that make up the gridlines using the Spacing option in the Grid and Guides dialog box (explained below). This allows you to adjust the precision of object alignment.
Utilizing Snap-to Options for Precise Alignment
The “Snap to” feature allows you to automatically align objects to the nearest gridline or guide. This feature greatly simplifies the process of achieving precise and consistent alignment.
Here’s how to configure the Snap-to options:
-
On the View tab, in the Show group, click the dialog box launcher (a small arrow in the bottom right corner). This opens the Grid and Guides dialog box.
Alt text: Grid and Guides dialog box launcher highlighted in the Show group on the View tab in PowerPoint.
-
To enable snapping to the grid: Under the Snap to section, check the Snap objects to grid box. This will cause objects to align to the closest intersection of the gridlines.
-
To display the grid on screen: Under the Grid settings section, check the Display grid on screen box. This makes the gridlines visible.
To temporarily disable the snap-to options while dragging an object, hold down the Alt key.
To disable the Snap-to options:
-
Select View, and in the Show group, select the dialog box launcher.
Alt text: Dialog box launcher icon in the Show group on the View tab in PowerPoint.
-
In the Grid and Guides dialog box, clear the Snap objects to grid box.
To make the current settings the default for all new presentations, click Set as Default in the Grid and Guides dialog box.
Drawing Guides for Centering and Alignment
Drawing guides are dotted lines (one vertical and one horizontal) that intersect at the center of the slide. They are helpful for centering objects and ensuring symmetrical layouts.
To show or hide drawing guides:
- Go to the View tab.
- In the Show group, check or uncheck the Guides box. This will display or hide the default drawing guides.
When drawing guides are enabled, objects will “snap” to these lines when dragged within a few pixels of them, making precise centering easy.
Adding, Removing, and Customizing Drawing Guides
PowerPoint allows you to add, remove, and customize drawing guides to fit your specific needs.
- To add a guide: Ctrl+click (or right-click) on the slide, point to Guides, and then select Add Vertical Guide or Add Horizontal Guide. This creates a new guide at the location of your click.
- To remove a guide: Ctrl+click (or right-click) on the guide line, and then select Delete on the menu.
You can also change the color of a guide. Right-click the guide, select Color, and choose your desired color. This is helpful for differentiating between multiple guides or making a guide stand out against the slide background.
Dynamic Guides
Dynamic guides, also known as smart guides, appear automatically to help you align and space objects relative to each other. They are turned on by default, but you can disable them.
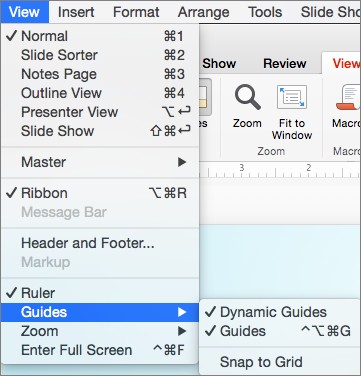
- Select View > Guides > Dynamic Guides to toggle them on or off.
Tips for Using Grids and Guides Effectively
- For fine control over object placement, hold down the Alt key (Windows) or Command key (Mac) while dragging to temporarily override the snap-to options.
- If the Snap objects to grid box is checked, you can draw straight lines when drawing a freeform shape.
 Grid and guide options
Alt text: A dropdown menu for Guides under the View tab in PowerPoint, showcasing options for Grid, Guides and Dynamic Guides.
Conclusion
PowerPoint’s gridlines, snap-to options, and drawing guides are powerful tools for achieving precise alignment and visual consistency in your presentations. By understanding how to display guides in PowerPoint and customize these features, you can create professional and visually appealing slides that effectively communicate your message. Take advantage of these guides to enhance the visual impact and clarity of your presentations.