Guided Access iPhone 12 is a powerful accessibility feature that confines your device to a single app and allows you to control which features are available. This feature is invaluable in various scenarios, like when lending your iPhone 12 to a child or when unintentional gestures might disrupt your focus. With comprehensive instructions and insightful advice, CONDUCT.EDU.VN explains step-by-step how to use Guided Access iPhone 12, covering its configuration, management and troubleshooting. Understand better device accessibility, screen pinning, and focus mode to improve user experience.
1. Understanding Guided Access on iPhone 12
Guided Access is an accessibility feature designed to help individuals with cognitive or attention difficulties stay focused on a task. It locks the iPhone 12 into a single app, preventing the user from navigating to other apps or areas of the device. This can be especially useful for:
- Parents: Restricting children to a specific educational app or game.
- Educators: Keeping students focused on learning materials during class.
- Individuals with Attention Deficit Hyperactivity Disorder (ADHD): Minimizing distractions and promoting concentration.
- Anyone who wants to prevent accidental app switching: When using the device for a specific purpose, such as giving a presentation or following a recipe.
By limiting access to other features and applications, Guided Access creates a more controlled environment, reducing the potential for distraction and promoting a better user experience. The experts at CONDUCT.EDU.VN help you create a safe and productive digital environment with specialized advice and methods.
1.1. Benefits of Using Guided Access
Guided Access provides several benefits beyond simply locking the device to a single app. These include:
- Improved Focus: By eliminating distractions, Guided Access helps users concentrate on the task at hand.
- Enhanced Security: Prevents unauthorized access to personal information or settings.
- Customizable Restrictions: Allows you to disable hardware buttons, touch input in specific areas of the screen, and other features.
- Peace of Mind: Provides reassurance that the device is being used appropriately, especially when given to children or individuals with cognitive impairments.
1.2. Accessibility Features on iPhone 12
The iPhone 12 offers a range of accessibility features designed to make the device more user-friendly for individuals with disabilities. Guided Access is just one of many tools available, including:
- VoiceOver: A screen reader that describes aloud what appears on the screen.
- Zoom: Magnifies the entire screen or specific areas.
- Display Accommodations: Allows you to adjust color filters, reduce white point, and invert colors.
- Switch Control: Enables users to control the device using a single switch or multiple switches.
- AssistiveTouch: Provides an on-screen menu for performing common gestures and actions.
These features, combined with Guided Access, make the iPhone 12 a highly accessible device for a wide range of users.
2. Setting Up Guided Access on Your iPhone 12
Before you can use Guided Access, you need to enable it in the Settings app. Here’s how:
- Open the Settings app: Locate the Settings icon on your home screen and tap it.
- Navigate to Accessibility: Scroll down and tap on “Accessibility.”
- Find Guided Access: Scroll down to the “General” section and tap on “Guided Access.”
- Enable Guided Access: Toggle the switch to the “On” position.
 ios13-iphone-xs-settings-accessibility-guided-access-safari
2.1. Configuring Passcode Settings
Once Guided Access is enabled, you need to set up a passcode that will be used to exit Guided Access mode.
- Tap on “Passcode Settings”: This option allows you to configure the passcode used to end a Guided Access session.
- Tap on “Set Guided Access Passcode”: You will be prompted to enter a new passcode.
- Enter a Passcode: Choose a passcode that is easy for you to remember but difficult for others to guess.
- Re-enter the Passcode: Confirm the passcode by entering it again.
- Enable Touch ID or Face ID (Optional): You can also enable Touch ID or Face ID as an alternative way to end a Guided Access session. This can be convenient if you have difficulty remembering passcodes.
2.2. Understanding Accessibility Options
While in the Accessibility settings, take some time to explore the other available options. These settings can further customize the user experience for individuals with specific needs. Some notable options include:
- VoiceOver: Provides spoken descriptions of items on the screen.
- Zoom: Magnifies the screen for users with low vision.
- Display & Text Size: Allows you to adjust text size, contrast, and color filters.
- Motion: Reduces the amount of motion on the screen to prevent dizziness or nausea.
- Spoken Content: Allows you to have selected text read aloud.
3. Starting a Guided Access Session on iPhone 12
Once Guided Access is set up, starting a session is quick and easy.
- Open the App: Open the app that you want to lock the device into. For example, if you want to restrict access to a specific game, open that game.
- Triple-Click the Side Button: Quickly press the side button (power button) three times in a row. This will activate Guided Access.
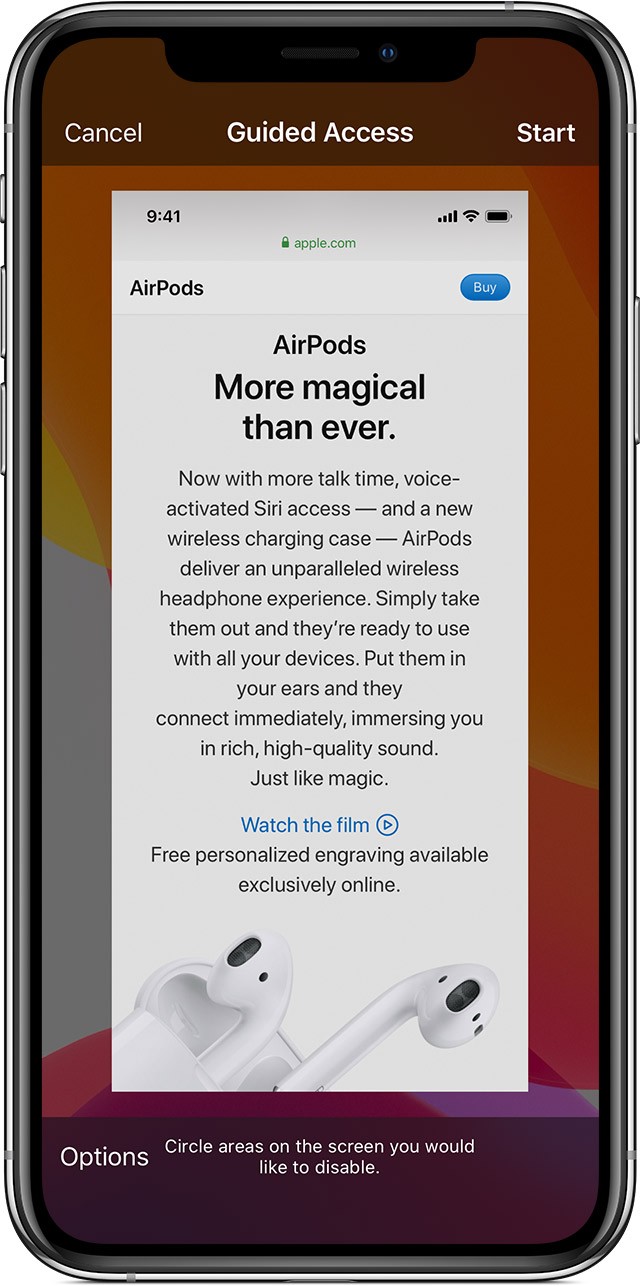
- Configure Restrictions (Optional): Before starting the session, you can configure specific restrictions, such as disabling certain areas of the screen or hardware buttons.
- Tap “Start”: Once you have configured the desired restrictions, tap the “Start” button in the bottom right corner of the screen.
- Enter Your Passcode: If prompted, enter your Guided Access passcode.
Your iPhone 12 is now in Guided Access mode, locked into the app you selected.
3.1. Using Siri to Start Guided Access
You can also use Siri to start a Guided Access session.
- Open the App: Open the app that you want to lock the device into.
- Activate Siri: Say “Hey Siri” or press and hold the side button to activate Siri.
- Tell Siri “Turn on Guided Access”: Siri will enable Guided Access and lock the device into the current app.
3.2. Customizing Screen Areas
One of the most powerful features of Guided Access is the ability to disable touch input in specific areas of the screen. This can be useful for preventing accidental taps or restricting access to certain features within the app.
- Start a Guided Access Session: Follow the steps above to start a Guided Access session.
- Circle the Areas to Disable: Use your finger to draw circles around the areas of the screen that you want to disable.
- Adjust the Circles: You can move or resize the circles by dragging the edges.
- Remove Circles: To remove a circle, tap the “X” inside it.
Once you have configured the desired screen areas, tap “Start” to begin the Guided Access session with those restrictions in place.
4. Controlling Available Features During Guided Access
Guided Access allows you to control which features are available during a session. To access these controls:
- Triple-Click the Side Button: Quickly press the side button (power button) three times in a row.
- Enter Your Passcode: If prompted, enter your Guided Access passcode.
- Tap “Options”: In the bottom left corner of the screen, tap the “Options” button.
4.1. Available Options
The Options menu allows you to customize the Guided Access session in several ways. The options include:
- Sleep/Wake Button: Disables the Sleep/Wake button, preventing the user from turning off the screen.
- Volume Buttons: Disables the volume buttons, preventing the user from adjusting the volume.
- Motion: Limits how the device responds to motion, such as shaking or rotating.
- Keyboards: Disables the keyboard, preventing the user from typing.
- Touch: Disables touch input on the entire screen.
- Dictionary Lookup: Enables or disables the Look Up feature when selecting text.
- Time Limit: Sets a time limit for the Guided Access session.
4.2. Adjusting Hardware Buttons
The Sleep/Wake and Volume Buttons options allow you to disable the physical buttons on the device. This can be useful for preventing the user from accidentally turning off the screen or adjusting the volume.
- Access the Options Menu: Follow the steps above to access the Options menu.
- Toggle the Sleep/Wake Button or Volume Buttons: Tap the switches next to these options to enable or disable them.
4.3. Managing Screen Motion
The Motion option limits how the device responds to motion. When this option is enabled, the screen will not respond to shaking or rotating. This can be useful for users who are sensitive to motion or who accidentally trigger these actions.
- Access the Options Menu: Follow the steps above to access the Options menu.
- Toggle the Motion Switch: Tap the switch next to “Motion” to enable or disable it.
4.4. Disabling the Keyboard and Touch
The Keyboards and Touch options allow you to disable the keyboard and touch input on the screen. This can be useful for preventing the user from typing or interacting with the screen in any way.
- Access the Options Menu: Follow the steps above to access the Options menu.
- Toggle the Keyboards or Touch Switches: Tap the switches next to these options to enable or disable them.
4.5. Setting a Time Limit
The Time Limit option allows you to set a time limit for the Guided Access session. When the time limit expires, the session will automatically end.
- Access the Options Menu: Follow the steps above to access the Options menu.
- Toggle the Time Limit Switch: Tap the switch next to “Time Limit” to enable it.
- Set the Time Limit: Choose a time limit from the available options.
5. Ending a Guided Access Session on iPhone 12
To end a Guided Access session:
- Triple-Click the Side Button: Quickly press the side button (power button) three times in a row.
- Enter Your Passcode: If prompted, enter your Guided Access passcode.
- Tap “End”: In the bottom left corner of the screen, tap the “End” button.
If you have enabled Touch ID or Face ID for Guided Access, you can also end the session by using Touch ID or Face ID.
5.1. Troubleshooting Common Issues
Sometimes, you may encounter issues when using Guided Access. Here are some common problems and how to solve them:
- Forgetting the Passcode: If you forget your Guided Access passcode, you will need to restore your iPhone to factory settings. This will erase all data on your device, so it is important to back up your data regularly.
- Guided Access Not Starting: If Guided Access is not starting when you triple-click the side button, make sure that Guided Access is enabled in the Settings app.
- Screen Not Responding to Touch: If the screen is not responding to touch, make sure that the “Touch” option is enabled in the Options menu.
6. Advanced Tips and Tricks for Guided Access
Here are some advanced tips and tricks for using Guided Access on your iPhone 12:
- Create Custom Restrictions for Different Apps: You can create different Guided Access restrictions for different apps. For example, you might want to disable the keyboard in a game but allow it in a text editor.
- Use Guided Access to Create a Kiosk Mode: You can use Guided Access to create a kiosk mode for your iPhone. This can be useful for displaying information in a public place or for allowing customers to use your device for a specific purpose.
- Combine Guided Access with Other Accessibility Features: You can combine Guided Access with other accessibility features, such as VoiceOver or Zoom, to create a more customized user experience.
6.1. Setting Up a Kiosk Mode
To set up a kiosk mode using Guided Access:
- Choose the App: Choose the app that you want to display in kiosk mode.
- Enable Guided Access: Enable Guided Access in the Settings app.
- Start a Guided Access Session: Start a Guided Access session in the chosen app.
- Configure Restrictions: Configure the desired restrictions, such as disabling the Sleep/Wake button, Volume Buttons, and Touch.
- Hide the Home Button: If you want to completely prevent the user from exiting the app, you can hide the Home button using AssistiveTouch.
6.2. Combining with Other Accessibility Tools
Guided Access can be combined with other accessibility features to create a more customized user experience. For example, you can use Guided Access to lock the device into a specific app and then use VoiceOver to provide spoken descriptions of the items on the screen.
- Enable VoiceOver: Enable VoiceOver in the Accessibility settings.
- Start a Guided Access Session: Start a Guided Access session in the desired app.
- Adjust VoiceOver Settings: Adjust the VoiceOver settings to suit your needs.
7. Ethical Considerations for Using Guided Access
While Guided Access is a valuable tool, it is important to use it ethically and responsibly. Here are some ethical considerations to keep in mind:
- Obtain Consent: Always obtain consent before enabling Guided Access on someone else’s device.
- Explain the Restrictions: Clearly explain the restrictions that are in place and why they are necessary.
- Respect Autonomy: Respect the individual’s autonomy and allow them to make their own choices whenever possible.
- Avoid Coercion: Avoid using Guided Access to coerce or manipulate someone.
7.1. Privacy and Security Implications
Using Guided Access can have privacy and security implications. It is important to be aware of these implications and take steps to protect your privacy and security.
- Passcode Security: Choose a strong passcode that is difficult for others to guess.
- Data Protection: Be aware of the data that is being collected by the app that you are using in Guided Access mode.
- Unauthorized Access: Take steps to prevent unauthorized access to your device.
7.2. Legal Compliance
When using Guided Access, it is important to comply with all applicable laws and regulations. This includes laws related to privacy, data protection, and accessibility.
8. Guided Access in Education and Special Needs
Guided Access can be a powerful tool in educational settings and for individuals with special needs.
8.1. Supporting Students with Learning Differences
For students with learning differences, such as ADHD or autism, Guided Access can help to create a more focused and less distracting learning environment. By limiting access to other apps and features, students can concentrate on the task at hand and avoid being overwhelmed by extraneous stimuli.
8.2. Creating a Focused Learning Environment
Educators can use Guided Access to create a focused learning environment in the classroom. By locking students into specific educational apps or websites, teachers can ensure that students are engaged in the learning process and not distracted by social media or other online content.
9. Guided Access in Business and Professional Settings
Guided Access can also be used in business and professional settings for a variety of purposes.
9.1. Securing Kiosk Devices
Businesses can use Guided Access to secure kiosk devices that are used for displaying information or providing services to customers. By locking the device into a specific app, businesses can prevent unauthorized access to sensitive data and ensure that the device is used for its intended purpose.
9.2. Enhancing Employee Productivity
In professional settings, Guided Access can be used to enhance employee productivity by limiting distractions and promoting focus. For example, employees who are working on a specific task can use Guided Access to lock themselves into the relevant app and avoid being tempted to check email or social media.
10. Continuous Improvement and Updates for Guided Access
Apple regularly updates iOS and its accessibility features, including Guided Access. It’s essential to stay informed about these updates to leverage new functionalities and improvements.
10.1. Staying Updated with iOS Accessibility Features
Keep an eye on Apple’s release notes and accessibility resources to learn about new features and updates to Guided Access. This ensures you’re using the tool to its full potential.
10.2. Providing Feedback to Apple
Apple values user feedback. If you have suggestions for improving Guided Access or encounter any issues, consider providing feedback through Apple’s official channels. Your input can help shape the future of this valuable accessibility tool.
11. Case Studies: Real-World Applications of Guided Access
To illustrate the practical applications of Guided Access, let’s explore a few case studies.
11.1. A School Implementing Guided Access for Students with Autism
A school implemented Guided Access on iPads used by students with autism. By locking the devices into educational apps and disabling distracting features, the school saw a significant improvement in student engagement and focus.
11.2. A Retail Store Using Guided Access for Customer Kiosks
A retail store used Guided Access to secure customer kiosks. By locking the devices into a specific app, the store prevented unauthorized access to sensitive data and ensured that customers could only use the devices for their intended purpose.
12. Guided Access vs. Other Accessibility Features
Guided Access is just one of many accessibility features available on the iPhone 12. It’s important to understand how Guided Access differs from other features and when it’s the most appropriate tool to use.
12.1. Comparing Guided Access with Screen Time
Screen Time is another feature that allows you to restrict access to certain apps and features. However, Screen Time is designed to help you manage your overall device usage, while Guided Access is designed to lock the device into a single app for a specific purpose.
12.2. Understanding the Differences and Best Use Cases
Guided Access is best used when you want to lock the device into a single app and control which features are available. Screen Time is best used when you want to manage your overall device usage and set limits on how much time you spend on certain apps.
13. The Future of Accessibility on iOS
Apple is committed to making its products accessible to everyone. The company is constantly working on new accessibility features and improvements to existing features.
13.1. Apple’s Commitment to Inclusive Technology
Apple believes that technology should be accessible to everyone, regardless of their abilities. The company is committed to creating products that are easy to use and that empower people to achieve their goals.
13.2. Predictions for Future Accessibility Enhancements
As technology evolves, we can expect to see even more innovative accessibility features on iOS. These features will likely leverage artificial intelligence, machine learning, and other advanced technologies to create a more personalized and inclusive user experience.
14. Best Practices for Maintaining Device Security with Guided Access
When using Guided Access, it’s important to follow best practices for maintaining device security.
14.1. Regularly Updating iOS
Keep your iPhone 12 up to date with the latest version of iOS. These updates often include security patches and bug fixes that can help to protect your device from threats.
14.2. Using Strong Passcodes
Use strong passcodes for both your device and Guided Access. A strong passcode should be at least six characters long and include a combination of letters, numbers, and symbols.
15. Guided Access and Assistive Technology
Guided Access can be used in conjunction with other assistive technologies to create a more customized and accessible experience.
15.1. Integrating with VoiceOver and Other Tools
For example, you can use Guided Access to lock the device into a specific app and then use VoiceOver to provide spoken descriptions of the items on the screen.
15.2. Enhancing User Experience through Combined Technologies
By combining Guided Access with other assistive technologies, you can create a more personalized and empowering experience for individuals with disabilities.
16. Addressing Common Misconceptions About Guided Access
There are several common misconceptions about Guided Access. Let’s address some of these misconceptions.
16.1. Debunking Myths and Clarifying Facts
One common misconception is that Guided Access is only for children. In reality, Guided Access can be used by anyone who wants to focus on a specific task or prevent unauthorized access to their device.
16.2. Providing Accurate Information and Usage Scenarios
Guided Access is a versatile tool that can be used in a variety of scenarios. Whether you’re a parent, educator, business professional, or individual with special needs, Guided Access can help you to create a more focused, secure, and accessible experience.
17. Compliance with Accessibility Standards and Regulations
When using Guided Access, it’s important to comply with all applicable accessibility standards and regulations.
17.1. Adhering to WCAG Guidelines
The Web Content Accessibility Guidelines (WCAG) are a set of guidelines for making web content more accessible to people with disabilities. When using Guided Access, it’s important to ensure that the content within the locked app adheres to WCAG guidelines.
17.2. Ensuring Accessibility for All Users
By adhering to accessibility standards and regulations, you can ensure that Guided Access is used in a way that is inclusive and empowering for all users.
18. User Interface Customization Options within Guided Access
Guided Access provides several options for customizing the user interface within the locked app.
18.1. Adjusting Display Settings
You can adjust display settings, such as brightness and contrast, to create a more comfortable viewing experience.
18.2. Tailoring the Interface for Specific Needs
By tailoring the interface for specific needs, you can create a more personalized and accessible experience for individuals with disabilities.
19. The Role of Training and Education in Maximizing Guided Access Effectiveness
To maximize the effectiveness of Guided Access, it’s important to provide training and education to users and caregivers.
19.1. Training Programs for Educators and Caregivers
Training programs can help educators and caregivers learn how to use Guided Access effectively and how to customize it for specific needs.
19.2. Empowering Users through Knowledge and Skills
By empowering users with knowledge and skills, you can help them to take full advantage of the benefits of Guided Access.
20. How Guided Access Supports Cognitive Accessibility
Guided Access plays a significant role in supporting cognitive accessibility, making technology more usable for individuals with cognitive impairments.
20.1. Simplifying Complex Interfaces
Guided Access simplifies complex interfaces by locking the device into a single app and disabling distracting features.
20.2. Reducing Cognitive Load for Users
By reducing cognitive load, Guided Access helps users with cognitive impairments to focus on the task at hand and avoid being overwhelmed by extraneous stimuli.
21. Guided Access as a Tool for Digital Wellbeing
Guided Access can also be used as a tool for digital wellbeing, helping individuals to manage their device usage and avoid distractions.
21.1. Promoting Focused Device Usage
By promoting focused device usage, Guided Access helps individuals to be more mindful of how they are spending their time and to avoid getting lost in endless scrolling or browsing.
21.2. Balancing Technology Use with Other Activities
Guided Access can also help individuals to balance their technology use with other activities, such as spending time with family and friends, exercising, or pursuing hobbies.
22. Building a Supportive Community Around Guided Access
Building a supportive community around Guided Access can provide users and caregivers with a valuable source of information, support, and encouragement.
22.1. Online Forums and Support Groups
Online forums and support groups can provide a space for users and caregivers to connect with others, share experiences, and ask questions.
22.2. Sharing Tips, Experiences, and Best Practices
By sharing tips, experiences, and best practices, community members can help each other to get the most out of Guided Access.
23. Exploring Third-Party Apps That Enhance Guided Access Functionality
Several third-party apps enhance Guided Access functionality, providing additional features and customization options.
23.1. Reviewing Complementary Apps and Tools
Reviewing complementary apps and tools can help you to find the best solutions for your specific needs.
23.2. Evaluating App Compatibility and Security
When evaluating third-party apps, it’s important to consider their compatibility with Guided Access and their security.
24. Demystifying the Technical Aspects of Guided Access for Non-Technical Users
For non-technical users, the technical aspects of Guided Access can be daunting. Let’s demystify some of these aspects.
24.1. Simplifying Terminology and Concepts
Simplifying terminology and concepts can help non-technical users to understand how Guided Access works and how to use it effectively.
24.2. Providing Step-by-Step Guides and Visual Aids
Providing step-by-step guides and visual aids can make it easier for non-technical users to set up and use Guided Access.
25. Addressing Cultural and Linguistic Considerations in Guided Access Implementation
When implementing Guided Access, it’s important to consider cultural and linguistic factors.
25.1. Ensuring Accessibility for Diverse Populations
Ensuring accessibility for diverse populations requires considering language preferences, cultural norms, and other factors.
25.2. Adapting Guided Access for Different Contexts
Adapting Guided Access for different contexts may require translating instructions, customizing the user interface, or providing culturally relevant content.
26. Enhancing Digital Inclusion Through Guided Access
Guided Access plays a crucial role in enhancing digital inclusion, making technology more accessible and empowering for all users.
26.1. Bridging the Digital Divide
By bridging the digital divide, Guided Access helps to ensure that everyone has the opportunity to participate in the digital world.
26.2. Promoting Equal Access to Technology
Promoting equal access to technology is essential for creating a more just and equitable society.
27. Guided Access and the Future of User-Centric Design
Guided Access exemplifies the principles of user-centric design, putting the needs and preferences of users at the center of the design process.
27.1. Emphasizing User Needs and Preferences
By emphasizing user needs and preferences, user-centric design creates products and services that are more effective, efficient, and enjoyable to use.
27.2. Shaping the Future of Technology
User-centric design is shaping the future of technology, leading to more inclusive and empowering solutions.
28. Ethical Implications of Over-Reliance on Guided Access
While Guided Access is a valuable tool, it’s important to be aware of the ethical implications of over-reliance on it.
28.1. Balancing Protection with Autonomy
Balancing protection with autonomy requires considering the individual’s rights and preferences and avoiding the use of Guided Access in a way that is coercive or manipulative.
28.2. Avoiding Stigmatization and Promoting Independence
Avoiding stigmatization and promoting independence requires using Guided Access in a way that is respectful and empowering, and avoiding the use of it in a way that reinforces negative stereotypes.
29. Guided Access as a Stepping Stone to Broader Technology Adoption
Guided Access can serve as a stepping stone to broader technology adoption for individuals who may be hesitant or apprehensive about using technology.
29.1. Building Confidence and Familiarity
By building confidence and familiarity, Guided Access can help individuals to overcome their fears and anxieties and to embrace technology as a tool for empowerment.
30. Conclusion: Empowering Users with Guided Access on iPhone 12
Guided Access is a powerful tool that can empower users with iPhone 12 to focus, secure their devices, and enhance accessibility. By understanding its features, ethical considerations, and best practices, you can use Guided Access to create a more personalized, inclusive, and empowering experience for yourself and others.
For more in-depth information and expert guidance on Guided Access and other accessibility features, visit CONDUCT.EDU.VN. Our comprehensive resources and step-by-step instructions will help you maximize the potential of your iPhone 12. Contact us at 100 Ethics Plaza, Guideline City, CA 90210, United States, or reach out via WhatsApp at +1 (707) 555-1234.
Frequently Asked Questions (FAQs) about Guided Access on iPhone 12
-
What is Guided Access on iPhone 12?
Guided Access is an accessibility feature that locks your iPhone 12 into a single app and allows you to control which features are available.
-
How do I enable Guided Access on my iPhone 12?
Go to Settings > Accessibility > Guided Access and toggle the switch to the “On” position.
-
How do I start a Guided Access session?
Open the app you want to lock the device into, triple-click the side button, configure restrictions (optional), and tap “Start.”
-
How do I end a Guided Access session?
Triple-click the side button, enter your passcode, and tap “End.”
-
What if I forget my Guided Access passcode?
You will need to restore your iPhone to factory settings, which will erase all data on your device.
-
Can I use Siri to start Guided Access?
Yes, you can say “Hey Siri, turn on Guided Access.”
-
What options can I control during a Guided Access session?
You can control the Sleep/Wake button, Volume Buttons, Motion, Keyboards, Touch, Dictionary Lookup, and Time Limit.
-
Is Guided Access only for children?
No, Guided Access can be used by anyone who wants to focus on a specific task or prevent unauthorized access to their device.
-
How can Guided Access help in a business setting?
Businesses can use Guided Access to secure kiosk devices and enhance employee productivity.
-
Where can I find more information and support for Guided Access?
Visit conduct.edu.vn for comprehensive resources and step-by-step instructions.