Guided Access on iPad restricts your device to a single app and allows you to control feature availability. CONDUCT.EDU.VN offers insights into this powerful accessibility tool, and how to properly utilize it for a safer and more focused user experience. Explore our guide to understand the process involved, including setup, usage, and customization, ensuring your iPad serves its intended purpose without distractions or unintended interactions. Discover how to utilize this robust accessibility feature that enhances focus, and simplifies the user experience.
1. Understanding Guided Access on iPad
Guided Access is a valuable accessibility feature on iPad, designed to help users focus on a single task or app. It’s particularly useful in various scenarios, such as when a child is using the device, or when accidental gestures might lead to distractions. Let’s explore the key aspects of this powerful tool.
1.1. What is Guided Access?
Guided Access locks your iPad into a single app, disabling the Home button and other navigation features. This prevents users from accidentally exiting the app or accessing other areas of the device. The feature also lets you disable specific areas of the screen, preventing any interaction with those parts. This ensures focused use and prevents unintended actions.
1.2. Why Use Guided Access?
There are several reasons why you might want to use Guided Access:
- Parental Control: When you hand over your iPad to a child, Guided Access prevents them from wandering into other apps, making unauthorized purchases, or accessing inappropriate content.
- Classroom Settings: Teachers can use Guided Access to keep students focused on a specific educational app, preventing distractions and promoting engagement.
- Accessibility: Individuals with cognitive or motor skill challenges can benefit from Guided Access by simplifying the interface and reducing the risk of accidental taps.
- Presentations and Kiosks: In business settings, Guided Access can lock an iPad to a presentation or kiosk app, ensuring that users can’t access other information or settings on the device.
- Personal Focus: By eliminating distractions, Guided Access enhances concentration, making it easier to focus on the task at hand.
1.3. Key Benefits of Guided Access
- Enhanced Focus: By restricting access to a single app, Guided Access helps users concentrate on the task at hand without distractions.
- Simplified Interface: Disabling certain features and screen areas simplifies the user experience, particularly beneficial for individuals with cognitive challenges.
- Customizable Settings: Guided Access offers a range of options for customizing the experience, including disabling hardware buttons, touch input, and motion controls.
- Increased Security: By preventing access to other apps and settings, Guided Access enhances security and privacy, particularly important when sharing devices with others.
- Accidental Gesture Prevention: It prevents accidental gestures that can interrupt the user’s activity.
1.4. Target Audience for Guided Access
- Parents: To control and monitor children’s iPad usage, preventing access to unwanted apps and content.
- Educators: To create a controlled learning environment in classrooms, keeping students focused on educational apps.
- Individuals with Disabilities: To simplify the iPad interface, making it easier to use for people with cognitive or motor skill challenges.
- Business Professionals: To lock iPads to specific apps for presentations, kiosks, or other business purposes, ensuring a controlled and focused experience.
2. Setting Up Guided Access on Your iPad
Before you can start using Guided Access, you need to set it up on your iPad. Here’s a step-by-step guide to get you started.
2.1. Navigating to Accessibility Settings
The first step is to find the Accessibility settings on your iPad. This is where you’ll enable and configure Guided Access.
- Open the Settings app: Look for the gear icon on your home screen and tap it.
- Scroll down and tap Accessibility: In the Settings menu, scroll down until you see “Accessibility” and tap it.
- Find Guided Access: In the Accessibility menu, scroll down to the “General” section and tap “Guided Access.”
2.2. Enabling Guided Access
Once you’re in the Guided Access settings, you can enable the feature.
- Toggle Guided Access on: At the top of the Guided Access screen, you’ll see a switch labeled “Guided Access.” Tap the switch to turn it on. The switch will turn green when enabled.
2.3. Setting a Passcode
To prevent unauthorized users from ending a Guided Access session, you need to set a passcode.
- Tap Passcode Settings: In the Guided Access menu, tap “Passcode Settings.”
- Tap Set Guided Access Passcode: On the Passcode Settings screen, tap “Set Guided Access Passcode.”
- Enter a Passcode: You’ll be prompted to enter a six-digit passcode. Enter a passcode that you can easily remember but is difficult for others to guess.
- Re-enter the Passcode: You’ll be asked to re-enter the passcode to confirm it. Make sure you enter the same passcode as before.
2.4. Enabling Touch ID or Face ID
For added convenience, you can enable Touch ID or Face ID to end Guided Access sessions.
- Go to Passcode Settings: Follow the steps in Section 2.3 to navigate to the Passcode Settings screen.
- Enable Touch ID or Face ID: On the Passcode Settings screen, you’ll see options to enable Touch ID or Face ID. Tap the switch next to the option you want to enable.
- Authenticate: You may be prompted to authenticate using your fingerprint or facial recognition to confirm the change.
2.5. Setting a Time Limit
Guided Access allows you to set a time limit for each session. This is particularly useful for parents who want to limit their child’s screen time.
- Navigate to Guided Access Settings: Go to Settings > Accessibility > Guided Access.
- Enable Time Limits: Make sure the “Time Limits” option is toggled on.
- Sound and Speak: Adjust the settings for the alarm that sounds when the time limit is approaching.
2.6. Configuring Accessibility Shortcut
The Accessibility Shortcut provides a quick way to start Guided Access. You can configure it to start Guided Access by triple-clicking the Side or Home button.
- Go to Accessibility Shortcut: In the Accessibility menu, scroll down to the bottom and tap “Accessibility Shortcut.”
- Select Guided Access: On the Accessibility Shortcut screen, select “Guided Access” from the list of options.
3. Starting a Guided Access Session
Once you’ve set up Guided Access, you can start a session in any app. Here’s how:
3.1. Opening the Desired App
First, open the app that you want to use in Guided Access. This could be a game, a learning app, or any other app that you want to focus on.
3.2. Activating Guided Access
To start Guided Access, you need to triple-click either the Side button or the Home button, depending on your iPad model.
- Triple-Click the Side or Home Button: If you have an iPad with Face ID (no Home button), triple-click the Side button (the power button). If you have an iPad with a Home button, triple-click the Home button.
- Guided Access Menu: After triple-clicking the button, a Guided Access menu will appear on the screen.
3.3. Configuring Options
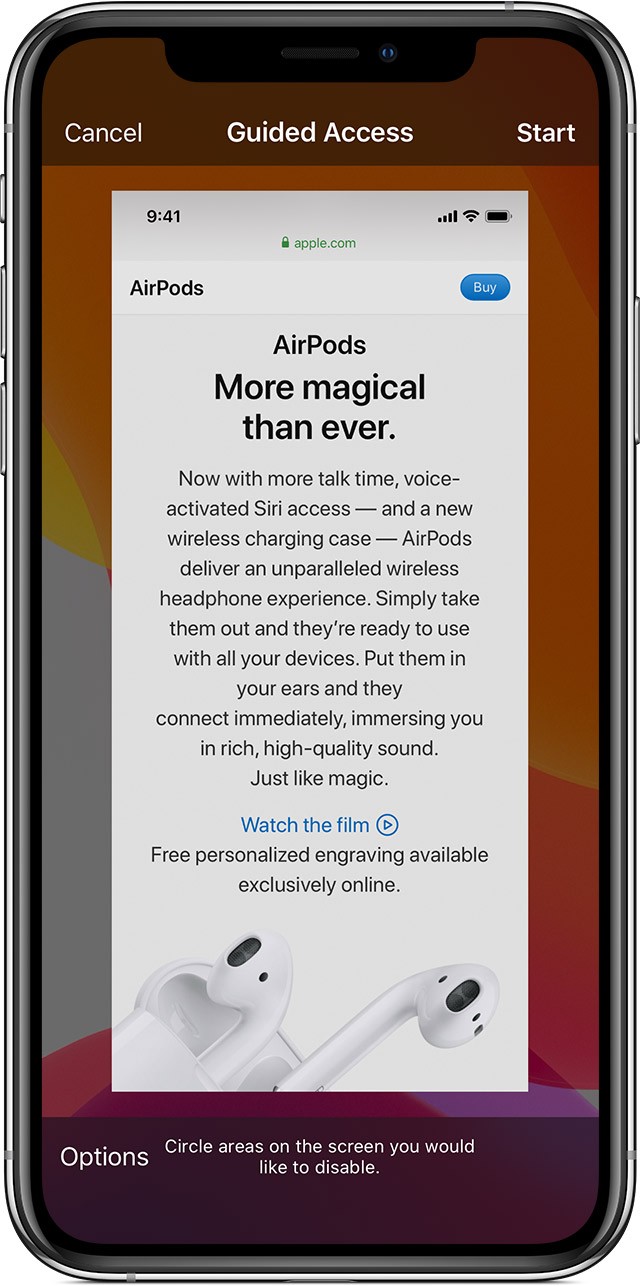
Before starting the session, you can configure various options to customize the Guided Access experience.
- Circle Areas to Disable: If you want to disable certain areas of the screen, use your finger to draw circles around those areas. These areas will become grayed out and unresponsive to touch.
- Resize or Move Circles: You can resize or move the circles by dragging the handles or tapping and dragging the entire circle.
- Remove Circles: To remove a circle, tap the “X” inside the circle.
- Tap Options: In the bottom-left corner of the screen, tap the “Options” button to access additional settings.
- Sleep/Wake Button: Disable the Sleep/Wake button.
- Volume Buttons: Disable the volume buttons.
- Motion: Limit how the device responds to motion.
- Keyboards: Disable the keyboard.
- Touch: Disable touch input.
- Dictionary Lookup: Enable or disable dictionary lookup.
- Time Limit: Set a time limit for the session.
3.4. Starting the Session
Once you’ve configured the options to your liking, you can start the Guided Access session.
- Tap Start: In the top-right corner of the screen, tap the “Start” button.
- Enter Passcode: If you’ve set a passcode, you’ll be prompted to enter it to confirm that you want to start the session.
- Session Begins: The Guided Access session will begin, and your iPad will be locked into the current app with the specified options enabled.
3.5. Using Siri to Start Guided Access
Alternatively, you can use Siri to start a Guided Access session.
- Open the Desired App: Open the app you wish to lock into.
- Activate Siri: Say “Hey Siri” or press and hold the Side or Home button to activate Siri.
- Command Siri: Say “Turn on Guided Access.” Siri will enable Guided Access for the current app.
4. Customizing Guided Access Features
Guided Access offers several customization options to tailor the experience to your specific needs. Here’s a detailed look at each option.
4.1. Disabling the Sleep/Wake Button
This option prevents users from turning off the screen using the Sleep/Wake button, ensuring the app remains active.
- Access Options: Triple-click the Side or Home button and tap “Options.”
- Toggle Sleep/Wake Button: Turn off the “Sleep/Wake Button” option.
4.2. Disabling Volume Buttons
This option prevents users from adjusting the volume using the volume buttons, maintaining a consistent audio level.
- Access Options: Triple-click the Side or Home button and tap “Options.”
- Toggle Volume Buttons: Turn off the “Volume Buttons” option.
4.3. Limiting Motion
This option limits how your device responds to motion, preventing screen rotation and disabling shake gestures.
- Access Options: Triple-click the Side or Home button and tap “Options.”
- Toggle Motion: Turn off the “Motion” option.
4.4. Disabling Keyboards
This option disables the keyboard, preventing text input. This is useful when you want to restrict interaction to specific elements of the app.
- Access Options: Triple-click the Side or Home button and tap “Options.”
- Toggle Keyboards: Turn off the “Keyboards” option.
4.5. Disabling Touch
This option disables touch input altogether, making the screen unresponsive to touch. This is useful for displaying static content or preventing accidental taps.
- Access Options: Triple-click the Side or Home button and tap “Options.”
- Toggle Touch: Turn off the “Touch” option.
4.6. Enabling Dictionary Lookup
This option allows users to use the Look Up feature when selecting text, providing quick access to definitions and other information.
- Access Options: Triple-click the Side or Home button and tap “Options.”
- Toggle Dictionary Lookup: Turn on the “Dictionary Lookup” option.
4.7. Setting a Time Limit for Guided Access
Setting a time limit helps manage usage, especially for children.
- Access Options: Triple-click the Side or Home button and tap “Options”.
- Toggle Time Limit: Turn on the “Time Limit” option.
- Set the Time: Choose the desired time limit. An alarm will sound when the time is about to expire.
5. Ending a Guided Access Session
When you’re done using Guided Access, you can easily end the session.
5.1. Triple-Clicking the Side or Home Button
To end a Guided Access session, triple-click the Side button or the Home button, depending on your iPad model.
5.2. Entering the Passcode
After triple-clicking the button, you’ll be prompted to enter your Guided Access passcode.
- Enter Passcode: Use the on-screen keyboard to enter the passcode you set up when enabling Guided Access.
5.3. Using Touch ID or Face ID
If you’ve enabled Touch ID or Face ID, you can use it to authenticate instead of entering the passcode.
- Authenticate: Place your finger on the Home button (for Touch ID) or look at the screen (for Face ID) to authenticate.
5.4. Tapping End
After entering the passcode or authenticating with Touch ID or Face ID, you’ll see the Guided Access menu again.
- Tap End: In the top-left corner of the screen, tap the “End” button.
- Session Ends: The Guided Access session will end, and your iPad will return to normal operation.
6. Troubleshooting Common Issues
While Guided Access is generally reliable, you may encounter some issues. Here are some common problems and how to troubleshoot them.
6.1. Forgetting the Passcode
If you forget your Guided Access passcode, you’ll need to restore your iPad to factory settings. This will erase all data on your device, so it’s important to back up your iPad regularly.
- Connect to a Computer: Connect your iPad to a computer using a USB cable.
- Enter Recovery Mode: Follow the steps to enter recovery mode for your iPad model:
- iPad with Face ID: Press and quickly release the Volume Up button, press and quickly release the Volume Down button, then press and hold the Side button until you see the recovery mode screen.
- iPad with Home Button: Press and hold both the Home button and the Top (or Side) button at the same time. Keep holding them until you see the recovery mode screen.
- Restore iPad: In iTunes or Finder on your computer, you’ll see a message saying that there’s a problem with your iPad and that you need to restore it. Click “Restore” and follow the on-screen instructions.
6.2. Guided Access Won’t Start
If Guided Access isn’t starting when you triple-click the Side or Home button, make sure that the Accessibility Shortcut is configured correctly.
- Go to Accessibility Shortcut: Go to Settings > Accessibility > Accessibility Shortcut.
- Select Guided Access: Make sure that “Guided Access” is selected from the list of options.
6.3. Screen is Unresponsive
If the screen is unresponsive during a Guided Access session, make sure that the “Touch” option is enabled in the Guided Access options.
- Access Options: Triple-click the Side or Home button and enter your passcode.
- Check Touch Option: In the Guided Access menu, tap “Options” and make sure that the “Touch” option is turned on.
6.4. App is Crashing
If the app you’re using in Guided Access is crashing, try closing and reopening the app before starting a new Guided Access session. If the problem persists, try updating the app to the latest version or contacting the app developer for support.
6.5. Unable to Disable Certain Screen Areas
Ensure that the areas you are trying to disable are not essential for the app’s functionality. Some apps may require certain areas to remain active for proper operation.
- Adjust Circles: Try adjusting the size and position of the circles to ensure they are correctly placed over the areas you want to disable.
- Check App Requirements: Verify that the areas you are trying to disable are not required for the app to function correctly.
7. Advanced Tips and Tricks
To get the most out of Guided Access, here are some advanced tips and tricks.
7.1. Using Guided Access with Multiple Apps
While Guided Access is designed for single-app use, you can use it in conjunction with other accessibility features to create a more versatile experience. For example, you can use Switch Control to navigate between multiple apps while Guided Access is enabled.
7.2. Creating Custom Profiles
You can create custom profiles for different scenarios by saving different configurations of Guided Access options. For example, you can create a profile for kids with certain options enabled and a profile for presentations with different options enabled.
7.3. Integrating with AssistiveTouch
AssistiveTouch can be used in conjunction with Guided Access to provide additional navigation and control options. This is particularly useful for individuals with motor skill challenges.
7.4. Monitoring Usage with Screen Time
Use Screen Time to monitor how Guided Access is being used, including the amount of time spent in specific apps. This can provide valuable insights into usage patterns and help you make informed decisions about how to configure Guided Access.
7.5. Exploring Third-Party Apps
Explore third-party apps that offer enhanced Guided Access features, such as remote management, detailed analytics, and advanced customization options. These apps can provide additional functionality and control beyond what is available in the built-in Guided Access feature.
8. Real-World Applications of Guided Access
Guided Access has numerous real-world applications across various settings. Here are some examples of how it can be used effectively.
8.1. In the Classroom
- Focused Learning: Teachers can lock iPads to specific educational apps, preventing students from accessing games, social media, or other distractions.
- Standardized Testing: During standardized tests, Guided Access can ensure that students only access the testing app, preventing cheating and maintaining test integrity.
- Special Education: For students with special needs, Guided Access can simplify the iPad interface, making it easier to use for learning and communication.
8.2. At Home
- Parental Control: Parents can use Guided Access to limit their child’s screen time, prevent access to inappropriate content, and ensure they are using educational apps.
- Family Activities: During family activities like watching movies or playing games, Guided Access can prevent accidental taps and ensure a smooth and enjoyable experience.
- Guest Access: When guests use your iPad, Guided Access can restrict them to specific apps, protecting your personal data and settings.
8.3. In Business
- Kiosks and Displays: Businesses can use Guided Access to lock iPads to specific apps for kiosks, displays, or interactive exhibits, ensuring a controlled and consistent experience for customers.
- Presentations: During presentations, Guided Access can prevent accidental exits from the presentation app, ensuring a smooth and professional delivery.
- Training and Tutorials: For training sessions, Guided Access can lock iPads to specific training apps, preventing distractions and ensuring that participants focus on the material.
8.4. For Accessibility
- Cognitive Support: Individuals with cognitive challenges can use Guided Access to simplify the iPad interface, making it easier to use for communication, entertainment, and daily tasks.
- Motor Skill Support: For individuals with motor skill challenges, Guided Access can disable certain screen areas and hardware buttons, reducing the risk of accidental taps and making the iPad more accessible.
- Sensory Support: Guided Access can be used in conjunction with other accessibility features like VoiceOver and Zoom to provide a comprehensive assistive experience for individuals with sensory impairments.
9. How CONDUCT.EDU.VN Enhances Understanding of Digital Safety
CONDUCT.EDU.VN provides comprehensive resources and guidelines on digital safety, offering users valuable insights into responsible technology use. The platform serves as a reliable source for understanding various aspects of digital well-being, including how to use accessibility features like Guided Access effectively. By promoting informed and ethical digital practices, CONDUCT.EDU.VN empowers individuals to navigate the digital world safely and responsibly.
9.1. Expert Guidance on Accessibility Features
CONDUCT.EDU.VN offers detailed, step-by-step guides on using accessibility features such as Guided Access, ensuring that users of all technical levels can understand and implement these tools effectively. The platform’s expertise helps individuals customize their devices for optimal focus and safety.
9.2. Promoting Ethical Digital Practices
The website emphasizes the importance of ethical digital behavior, providing resources on responsible technology use and digital citizenship. This includes guidelines on respecting privacy, avoiding cyberbullying, and promoting positive online interactions.
9.3. Resources for Parents and Educators
CONDUCT.EDU.VN offers tailored resources for parents and educators, providing tools and strategies for creating safe and productive digital environments for children and students. These resources include tips on monitoring screen time, setting appropriate boundaries, and using accessibility features to enhance learning.
9.4. Community Support and Discussion
The platform fosters a community where users can share their experiences, ask questions, and learn from others. This collaborative environment enhances understanding and encourages the adoption of best practices for digital safety.
9.5. Up-to-Date Information and Trends
CONDUCT.EDU.VN stays current with the latest digital trends and safety concerns, providing users with timely information and practical advice. This ensures that individuals are well-informed and equipped to handle new challenges in the digital world.
10. Ethical Considerations When Using Guided Access
While Guided Access is a useful tool, it’s important to use it ethically and responsibly.
10.1. Transparency with Users
Always inform users when you are enabling Guided Access on their device. Transparency builds trust and ensures that users understand the limitations being placed on their device.
10.2. Respecting Privacy
Be mindful of privacy when using Guided Access. Avoid accessing or monitoring personal information without consent. Only use Guided Access for its intended purpose, such as promoting focus or preventing accidental taps.
10.3. Avoiding Coercion
Do not use Guided Access to coerce or manipulate users. Ensure that they have the option to end the session and that their choices are respected.
10.4. Following Legal Guidelines
Adhere to all legal guidelines and regulations when using Guided Access, particularly in settings where privacy and consent are paramount, such as schools and workplaces.
10.5. Promoting Digital Well-being
Use Guided Access as a tool to promote digital well-being, rather than as a means of control. Encourage users to take breaks, engage in offline activities, and maintain a healthy balance between technology and other aspects of their lives.
11. Frequently Asked Questions (FAQ)
11.1. What is Guided Access?
Guided Access is an accessibility feature on iPad that locks the device into a single app, restricting access to other apps and features.
11.2. How do I enable Guided Access?
Go to Settings > Accessibility > Guided Access and toggle the feature on.
11.3. How do I start a Guided Access session?
Open the app you want to use, triple-click the Side or Home button, configure options, and tap Start.
11.4. How do I end a Guided Access session?
Triple-click the Side or Home button, enter your passcode, and tap End.
11.5. What if I forget my Guided Access passcode?
You will need to restore your iPad to factory settings. Back up your device regularly to avoid data loss.
11.6. Can I use Guided Access with multiple apps?
Guided Access is designed for single-app use, but you can use it in conjunction with other accessibility features for more versatility.
11.7. How do I disable certain screen areas?
During setup, use your finger to draw circles around the areas you want to disable.
11.8. Is Guided Access available on all iPad models?
Yes, Guided Access is available on all iPad models running iOS 6 or later.
11.9. Can I set a time limit for Guided Access?
Yes, you can set a time limit in the Guided Access options.
11.10. How does Guided Access help with accessibility?
It simplifies the iPad interface, reduces distractions, and makes it easier for individuals with cognitive or motor skill challenges to use the device.
12. External Resources for Further Learning
For those looking to deepen their knowledge of digital safety and Guided Access, several external resources are available.
12.1. Apple Support
Apple’s official support website offers detailed guides and troubleshooting tips for Guided Access and other accessibility features.
12.2. Common Sense Media
Common Sense Media provides valuable resources for parents and educators on managing technology use and promoting digital well-being.
12.3. National Center for Missing and Exploited Children (NCMEC)
NCMEC offers resources on online safety and child protection, helping parents and educators keep children safe in the digital world.
12.4. ConnectSafely
ConnectSafely provides research-based safety tips, parents’ guidebooks, and much more to help everyone make the most of their technology experience.
12.5. Family Online Safety Institute (FOSI)
FOSI’s mission is to make the online world safer for kids and their families. FOSI convenes leaders in industry, government, and the non-profit sectors to collaborate and innovate new solutions and policies in the field of online safety.
13. The Future of Digital Safety and Guided Access
As technology evolves, so too will the strategies and tools for ensuring digital safety. Here are some potential future developments for Guided Access and related areas.
13.1. Enhanced AI Integration
Future versions of Guided Access may incorporate artificial intelligence to better understand user needs and customize the experience accordingly.
13.2. Improved Remote Management
Remote management features could be enhanced, allowing parents and educators to remotely configure and monitor Guided Access sessions.
13.3. Advanced Analytics
More detailed analytics could be provided, offering insights into app usage, screen time, and other metrics for better monitoring and control.
13.4. Cross-Platform Compatibility
Guided Access or similar features could be extended to other platforms and devices, providing a consistent experience across different ecosystems.
13.5. Biometric Authentication Enhancements
More advanced biometric authentication methods could be integrated, such as voice recognition or behavioral biometrics, to enhance security and convenience.
Guided Access on iPad is a powerful tool that can enhance focus, simplify the user experience, and promote digital safety. By understanding its features, customizing its options, and using it responsibly, you can unlock the full potential of your iPad while ensuring a safe and productive digital environment.
For more information and detailed guides on digital safety and accessibility features, visit CONDUCT.EDU.VN. We’re dedicated to providing you with the knowledge and resources you need to navigate the digital world with confidence.
 Ios13 iphone xs settings accessibility guided access safari
Understanding accessibility settings on your iPhone or iPad helps tailor the device to your specific needs, as highlighted by CONDUCT.EDU.VN’s resources on digital accessibility.
Remember, staying informed and proactive is the key to digital well-being. Whether you’re a parent, educator, business professional, or individual user, embracing the resources available and using tools like Guided Access ethically can make a significant difference in your digital experience.
If you’re finding it difficult to navigate the complexities of digital safety and need clear, reliable guidance on implementing best practices, we invite you to explore conduct.edu.vn. Our website offers comprehensive information, step-by-step instructions, and expert advice to help you create a safer and more focused digital environment. Contact us at 100 Ethics Plaza, Guideline City, CA 90210, United States, or reach out via WhatsApp at +1 (707) 555-1234. Let us help you enhance your digital well-being today.
Adjusting volume settings is part of ensuring optimal user experience on your device, and CONDUCT.EDU.VN provides insights on managing these settings for accessibility.
Keyboards and text input accessibility options are discussed on CONDUCT.EDU.VN, offering solutions for users with different needs to interact effectively with their devices.
Dictionary lookup is just one of the many accessibility features that CONDUCT.EDU.VN covers, highlighting how these tools can enhance understanding and learning.