Guided Access on iPhone 11 offers a focused user experience, allowing you to lock your device into a single app and control which features are available, as explained on CONDUCT.EDU.VN. This is particularly useful for parents, educators, or anyone who wants to minimize distractions. This comprehensive guide will detail how to set up, use, and troubleshoot Guided Access on your iPhone 11, ensuring a secure and distraction-free environment using accessibility features and parental controls.
1. Understanding Guided Access: An Overview
Guided Access is an accessibility feature built into iOS that allows you to lock your iPhone 11 into a single app. This feature is invaluable in various scenarios. It restricts access to other applications and features, ensuring a focused and secure user experience.
1.1. What is Guided Access?
Guided Access is a feature designed to help users stay focused on a specific task or app. By enabling it, you can disable the Home button (or swipe-up gesture on iPhone X and later), volume buttons, and other hardware controls.
1.2. Why Use Guided Access?
- Parental Control: When you let your child use your iPhone 11, you can use Guided Access to ensure they only use the intended app. This prevents them from accidentally accessing other apps or making unauthorized purchases.
- Focus and Productivity: If you are easily distracted, Guided Access can help you stay focused on a single task, such as reading an e-book or completing a work-related app.
- Accessibility: For individuals with cognitive disabilities, Guided Access can simplify the iPhone 11 experience by limiting options and reducing confusion.
- Presentation Mode: During presentations, Guided Access can prevent accidental gestures or notifications from interrupting your presentation.
- Kiosk Mode: In public settings, you can use Guided Access to turn your iPhone 11 into a kiosk, allowing users to interact with a specific app without accessing other device features.
1.3. Key Features of Guided Access
- Single App Mode: Locks the device into a single app, preventing users from switching to other apps.
- Hardware Control Restriction: Disables or restricts the use of hardware buttons like volume, power, and Home/Side buttons.
- Touchscreen Control: Allows you to disable touch input on specific areas of the screen, preventing accidental taps or interactions.
- Time Limits: Sets a time limit for the Guided Access session, automatically ending it after the specified duration.
- Passcode Protection: Requires a passcode, Touch ID, or Face ID to end the Guided Access session, ensuring only authorized users can exit.
2. Setting Up Guided Access on Your iPhone 11
Before you can use Guided Access, you need to enable and configure it in the Settings app. This involves navigating to the Accessibility settings and setting up a passcode.
2.1. Step-by-Step Guide to Enabling Guided Access
-
Open the Settings App: Locate and open the Settings app on your iPhone 11.
-
Navigate to Accessibility: Scroll down and tap on “Accessibility.”
 IPhone accessibility settings
 -
Find Guided Access: Scroll down to the “General” section and tap on “Guided Access.”
-
Enable Guided Access: Toggle the “Guided Access” switch to the ON position.
2.2. Configuring Passcode Settings
- Tap Passcode Settings: Within the Guided Access settings, tap on “Passcode Settings.”
- Set Guided Access Passcode: Tap on “Set Guided Access Passcode.”
- Enter a Passcode: Enter a six-digit passcode. You will be prompted to re-enter the passcode to confirm.
- Enable Touch ID or Face ID (Optional): For added convenience, you can enable Touch ID or Face ID to end Guided Access sessions. Toggle the “Touch ID” or “Face ID” switch to the ON position.
2.3. Setting Time Limits
- Enable Time Limits: In the Guided Access settings, tap on “Time Limits.”
- Choose an Action: Select what should happen when the time limit expires. You can choose to have an alarm sound or simply end the Guided Access session.
2.4. Accessibility Shortcut
- Enable Accessibility Shortcut: Go back to the main Accessibility settings screen.
- Scroll to the Bottom: Scroll to the bottom and tap on “Accessibility Shortcut.”
- Select Guided Access: Check the box next to “Guided Access.” This allows you to quickly start Guided Access by triple-clicking the Side button.
3. Starting a Guided Access Session on iPhone 11
Once Guided Access is set up, starting a session is quick and straightforward. It involves opening the desired app and activating Guided Access using the Side button.
3.1. Initiating Guided Access
- Open the Desired App: Launch the app you want to lock the device into.
- Triple-Click the Side Button: Quickly press the Side button (the power button) three times. This will activate the Guided Access menu.
- Configure Options (Optional): Before starting the session, you can configure various options. Tap “Options” in the bottom-left corner of the screen.
3.2. Available Options During Setup
-
Sleep/Wake Button: Disable the Sleep/Wake button to prevent the device from being turned off.
-
Volume Buttons: Disable the volume buttons to prevent volume adjustments.
-
Motion: Disable motion controls to prevent screen rotation or response to shaking.
-
Keyboards: Disable the keyboard to prevent text input.
-
Touch: Disable touch input to prevent any screen interactions.
-
Dictionary Lookup: Enable or disable the dictionary lookup feature.
-
Time Limit: Set a time limit for the session.
-
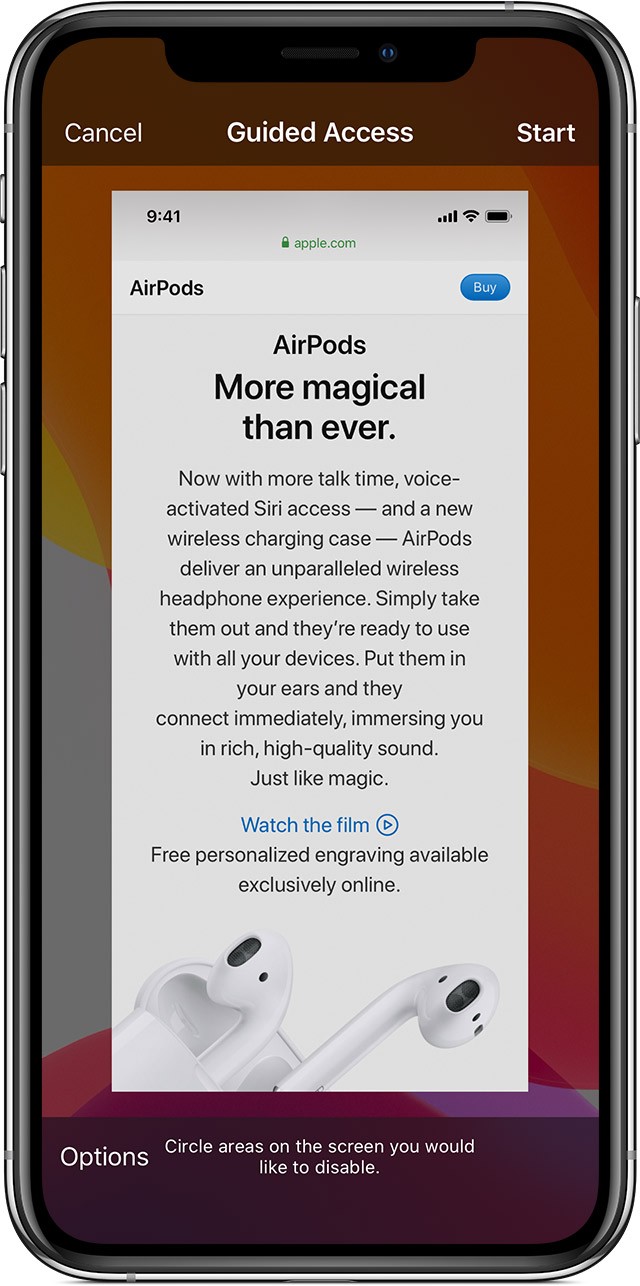
Define Screen Areas: Circle specific areas of the screen to disable touch input in those regions. This is useful for preventing accidental taps on certain buttons or ads.
3.3. Starting the Session
- Tap Start: After configuring the desired options, tap “Start” in the top-right corner of the screen.
- Enter Passcode (If Required): If you have set a Guided Access passcode, you will be prompted to enter it.
3.4. Using Siri to Start Guided Access
- Open the Desired App: Launch the app you want to lock the device into.
- Activate Siri: Say “Hey Siri” or press and hold the Side button to activate Siri.
- Command Siri: Say “Turn on Guided Access.” Siri will enable Guided Access in the current app.
4. Customizing Guided Access Options
Guided Access offers several customization options to tailor the experience to your specific needs. These options include disabling hardware buttons, touch input, and defining specific screen areas.
4.1. Disabling Hardware Buttons
- Start a Guided Access Session: Follow the steps in Section 3 to start a Guided Access session.
- Triple-Click the Side Button: Quickly press the Side button three times to bring up the Guided Access menu.
- Tap Options: Tap “Options” in the bottom-left corner of the screen.
- Toggle Buttons: Toggle the switches next to “Sleep/Wake Button” and “Volume Buttons” to disable them.
- Tap Done: Tap “Done” in the top-right corner to save the changes.
4.2. Disabling Touch Input
- Start a Guided Access Session: Follow the steps in Section 3 to start a Guided Access session.
- Triple-Click the Side Button: Quickly press the Side button three times to bring up the Guided Access menu.
- Tap Options: Tap “Options” in the bottom-left corner of the screen.
- Toggle Touch: Toggle the switch next to “Touch” to disable touch input on the entire screen.
- Tap Done: Tap “Done” in the top-right corner to save the changes.
4.3. Defining Screen Areas
- Start a Guided Access Session: Follow the steps in Section 3 to start a Guided Access session.
- Triple-Click the Side Button: Quickly press the Side button three times to bring up the Guided Access menu.
- Circle Areas to Disable: Use your finger to draw circles around the areas of the screen you want to disable touch input.
- Adjust or Remove Circles: You can move or resize the circles by dragging their edges. To remove a circle, tap the “X” inside it.
- Tap Start: After defining the screen areas, tap “Start” in the top-right corner to begin the session.
5. Ending a Guided Access Session
Ending a Guided Access session requires entering the passcode, using Touch ID, or using Face ID, depending on how you configured the settings.
5.1. Using Passcode
- Triple-Click the Side Button: Quickly press the Side button three times to bring up the Guided Access menu.
- Enter Passcode: Enter the Guided Access passcode you set up in Section 2.
- Tap End: Tap “End” in the top-left corner of the screen.
5.2. Using Touch ID or Face ID
- Triple-Click the Side Button: Quickly press the Side button three times to bring up the Guided Access menu.
- Authenticate: Use Touch ID or Face ID to authenticate.
- Tap End: Tap “End” in the top-left corner of the screen.
6. Troubleshooting Guided Access
Even with careful setup, you may encounter issues with Guided Access. Here are some common problems and their solutions.
6.1. Forgetting the Passcode
If you forget the Guided Access passcode, you will need to restore your iPhone 11 to factory settings. This will erase all data on your device, so it is essential to have a backup.
- Connect to a Computer: Connect your iPhone 11 to a computer with iTunes (or Finder on macOS Catalina and later).
- Enter Recovery Mode:
- iPhone 8 or Later: Press and quickly release the Volume Up button. Press and quickly release the Volume Down button. Press and hold the Side button until you see the recovery mode screen.
- Restore iPhone: In iTunes (or Finder), you will see a prompt to restore or update your iPhone. Choose “Restore.”
- Follow On-Screen Instructions: Follow the on-screen instructions to restore your iPhone to factory settings.
- Restore from Backup (Optional): After the restore process is complete, you can restore your data from a backup.
6.2. Guided Access Not Starting
If Guided Access is not starting when you triple-click the Side button, ensure that the Accessibility Shortcut is enabled for Guided Access.
- Open Settings: Open the Settings app on your iPhone 11.
- Navigate to Accessibility: Scroll down and tap on “Accessibility.”
- Select Accessibility Shortcut: Scroll to the bottom and tap on “Accessibility Shortcut.”
- Check Guided Access: Ensure that “Guided Access” is checked.
6.3. Touchscreen Not Responding
If the touchscreen is not responding during a Guided Access session, make sure that the “Touch” option is enabled in the Guided Access settings.
- Triple-Click the Side Button: Quickly press the Side button three times to bring up the Guided Access menu.
- Enter Passcode: Enter the Guided Access passcode.
- Tap Options: Tap “Options” in the bottom-left corner of the screen.
- Check Touch: Ensure that the “Touch” switch is toggled on.
- Tap Done: Tap “Done” in the top-right corner to save the changes.
6.4. Time Limit Issues
If the Guided Access session is not ending after the specified time limit, ensure that the time limit is correctly set.
- Open Settings: Open the Settings app on your iPhone 11.
- Navigate to Accessibility: Scroll down and tap on “Accessibility.”
- Select Guided Access: Tap on “Guided Access.”
- Tap Time Limits: Tap on “Time Limits.”
- Verify Settings: Ensure that the desired action (alarm or end session) is selected.
7. Advanced Uses of Guided Access
Beyond the basic applications, Guided Access can be used in more advanced and creative ways to enhance user experience and security.
7.1. Creating a Focused Testing Environment
In educational settings, Guided Access can be used to create a focused testing environment. By locking students into a specific testing app, you can prevent them from accessing other resources or communicating with classmates during the test.
- Open the Testing App: Launch the testing app on the iPhone 11.
- Start Guided Access: Triple-click the Side button and start a Guided Access session.
- Disable Touch on Specific Areas: Use the screen area selection tool to disable touch input on areas like the navigation bar or other potentially distracting elements.
- Set a Time Limit: Set a time limit for the duration of the test.
- Start the Test: Instruct students to begin the test.
7.2. Implementing Kiosk Mode
Guided Access can turn an iPhone 11 into a kiosk for public use, such as in museums, information centers, or retail stores. This allows users to interact with a specific app without accessing other device features.
- Choose the Kiosk App: Select the app you want to use for the kiosk, such as a product catalog or information display.
- Start Guided Access: Triple-click the Side button and start a Guided Access session.
- Disable Hardware Buttons: Disable the Sleep/Wake button and Volume buttons to prevent users from tampering with the device.
- Disable Touch on Unnecessary Areas: Use the screen area selection tool to disable touch input on areas like the settings menu or other unwanted features.
- Secure the Device: Mount the iPhone 11 in a secure enclosure to prevent theft or damage.
7.3. Enhancing Accessibility for Individuals with Cognitive Disabilities
For individuals with cognitive disabilities, Guided Access can simplify the iPhone 11 experience by limiting options and reducing confusion.
- Identify Essential Apps: Determine which apps are essential for the user.
- Start Guided Access: Triple-click the Side button and start a Guided Access session in one of the essential apps.
- Disable Unnecessary Features: Disable hardware buttons, touch input on distracting areas, and other unnecessary features.
- Provide Training: Train the user on how to use the app within the Guided Access environment.
- Monitor and Adjust: Monitor the user’s experience and adjust the Guided Access settings as needed.
8. The Importance of User Privacy and Security
When using Guided Access, it’s important to consider user privacy and security. This is especially true when using Guided Access with children or in public settings.
8.1. Protecting Personal Information
- Review App Permissions: Before starting a Guided Access session, review the app’s permissions to ensure it does not access sensitive information without your knowledge.
- Disable Location Services: If the app does not require location services, disable them in the iPhone 11 settings.
- Limit Data Collection: Be aware of the app’s data collection practices and limit the amount of personal information shared with the app.
8.2. Preventing Unauthorized Access
- Set a Strong Passcode: Use a strong and unique passcode for Guided Access to prevent unauthorized users from ending the session.
- Enable Touch ID or Face ID: Enable Touch ID or Face ID for added security.
- Monitor Usage: Regularly monitor the usage of the iPhone 11 during Guided Access sessions to ensure it is being used appropriately.
8.3. Educating Users
- Explain Guided Access: Explain to users how Guided Access works and why it is being used.
- Provide Instructions: Provide clear instructions on how to use the app within the Guided Access environment.
- Address Concerns: Address any concerns or questions users may have about Guided Access.
9. Guided Access and Other Accessibility Features
Guided Access is just one of many accessibility features available on the iPhone 11. Combining Guided Access with other features can create an even more tailored and accessible experience.
9.1. VoiceOver
VoiceOver is a screen reader that describes aloud what appears on the screen. Combining VoiceOver with Guided Access can be beneficial for users who are blind or visually impaired.
- Enable VoiceOver: In the Accessibility settings, enable VoiceOver.
- Start Guided Access: Start a Guided Access session in the desired app.
- Navigate with VoiceOver: Use VoiceOver gestures to navigate the app.
9.2. Zoom
Zoom magnifies the entire screen, making it easier for users with low vision to see the content. Combining Zoom with Guided Access can help users focus on a specific area of the screen.
- Enable Zoom: In the Accessibility settings, enable Zoom.
- Start Guided Access: Start a Guided Access session in the desired app.
- Use Zoom Gestures: Use Zoom gestures to magnify the screen.
9.3. Switch Control
Switch Control allows users to interact with the iPhone 11 using one or more switches. This can be beneficial for users with limited mobility. Combining Switch Control with Guided Access can provide a more controlled and focused experience.
- Set Up Switch Control: In the Accessibility settings, set up Switch Control.
- Start Guided Access: Start a Guided Access session in the desired app.
- Use Switches to Navigate: Use the switches to navigate the app.
10. Real-World Examples and Case Studies
To illustrate the practical applications of Guided Access, here are a few real-world examples and case studies.
10.1. Case Study: Using Guided Access in a Special Education Classroom
A special education teacher uses Guided Access to help students with autism stay focused during learning activities. By locking the iPad into a specific educational app and disabling distracting features, the teacher has seen a significant improvement in student engagement and learning outcomes.
10.2. Example: Using Guided Access During Travel
A parent uses Guided Access to keep their child entertained during a long car ride. By locking the iPhone into a video streaming app, the parent can prevent the child from accessing other apps or making accidental purchases.
10.3. Case Study: Implementing Guided Access in a Retail Store
A retail store uses Guided Access to create an interactive product catalog on iPads. By locking the iPads into the catalog app and disabling hardware buttons, the store can provide customers with a seamless and secure shopping experience.
11. Staying Updated with the Latest iOS Features
Apple regularly updates iOS with new features and improvements. It’s important to stay updated with the latest iOS version to take advantage of the latest Guided Access features and security enhancements.
11.1. Checking for Updates
- Open Settings: Open the Settings app on your iPhone 11.
- Navigate to General: Scroll down and tap on “General.”
- Select Software Update: Tap on “Software Update.”
- Check for Updates: If an update is available, follow the on-screen instructions to download and install it.
11.2. Reviewing Release Notes
When a new iOS version is released, review the release notes to learn about the new features, bug fixes, and security enhancements. This will help you understand how the update may affect your Guided Access setup.
11.3. Adjusting Settings as Needed
After updating iOS, review your Guided Access settings to ensure they are still configured to your liking. Some settings may have been reset or changed during the update.
12. Best Practices for Using Guided Access
To ensure the best possible experience with Guided Access, follow these best practices.
12.1. Plan Ahead
Before starting a Guided Access session, plan ahead and determine which settings are needed. This will help you create a tailored and effective experience.
12.2. Test Settings
After configuring Guided Access settings, test them thoroughly to ensure they are working as expected. This will help you identify and resolve any issues before they become a problem.
12.3. Provide Clear Instructions
Provide clear instructions to users on how to use the app within the Guided Access environment. This will help them get the most out of the experience.
12.4. Monitor Usage
Regularly monitor the usage of the iPhone 11 during Guided Access sessions to ensure it is being used appropriately. This will help you identify and address any potential issues.
12.5. Stay Informed
Stay informed about the latest Guided Access features and best practices. This will help you create the best possible experience for yourself and others.
13. Ethical Considerations
Using Guided Access raises ethical considerations, especially when used on others, such as children or individuals with cognitive impairments.
13.1. Transparency and Consent
Always be transparent about using Guided Access and, when possible, obtain consent from the individual. Explain why Guided Access is being used and what restrictions it places on device usage. For children, ensure the explanation is age-appropriate.
13.2. Respect for Autonomy
While Guided Access can be helpful, it’s crucial to respect the autonomy of the user. Avoid using Guided Access in a way that overly restricts their freedom or prevents them from making choices. Regularly assess whether the restrictions are still necessary and adjust settings as needed.
13.3. Avoiding Coercion
Ensure that Guided Access is not used as a form of coercion or punishment. It should be implemented to support focus, safety, or accessibility, not to control or manipulate behavior.
13.4. Data Privacy
Be mindful of data privacy when using Guided Access with apps. Review the app’s data collection practices and ensure that personal information is protected. Disable location services and other data-sharing features if they are not essential.
14. Legal Aspects
While Guided Access is a built-in feature, understanding the legal aspects of its use is important, especially in professional or public settings.
14.1. Compliance with Privacy Laws
Ensure that the use of Guided Access complies with relevant privacy laws, such as GDPR (General Data Protection Regulation) in Europe or CCPA (California Consumer Privacy Act) in the United States. These laws govern the collection, use, and protection of personal data.
14.2. Workplace Policies
In a workplace setting, implementing Guided Access on company devices should align with established workplace policies. Employees should be informed about the use of Guided Access and its purpose, and their consent should be obtained when required by law or company policy.
14.3. Educational Institutions
Educational institutions using Guided Access for testing or focused learning environments must comply with student privacy laws, such as FERPA (Family Educational Rights and Privacy Act) in the United States. These laws protect the privacy of student education records.
14.4. Accessibility Laws
Ensure that the use of Guided Access does not violate accessibility laws, such as the Americans with Disabilities Act (ADA) in the United States. While Guided Access can enhance accessibility for some users, it should not be implemented in a way that discriminates against or excludes individuals with disabilities.
15. Common Mistakes to Avoid
To make the most of Guided Access and avoid potential pitfalls, here are some common mistakes to avoid.
15.1. Forgetting the Passcode
One of the most common mistakes is forgetting the Guided Access passcode. This can lock you out of the device and require a factory reset. Always store the passcode in a safe and memorable place. Consider using password management tools or writing it down in a secure location.
15.2. Not Disabling Hardware Buttons
Failing to disable hardware buttons, such as the Sleep/Wake button or Volume buttons, can allow users to bypass the Guided Access restrictions. Always disable these buttons when they are not needed to prevent tampering.
15.3. Not Defining Screen Areas
Not defining specific screen areas to disable touch input can lead to accidental taps and unwanted interactions. Use the screen area selection tool to disable touch input on areas like the navigation bar or other potentially distracting elements.
15.4. Not Setting a Time Limit
Failing to set a time limit can result in the Guided Access session running indefinitely, which may not be desirable. Always set a time limit when appropriate to ensure the session ends automatically after a specified duration.
15.5. Not Monitoring Usage
Not monitoring the usage of the iPhone 11 during Guided Access sessions can prevent you from identifying and addressing potential issues. Regularly monitor usage to ensure the device is being used appropriately and that the Guided Access settings are effective.
16. The Future of Guided Access
As technology evolves, the future of Guided Access is likely to include more advanced features and capabilities.
16.1. Integration with AI and Machine Learning
Future versions of Guided Access may integrate with AI and machine learning to provide more personalized and adaptive experiences. For example, AI could analyze user behavior and automatically adjust Guided Access settings to optimize focus and productivity.
16.2. Enhanced Security Features
Enhanced security features, such as biometric authentication and advanced encryption, could further protect Guided Access sessions from unauthorized access. This would be particularly beneficial in high-security environments, such as government agencies or financial institutions.
16.3. Cross-Platform Compatibility
Cross-platform compatibility could allow Guided Access settings to be synced across multiple devices, such as iPhones, iPads, and Macs. This would make it easier to manage Guided Access settings and ensure a consistent experience across all devices.
16.4. Improved Accessibility
Improved accessibility features could make Guided Access more usable for individuals with disabilities. This could include enhanced VoiceOver support, customizable switch control options, and more flexible screen area selection tools.
17. Additional Resources
For more information about Guided Access and other accessibility features, consult the following resources.
17.1. Apple Support Website
The Apple Support website provides detailed information about Guided Access, including setup instructions, troubleshooting tips, and FAQs.
17.2. Apple Accessibility Website
The Apple Accessibility website provides information about all of Apple’s accessibility features, including VoiceOver, Zoom, Switch Control, and more.
17.3. Online Forums and Communities
Online forums and communities, such as the Apple Support Communities, can provide valuable insights and support from other users.
17.4. Third-Party Apps and Accessories
Third-party apps and accessories can enhance the Guided Access experience. For example, specialized cases can provide added protection for the iPhone 11, and accessibility apps can provide additional features and capabilities.
18. Case Studies: Real-World Applications
Examining real-world applications can further highlight the versatility and effectiveness of Guided Access.
18.1. Guided Access in Healthcare
In healthcare settings, Guided Access can be used to provide patients with access to specific medical information or entertainment apps while preventing them from accessing other device features. This can help improve patient satisfaction and reduce distractions.
18.2. Guided Access in Libraries
Libraries can use Guided Access to create dedicated workstations for specific tasks, such as accessing online catalogs or research databases. This can help patrons stay focused and prevent them from accessing inappropriate content.
18.3. Guided Access in Museums
Museums can use Guided Access to provide visitors with interactive exhibits on iPads. By locking the iPads into the exhibit app and disabling hardware buttons, museums can ensure a seamless and engaging experience.
19. Tips and Tricks for Maximizing Efficiency
To make the most of Guided Access, consider these additional tips and tricks.
19.1. Create Custom Profiles
Create custom Guided Access profiles for different scenarios. For example, you could create a profile for children, one for presentations, and one for accessibility. This will allow you to quickly switch between different sets of settings as needed.
19.2. Use Siri Shortcuts
Use Siri Shortcuts to automate Guided Access tasks. For example, you could create a shortcut to start Guided Access in a specific app with a single voice command.
19.3. Explore Third-Party Apps
Explore third-party apps that enhance Guided Access functionality. Some apps provide additional features, such as remote management, usage tracking, and advanced security settings.
19.4. Provide Feedback to Apple
Provide feedback to Apple about your Guided Access experience. This will help Apple improve the feature and add new capabilities in future iOS versions.
20. Call to Action and Further Assistance
Guided Access on iPhone 11 is a powerful tool for enhancing focus, security, and accessibility. By understanding its features, following best practices, and staying informed about the latest updates, you can make the most of this valuable tool.
If you’re facing difficulties in finding reliable rules of conduct and behavior standards for specific situations, or if you’re feeling overwhelmed by conflicting information, CONDUCT.EDU.VN is here to help. We provide detailed, easy-to-understand information on conduct rules and behavior standards across various fields. We explain fundamental ethical principles and offer practical application examples.
Visit CONDUCT.EDU.VN today to explore more articles and find the guidance you need. For personalized assistance, you can reach us at 100 Ethics Plaza, Guideline City, CA 90210, United States, or contact us via WhatsApp at +1 (707) 555-1234. Let conduct.edu.vn be your trusted resource for navigating the complexities of conduct and behavior.